
User Manual
Page 9
... Steps ...12 Inserting the Batteries ...12 Applicable Batteries ...12 Turning On and Off the Camera...12 Setting Display Language, Date and Time 14 Inserting Memory Cards ...16 Removing Memory Cards...17 G Basic Photography and Playback: Easy Auto Mode 18 Step 1 Turn the Camera On and Select G (Easy Auto) Mode 18 Indicators Displayed...
... Steps ...12 Inserting the Batteries ...12 Applicable Batteries ...12 Turning On and Off the Camera...12 Setting Display Language, Date and Time 14 Inserting Memory Cards ...16 Removing Memory Cards...17 G Basic Photography and Playback: Easy Auto Mode 18 Step 1 Turn the Camera On and Select G (Easy Auto) Mode 18 Indicators Displayed...

User Manual
Page 12
...Settings ...90 f Date Imprint...92 w Electronic VR...93 U Motion Detection ...94 h AF Assist ...95 i Sound Settings ...96 k Auto Off ...97 l Format Memory/m Format Card...98 n Language ...99 o Video Mode ...99 d Blink Warning...100 p Reset All ...101 s Battery Type...103 d Protect ...104 f Rotate ...Image...105 h Copy...106 r Firmware Version ...107 Technical Notes...108 Optional Accessories ...108 Approved Memory Cards ...109 Image File and Folder Names...110 Caring for the Camera ...111 Cleaning ...113 Storage ...114 Error Messages...115 Troubleshooting...118...
...Settings ...90 f Date Imprint...92 w Electronic VR...93 U Motion Detection ...94 h AF Assist ...95 i Sound Settings ...96 k Auto Off ...97 l Format Memory/m Format Card...98 n Language ...99 o Video Mode ...99 d Blink Warning...100 p Reset All ...101 s Battery Type...103 d Protect ...104 f Rotate ...Image...105 h Copy...106 r Firmware Version ...107 Technical Notes...108 Optional Accessories ...108 Approved Memory Cards ...109 Image File and Folder Names...110 Caring for the Camera ...111 Cleaning ...113 Storage ...114 Error Messages...115 Troubleshooting...118...

User Manual
Page 13
... Introduction About This Manual Thank you for your Nikon digital camera. Symbols and Conventions To make it easier to help you need, the following symbols and conventions are used to the pictures on the memory card. The memory card must be removed before using the camera....elsewhere in this manual or in the camera monitor, and the names of a Nikon COOLPIX L24 digital camera. Illustrations and Screen Display Illustrations and text displays shown in this manual, images are referred to as "memory card." • The setting at the time of purchase is inserted, all ...
... Introduction About This Manual Thank you for your Nikon digital camera. Symbols and Conventions To make it easier to help you need, the following symbols and conventions are used to the pictures on the memory card. The memory card must be removed before using the camera....elsewhere in this manual or in the camera monitor, and the names of a Nikon COOLPIX L24 digital camera. Illustrations and Screen Display Illustrations and text displays shown in this manual, images are referred to as "memory card." • The setting at the time of purchase is inserted, all ...

User Manual
Page 15
... software, or format the device and then completely refill it with copyright notices The copying or reproduction of copyrighted creative works such as memory cards or builtin camera memory does not completely erase the original image data. Be sure to infringe copyright laws. Do not use this product for the purpose of...
... software, or format the device and then completely refill it with copyright notices The copying or reproduction of copyrighted creative works such as memory cards or builtin camera memory does not completely erase the original image data. Be sure to infringe copyright laws. Do not use this product for the purpose of...

User Manual
Page 17
Parts of the Camera 1 2 34 5 67 89 Introduction 10 11 12 13 14 1 Monitor 6 2 d button 10, 54, 71, 79, 84 3 k (apply selection) button 9 4 A (shooting mode) button 8 5 Flash lamp 29 6 c (playback) button 8, 24 7 Multi selector 9 8 l (delete) button 24, 25, 55 9 Battery-chamber/ memory card slot cover 12, 16 10 Tripod socket 11 Pin cover 56, 58, 63 12 USB connector and audio/video output 56, 58, 63 13 Memory card slot 16 14 Battery-chamber 12 5
Parts of the Camera 1 2 34 5 67 89 Introduction 10 11 12 13 14 1 Monitor 6 2 d button 10, 54, 71, 79, 84 3 k (apply selection) button 9 4 A (shooting mode) button 8 5 Flash lamp 29 6 c (playback) button 8, 24 7 Multi selector 9 8 l (delete) button 24, 25, 55 9 Battery-chamber/ memory card slot cover 12, 16 10 Tripod socket 11 Pin cover 56, 58, 63 12 USB connector and audio/video output 56, 58, 63 13 Memory card slot 16 14 Battery-chamber 12 5

User Manual
Page 18
Refer to the current shooting mode. Parts of exposures remaining 15 (still pictures 18 b Movie length 53 16 Internal memory indicator 19 17 Aperture 22 18 Focus area 20, 22 19 Focus area (Face Detection) .........20, 22 20 Shutter speed 22 21 ISO sensitivity 29 ...
Refer to the current shooting mode. Parts of exposures remaining 15 (still pictures 18 b Movie length 53 16 Internal memory indicator 19 17 Aperture 22 18 Focus area 20, 22 19 Focus area (Face Detection) .........20, 22 20 Shutter speed 22 21 ISO sensitivity 29 ...

User Manual
Page 19
... 14 3 Volume 55 4 Battery level indicator 18 5 Movie options 54 6 Image mode 72 a Current frame number/ 7 total number of frames 24 b Movie length 55 8 Internal memory indicator 24 9 Movie playback indicator 55 10 Print-order icon 68 11 Small picture 51 12 D-Lighting icon 50 13 Protect icon 104 14 File...
... 14 3 Volume 55 4 Battery level indicator 18 5 Movie options 54 6 Image mode 72 a Current frame number/ 7 total number of frames 24 b Movie length 55 8 Internal memory indicator 24 9 Movie playback indicator 55 10 Print-order icon 68 11 Small picture 51 12 D-Lighting icon 50 13 Protect icon 104 14 File...

User Manual
Page 24
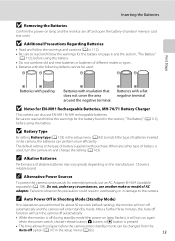
First Steps 3 Close the battery-chamber/memory card slot 1 cover. 2 Applicable Batteries • Two LR6/L40 (AA-size) alkaline batteries (batteries supplied) • Two FR6/L91 (AA-size) lithium batteries • Two ... monitor turns on the label at the entrance of the battery chamber, and insert the batteries. First Steps Inserting the Batteries 1 Open the battery-chamber/memory card slot 3 cover. Before opening the battery-chamber/memory card slot cover, hold down to prevent the batteries from falling out. 1 2 2 Inserting the Batteries.
First Steps 3 Close the battery-chamber/memory card slot 1 cover. 2 Applicable Batteries • Two LR6/L40 (AA-size) alkaline batteries (batteries supplied) • Two FR6/L91 (AA-size) lithium batteries • Two ... monitor turns on the label at the entrance of the battery chamber, and insert the batteries. First Steps Inserting the Batteries 1 Open the battery-chamber/memory card slot 3 cover. Before opening the battery-chamber/memory card slot cover, hold down to prevent the batteries from falling out. 1 2 2 Inserting the Batteries.
User Manual
Page 25
... or model of different makes or types. • Batteries with the following defects cannot be changed from the Auto off and open the battery-chamber/ memory card slot cover. C Alternative Power Sources To power the camera continuously for about 30 seconds (default setting), the monitor will turn off during standby mode...
... or model of different makes or types. • Batteries with the following defects cannot be changed from the Auto off and open the battery-chamber/ memory card slot cover. C Alternative Power Sources To power the camera continuously for about 30 seconds (default setting), the monitor will turn off during standby mode...

User Manual
Page 28
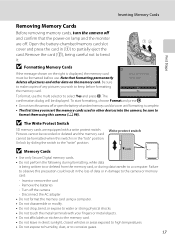
... stored on removable Secure Digital (SD) memory cards (available separately) (A 109). Close the battery-chamber/memory card slot cover. B Inserting Memory Cards Inserting the memory card upside down to turn off and open the battery-chamber/ 3 memory card slot cover. If a memory card is correctly oriented. 16 First Steps Inserting Memory Cards Images are saved in correctly...
... stored on removable Secure Digital (SD) memory cards (available separately) (A 109). Close the battery-chamber/memory card slot cover. B Inserting Memory Cards Inserting the memory card upside down to turn off and open the battery-chamber/ 3 memory card slot cover. If a memory card is correctly oriented. 16 First Steps Inserting Memory Cards Images are saved in correctly...
User Manual
Page 29
...sunlight, closed vehicles or areas exposed to high temperatures. • Do not expose to humidity, dust, or to select Yes and press k. B Formatting Memory Cards 12 If the message shown on lamp and the monitor are equipped with your fingers or metal objects. • Do not affix labels or...physical shocks. • Do not touch the metal terminals with a write protect switch. Remove the card (2), being written to or deleted from the memory card, or during formatting, while data is being careful not to keep before use the multi selector to corrosive gases. 17 Unlock by sliding the...
...sunlight, closed vehicles or areas exposed to high temperatures. • Do not expose to humidity, dust, or to select Yes and press k. B Formatting Memory Cards 12 If the message shown on lamp and the monitor are equipped with your fingers or metal objects. • Do not affix labels or...physical shocks. • Do not touch the metal terminals with a write protect switch. Remove the card (2), being written to or deleted from the memory card, or during formatting, while data is being careful not to keep before use the multi selector to corrosive gases. 17 Unlock by sliding the...

User Manual
Page 30
... Number of Exposures Remaining The number of pictures that suits the scene (A 26). 1 Press the power switch to turn on the capacity of the internal memory or memory card and image mode setting (A 73). 18 The lens will turn on lamp (green) will light for a moment and the monitor will extend at...
... Number of Exposures Remaining The number of pictures that suits the scene (A 26). 1 Press the power switch to turn on the capacity of the internal memory or memory card and image mode setting (A 73). 18 The lens will turn on lamp (green) will light for a moment and the monitor will extend at...
User Manual
Page 31
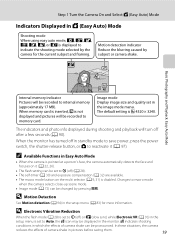
... Auto) Mode Indicators Displayed in G (Easy Auto) Mode Shooting mode When using easy auto mode, U, e, f, g, h, i, or j is displayed to memory card. When memory card is inserted, C is not displayed and pictures will be recorded to indicate the shooting mode selected by the camera for more information. Image...selects close-up scene mode. • Image mode (A 72) can be changed by subject or camera shake. Changes to internal memory (approximately 17 MB). D Motion Detection See Motion detection (A 94) in the image mode menu. Basic Photography and Playback: Easy Auto Mode ...
... Auto) Mode Indicators Displayed in G (Easy Auto) Mode Shooting mode When using easy auto mode, U, e, f, g, h, i, or j is displayed to memory card. When memory card is inserted, C is not displayed and pictures will be recorded to indicate the shooting mode selected by the camera for more information. Image...selects close-up scene mode. • Image mode (A 72) can be changed by subject or camera shake. Changes to internal memory (approximately 17 MB). D Motion Detection See Motion detection (A 94) in the image mode menu. Basic Photography and Playback: Easy Auto Mode ...

User Manual
Page 34
... is detected: When no faces are displayed when the shutter-release button is in focus, the focus indicator (A 6) will be recorded to the memory card or internal memory. 22 Change the composition and try pressing the shutter-release button halfway again. 2 Press the shutter-release button the rest of the frame, but...
... is detected: When no faces are displayed when the shutter-release button is in focus, the focus indicator (A 6) will be recorded to the memory card or internal memory. 22 Change the composition and try pressing the shutter-release button halfway again. 2 Press the shutter-release button the rest of the frame, but...

User Manual
Page 35
... camera or card. the subject is inside a cage) • Subject is set to refocus, several times if necessary. Do not open the battery-chamber/memory card slot cover. Screen When d Blink warning is moving rapidly In these situations, try pressing the shutter-release button halfway again to On, the Did... someone blink? Removing the battery or the memory card while data is displayed after taking a picture if the camera detects a face with closed eyes. C The Did someone blink?
... camera or card. the subject is inside a cage) • Subject is set to refocus, several times if necessary. Do not open the battery-chamber/memory card slot cover. Screen When d Blink warning is moving rapidly In these situations, try pressing the shutter-release button halfway again to On, the Did... someone blink? Removing the battery or the memory card while data is displayed after taking a picture if the camera detects a face with closed eyes. C The Did someone blink?

User Manual
Page 36
...Press l to delete the picture currently displayed in the monitor. 44 Internal memory indicator 2 Use the multi selector to scan quickly through pictures. Press A to switch to view additional pictures. When memory card is inserted, C is displayed, pictures stored in full-frame playback ...K to shooting mode. Multi selector When C is not displayed and pictures stored on the memory card will be recovered. A (shooting mode) button The last picture taken will be displayed in the internal memory will be displayed. To exit without deleting the picture, choose No and press k. 24 ...
...Press l to delete the picture currently displayed in the monitor. 44 Internal memory indicator 2 Use the multi selector to scan quickly through pictures. Press A to switch to view additional pictures. When memory card is inserted, C is displayed, pictures stored in full-frame playback ...K to shooting mode. Multi selector When C is not displayed and pictures stored on the memory card will be recovered. A (shooting mode) button The last picture taken will be displayed in the internal memory will be displayed. To exit without deleting the picture, choose No and press k. 24 ...
User Manual
Page 37
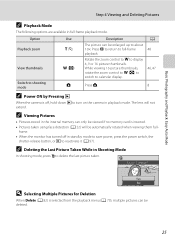
... l to delete the last picture taken. A 48 46, 47 Press A. 8 C Power ON by Pressing c When the camera is off in the internal memory can only be viewed if no memory card is selected from the playback menu (A 79), multiple pictures can be enlarged up to about 10×. Yes No D Selecting Multiple...
... l to delete the last picture taken. A 48 46, 47 Press A. 8 C Power ON by Pressing c When the camera is off in the internal memory can only be viewed if no memory card is selected from the playback menu (A 79), multiple pictures can be enlarged up to about 10×. Yes No D Selecting Multiple...

User Manual
Page 47
... is set to R 4320 × 3240). • The maximum frame rate with continuous shooting may vary depending upon the current image mode setting and the memory card used to illuminate the subject while maintaining the mood of the frame. m W n Off p Off o 0.0* * Other settings can be on the subject in the center...
... is set to R 4320 × 3240). • The maximum frame rate with continuous shooting may vary depending upon the current image mode setting and the memory card used to illuminate the subject while maintaining the mood of the frame. m W n Off p Off o 0.0* * Other settings can be on the subject in the center...

User Manual
Page 53
... the next time food mode is unable to shoot. Using the Scene Mode Shooting Suited for the Scene Taking Pictures for changes in the camera's memory even after the camera is turned off, and are saved in the subject's color caused by the surrounding lighting. You can focus on an object...
... the next time food mode is unable to shoot. Using the Scene Mode Shooting Suited for the Scene Taking Pictures for changes in the camera's memory even after the camera is turned off, and are saved in the subject's color caused by the surrounding lighting. You can focus on an object...

User Manual
Page 61
... for original pictures are available. Enlarge the image or refine the composition and create a copy containing only the portion visible in the internal memory or on the memory card. Use the camera to edit pictures in-camera and store them as the original. • Print set (A 68) and Protect ...• Pictures taken at an Image mode setting (A 72) of P 3968×2232 cannot be edited. • Only pictures taken with the COOLPIX L24 can be transferred to be used. Copies Created By: D-Lighting Can Be Edited By: Small picture and crop can be edited with editing functions are...
... for original pictures are available. Enlarge the image or refine the composition and create a copy containing only the portion visible in the internal memory or on the memory card. Use the camera to edit pictures in-camera and store them as the original. • Print set (A 68) and Protect ...• Pictures taken at an Image mode setting (A 72) of P 3968×2232 cannot be edited. • Only pictures taken with the COOLPIX L24 can be transferred to be used. Copies Created By: D-Lighting Can Be Edited By: Small picture and crop can be edited with editing functions are...


