
User Manual
Page 9
... Button...11 Attaching the Camera Strap ...11 First Steps ...12 Inserting the Batteries ...12 Applicable Batteries ...12 Turning On and Off the Camera...12 Setting Display Language, Date and Time 14 Inserting Memory Cards ...16 Removing Memory Cards...17 G Basic Photography and Playback: Easy Auto Mode 18 Step 1 Turn the Camera On...
... Button...11 Attaching the Camera Strap ...11 First Steps ...12 Inserting the Batteries ...12 Applicable Batteries ...12 Turning On and Off the Camera...12 Setting Display Language, Date and Time 14 Inserting Memory Cards ...16 Removing Memory Cards...17 G Basic Photography and Playback: Easy Auto Mode 18 Step 1 Turn the Camera On...

User Manual
Page 12
... Contents Basic Camera Setup: The Setup Menu 83 Displaying the Setup Menu...84 a Menus ...85 c Welcome Screen...86 d Date...87 e Monitor Settings ...90 f Date Imprint...92 w Electronic VR...93 U Motion Detection ...94 h AF Assist ...95 i Sound Settings ...96 k Auto Off ...97 l Format Memory/m Format Card...98 n Language ...99 o Video Mode ...99 d Blink Warning...100...
... Contents Basic Camera Setup: The Setup Menu 83 Displaying the Setup Menu...84 a Menus ...85 c Welcome Screen...86 d Date...87 e Monitor Settings ...90 f Date Imprint...92 w Electronic VR...93 U Motion Detection ...94 h AF Assist ...95 i Sound Settings ...96 k Auto Off ...97 l Format Memory/m Format Card...98 n Language ...99 o Video Mode ...99 d Blink Warning...100...

User Manual
Page 18
The indicators and photo info displayed during shooting and playback (actual display varies with current camera settings). Refer to the current shooting mode. Parts of exposures remaining 15 (still pictures 18 b Movie length 53 16 Internal memory indicator 19 ... indicator 22 6 Flash mode 28 7 Battery level indicator 18 8 Motion detection indicator ...........19, 94 9 Electronic VR 93 10 "Date not set" indicator 87, 115 11 Travel destination indicator 87 12 Date imprint 92 13 Movie options 54 14 Image mode 72 1m00 s b 1m00 s 18 a Number of the Camera Introduction The Monitor...
The indicators and photo info displayed during shooting and playback (actual display varies with current camera settings). Refer to the current shooting mode. Parts of exposures remaining 15 (still pictures 18 b Movie length 53 16 Internal memory indicator 19 ... indicator 22 6 Flash mode 28 7 Battery level indicator 18 8 Motion detection indicator ...........19, 94 9 Electronic VR 93 10 "Date not set" indicator 87, 115 11 Travel destination indicator 87 12 Date imprint 92 13 Movie options 54 14 Image mode 72 1m00 s b 1m00 s 18 a Number of the Camera Introduction The Monitor...

User Manual
Page 19
... Introduction Playback 14 13 11 12 10 1 23 4 15/05/2011 12:00 9999.JPG 5 6 999 999 98 7 999 999 a 9999 9999 1m00s b 1m 00 s 1 Date of recording 14 2 Time of recording 14 3 Volume 55 4 Battery level indicator 18 5 Movie options 54 6 Image mode 72 a Current frame number/ 7 total number of... 68 11 Small picture 51 12 D-Lighting icon 50 13 Protect icon 104 14 File number and type 110 * The displayed icons vary with the settings in shooting mode. 7
... Introduction Playback 14 13 11 12 10 1 23 4 15/05/2011 12:00 9999.JPG 5 6 999 999 98 7 999 999 a 9999 9999 1m00s b 1m 00 s 1 Date of recording 14 2 Time of recording 14 3 Volume 55 4 Battery level indicator 18 5 Movie options 54 6 Image mode 72 a Current frame number/ 7 total number of... 68 11 Small picture 51 12 D-Lighting icon 50 13 Protect icon 104 14 File number and type 110 * The displayed icons vary with the settings in shooting mode. 7

User Manual
Page 22
... contains two or more menu items to highlight the tab. Displayed when there are more previous menu items. Displayed when there are displayed. Set up Menus Welcome screen Date Monitor settings Date imprint Electronic VR Exit Press the multi selector J to follow. The selected menu will be displayed. AF assist Auto Off Exit Press...
... contains two or more menu items to highlight the tab. Displayed when there are more previous menu items. Displayed when there are displayed. Set up Menus Welcome screen Date Monitor settings Date imprint Electronic VR Exit Press the multi selector J to follow. The selected menu will be displayed. AF assist Auto Off Exit Press...

User Manual
Page 26
...) will light for a moment and the monitor will not be set the daylight saving time to set . Date Set time and date? 4 Press J or K to choose the desired language and press k. When the daylight saving time setting is selected, the date and time will turn on the camera. If No is selected,... the W mark appears on . First Steps 2 Use the multi selector to select your home time zone (city name) (A 89) and press k. To release the daylight saving time setting, press I....
...) will light for a moment and the monitor will not be set the daylight saving time to set . Date Set time and date? 4 Press J or K to choose the desired language and press k. When the daylight saving time setting is selected, the date and time will turn on the camera. If No is selected,... the W mark appears on . First Steps 2 Use the multi selector to select your home time zone (city name) (A 89) and press k. To release the daylight saving time setting, press I....

User Manual
Page 27
... displayed and press k or K. See "Shooting in Easy auto mode (A 18). First Steps Setting Display Language, Date and Time 5 Change the date and time. Press the multi selector H or I to the previous item. 6 Choose the order in the setup menu. 15 The camera enters the ...step 5. • To change the time zone and the daylight saving settings, select Time zone from Date in the setup menu (A 87, 88). • To imprint the shooting date into images when taking pictures, make sure the date and time are set, then set Date imprint (A 92) in which the day, month and year are applied...
... displayed and press k or K. See "Shooting in Easy auto mode (A 18). First Steps Setting Display Language, Date and Time 5 Change the date and time. Press the multi selector H or I to the previous item. 6 Choose the order in the setup menu. 15 The camera enters the ...step 5. • To change the time zone and the daylight saving settings, select Time zone from Date in the setup menu (A 87, 88). • To imprint the shooting date into images when taking pictures, make sure the date and time are set, then set Date imprint (A 92) in which the day, month and year are applied...

User Manual
Page 59
... 16-thumbnail (A 46) in calendar display. More on Playback B Calendar Display • Pictures taken when the camera's date is not set are treated as pictures taken on the day they were taken. To Use Description A Choose date Press the multi selector H, I, J or K. 9 Switch to full-frame playback Switch to thumbnail display k g (i) The first...
... 16-thumbnail (A 46) in calendar display. More on Playback B Calendar Display • Pictures taken when the camera's date is not set are treated as pictures taken on the day they were taken. To Use Description A Choose date Press the multi selector H, I, J or K. 9 Switch to full-frame playback Switch to thumbnail display k g (i) The first...

User Manual
Page 61
... are available. C Restrictions on In-camera Editing • Pictures taken at an Image mode setting (A 72) of P 3968×2232 cannot be edited. • Only pictures taken with the COOLPIX L24 can be transferred to a computer. • Editing functions are stored with small picture or... crop, use D-Lighting together with the same recording date and time as the original. • Print set (A 68) and Protect (A 104) settings configured for use on the...
... are available. C Restrictions on In-camera Editing • Pictures taken at an Image mode setting (A 72) of P 3968×2232 cannot be edited. • Only pictures taken with the COOLPIX L24 can be transferred to a computer. • Editing functions are stored with small picture or... crop, use D-Lighting together with the same recording date and time as the original. • Print set (A 68) and Protect (A 104) settings configured for use on the...

User Manual
Page 81
... displayed during playback. C Deleting All Print Orders 15.05.2011 Choose Delete print set in step 3 of the print set is enabled, are changed from printers that do not support printing of shooting date and photo information is used. • Photo information cannot be imprinted in the ... to a printer, via the supplied USB cable, for all pictures in the print set menu is enabled with DPOF printing when Date in the Print set screen. 69 Print set menu is displayed. • The date and time printed on all pictures. Choose Done and press k to also print shooting...
... displayed during playback. C Deleting All Print Orders 15.05.2011 Choose Delete print set in step 3 of the print set is enabled, are changed from printers that do not support printing of shooting date and photo information is used. • Photo information cannot be imprinted in the ... to a printer, via the supplied USB cable, for all pictures in the print set menu is enabled with DPOF printing when Date in the Print set screen. 69 Print set menu is displayed. • The date and time printed on all pictures. Choose Done and press k to also print shooting...

User Manual
Page 95
... default values. 83 Basic Camera Setup: The Setup Menu Shooting, Playback and Setup Menus The setup menu contains the following settings. a c d e f w U h i k l/m n o d p Menus A 85 Select the method for camera monitor display. Date A 87 Set camera clock and choose home and destination time zones. Language A 99 Choose the language used for displaying menus. Reset all...
... default values. 83 Basic Camera Setup: The Setup Menu Shooting, Playback and Setup Menus The setup menu contains the following settings. a c d e f w U h i k l/m n o d p Menus A 85 Select the method for camera monitor display. Date A 87 Set camera clock and choose home and destination time zones. Language A 99 Choose the language used for displaying menus. Reset all...

User Manual
Page 96
... version Display camera firmware version. Displaying the Setup Menu Display the menu screen and select z (Setup). 1 Press d to select the z tab. 84 Exit Set up Menus Welcome screen Date Monitor settings Date imprint Electronic VR Exit A 103 A 104 A 105 A 106 A 107 Shooting, Playback and Setup Menus When using easy auto mode, scene mode, smart...
... version Display camera firmware version. Displaying the Setup Menu Display the menu screen and select z (Setup). 1 Press d to select the z tab. 84 Exit Set up Menus Welcome screen Date Monitor settings Date imprint Electronic VR Exit A 103 A 104 A 105 A 106 A 107 Shooting, Playback and Setup Menus When using easy auto mode, scene mode, smart...

User Manual
Page 97
... menu, press the d or press J and select another tab. Set up Menus Welcome screen Date Monitor settings Date imprint Electronic VR Exit Menu names Menus Exit Shooting, Playback and Setup Menus 85 Text (default setting) Menus are displayed in a single page. Set up Menus Welcome screen Date Monitor settings Date imprint Electronic VR Exit a Menus Press d M z (setup menu) (A 84...
... menu, press the d or press J and select another tab. Set up Menus Welcome screen Date Monitor settings Date imprint Electronic VR Exit Menu names Menus Exit Shooting, Playback and Setup Menus 85 Text (default setting) Menus are displayed in a single page. Set up Menus Welcome screen Date Monitor settings Date imprint Electronic VR Exit a Menus Press d M z (setup menu) (A 84...

User Manual
Page 99
...87 Shooting, Playback and Setup Menus Basic Camera Setup: The Setup Menu d Date Press d M z (setup menu) (A 84) M d Date Set the camera clock. Time zone Set the home (w) time zone (district) or daylight saving time. Setting Travel Destination Time Zone 1 Use the multi selector to the region currently ... the time difference (A 89) is displayed. The Time zone menu is automatically calculated and the date and time in which the day, month, and year are recorded. Date Set camera clock to set the date and time. • Highlight an item (day, month, year, hour, minute, and the...
...87 Shooting, Playback and Setup Menus Basic Camera Setup: The Setup Menu d Date Press d M z (setup menu) (A 84) M d Date Set the camera clock. Time zone Set the home (w) time zone (district) or daylight saving time. Setting Travel Destination Time Zone 1 Use the multi selector to the region currently ... the time difference (A 89) is displayed. The Time zone menu is automatically calculated and the date and time in which the day, month, and year are recorded. Date Set camera clock to set the date and time. • Highlight an item (day, month, year, hour, minute, and the...

User Manual
Page 100
... provide several days of backup power after about ten hours of the batteries that powers the camera. W will be displayed in Step 4. Press k to set the Date imprint setting in shooting mode. C w (Home Time Zone) • To switch to the home time zone, choose w in step 2 and press k. •... adapter is connected, and can be displayed in the monitor when the camera is independent of charging. D Imprinting the Date on Pictures After setting the date and time, set the home time zone. While the travel destination. To turn the daylight saving time option on the image data when ...
... provide several days of backup power after about ten hours of the batteries that powers the camera. W will be displayed in Step 4. Press k to set the Date imprint setting in shooting mode. C w (Home Time Zone) • To switch to the home time zone, choose w in step 2 and press k. •... adapter is connected, and can be displayed in the monitor when the camera is independent of charging. D Imprinting the Date on Pictures After setting the date and time, set the home time zone. While the travel destination. To turn the daylight saving time option on the image data when ...

User Manual
Page 101
Basic Camera Setup: The Setup Menu D Time Zones The camera supports the time zones listed below , set the camera's clock manually to local time using Date in the setup menu. Time zone -11 Midway, Samoa -10 Hawaii, Tahiti -9 Alaska, Anchorage -8 PST (PDT): Los Angeles, Seattle, Vancouver -7 MST (MDT): Denver, Phoenix, La ...
Basic Camera Setup: The Setup Menu D Time Zones The camera supports the time zones listed below , set the camera's clock manually to local time using Date in the setup menu. Time zone -11 Midway, Samoa -10 Hawaii, Tahiti -9 Alaska, Anchorage -8 PST (PDT): Los Angeles, Seattle, Vancouver -7 MST (MDT): Denver, Phoenix, La ...
User Manual
Page 104
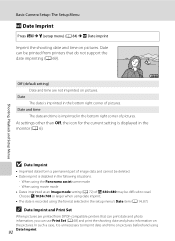
... (A 69). 15.05.2011 Off (default setting) Date and time are not imprinted on the pictures. Shooting, Playback and Setup Menus Basic Camera Setup: The Setup Menu f Date Imprint Press d M z (setup menu) (A 84) M f Date imprint Imprint the shooting date and time on pictures beforehand using 92 Date Imprint. At settings other than Off, the icon for the...
... (A 69). 15.05.2011 Off (default setting) Date and time are not imprinted on the pictures. Shooting, Playback and Setup Menus Basic Camera Setup: The Setup Menu f Date Imprint Press d M z (setup menu) (A 84) M f Date imprint Imprint the shooting date and time on pictures beforehand using 92 Date Imprint. At settings other than Off, the icon for the...

User Manual
Page 114
...file numbering to "0001", delete all pictures (A 82) before selecting Reset all. • The following settings in the White balance menu (A 75) Setup menu: Settings for picture registered for Welcome screen (A 86), Date (A 87), Language (A 99), Video mode (A 99), and Battery type (A 103) 102 Shooting menu...Menus Basic Camera Setup: The Setup Menu Setup Menu Option Menus (A 85) Welcome screen (A 86) Photo info (A 90) Image review (A 90) Brightness (A 90) Date imprint (A 92) Electronic VR (A 93) Motion detection (A 94) AF assist (A 95) Button sound (A 96) Shutter sound (A 96) Auto off (A 97)...
...file numbering to "0001", delete all pictures (A 82) before selecting Reset all. • The following settings in the White balance menu (A 75) Setup menu: Settings for picture registered for Welcome screen (A 86), Date (A 87), Language (A 99), Video mode (A 99), and Battery type (A 103) 102 Shooting menu...Menus Basic Camera Setup: The Setup Menu Setup Menu Option Menus (A 85) Welcome screen (A 86) Photo info (A 90) Image review (A 90) Brightness (A 90) Date imprint (A 92) Electronic VR (A 93) Motion detection (A 94) AF assist (A 95) Button sound (A 96) Shutter sound (A 96) Auto off (A 97)...

User Manual
Page 130
...87 accurate timepieces and reset as expected, check the list of common problems below before consulting your retailer or Nikon-authorized service representative. all settings were 88 restored to indicate the clock is exhausted; Technical Notes 118 Troubleshooting If the camera fails to ... against more information. Refer to Panorama 40 assist • Movies 53 Camera settings reset The clock battery is not set.) Set the correct date and time using Date in Hide info is dirty. Display, Settings and Power Supply Problem Cause/Solution A Monitor is blank • Camera is...
...87 accurate timepieces and reset as expected, check the list of common problems below before consulting your retailer or Nikon-authorized service representative. all settings were 88 restored to indicate the clock is exhausted; Technical Notes 118 Troubleshooting If the camera fails to ... against more information. Refer to Panorama 40 assist • Movies 53 Camera settings reset The clock battery is not set.) Set the correct date and time using Date in Hide info is dirty. Display, Settings and Power Supply Problem Cause/Solution A Monitor is blank • Camera is...
User Manual
Page 141
... 48 Portrait b 34 Power 12, 14, 18 Power switch 4, 12, 18 Power-on lamp 12, 18 Preset manual 75 Print 64, 65, 68 Print set 68 Print Set (Date) 69 Printer 62 Protect 104 R Recording movies 53 Red-eye reduction 28, 29 Reset all 101 Rotate image 105 RSCN 110 S Scene mode 33... button 4, 22 Single 76 Sleep Mode 97 Slide show 81 Slow Sync 28 Small picture 51 Index Small size 54 Smart Portrait Mode 44 Sound settings 96 Speaker 4 Sports d 35 SSCN 110 Standard color 77 Strap 11 Sunset h 36 T Tabs 10 The c (Playback) Button 8 Thumbnail playback 46 Time zone 14, 87...
... 48 Portrait b 34 Power 12, 14, 18 Power switch 4, 12, 18 Power-on lamp 12, 18 Preset manual 75 Print 64, 65, 68 Print set 68 Print Set (Date) 69 Printer 62 Protect 104 R Recording movies 53 Red-eye reduction 28, 29 Reset all 101 Rotate image 105 RSCN 110 S Scene mode 33... button 4, 22 Single 76 Sleep Mode 97 Slide show 81 Slow Sync 28 Small picture 51 Index Small size 54 Smart Portrait Mode 44 Sound settings 96 Speaker 4 Sports d 35 SSCN 110 Standard color 77 Strap 11 Sunset h 36 T Tabs 10 The c (Playback) Button 8 Thumbnail playback 46 Time zone 14, 87...


