
User Manual
Page 7
... to this product will not occur in a particular installation. Wash hands after handling. Interface Cables Use the interface cables sold or provided by Nikon for help. Nikon Inc., 1300 Walt Whitman Road Melville, New York 11747-3064 USA Tel: 631-547-4200 v If this equipment does cause harmful interference to...requires the user to be determined by turning the equipment off and on, the user is encouraged to try to correct the interference by Nikon Corporation may void the user's authority to which can radiate radio frequency energy and, if not installed and used in the State of...
... to this product will not occur in a particular installation. Wash hands after handling. Interface Cables Use the interface cables sold or provided by Nikon for help. Nikon Inc., 1300 Walt Whitman Road Melville, New York 11747-3064 USA Tel: 631-547-4200 v If this equipment does cause harmful interference to...requires the user to be determined by turning the equipment off and on, the user is encouraged to try to correct the interference by Nikon Corporation may void the user's authority to which can radiate radio frequency energy and, if not installed and used in the State of...

User Manual
Page 9
......2 Parts of the Camera...4 The Camera Body ...4 The Monitor...6 Basic Operations...8 A (shooting mode) Button...8 c (playback) Button ...8 The Multi Selector...9 d Button ...10 Switching Between Tabs...10 Help Displays...11 About the Shutter-release Button...11 Attaching the Camera Strap ...11 First Steps ...12 Inserting the Batteries ...12 Applicable Batteries ...12 Turning On...
......2 Parts of the Camera...4 The Camera Body ...4 The Monitor...6 Basic Operations...8 A (shooting mode) Button...8 c (playback) Button ...8 The Multi Selector...9 d Button ...10 Switching Between Tabs...10 Help Displays...11 About the Shutter-release Button...11 Attaching the Camera Strap ...11 First Steps ...12 Inserting the Batteries ...12 Applicable Batteries ...12 Turning On...

User Manual
Page 13
...monitor display samples so that more clearly shown. Symbols and Conventions To make it . This icon indicates that monitor indicators can be helpful when using the camera. Illustrations and Screen Display Illustrations and text displays shown in this manual may be more A information is ... damage to as the "default setting." • The names of menu items displayed in the camera monitor, and the names of a Nikon COOLPIX L24 digital camera. This icon marks notes, information C that should be read before use the product will read before the internal memory can be...
...monitor display samples so that more clearly shown. Symbols and Conventions To make it . This icon indicates that monitor indicators can be helpful when using the camera. Illustrations and Screen Display Illustrations and text displays shown in this manual may be more A information is ... damage to as the "default setting." • The names of menu items displayed in the camera monitor, and the names of a Nikon COOLPIX L24 digital camera. This icon marks notes, information C that should be read before use the product will read before the internal memory can be...

User Manual
Page 16
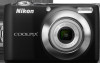
Introduction Parts of the Camera The Camera Body 12 3 4 98 7 Lens cover closed 5 6 10 11 1 Shutter-release button 22 Zoom control 21 f : wide 21 2 g : tele 21 h : Thumbnail playback 46 i : playback zoom 48 j : help 11 3 Power switch/Power-on lamp ....... 18, 97 4 Self-timer lamp 30 AF-assist illuminator 23, 95 5 Flash 28 6 Lens 113, 123 7 Speaker 55 8 Power connector cover (for connecting optional AC adapter 108 9 Eyelet for camera strap 11 10 Lens cover 111 11 Built-in microphone 53 4
Introduction Parts of the Camera The Camera Body 12 3 4 98 7 Lens cover closed 5 6 10 11 1 Shutter-release button 22 Zoom control 21 f : wide 21 2 g : tele 21 h : Thumbnail playback 46 i : playback zoom 48 j : help 11 3 Power switch/Power-on lamp ....... 18, 97 4 Self-timer lamp 30 AF-assist illuminator 23, 95 5 Flash 28 6 Lens 113, 123 7 Speaker 55 8 Power connector cover (for connecting optional AC adapter 108 9 Eyelet for camera strap 11 10 Lens cover 111 11 Built-in microphone 53 4

User Manual
Page 23
... right of the menu screen to g (j) again. Exit Back About the Shutter-release Button The camera features a two-stage shutter-release button. Introduction Basic Operations Help Displays Rotate the zoom control to g (j) when M/j is held in this may result in series), or multi-shot 16. To return to the original menu...
... right of the menu screen to g (j) again. Exit Back About the Shutter-release Button The camera features a two-stage shutter-release button. Introduction Basic Operations Help Displays Rotate the zoom control to g (j) when M/j is held in this may result in series), or multi-shot 16. To return to the original menu...

User Manual
Page 72
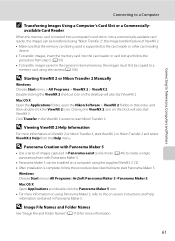
For more information on using ViewNX 2, refer to a Computer ViewNX 2 starts automatically when the transfer is complete, turn off the camera and disconnect the USB cable. 60 Disconnecting the Camera Do not turn off the camera or disconnect the camera from the computer during transfer. When transfer is complete (default setting of ViewNX 2). Connecting to Televisions, Computers and Printers Connecting to the ViewNX 2 help information (A 61). Transferred images can be viewed.
For more information on using ViewNX 2, refer to a Computer ViewNX 2 starts automatically when the transfer is complete, turn off the camera and disconnect the USB cable. 60 Disconnecting the Camera Do not turn off the camera or disconnect the camera from the computer during transfer. When transfer is complete (default setting of ViewNX 2). Connecting to Televisions, Computers and Printers Connecting to the ViewNX 2 help information (A 61). Transferred images can be viewed.
User Manual
Page 73
...110) for more information on using the camera (A 106). Double-clicking the ViewNX 2 shortcut icon on ViewNX 2 or Nikon Transfer 2, start ViewNX 2 or Nikon Transfer 2 and select ViewNX 2 Help from step 5 (A 59). • To transfer images saved in the camera's internal memory, the images must first ... will also start ViewNX 2. available Card Reader When the memory card is complete, follow the procedure from the Help menu. Mac OS X Open the Applications folder, open the Nikon Software > ViewNX 2 folders in the ViewNX 2 screen to create a single panorama photo with Panorama Maker 5....
...110) for more information on using the camera (A 106). Double-clicking the ViewNX 2 shortcut icon on ViewNX 2 or Nikon Transfer 2, start ViewNX 2 or Nikon Transfer 2 and select ViewNX 2 Help from step 5 (A 59). • To transfer images saved in the camera's internal memory, the images must first ... will also start ViewNX 2. available Card Reader When the memory card is complete, follow the procedure from the Help menu. Mac OS X Open the Applications folder, open the Nikon Software > ViewNX 2 folders in the ViewNX 2 screen to create a single panorama photo with Panorama Maker 5....

User Manual
Page 103
... is displayed, as Hide info. Hide info 15/05/2011 15:30 0004.JPG Framing grid 4 In the following shooting modes, a framing grid appears to help frame pictures, in addition to the information displayed in Auto info. • G Easy auto mode • A Auto mode In other shooting modes, the same information...
... is displayed, as Hide info. Hide info 15/05/2011 15:30 0004.JPG Framing grid 4 In the following shooting modes, a framing grid appears to help frame pictures, in addition to the information displayed in Auto info. • G Easy auto mode • A Auto mode In other shooting modes, the same information...

User Manual
Page 133
... in easy auto mode or the Night portrait scene mode) and the fill flash with 49 other than Night portrait, and change the flash to help information contained in on television. • Choose correct Video mode. 99 • Memory card contains no pictures. Technical Notes Pictures not displayed on... taken with slow sync and red-eye reduction is used, red-eye reduction may be applied, in rare cases, to 320 × 240 or smaller. Nikon Transfer 2 does not start when camera is connected. • Camera is off. 18 • Battery exhausted. 18 • USB cable is not correctly ...
... in easy auto mode or the Night portrait scene mode) and the fill flash with 49 other than Night portrait, and change the flash to help information contained in on television. • Choose correct Video mode. 99 • Memory card contains no pictures. Technical Notes Pictures not displayed on... taken with slow sync and red-eye reduction is used, red-eye reduction may be applied, in rare cases, to 320 × 240 or smaller. Nikon Transfer 2 does not start when camera is connected. • Camera is off. 18 • Battery exhausted. 18 • USB cable is not correctly ...

User Manual
Page 140
... u 38, 41 Format 17, 98 Format memory card 17, 98 Formatting internal memory 98 FSCN 110 Full-frame playback mode 24, 25 H Halfway 11 Help 11 I Identifier 110 Image mode 19, 33, 72 Image review 90 Incandescent 74 Indicator lamp 5 Internal memory 16 ISO sensitivity 29 128 J JPG 110 ...Movie playback 55 Movie settings 54 Multi selector 5, 9 Multi-shot 16 76 Museum l 38 N Nickel-metal hydride batteries 12 Night landscape j 37 Night Portrait e 35 Nikon Transfer 2 57, 58, 61 Number of Exposures Remaining 18, 73 O Optical zoom 21 Optional Accessories 108 P Panorama assist p 40, 42 Panorama Maker 5 57,...
... u 38, 41 Format 17, 98 Format memory card 17, 98 Formatting internal memory 98 FSCN 110 Full-frame playback mode 24, 25 H Halfway 11 Help 11 I Identifier 110 Image mode 19, 33, 72 Image review 90 Incandescent 74 Indicator lamp 5 Internal memory 16 ISO sensitivity 29 128 J JPG 110 ...Movie playback 55 Movie settings 54 Multi selector 5, 9 Multi-shot 16 76 Museum l 38 N Nickel-metal hydride batteries 12 Night landscape j 37 Night Portrait e 35 Nikon Transfer 2 57, 58, 61 Number of Exposures Remaining 18, 73 O Optical zoom 21 Optional Accessories 108 P Panorama assist p 40, 42 Panorama Maker 5 57,...


