

L22 / L21 User's Manual
Page 4
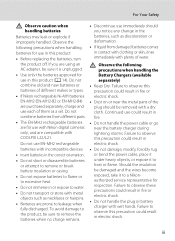
...should be taken to prevent infants from putting the batteries or other accident, take the equipment to a Nikon-authorized service representative for inspection. Handle the camera strap with care Never place the strap around the neck of malfunction Should you notice smoke or an unusual... the batteries immediately, taking care to prevent possible injury. Should the camera or AC adapter break open as this equipment. ii Do not disassemble Touching the internal parts of a fall or other small parts into their entirety before using this could result in explosion or fire....
...should be taken to prevent infants from putting the batteries or other accident, take the equipment to a Nikon-authorized service representative for inspection. Handle the camera strap with care Never place the strap around the neck of malfunction Should you notice smoke or an unusual... the batteries immediately, taking care to prevent possible injury. Should the camera or AC adapter break open as this equipment. ii Do not disassemble Touching the internal parts of a fall or other small parts into their entirety before using this could result in explosion or fire....
L22 / L21 User's Manual
Page 5
... it under heavy objects, or expose it is unplugged. • Use only the batteries approved for use with Nikon digital cameras only, and are using an AC adapter, be removed with COOLPIX L22/L21. Continued use immediately should be sure it to observe this product (A 14). Observe the following precautions when handling...result in fire. • Do not handle the power cable or go near the metal parts of water. Do not combine old and new batteries or batteries of different makes or types. • If Nikon rechargeable Ni-MH batteries EN-MH2 (EN-MH2-B2 or EN-MH2-B4) are for ...
... it under heavy objects, or expose it is unplugged. • Use only the batteries approved for use with Nikon digital cameras only, and are using an AC adapter, be removed with COOLPIX L22/L21. Continued use immediately should be sure it to observe this product (A 14). Observe the following precautions when handling...result in fire. • Do not handle the power cable or go near the metal parts of water. Do not combine old and new batteries or batteries of different makes or types. • If Nikon rechargeable Ni-MH batteries EN-MH2 (EN-MH2-B2 or EN-MH2-B4) are for ...

L22 / L21 User's Manual
Page 6
...ROMs The CD-ROMs supplied with product regulations. Observe caution when using the flash Using the flash close to maintain compliance with this camera may disrupt the electronic systems of the airplane or the instruments of the hospital when using inside an airplane or the hospital Turn... the power off while inside the airplane during take off or landing. The electromagnetic waves given out by Nikon for the purpose, to your fingers or other moving parts. Avoid contact with the flash window touching a person or object Failure to prevent liquid crystal from the monitor ...
...ROMs The CD-ROMs supplied with product regulations. Observe caution when using the flash Using the flash close to maintain compliance with this camera may disrupt the electronic systems of the airplane or the instruments of the hospital when using inside an airplane or the hospital Turn... the power off while inside the airplane during take off or landing. The electromagnetic waves given out by Nikon for the purpose, to your fingers or other moving parts. Avoid contact with the flash window touching a person or object Failure to prevent liquid crystal from the monitor ...
L22 / L21 User's Manual
Page 9
Table of Contents For Your Safety...ii WARNINGS...ii Notices ...v Introduction ...1 About This Manual ...1 Information and Precautions...2 Parts of the Camera...4 The Camera Body ...4 The Monitor...8 Basic Operations...10 A (shooting mode) button ...10 c (playback) button...10 The Multi Selector...11 d button ...12...Language, Date and Time 16 Inserting Memory Cards ...18 Removing Memory Cards...19 G Basic Photography and Playback: Easy Auto Mode 20 Step 1 Turn the Camera On and Select G (Easy Auto) Mode 20 Indicators Displayed in G (Easy auto) Mode 21 Step 2 Frame a Picture ...22 Using the ...
Table of Contents For Your Safety...ii WARNINGS...ii Notices ...v Introduction ...1 About This Manual ...1 Information and Precautions...2 Parts of the Camera...4 The Camera Body ...4 The Monitor...8 Basic Operations...10 A (shooting mode) button ...10 c (playback) button...10 The Multi Selector...11 d button ...12...Language, Date and Time 16 Inserting Memory Cards ...18 Removing Memory Cards...19 G Basic Photography and Playback: Easy Auto Mode 20 Step 1 Turn the Camera On and Select G (Easy Auto) Mode 20 Indicators Displayed in G (Easy auto) Mode 21 Step 2 Frame a Picture ...22 Using the ...
L22 / L21 User's Manual
Page 14
... in a retrieval system, or translated into any language in any form, by Nikon specifically for contact information: http://imaging.nikon.com/ Use Only Nikon Brand Electronic Accessories Nikon COOLPIX cameras are engineered and proven to operate within the operational and safety requirements of this product... were you to bring any errors or omissions to the attention of the Nikon representative in your area. Introduction Information and Precautions Life-Long Learning As part of Nikon's "Life-Long Learning" commitment to ongoing product support and education, continually updated...
... in a retrieval system, or translated into any language in any form, by Nikon specifically for contact information: http://imaging.nikon.com/ Use Only Nikon Brand Electronic Accessories Nikon COOLPIX cameras are engineered and proven to operate within the operational and safety requirements of this product... were you to bring any errors or omissions to the attention of the Nikon representative in your area. Introduction Information and Precautions Life-Long Learning As part of Nikon's "Life-Long Learning" commitment to ongoing product support and education, continually updated...
L22 / L21 User's Manual
Page 16
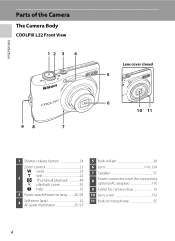
Introduction Parts of the Camera The Camera Body COOLPIX L22 Front View 12 3 4 98 7 Lens cover closed 5 6 10 11 1 Shutter-release button 24 Zoom control 23 f : wide 23 2 g : tele 23 h : Thumbnail playback 48 i : playback zoom 50 j : help 13 3 Power switch/Power-on lamp ....... 20, 99 4 Self-timer lamp 32 AF-assist illuminator 25, 97 5 Built-in flash 30 6 Lens 114, 124 7 Speaker 57 8 Power connector cover (for connecting optional AC adapter 110 9 Eyelet for camera strap 13 10 Lens cover 112 11 Built-in microphone 55 4
Introduction Parts of the Camera The Camera Body COOLPIX L22 Front View 12 3 4 98 7 Lens cover closed 5 6 10 11 1 Shutter-release button 24 Zoom control 23 f : wide 23 2 g : tele 23 h : Thumbnail playback 48 i : playback zoom 50 j : help 13 3 Power switch/Power-on lamp ....... 20, 99 4 Self-timer lamp 32 AF-assist illuminator 25, 97 5 Built-in flash 30 6 Lens 114, 124 7 Speaker 57 8 Power connector cover (for connecting optional AC adapter 110 9 Eyelet for camera strap 13 10 Lens cover 112 11 Built-in microphone 55 4
L22 / L21 User's Manual
Page 17
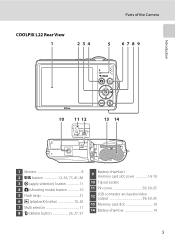
COOLPIX L22 Rear View 1 2 34 Parts of the Camera 5 67 89 Introduction 10 11 12 13 14 1 Monitor 8 2 d button 12, 56, 73, 81, 86 3 k (apply selection) button 11 4 A (shooting mode) button 10 5 Flash lamp 31 6 c (playback) button 10, 26 7 Multi selector 11 8 l (delete) button 26, 27, 57 9 Battery-chamber/ memory card slot cover 14, 18 10 Tripod socket 11 Pin cover 58, 60, 65 12 USB connector and audio/video output 58, 60, 65 13 Memory card slot 18 14 Battery-chamber 14 5
COOLPIX L22 Rear View 1 2 34 Parts of the Camera 5 67 89 Introduction 10 11 12 13 14 1 Monitor 8 2 d button 12, 56, 73, 81, 86 3 k (apply selection) button 11 4 A (shooting mode) button 10 5 Flash lamp 31 6 c (playback) button 10, 26 7 Multi selector 11 8 l (delete) button 26, 27, 57 9 Battery-chamber/ memory card slot cover 14, 18 10 Tripod socket 11 Pin cover 58, 60, 65 12 USB connector and audio/video output 58, 60, 65 13 Memory card slot 18 14 Battery-chamber 14 5
L22 / L21 User's Manual
Page 18
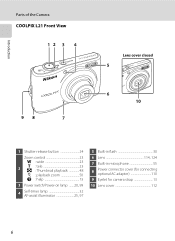
Introduction Parts of the Camera COOLPIX L21 Front View 12 3 4 98 7 Lens cover closed 5 6 10 1 Shutter-release button 24 Zoom control 23 f : wide 23 2 g : tele 23 h : Thumbnail playback 48 i : playback zoom 50 j : help 13 3 Power switch/Power-on lamp ....... 20, 99 4 Self-timer lamp 32 AF-assist illuminator 25, 97 5 Built-in flash 30 6 Lens 114, 124 7 Built-in microphone 55 8 Power connector cover (for connecting optional AC adapter 110 9 Eyelet for camera strap 13 10 Lens cover 112 6
Introduction Parts of the Camera COOLPIX L21 Front View 12 3 4 98 7 Lens cover closed 5 6 10 1 Shutter-release button 24 Zoom control 23 f : wide 23 2 g : tele 23 h : Thumbnail playback 48 i : playback zoom 50 j : help 13 3 Power switch/Power-on lamp ....... 20, 99 4 Self-timer lamp 32 AF-assist illuminator 25, 97 5 Built-in flash 30 6 Lens 114, 124 7 Built-in microphone 55 8 Power connector cover (for connecting optional AC adapter 110 9 Eyelet for camera strap 13 10 Lens cover 112 6
L22 / L21 User's Manual
Page 19
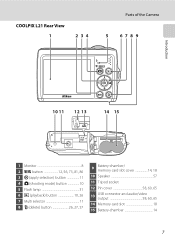
COOLPIX L21 Rear View 1 2 34 Parts of the Camera 5 67 8 9 Introduction 10 11 12 13 14 15 1 Monitor 8 2 d button 12, 56, 73, 81, 86 3 k (apply selection) button 11 4 A (shooting mode) button 10 5 Flash lamp 31 6 c (playback) button 10, 26 7 Multi selector 11 8 l (delete) button 26, 27, 57 9 Battery-chamber/ memory card slot cover 14, 18 10 Speaker 57 11 Tripod socket 12 Pin cover 58, 60, 65 13 USB connector and audio/video output 58, 60, 65 14 Memory card slot 18 15 Battery-chamber 14 7
COOLPIX L21 Rear View 1 2 34 Parts of the Camera 5 67 8 9 Introduction 10 11 12 13 14 15 1 Monitor 8 2 d button 12, 56, 73, 81, 86 3 k (apply selection) button 11 4 A (shooting mode) button 10 5 Flash lamp 31 6 c (playback) button 10, 26 7 Multi selector 11 8 l (delete) button 26, 27, 57 9 Battery-chamber/ memory card slot cover 14, 18 10 Speaker 57 11 Tripod socket 12 Pin cover 58, 60, 65 13 USB connector and audio/video output 58, 60, 65 14 Memory card slot 18 15 Battery-chamber 14 7
L22 / L21 User's Manual
Page 20
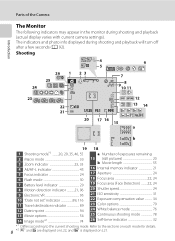
Parts of exposures remaining 2 Macro mode 33 3 Zoom indicator 23, 33 4 AE/AF-L indicator 45 5 ... mode 78 26 Self-timer indicator 32 *1 Differs according to the sections on each mode for details. 8 *2 S and L are displayed on L22, and z is displayed on L21. Shooting 4 6 5 26 1 2 3 25 10 24 7 9 10811 23 12 22 +1.0 21 1/125...999 a 9999 1m00 s b 1m00 s 19 18 1 Shooting mode*1 .........20, 29, 35, 46, 55 a Number of the Camera Introduction The Monitor The following indicators may appear in the monitor during shooting and playback will turn off after a few seconds (A 92)....
Parts of exposures remaining 2 Macro mode 33 3 Zoom indicator 23, 33 4 AE/AF-L indicator 45 5 ... mode 78 26 Self-timer indicator 32 *1 Differs according to the sections on each mode for details. 8 *2 S and L are displayed on L22, and z is displayed on L21. Shooting 4 6 5 26 1 2 3 25 10 24 7 9 10811 23 12 22 +1.0 21 1/125...999 a 9999 1m00 s b 1m00 s 19 18 1 Shooting mode*1 .........20, 29, 35, 46, 55 a Number of the Camera Introduction The Monitor The following indicators may appear in the monitor during shooting and playback will turn off after a few seconds (A 92)....
L22 / L21 User's Manual
Page 21
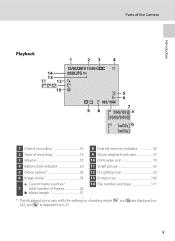
Parts of the Camera Introduction Playback 14 13 11 12 10 1 23 4 15/05/2010 12:00 9999.JPG 5 6 999 999 98 7 999 999 a 9999 9999 1m00s b 1m00s 1 Date ... 52 13 Protect icon 106 14 File number and type 111 * The displayed icons vary with the settings in shooting mode. S and L are displayed on L22, and z is displayed on L21. 9
Parts of the Camera Introduction Playback 14 13 11 12 10 1 23 4 15/05/2010 12:00 9999.JPG 5 6 999 999 98 7 999 999 a 9999 9999 1m00s b 1m00s 1 Date ... 52 13 Protect icon 106 14 File number and type 111 * The displayed icons vary with the settings in shooting mode. S and L are displayed on L22, and z is displayed on L21. 9
L22 / L21 User's Manual
Page 106
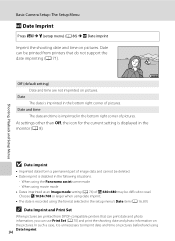
...Off, the icon for the current setting is displayed in the following situations. - B Date imprint • Imprinted dates form a permanent part of pictures. C Date Imprint and Print Set When pictures are printed from printers that can print date and photo information, you can be... Choose N 1024×768 or larger when using date imprint. • The date is disabled in the monitor (A 8). Shooting, Playback and Setup Menus Basic Camera Setup: The Setup Menu f Date Imprint Press d M z (setup menu) (A 86) M f Date imprint Imprint the shooting date and time on pictures ...
...Off, the icon for the current setting is displayed in the following situations. - B Date imprint • Imprinted dates form a permanent part of pictures. C Date Imprint and Print Set When pictures are printed from printers that can print date and photo information, you can be... Choose N 1024×768 or larger when using date imprint. • The date is disabled in the monitor (A 8). Shooting, Playback and Setup Menus Basic Camera Setup: The Setup Menu f Date Imprint Press d M z (setup menu) (A 86) M f Date imprint Imprint the shooting date and time on pictures ...

L22 / L21 User's Manual
Page 124
...Do not apply force to prevent the liquid crystal from strong magnetic fields Do not use or store this Nikon product, observe the following precautions when using or storing the camera. Strong static charges or the magnetic fields produced by broken glass and to the lens, lens cover, ...monitor, memory card slot or battery chamber. B Turn the product off before exposing it to sudden changes in camera malfunction or damage to the lens. These parts are being recorded or deleted. B Avoid sudden changes in temperature Sudden changes in the vicinity of data or in water ...
...Do not apply force to prevent the liquid crystal from strong magnetic fields Do not use or store this Nikon product, observe the following precautions when using or storing the camera. Strong static charges or the magnetic fields produced by broken glass and to the lens, lens cover, ...monitor, memory card slot or battery chamber. B Turn the product off before exposing it to sudden changes in camera malfunction or damage to the lens. These parts are being recorded or deleted. B Avoid sudden changes in temperature Sudden changes in the vicinity of data or in water ...

L22 / L21 User's Manual
Page 126
...the other stains that cannot be removed with a blower, wipe the lens with commercial lens cleaner. Technical Notes 114 Caring for the Camera Cleaning Avoid touching glass parts with a soft, dry cloth. Do not use alcohol, thinner, or other stains, clean the monitor with fresh water, then dry ...thoroughly. Note that is pumped to apply pressure. Body Use a blower to one end that foreign matter inside the camera could cause damage ...
...the other stains that cannot be removed with a blower, wipe the lens with commercial lens cleaner. Technical Notes 114 Caring for the Camera Cleaning Avoid touching glass parts with a soft, dry cloth. Do not use alcohol, thinner, or other stains, clean the monitor with fresh water, then dry ...thoroughly. Note that is pumped to apply pressure. Body Use a blower to one end that foreign matter inside the camera could cause damage ...


