User Manual
Page 31
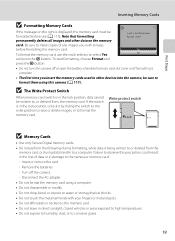
... the metal terminals with your fingers or metal objects. • Do not affix labels or stickers to the memory card. • Do not leave in direct sunlight, closed vehicles or areas exposed to high temperatures. • Do not expose to humidity, dust, or to corrosive gases. 19 Card is complete. •...
... the metal terminals with your fingers or metal objects. • Do not affix labels or stickers to the memory card. • Do not leave in direct sunlight, closed vehicles or areas exposed to high temperatures. • Do not expose to humidity, dust, or to corrosive gases. 19 Card is complete. •...

User Manual
Page 55
... the following situations. - Off: The shutter is automatically set to Off in focus, three images are turned or the brightness of the pets' movement, the direction in which the faces are continuously captured (Frame rate: approx. 0.7 fps when image mode is set to R 4320×3240). The button sound and shutter...
... the following situations. - Off: The shutter is automatically set to Off in focus, three images are turned or the brightness of the pets' movement, the direction in which the faces are continuously captured (Frame rate: approx. 0.7 fps when image mode is set to R 4320×3240). The button sound and shutter...
User Manual
Page 56
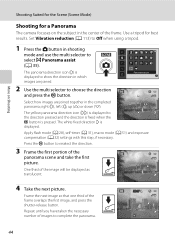
...the subject in the center of the image will be displayed as translucent. 30 4 Take the next picture. The panorama direction icon (I) is displayed. right (I is displayed to reselect the direction. 3 Frame the first portion of the frame overlaps the first image, and press the shutter-release button. The white... fixed direction I ), left (J), up (K) or down (L). Select how images are joined. One third of the frame. Frame the next image so that one third ...
...the subject in the center of the image will be displayed as translucent. 30 4 Take the next picture. The panorama direction icon (I) is displayed. right (I is displayed to reselect the direction. 3 Frame the first portion of the frame overlaps the first image, and press the shutter-release button. The white... fixed direction I ), left (J), up (K) or down (L). Select how images are joined. One third of the frame. Frame the next image so that one third ...
User Manual
Page 67
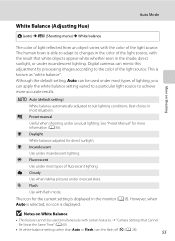
... images according to the color of the light source, with certain features. ➝ "Camera Settings that white objects appear white whether seen in the shade, direct sunlight, or under most types of lighting, you can apply the white balance setting suited to a particular light source to suit lighting conditions. The icon...
... images according to the color of the light source, with certain features. ➝ "Camera Settings that white objects appear white whether seen in the shade, direct sunlight, or under most types of lighting, you can apply the white balance setting suited to a particular light source to suit lighting conditions. The icon...

User Manual
Page 81
... and time on images will be printed from printers that do not support date imprinting (A 69). Dates can be printed when the camera is connected directly to delete print orders for DPOF printing (A 101). • Date and Info are reset each time the Print order menu is displayed. • The date...
... and time on images will be printed from printers that do not support date imprinting (A 69). Dates can be printed when the camera is connected directly to delete print orders for DPOF printing (A 101). • Date and Info are reset each time the Print order menu is displayed. • The date...

User Manual
Page 84
... the number of images, press the k button. Repeat steps 1 and 2 to 12 thumbnails. Back ON/OFF 3 To fix the selection of copies). More on -screen directions. When ON is selected, y is displayed when selecting images. • Print order > Select images (A 67) • Protect (A 71) • Rotate image (A 73) • Copy > Selected...
... the number of images, press the k button. Repeat steps 1 and 2 to 12 thumbnails. Back ON/OFF 3 To fix the selection of copies). More on -screen directions. When ON is selected, y is displayed when selecting images. • Print order > Select images (A 67) • Protect (A 71) • Rotate image (A 73) • Copy > Selected...

User Manual
Page 85
Images can be rotated 90° clockwise or counterclockwise. Images that were saved in either direction. Playback Menu f Rotate Image c button (Playback mode) M d (Playback menu) M f Rotate image Set the image orientation (vertical or horizontal frame) displayed on ...Playback 73 Select images on the image. Press the multi selector J or K to select the displayed direction and the vertical / horizontal position data will be saved on the image selection screen (A 72) to 180° in the portrait (vertical) orientation...
Images can be rotated 90° clockwise or counterclockwise. Images that were saved in either direction. Playback Menu f Rotate Image c button (Playback mode) M d (Playback menu) M f Rotate image Set the image orientation (vertical or horizontal frame) displayed on ...Playback 73 Select images on the image. Press the multi selector J or K to select the displayed direction and the vertical / horizontal position data will be saved on the image selection screen (A 72) to 180° in the portrait (vertical) orientation...
User Manual
Page 109
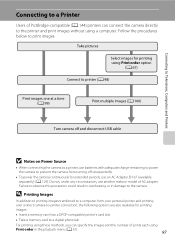
...to a printer, use batteries with adequate charge remaining to power the camera to prevent the camera from your personal printer and printing over a direct camera-to-printer connection, the following options are also available for extended periods, use an AC Adapter EH-67 (available separately) (A 129... printer's card slot • Take a memory card to a digital photo lab For printing using these methods, you can connect the camera directly to the printer and print images without using a computer. Take pictures Select images for printing using Print order in damage to print images. ...
...to a printer, use batteries with adequate charge remaining to power the camera to prevent the camera from your personal printer and printing over a direct camera-to-printer connection, the following options are also available for extended periods, use an AC Adapter EH-67 (available separately) (A 129... printer's card slot • Take a memory card to a digital photo lab For printing using these methods, you can connect the camera directly to the printer and print images without using a computer. Take pictures Select images for printing using Print order in damage to print images. ...
User Manual
Page 156
... when images are output from Exif-compliant printers. • PictBridge: A standard developed cooperatively by the digital camera and printer industries, allowing photographs to be output directly to a printer without connecting the camera to a computer. 144 Technical Notes
... when images are output from Exif-compliant printers. • PictBridge: A standard developed cooperatively by the digital camera and printer industries, allowing photographs to be output directly to a printer without connecting the camera to a computer. 144 Technical Notes

User Manual
Page 157
... 92 Continuous 57 Copy 74 Crop 78 Cyanotype 59 D Daylight 55 Daylight saving time 16, 108 DC input connector 4 Delete 27, 87 Digital zoom 23 Direct print 97 D-Lighting 75, 76 DPOF 144 DPOF printing 102 DSCN 131 Dusk/dawn i 38 E Easy auto mode 20, 34 EH-67 15, 129 145...
... 92 Continuous 57 Copy 74 Crop 78 Cyanotype 59 D Daylight 55 Daylight saving time 16, 108 DC input connector 4 Delete 27, 87 Digital zoom 23 Direct print 97 D-Lighting 75, 76 DPOF 144 DPOF printing 102 DSCN 131 Dusk/dawn i 38 E Easy auto mode 20, 34 EH-67 15, 129 145...


