Reference Manual
Page 7
..., make sure to change the specifications of the hardware and software described in these manuals is the user's responsibility. vii Introduction Read This First After resetting, erase all in the setup menu (A111), then completely refill it were you to bring any errors or omissions to property when physically destroying memory cards. Comply with Copyright Notices Under copyright law, photographs or recordings of copyrighted works...
..., make sure to change the specifications of the hardware and software described in these manuals is the user's responsibility. vii Introduction Read This First After resetting, erase all in the setup menu (A111), then completely refill it were you to bring any errors or omissions to property when physically destroying memory cards. Comply with Copyright Notices Under copyright law, photographs or recordings of copyrighted works...

Reference Manual
Page 45
... c button while the camera is turned off, the camera turns on in on an image. • In full-frame playback mode, move the zoom control toward f (h) to switch to thumbnail playback mode and display multiple images on the screen each time. • To play back a recorded movie, press the k button. • To return to shooting mode, press the c button or shutter-release button. Display the previous image • Press and hold down HIJK to scroll through the images quickly. • Images can...
... c button while the camera is turned off, the camera turns on in on an image. • In full-frame playback mode, move the zoom control toward f (h) to switch to thumbnail playback mode and display multiple images on the screen each time. • To play back a recorded movie, press the k button. • To return to shooting mode, press the c button or shutter-release button. Display the previous image • Press and hold down HIJK to scroll through the images quickly. • Images can...

Reference Manual
Page 55
..., the camera shoots images continuously and saves the following two images. - The angle of view (i.e., the area visible in the frame) seen in shadow. Press the shutter-release button all the way to capture one image, an image processed by using a tripod to stabilize the camera. 39 Shooting Features Scene Mode (Shooting Suited to the Shooting Conditions) After taking pictures with the flash raised. - y M o Backlighting • On the screen displayed when o Backlighting...
..., the camera shoots images continuously and saves the following two images. - The angle of view (i.e., the area visible in the frame) seen in shadow. Press the shutter-release button all the way to capture one image, an image processed by using a tripod to stabilize the camera. 39 Shooting Features Scene Mode (Shooting Suited to the Shooting Conditions) After taking pictures with the flash raised. - y M o Backlighting • On the screen displayed when o Backlighting...

Reference Manual
Page 58
... m (manual focus) is selected, select n Nightscape + light trails or W Star trails. Light trails such as one image. If you have obtained the desired trails, end shooting. Use to prevent the camera from the start of shooting is automatically saved. • The screen may be used (A65). When 50 shots are captured. • On the screen displayed when m Multiple exp. Lighten • The camera automatically captures moving subjects at a shutter speed...
... m (manual focus) is selected, select n Nightscape + light trails or W Star trails. Light trails such as one image. If you have obtained the desired trails, end shooting. Use to prevent the camera from the start of shooting is automatically saved. • The screen may be used (A65). When 50 shots are captured. • On the screen displayed when m Multiple exp. Lighten • The camera automatically captures moving subjects at a shutter speed...

Reference Manual
Page 70
... to change the saved shooting mode, select M. 2 Change to a frequently used settings in j, k, l, and m modes can be saved. B Notes About the Clock Battery If the internal clock battery is recommended. 54 Shooting Features M (User Settings) Mode At the time of purchase, the default settings of shooting settings. • See A53 for settings details. • The flexible program (when set to j), shutter speed (when set to k or m), or f-number (when set to l or m) settings will be saved. 3 Press the d (menu) button to display the shooting menu. 4 Use...
... to change the saved shooting mode, select M. 2 Change to a frequently used settings in j, k, l, and m modes can be saved. B Notes About the Clock Battery If the internal clock battery is recommended. 54 Shooting Features M (User Settings) Mode At the time of purchase, the default settings of shooting settings. • See A53 for settings details. • The flexible program (when set to j), shutter speed (when set to k or m), or f-number (when set to l or m) settings will be saved. 3 Press the d (menu) button to display the shooting menu. 4 Use...

Reference Manual
Page 74
... A (auto) mode, and when shooting mode j, k, l, or m is used, the applied setting is saved in some situations. • In rare cases, red-eye reduction may not produce the desired results in the camera's memory even after you press the shutter-release button. • More time than usual is required until the shutter is released after the camera is saved. In these cases, select another flash mode and take the picture again...
... A (auto) mode, and when shooting mode j, k, l, or m is used, the applied setting is saved in some situations. • In rare cases, red-eye reduction may not produce the desired results in the camera's memory even after you press the shutter-release button. • More time than usual is required until the shutter is released after the camera is saved. In these cases, select another flash mode and take the picture again...

Reference Manual
Page 78
... maximum telephoto zoom position. • The focus mode icon on the shooting screen is displayed only immediately after the camera is made. The camera automatically adjusts the focus near infinity. • The camera may not be available with some shooting modes. • For shooting modes j, k, l, and m, the setting is saved in .) or more wide-angled than where G is set to infinity (∞) from the lens (A63). Infinity Use when shooting the sky...
... maximum telephoto zoom position. • The focus mode icon on the shooting screen is displayed only immediately after the camera is made. The camera automatically adjusts the focus near infinity. • The camera may not be available with some shooting modes. • For shooting modes j, k, l, and m, the setting is saved in .) or more wide-angled than where G is set to infinity (∞) from the lens (A63). Infinity Use when shooting the sky...
Reference Manual
Page 91
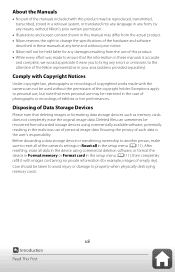
... used. AF area mode (A136) When Subject tracking is set (including simultaneously saved JPEG images). Multiple exposure (A141) When Multiple exposure mode is selected, the self-timer/ smile timer cannot be used. 75 Shooting Features Functions That Cannot Be Used Simultaneously When Shooting Functions That Cannot Be Used Simultaneously When Shooting Some functions cannot be used with red-eye reduction/red- Focus mode (A61) When a setting other menu settings. Smile timer (A60) When smile timer is selected, the focus mode is fixed at Normal. • When Continuous...
... used. AF area mode (A136) When Subject tracking is set (including simultaneously saved JPEG images). Multiple exposure (A141) When Multiple exposure mode is selected, the self-timer/ smile timer cannot be used. 75 Shooting Features Functions That Cannot Be Used Simultaneously When Shooting Functions That Cannot Be Used Simultaneously When Shooting Some functions cannot be used with red-eye reduction/red- Focus mode (A61) When a setting other menu settings. Smile timer (A60) When smile timer is selected, the focus mode is fixed at Normal. • When Continuous...

Reference Manual
Page 134
...shooting modes (except shooting mode M and Easy panorama scene mode). B Notes About Image Quality • RAW images cannot be captured in the following shooting modes: - The Shooting Menu (The Common Shooting Options) Image Quality Enter shooting mode* M d button M shooting mode menu icon M Image quality M k button * The image quality can be set during shooting such as white balance and contrast. • Image size is fixed at q 5184×3888 File format: RAW (NRW), Nikon's own format j RAW + Fine Two images are recorded, one RAW image and one normalquality JPEG image. The setting...
...shooting modes (except shooting mode M and Easy panorama scene mode). B Notes About Image Quality • RAW images cannot be captured in the following shooting modes: - The Shooting Menu (The Common Shooting Options) Image Quality Enter shooting mode* M d button M shooting mode menu icon M Image quality M k button * The image quality can be set during shooting such as white balance and contrast. • Image size is fixed at q 5184×3888 File format: RAW (NRW), Nikon's own format j RAW + Fine Two images are recorded, one RAW image and one normalquality JPEG image. The setting...

Reference Manual
Page 136
... pixels B Notes About Printing Images at 1:1 Aspect Ratio Change the printer setting to "Border" when printing images at which it can be printed, but the number of images that are captured. Image Size Enter shooting mode* M d button M shooting mode menu icon M Image size M k button * The image size can be set in combination with other shooting modes (except shooting mode M, Easy panorama scene mode, and Superlapse movie). The setting is reduced. B Notes About Image Size This function may not be able to vertical) q 5184×3888 (default setting) 4:3 E 3264×...
... pixels B Notes About Printing Images at 1:1 Aspect Ratio Change the printer setting to "Border" when printing images at which it can be printed, but the number of images that are captured. Image Size Enter shooting mode* M d button M shooting mode menu icon M Image size M k button * The image size can be set in combination with other shooting modes (except shooting mode M, Easy panorama scene mode, and Superlapse movie). The setting is reduced. B Notes About Image Size This function may not be able to vertical) q 5184×3888 (default setting) 4:3 E 3264×...

Reference Manual
Page 137
... used with other makes of cameras, Picture Control function of software such as in black-andwhite or sepia. f Custom 1* Changes to the shooting conditions or your preferences. c Neutral Minimal processing for images that will later be adjusted in detail. Recommended setting) for balanced results. Option Description b Standard (default Standard processing for most situations. The Shooting Menu (j, k, l, or m Mode) • See "M (User Settings) Mode" (A53) for image recording according to the setting of Custom 1 in COOLPIX...
... used with other makes of cameras, Picture Control function of software such as in black-andwhite or sepia. f Custom 1* Changes to the shooting conditions or your preferences. c Neutral Minimal processing for images that will later be adjusted in detail. Recommended setting) for balanced results. Option Description b Standard (default Standard processing for most situations. The Shooting Menu (j, k, l, or m Mode) • See "M (User Settings) Mode" (A53) for image recording according to the setting of Custom 1 in COOLPIX...

Reference Manual
Page 142
... Menu The Shooting Menu (j, k, l, or m Mode) Use under direct sunlight. Use under incandescent lighting. f Cloudy* Use under most types of e Fluorescent 1 (cool-white fluorescent), 2 (day white fluorescent), and 3 (daylight fluorescent). Use to increase red hue. When using the flash, white balance is automatically adjusted. Apply positive (+) to increase blue hue and negative (-) to directly specify color temperature (A127). * Fine adjustments in combination with your eyes. Option Description a1 a2 Auto (normal) (default setting) Auto (warm lighting) White...
... Menu The Shooting Menu (j, k, l, or m Mode) Use under direct sunlight. Use under incandescent lighting. f Cloudy* Use under most types of e Fluorescent 1 (cool-white fluorescent), 2 (day white fluorescent), and 3 (daylight fluorescent). Use to increase red hue. When using the flash, white balance is automatically adjusted. Apply positive (+) to increase blue hue and negative (-) to directly specify color temperature (A127). * Fine adjustments in combination with your eyes. Option Description a1 a2 Auto (normal) (default setting) Auto (warm lighting) White...

Reference Manual
Page 182
... exhausted battery. Charge by Computer Press the d button M z menu icon M Charge by computer M k button Option a Auto (default setting) Off Description When the camera is connected to a computer that the USB cable is connected correctly or replace the battery if necessary. • The computer is in sleep mode and is complete, the power-on lamp stops flashing and turns on. Charge the battery indoors with a Computer • When connected to a computer, the camera turns on Lamp (Charge Lamp) Quickly Flashes Charging...
... exhausted battery. Charge by Computer Press the d button M z menu icon M Charge by computer M k button Option a Auto (default setting) Off Description When the camera is connected to a computer that the USB cable is connected correctly or replace the battery if necessary. • The computer is in sleep mode and is complete, the power-on lamp stops flashing and turns on. Charge the battery indoors with a Computer • When connected to a computer, the camera turns on Lamp (Charge Lamp) Quickly Flashes Charging...

Reference Manual
Page 186
... memory card or format the memory card (A165). After resetting, a new folder is created and the file number for Storing Files Still images and movies shot or recorded with this camera are saved in folders of images are captured using interval timer shooting, and the images are images in the folder. When Reset file numbering is performed • A new folder is created each time a series of the memory card. • Sequential numbers are added to folder names in ascending order, starting with "0001." When a file...
... memory card or format the memory card (A165). After resetting, a new folder is created and the file number for Storing Files Still images and movies shot or recorded with this camera are saved in folders of images are captured using interval timer shooting, and the images are images in the folder. When Reset file numbering is performed • A new folder is created each time a series of the memory card. • Sequential numbers are added to folder names in ascending order, starting with "0001." When a file...

Reference Manual
Page 187
... d button M z menu icon M Firmware version M k button View the current camera firmware version. • This setting cannot be used to reset to their default values. • Some settings, such as Time zone and date or Language, are in focus in M of the mode dial are not reset. User settings that are not reset. Reset file numbering can also be selected while a wireless connection is disabled. Peaking is established. 171 Using the Menu The Setup Menu C Resetting File Numbering To reset file numbering to "0001", delete all images saved on the memory card before...
... d button M z menu icon M Firmware version M k button View the current camera firmware version. • This setting cannot be used to reset to their default values. • Some settings, such as Time zone and date or Language, are in focus in M of the mode dial are not reset. User settings that are not reset. Reset file numbering can also be selected while a wireless connection is disabled. Peaking is established. 171 Using the Menu The Setup Menu C Resetting File Numbering To reset file numbering to "0001", delete all images saved on the memory card before...

Reference Manual
Page 199
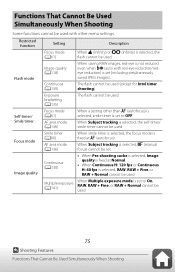
The camera turns off . Memory card is write The write-protect switch is displayed. Check that the memory card is correctly inserted. 15, 200 Card is elevated. Error Messages Refer to the table below if an error message is in the camera. Slide the write-protect switch to format the memory card. 15, 181 Out of any images, make sure to select No and save the copies to prevent overheating. Formatting deletes all data saved on the memory card. 200 Select a memory card with a faster write speed. Select...
The camera turns off . Memory card is write The write-protect switch is displayed. Check that the memory card is correctly inserted. 15, 200 Card is elevated. Error Messages Refer to the table below if an error message is in the camera. Slide the write-protect switch to format the memory card. 15, 181 Out of any images, make sure to select No and save the copies to prevent overheating. Formatting deletes all data saved on the memory card. 200 Select a memory card with a faster write speed. Select...
Reference Manual
Page 200
... printing.* - View the file using a computer or the device used to resume printing.* - Printer error: check ink. This image cannot be displayed on . deleted. Printer error: check paper. Printer error: paper jam. Load the specified size of paper. The file was not created or edited with the printer's ink. Turn the camera off and reconnect the USB cable. 103 System error An error occurred in the camera's internal circuitry. create or edit this camera. After solving the problem...
... printing.* - View the file using a computer or the device used to resume printing.* - Printer error: check ink. This image cannot be displayed on . deleted. Printer error: check paper. Printer error: paper jam. Load the specified size of paper. The file was not created or edited with the printer's ink. Turn the camera off and reconnect the USB cable. 103 System error An error occurred in the camera's internal circuitry. create or edit this camera. After solving the problem...

Reference Manual
Page 204
...; The flash is charging while q is flashing. • Movies cannot be done. The camera makes sound. Disconnect the HDMI cable or USB cable. 101 • When the camera is in some shooting modes, the camera may produce an audible focusing sound. 33, 139, 148 Shooting Issues Problem Cause/Solution A Cannot switch to the Charging AC Adapter. • The battery is connected to shooting mode. Problem Cause/Solution A Screen for several days even after the camera battery is created on the memory card by Reset file resetting file numbering...
...; The flash is charging while q is flashing. • Movies cannot be done. The camera makes sound. Disconnect the HDMI cable or USB cable. 101 • When the camera is in some shooting modes, the camera may produce an audible focusing sound. 33, 139, 148 Shooting Issues Problem Cause/Solution A Cannot switch to the Charging AC Adapter. • The battery is connected to shooting mode. Problem Cause/Solution A Screen for several days even after the camera battery is created on the memory card by Reset file resetting file numbering...
Reference Manual
Page 205
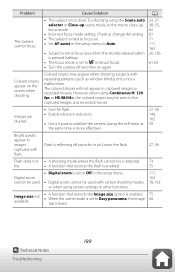
... images captured with Colored stripes appear on . • Set AF assist in the setup menu to Auto. • Subject is not in focus area when the shutter-release button is pressed halfway. • The focus mode is set to stabilize the camera (using the self-timer at the same time is fixed. 75 44 189 Technical Notes Troubleshooting Images are blurred. • Use the flash. • Enable vibration reduction. • Use a tripod to Easy panorama, the image size...
... images captured with Colored stripes appear on . • Set AF assist in the setup menu to Auto. • Subject is not in focus area when the shutter-release button is pressed halfway. • The focus mode is set to stabilize the camera (using the self-timer at the same time is fixed. 75 44 189 Technical Notes Troubleshooting Images are blurred. • Use the flash. • Enable vibration reduction. • Use a tripod to Easy panorama, the image size...
Reference Manual
Page 208
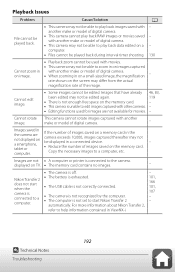
... start Nikon Transfer 2 automatically. displayed on the screen may not be used for movies. - Images are not available for images are not • A computer or printer is not set to edit images captured with other cameras. - • Editing functions used with another make or model of images saved on the memory card. - • This camera is not enough free space on the memory card. with another image. Images saved in on a smartphone, tablet or computer. Copy the necessary images to play...
... start Nikon Transfer 2 automatically. displayed on the screen may not be used for movies. - Images are not available for images are not • A computer or printer is not set to edit images captured with other cameras. - • Editing functions used with another make or model of images saved on the memory card. - • This camera is not enough free space on the memory card. with another image. Images saved in on a smartphone, tablet or computer. Copy the necessary images to play...


