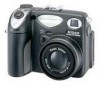
P5000 User's Manual
Page 2
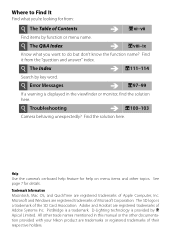
... QuickTime are registered trademarks of Apple Computer, Inc. Adobe and Acrobat are registered trademarks of Adobe Systems Inc. Help Use the camera's on-board help feature for details. PictBridge is displayed in this manual or the other topics. All other trade names mentioned ...or menu name. See page 7 for help on menu items and other documentation provided with your Nikon product are registered trademarks of the SD Card Association. O Troubleshooting Î aB100-103 Camera behaving unexpectedly? The SD logo is provided by key word. O Error Messages Î aB97...
... QuickTime are registered trademarks of Apple Computer, Inc. Adobe and Acrobat are registered trademarks of Adobe Systems Inc. Help Use the camera's on-board help feature for details. PictBridge is displayed in this manual or the other topics. All other trade names mentioned ...or menu name. See page 7 for help on menu items and other documentation provided with your Nikon product are registered trademarks of the SD Card Association. O Troubleshooting Î aB100-103 Camera behaving unexpectedly? The SD logo is provided by key word. O Error Messages Î aB97...
P5000 User's Manual
Page 3
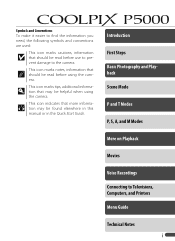
...Basic Photography and Playback Scene Mode P and T Modes P, S, A, and M Modes More on Playback Movies Voice Recordings Connecting to the camera. Symbols and Conventions To make it easier to find the information you need, the following symbols and conventions are used: D This icon... marks cautions, information that more information may be helpful when using the camera. A This icon marks notes, information that may be read before use to prevent damage to Televisions, Computers, and Printers Menu Guide Technical Notes...
...Basic Photography and Playback Scene Mode P and T Modes P, S, A, and M Modes More on Playback Movies Voice Recordings Connecting to the camera. Symbols and Conventions To make it easier to find the information you need, the following symbols and conventions are used: D This icon... marks cautions, information that more information may be helpful when using the camera. A This icon marks notes, information that may be read before use to prevent damage to Televisions, Computers, and Printers Menu Guide Technical Notes...
P5000 User's Manual
Page 4
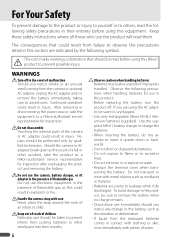
... the battery, turn the product off in the event of flammable gas Do not use in this Nikon product to a Nikon-authorized service representative for inspection. Should the camera or AC adapter break open as this equipment. Observe the following precautions when handling batteries for use ...parts of an infant or child. ii AObserve caution when handling batteries Batteries may leak or explode if improperly handled. AHandle the camera strap with metal objects such as discoloration or deformation. • If liquid from putting batteries or other accident, take the equipment ...
... the battery, turn the product off in the event of flammable gas Do not use in this Nikon product to a Nikon-authorized service representative for inspection. Should the camera or AC adapter break open as this equipment. Observe the following precautions when handling batteries for use ...parts of an infant or child. ii AObserve caution when handling batteries Batteries may leak or explode if improperly handled. AHandle the camera strap with metal objects such as discoloration or deformation. • If liquid from putting batteries or other accident, take the equipment ...
P5000 User's Manual
Page 7
... copy or reproduce passports issued by the government, licenses issued by law from being in possession of material that has been digitally copied or reproduced by means of necessary copies are to another person, erase all data using commercially available software, potentially resulting... companies (shares, bills, checks, gift certificates, etc.), commuter passes, or coupon tickets, except when a minimum of a scanner, digital camera, or other device may be recovered from discarded storage devices using commercial deletion software, or format the device and then completely refill it...
... copy or reproduce passports issued by the government, licenses issued by law from being in possession of material that has been digitally copied or reproduced by means of necessary copies are to another person, erase all data using commercially available software, potentially resulting... companies (shares, bills, checks, gift certificates, etc.), commuter passes, or coupon tickets, except when a minimum of a scanner, digital camera, or other device may be recovered from discarded storage devices using commercial deletion software, or format the device and then completely refill it...
P5000 User's Manual
Page 8
Table of Contents For Your Safety...ii Notices...iv Q&A Index ...viii Introduction ...1 Parts of the Camera ...2 First Steps ...9 Charging the Battery...9 Inserting the Battery ...10 Turning the Camera on and Off...12 Basic Setup...12 Inserting Memory Cards ...14 Basic Photography and Playback 16 U Mode...16 Viewing Pictures ...22 Using the Flash ...24...
Table of Contents For Your Safety...ii Notices...iv Q&A Index ...viii Introduction ...1 Parts of the Camera ...2 First Steps ...9 Charging the Battery...9 Inserting the Battery ...10 Turning the Camera on and Off...12 Basic Setup...12 Inserting Memory Cards ...14 Basic Photography and Playback 16 U Mode...16 Viewing Pictures ...22 Using the Flash ...24...
P5000 User's Manual
Page 9
... Transfer Marking 82 M Print Set 64 Z Hide Image 82 d Slide Show 81 w Small Pic 45 j Delete 81 f Copy 82 O Protect 81 Basic Camera Setup: The Setup Menu 83 a Menus 83 e Sound Settings 88 P Quick Startup 83 L Auto Off 88 s Welcome Screen 84 q Format Memory/Q Format Card...FUNC Button 89 K Vibration Reduction 87 V Reset All 89 B AF Assist 87 f Firmware Version 89 0 Digital Zoom 87 Technical Notes ...90 Optional Accessories...90 Caring for the Camera ...94 Cleaning...96 Storage ...96 Error Messages ...97 Troubleshooting ...100 Appendix...104 Specifications...108 Index ...111 vii ...
... Transfer Marking 82 M Print Set 64 Z Hide Image 82 d Slide Show 81 w Small Pic 45 j Delete 81 f Copy 82 O Protect 81 Basic Camera Setup: The Setup Menu 83 a Menus 83 e Sound Settings 88 P Quick Startup 83 L Auto Off 88 s Welcome Screen 84 q Format Memory/Q Format Card...FUNC Button 89 K Vibration Reduction 87 V Reset All 89 B AF Assist 87 f Firmware Version 89 0 Digital Zoom 87 Technical Notes ...90 Optional Accessories...90 Caring for the Camera ...94 Cleaning...96 Storage ...96 Error Messages ...97 Troubleshooting ...100 Appendix...104 Specifications...108 Index ...111 vii ...
P5000 User's Manual
Page 10
... adjust monitor brightness? Date 84 How do I travel? How much charge does the battery have left? How do I clean the camera? Key phrase B Monitor 4 Error messages and displays 97 Help 7 Battery level 16 Exposure 38 Optional accessories 90 Optional converter lenses ...92 Optional Speedlights 93 Approved memory cards 91 Cleaning the camera 96 Camera Setup Question Key phrase B How do I keep the camera from turning off ? How do I set the clock? How do I restore default settings? ...
... adjust monitor brightness? Date 84 How do I travel? How much charge does the battery have left? How do I clean the camera? Key phrase B Monitor 4 Error messages and displays 97 Help 7 Battery level 16 Exposure 38 Optional accessories 90 Optional converter lenses ...92 Optional Speedlights 93 Approved memory cards 91 Cleaning the camera 96 Camera Setup Question Key phrase B How do I keep the camera from turning off ? How do I set the clock? How do I restore default settings? ...

P5000 User's Manual
Page 11
... D-lighting 44 Can I take bigger photographs? PictBridge 60 Can I use the flash? Flash mode 24 How do I avoid blur with the camera zoomed in focus? Television playback 55 How do I print the date on my photographs? Printing photographs; S (scene) mode 29 How can I... get rid of recording 60 How do I view my photographs on the camera? Movies 47 How do I copy pictures at once? Viewing, Printing, and Retouching Photographs Question Key phrase B Can I record and play movies?...
... D-lighting 44 Can I take bigger photographs? PictBridge 60 Can I use the flash? Flash mode 24 How do I avoid blur with the camera zoomed in focus? Television playback 55 How do I print the date on my photographs? Printing photographs; S (scene) mode 29 How can I... get rid of recording 60 How do I view my photographs on the camera? Movies 47 How do I copy pictures at once? Viewing, Printing, and Retouching Photographs Question Key phrase B Can I record and play movies?...
P5000 User's Manual
Page 12
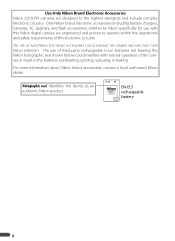
... seal shown below could interfere with this Nikon digital camera are designed to operate within the operational and safety requirements of this device as an authentic Nikon product. THE USE OF NON-NIKON ELECTRONIC ACCESSORIES COULD DAMAGE THE CAMERA AND MAY VOID YOUR NIKON WARRANTY. Use Only Nikon Brand Electronic Accessories Nikon COOLPIX cameras are engineered and proven to the highest...
... seal shown below could interfere with this Nikon digital camera are designed to operate within the operational and safety requirements of this device as an authentic Nikon product. THE USE OF NON-NIKON ELECTRONIC ACCESSORIES COULD DAMAGE THE CAMERA AND MAY VOID YOUR NIKON WARRANTY. Use Only Nikon Brand Electronic Accessories Nikon COOLPIX cameras are engineered and proven to the highest...
P5000 User's Manual
Page 13
... tips, answers to ensure that may be read all those who use the product. Nikon will be available from product malfunction. C Life-Long Learning As part of a Nikon COOLPIX P5000 digital camera. This manual has been written to help you for your area. Additional information may ...result from the Nikon representative in Asia, Oceania, and the Middle East: http://www.nikon-asia.com/ Visit these sites to keep ...
... tips, answers to ensure that may be read all those who use the product. Nikon will be available from product malfunction. C Life-Long Learning As part of a Nikon COOLPIX P5000 digital camera. This manual has been written to help you for your area. Additional information may ...result from the Nikon representative in Asia, Oceania, and the Middle East: http://www.nikon-asia.com/ Visit these sites to keep ...

P5000 User's Manual
Page 14
Parts of the Camera q wer ty u i o !0 Lens in storage position !1 !2 !3 !5 !6 !7 !8 !9 !4 1 Command dial....23, 29, 43, 48, 50, 52, 89 2 Power-on lamp 16 3 Power switch 12 4 Mode dial 6 5 Viewfinder ...18 6 Built-in flash 24 7 Accessory shoe cover 93 8 Accessory shoe (for optional flash unit 93 9 Shutter-release button 20-21 10 Eyelet for camera strap (×2 3 11 Zoom control 19 M (thumbnail playback 43 O (playback zoom 43 L (help 7 12 Cable connector 55, 58, 61 13 Connector cover 55, 58, 61...
Parts of the Camera q wer ty u i o !0 Lens in storage position !1 !2 !3 !5 !6 !7 !8 !9 !4 1 Command dial....23, 29, 43, 48, 50, 52, 89 2 Power-on lamp 16 3 Power switch 12 4 Mode dial 6 5 Viewfinder ...18 6 Built-in flash 24 7 Accessory shoe cover 93 8 Accessory shoe (for optional flash unit 93 9 Shutter-release button 20-21 10 Eyelet for camera strap (×2 3 11 Zoom control 19 M (thumbnail playback 43 O (playback zoom 43 L (help 7 12 Cable connector 55, 58, 61 13 Connector cover 55, 58, 61...

P5000 User's Manual
Page 15
... socket 14 Battery-chamber/memory card slot cover 10, 14 15 Memory card slot 14 16 Battery chamber 10 17 Battery latch 10 Attaching the Camera Strap Attach the strap as shown at right.
... socket 14 Battery-chamber/memory card slot cover 10, 14 15 Memory card slot 14 16 Battery chamber 10 17 Battery latch 10 Attaching the Camera Strap Attach the strap as shown at right.
P5000 User's Manual
Page 16
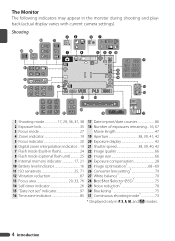
... remaining... 16, 67 3 Focus mode 27 Movie length 47 4 Zoom indicator 19 19 Aperture 38, 39, 41, 42 5 Focus indicator 20 20 Exposure display 42 6 Digital zoom interpolation indicator... 19 21 Shutter speed 38, 39, 40, 42 7 Flash mode (built-in flash 24 22 Image quality 66 8 Flash mode (optional flash... Noise reduction 78 30 Bracketing 75 31 Continuous shooting mode 73 * Displayed only in the monitor during shooting and playback (actual display varies with current camera settings).
... remaining... 16, 67 3 Focus mode 27 Movie length 47 4 Zoom indicator 19 19 Aperture 38, 39, 41, 42 5 Focus indicator 20 20 Exposure display 42 6 Digital zoom interpolation indicator... 19 21 Shutter speed 38, 39, 40, 42 7 Flash mode (built-in flash 24 22 Image quality 66 8 Flash mode (optional flash... Noise reduction 78 30 Bracketing 75 31 Continuous shooting mode 73 * Displayed only in the monitor during shooting and playback (actual display varies with current camera settings).
P5000 User's Manual
Page 18
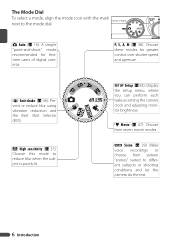
...and the Best Shot Selector (BSS). V Movie (B 47): Choose from sixteen "scenes" suited to different subjects or shooting conditions and let the camera do the rest. 6 Introduction T High sensitivity (B 37): Choose this mode to the mode dial. The Mode Dial To select a mode, ...when the subject is poorly lit. P, S, A, M (B 38): Choose these modes for firsttime users of digital cameras. R Setup (B 83): Display the setup menu, where you can perform such tasks as setting the camera clock and adjusting monitor brightness. S Scene (B 29): Make voice recordings or choose from seven movie modes....
...and the Best Shot Selector (BSS). V Movie (B 47): Choose from sixteen "scenes" suited to different subjects or shooting conditions and let the camera do the rest. 6 Introduction T High sensitivity (B 37): Choose this mode to the mode dial. The Mode Dial To select a mode, ...when the subject is poorly lit. P, S, A, M (B 38): Choose these modes for firsttime users of digital cameras. R Setup (B 83): Display the setup menu, where you can perform such tasks as setting the camera clock and adjusting monitor brightness. S Scene (B 29): Make voice recordings or choose from seven movie modes....

P5000 User's Manual
Page 19
...up Press left to return to previous menu, or move cursor left to T (L) again. Introduction 7 If a question mark ("8") is used to navigate the camera menus and to make selection Press down C Lost? To return to the original menu, press the zoom control to display H (self- timer) menu (B26... compensation) menu (B28) Press center (B) to make selection Press down to display E (focus mode) menu (B27) or move cursor down Navigating the Camera Menus (B 65) Press up to move cursor up Press left Press right to display submenu or move cursor right Press center (B) to display the flash...
...up Press left to return to previous menu, or move cursor left to T (L) again. Introduction 7 If a question mark ("8") is used to navigate the camera menus and to make selection Press down C Lost? To return to the original menu, press the zoom control to display H (self- timer) menu (B26... compensation) menu (B28) Press center (B) to make selection Press down to display E (focus mode) menu (B27) or move cursor down Navigating the Camera Menus (B 65) Press up to move cursor up Press left Press right to display submenu or move cursor right Press center (B) to display the flash...

P5000 User's Manual
Page 20
... the current picture. the vertical axis shows number of pixels of each brightness in the monitor, press the Q button. Pictures can only be taken when camera is a movie. • Exposure mode: P, S, A, or M (B 38). The Q Button To hide or display indicators in image. 8 Introduction Shooting data are not displayed if the current...
... the current picture. the vertical axis shows number of pixels of each brightness in the monitor, press the Q button. Pictures can only be taken when camera is a movie. • Exposure mode: P, S, A, or M (B 38). The Q Button To hide or display indicators in image. 8 Introduction Shooting data are not displayed if the current...

P5000 User's Manual
Page 21
First Steps Charging the Battery The camera uses a rechargeable EN-EL5 Li-ion battery (supplied). First Steps 9 cd 2 Insert the battery Remove the battery terminal cover and insert the battery as shown, ... charger or the battery is running low. 1 Plug the charger in about two hours. The CHARGE lamp will charge in Connect the power cable to a Nikon-authorized service representative for inspection.) A fully-exhausted battery will light (e). If the battery is complete when the CHARGE lamp stops blinking. Remove the battery and...
First Steps Charging the Battery The camera uses a rechargeable EN-EL5 Li-ion battery (supplied). First Steps 9 cd 2 Insert the battery Remove the battery terminal cover and insert the battery as shown, ... charger or the battery is running low. 1 Plug the charger in about two hours. The CHARGE lamp will charge in Connect the power cable to a Nikon-authorized service representative for inspection.) A fully-exhausted battery will light (e). If the battery is complete when the CHARGE lamp stops blinking. Remove the battery and...

P5000 User's Manual
Page 22
...Batteries Read and follow the warnings and cautions on pages ii-iii and 95 of AC adapter. do not, under any circumstances, attempt to the camera. 10 First Steps Do not, under any circumstances, use other types. The orange battery latch is pushed aside as described below. 1 Open ...orientation shown in damage to use another make or model of this precaution could damage the camera. Check to power the camera for extended periods (B 90). Failure to observe this manual. The camera can be used to be used with EN-EL5 batteries only; Inserting the Battery After charging...
...Batteries Read and follow the warnings and cautions on pages ii-iii and 95 of AC adapter. do not, under any circumstances, attempt to the camera. 10 First Steps Do not, under any circumstances, use other types. The orange battery latch is pushed aside as described below. 1 Open ...orientation shown in damage to use another make or model of this precaution could damage the camera. Check to power the camera for extended periods (B 90). Failure to observe this manual. The camera can be used to be used with EN-EL5 batteries only; Inserting the Battery After charging...

P5000 User's Manual
Page 23
Note that the battery may become hot during use; First Steps 11 The battery can then be removed by hand. Removing the Battery Turn the camera off before removing or inserting batteries. observe due caution when removing the battery. To eject the battery, open the batterychamber/memory card slot cover and slide the battery latch in the direction shown.
Note that the battery may become hot during use; First Steps 11 The battery can then be removed by hand. Removing the Battery Turn the camera off before removing or inserting batteries. observe due caution when removing the battery. To eject the battery, open the batterychamber/memory card slot cover and slide the battery latch in the direction shown.

P5000 User's Manual
Page 24
...set the time and date as described below (in the steps that follow, the multi selector controls used are highlighted in white). 1 2 Turn camera on in effect, press multi selector down to highlight Daylight saving and press B to select. Press and hold the G button to Step 5.... Press multi selector up to return to turn the camera on . 3 Highlight language. 4 Confirmation dialog displayed. 5 6 Highlight Yes. Time zone menu displayed.* Display map of world time zones. * If ...
...set the time and date as described below (in the steps that follow, the multi selector controls used are highlighted in white). 1 2 Turn camera on in effect, press multi selector down to highlight Daylight saving and press B to select. Press and hold the G button to Step 5.... Press multi selector up to return to turn the camera on . 3 Highlight language. 4 Confirmation dialog displayed. 5 6 Highlight Yes. Time zone menu displayed.* Display map of world time zones. * If ...


