User Manual
Page 2
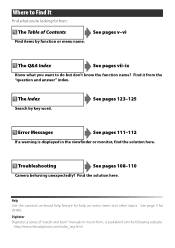
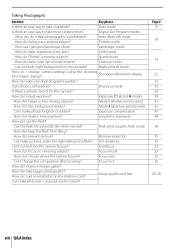
... a warning is displayed in movie form, is available from the "question and answer" index. Digitutor Digitutor, a series of Contents Find items by key word. Help Use the camera's on-board help on menu items and other topics. Find the solution here. Troubleshooting See pages 108-110... Camera behaving unexpectedly? The Index Search by function or menu name. See pages v-vi The Q&A Index See pages vii-ix Know what you want to Find ...
... a warning is displayed in movie form, is available from the "question and answer" index. Digitutor Digitutor, a series of Contents Find items by key word. Help Use the camera's on-board help on menu items and other topics. Find the solution here. Troubleshooting See pages 108-110... Camera behaving unexpectedly? The Index Search by function or menu name. See pages v-vi The Q&A Index See pages vii-ix Know what you want to Find ...
User Manual
Page 4
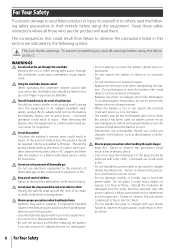
... or store the battery with metal objects such as discoloration or deformation. Before removing the battery turn the camera off and allow the battery to cool. • Discontinue use the product will read the following safety precautions in the battery, such as necklaces or hairpins. •...the precautions listed in injury. WARNINGS Do not look at the sun through the viewfinder could result in this section are using this Nikon product. Turn off before using this equipment. Should the product break open as this precaution could result in electric shock. • Do not damage...
... or store the battery with metal objects such as discoloration or deformation. Before removing the battery turn the camera off and allow the battery to cool. • Discontinue use the product will read the following safety precautions in the battery, such as necklaces or hairpins. •...the precautions listed in injury. WARNINGS Do not look at the sun through the viewfinder could result in this section are using this Nikon product. Turn off before using this equipment. Should the product break open as this precaution could result in electric shock. • Do not damage...

User Manual
Page 5
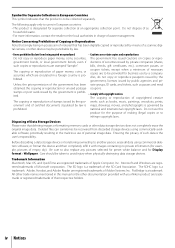
...receiver. These limits are not expressly ence to radio or television reception, which the receiver is connected. D40 ate radio frequency energy and, if not installed and used in a retrieval from that to which can radi- If this device that any damages resulting reproduced, ...observe this product. CAUTIONS ference to radio communications. approved by any sions to the attention of the Nikon representative in Canada CAUTION ATTENTION This class B digital apparatus meets all requirements of this precaution could cause hearing loss or damage the equipment. cause birth defects...
...receiver. These limits are not expressly ence to radio or television reception, which the receiver is connected. D40 ate radio frequency energy and, if not installed and used in a retrieval from that to which can radi- If this device that any damages resulting reproduced, ...observe this product. CAUTIONS ference to radio communications. approved by any sions to the attention of the Nikon representative in Canada CAUTION ATTENTION This class B digital apparatus meets all requirements of this precaution could cause hearing loss or damage the equipment. cause birth defects...
User Manual
Page 6
... The SD logo is governed by prohibited. Before discarding a data storage device or transferring ownership to be provided for business use by a company. government bonds, or local government bonds, even if ductions of securities issued by private companies (shares, such...Disposing of Data Storage Devices Please note that has been digitally copied or reproduced by means of a scanner, digital camera, or other documentation provided with your Nikon product are to another person, erase all data using commercially available software, potentially resulting in charge of waste ...
... The SD logo is governed by prohibited. Before discarding a data storage device or transferring ownership to be provided for business use by a company. government bonds, or local government bonds, even if ductions of securities issued by private companies (shares, such...Disposing of Data Storage Devices Please note that has been digitally copied or reproduced by means of a scanner, digital camera, or other documentation provided with your Nikon product are to another person, erase all data using commercially available software, potentially resulting in charge of waste ...

User Manual
Page 7
... vii Introduction 1 Getting to Know the Camera 2 First Steps 8 Attaching a Lens 8 Charging and Inserting the Battery 9 Basic Setup 11 Inserting Memory Cards 12 Adjusting Viewfinder Focus 14 Tutorial 15 "Point-and-Shoot" Photography ( Mode 15 Creative Photography (Digital Vari-Programs).........18 Basic Playback 20 Reference ...the USB Cable 55 Printing Photographs 57 Printing Via Direct USB Connection 57 Viewing Photographs on TV 62 Menu Guide 63 Using Camera Menus 63 Playback Options: The Playback Menu 65 Delete...65 Playback Folder 66 Rotate Tall 66 Slide Show 67 Print ...
... vii Introduction 1 Getting to Know the Camera 2 First Steps 8 Attaching a Lens 8 Charging and Inserting the Battery 9 Basic Setup 11 Inserting Memory Cards 12 Adjusting Viewfinder Focus 14 Tutorial 15 "Point-and-Shoot" Photography ( Mode 15 Creative Photography (Digital Vari-Programs).........18 Basic Playback 20 Reference ...the USB Cable 55 Printing Photographs 57 Printing Via Direct USB Connection 57 Viewing Photographs on TV 62 Menu Guide 63 Using Camera Menus 63 Playback Options: The Playback Menu 65 Delete...65 Playback Folder 66 Rotate Tall 66 Slide Show 67 Print ...

User Manual
Page 9
... the remote delay? Self timer How do I keep the camera from turning off? How much charge does the battery have left? What software is available for the D40 103 Servicing the camera x Cleaning the camera 104 Camera Setup Question Key phrase How do I use ? Key phrase Page # Using the menus 63-64 Help 3 Monitor, viewfinder 5-6, 81-82...
... the remote delay? Self timer How do I keep the camera from turning off? How much charge does the battery have left? What software is available for the D40 103 Servicing the camera x Cleaning the camera 104 Camera Setup Question Key phrase How do I use ? Key phrase Page # Using the menus 63-64 Help 3 Monitor, viewfinder 5-6, 81-82...
User Manual
Page 10
...33 33 39 41 42 47 44 34 35 37 23 23 25 26 29-30 viii Q&A Index Digital Vari-Program modes What do I do I take photos at a reduced size for this camera? Portrait mode How can I bring out a portrait subject? Night portrait mode How do I change the...to take more photos on a moving objects? Can I prevent red eye? settings using the shooting Shooting information display How do I take a lot of small objects? How do I get good landscape shots? How can I change camera information display? Can the flash fire automatically when needed? Auto (flash off ) mode...
...33 33 39 41 42 47 44 34 35 37 23 23 25 26 29-30 viii Q&A Index Digital Vari-Program modes What do I do I take photos at a reduced size for this camera? Portrait mode How can I bring out a portrait subject? Night portrait mode How do I change the...to take more photos on a moving objects? Can I prevent red eye? settings using the shooting Shooting information display How do I take a lot of small objects? How do I get good landscape shots? How can I change camera information display? Can the flash fire automatically when needed? Auto (flash off ) mode...
User Manual
Page 13
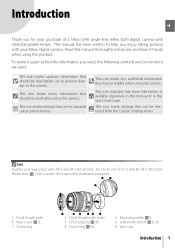
... 1 This manual has been written to help you enjoy taking pictures with your purchase of a Nikon D40 single-lens reflex (SLR) digital camera with AF-S and AF-I lenses only. This icon marks notes, information that may be read before using the camera. Lens Autofocus is supported with interchangeable lenses. This icon marks tips, additional information that should...
... 1 This manual has been written to help you enjoy taking pictures with your purchase of a Nikon D40 single-lens reflex (SLR) digital camera with AF-S and AF-I lenses only. This icon marks notes, information that may be read before using the camera. Lens Autofocus is supported with interchangeable lenses. This icon marks tips, additional information that should...

User Manual
Page 15
...cup 7 2 Viewfinder eyepiece 5, 14 3 Diopter adjustment control 14 4 (AE-L/AF-L) button 46, 77 (protect) button 54 5 Command dial 115 6 Eyelet for camera strap 7 7 Multi selector * 8 Memory card slot cover 12 9 (delete) button 20, 54 10 Memory card access lamp 12 11 Power connector cover for optional ... selector The multi selector is pressed; Help is displayed in the monitor by pressing the button. View previous photo Return to Know the Camera 3 Introduction: Getting to previous menu Cancel Press left View more photo info Move cursor up Press up or down Retouch photo ( 89...
...cup 7 2 Viewfinder eyepiece 5, 14 3 Diopter adjustment control 14 4 (AE-L/AF-L) button 46, 77 (protect) button 54 5 Command dial 115 6 Eyelet for camera strap 7 7 Multi selector * 8 Memory card slot cover 12 9 (delete) button 20, 54 10 Memory card access lamp 12 11 Power connector cover for optional ... selector The multi selector is pressed; Help is displayed in the monitor by pressing the button. View previous photo Return to Know the Camera 3 Introduction: Getting to previous menu Cancel Press left View more photo info Move cursor up Press up or down Retouch photo ( 89...
User Manual
Page 16
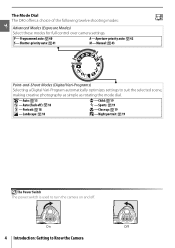
...used to suit the selected scene, making creative photography as simple as rotating the mode dial. -Auto: 15 - P-Programmed auto: 40 S-Shutter-priority auto: 41 A -Aperture-priority auto: 42 M-Manual: 43 Point-and-Shoot Modes (Digital Vari-Programs) Selecting a Digital Vari-Program automatically optimizes settings to turn the camera... on and off ): 18 -Portrait: 18 -Landscape: 18 - On Off 4 Introduction: Getting to Know the Camera The Mode Dial The D40 offers a ...
...used to suit the selected scene, making creative photography as simple as rotating the mode dial. -Auto: 15 - P-Programmed auto: 40 S-Shutter-priority auto: 41 A -Aperture-priority auto: 42 M-Manual: 43 Point-and-Shoot Modes (Digital Vari-Programs) Selecting a Digital Vari-Program automatically optimizes settings to turn the camera... on and off ): 18 -Portrait: 18 -Landscape: 18 - On Off 4 Introduction: Getting to Know the Camera The Mode Dial The D40 offers a ...
User Manual
Page 19
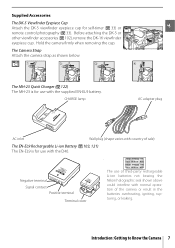
... when removing the cup. The Camera Strap Attach the camera strap as shown below. The MH-23 Quick Charger ( 122) The MH-23 is for use of third-party rechargeable Li-ion batteries not bearing the Nikon holographic seal shown above could interfere with the D40. . Supplied Accessories The DK-5 Viewfinder Eyepiece Cap Attach the...
... when removing the cup. The Camera Strap Attach the camera strap as shown below. The MH-23 Quick Charger ( 122) The MH-23 is for use of third-party rechargeable Li-ion batteries not bearing the Nikon holographic seal shown above could interfere with the D40. . Supplied Accessories The DK-5 Viewfinder Eyepiece Cap Attach the...

User Manual
Page 21
...Remove the battery from the battery. 1.2 Connect the power cord to fully charge. 1.4 Charging is complete when the CHARGE lamp stops blinking. Do not use the battery at ambient temperatures below . 1 Charge the battery. 1.1 Remove the terminal cover from the charger and unplug the charger. About 90 minutes ... capacity may drop if the battery is not charged at shipment. Charging and Inserting the Battery The supplied EN-EL9 battery is charged or used at lower temperatures. For best results, charge the battery at temperatures above 40°C (104°F). The CHARGE lamp will blink as ...
...Remove the battery from the battery. 1.2 Connect the power cord to fully charge. 1.4 Charging is complete when the CHARGE lamp stops blinking. Do not use the battery at ambient temperatures below . 1 Charge the battery. 1.1 Remove the terminal cover from the charger and unplug the charger. About 90 minutes ... capacity may drop if the battery is not charged at shipment. Charging and Inserting the Battery The supplied EN-EL9 battery is charged or used at lower temperatures. For best results, charge the battery at temperatures above 40°C (104°F). The CHARGE lamp will blink as ...
User Manual
Page 22
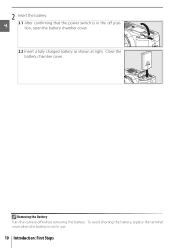
Close the battery chamber cover. Removing the Battery Turn the camera off position, open the battery chamber cover. 2.2 Insert a fully charged battery as shown at right. To avoid shorting the battery, replace the terminal cover when the battery is in use. 10 Introduction: First Steps 2 Insert the battery. 2.1 After confirming that the power switch is not in the off before removing the battery.
Close the battery chamber cover. Removing the Battery Turn the camera off position, open the battery chamber cover. 2.2 Insert a fully charged battery as shown at right. To avoid shorting the battery, replace the terminal cover when the battery is in use. 10 Introduction: First Steps 2 Insert the battery. 2.1 After confirming that the power switch is not in the off before removing the battery.
User Manual
Page 23
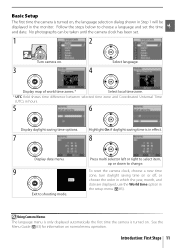
Press multi selector left or right to select item, up or down to change. Using Camera Menus The language menu is only displayed automatically the first time the camera is turned on . 3 Select language. 4 Display map of world time zones.* Select local time zone. * UTC field shows time difference between ... the Menu Guide ( 63) for information on or off, or choose the order in which the year, month, and date are displayed, use the World time option in the setup menu ( 83). Basic Setup The first time the camera is in effect. 8 Display date menu. 9 Exit to shooting mode.
Press multi selector left or right to select item, up or down to change. Using Camera Menus The language menu is only displayed automatically the first time the camera is turned on . 3 Select language. 4 Display map of world time zones.* Select local time zone. * UTC field shows time difference between ... the Menu Guide ( 63) for information on or off, or choose the order in which the year, month, and date are displayed, use the World time option in the setup menu ( 83). Basic Setup The first time the camera is in effect. 8 Display date menu. 9 Exit to shooting mode.

User Manual
Page 25
...left to highlight icon for current menu. 2.3 2.4 Highlight . 2.5 Position cursor in the "lock" position, the camera will display a message to another storage device before first use. Write-protect switch Introduction: First Steps 13 2 Memory cards must be formatted. Be sure all photographs and other ... Highlight Yes. When this switch is in setup menu. 2.6 Highlight Format memory card. 2.7 2.8 Display options. Formatting Memory Cards Use the camera Format memory card option to prevent accidental loss of data. The Write Protect Switch SD cards are formatted in the...
...left to highlight icon for current menu. 2.3 2.4 Highlight . 2.5 Position cursor in the "lock" position, the camera will display a message to another storage device before first use. Write-protect switch Introduction: First Steps 13 2 Memory cards must be formatted. Be sure all photographs and other ... Highlight Yes. When this switch is in setup menu. 2.6 Highlight Format memory card. 2.7 2.8 Display options. Formatting Memory Cards Use the camera Format memory card option to prevent accidental loss of data. The Write Protect Switch SD cards are formatted in the...

User Manual
Page 26
Before shooting, make sure that the display in the viewfinder is in clear focus. 1 Remove the lens cap and turn the camera on. 2 Slide the diopter adjustment control up and down until the focus brackets are in your eye. When operating the diopter adjustment control ...with your fingers or fingernails in sharp focus. Press the shutter-release button halfway to put your eye to the viewfinder, be adjusted using Custom Setting 15 (Auto off timers; 78). 14 Introduction: First Steps Focus brackets Auto Meter Off At default settings, the viewfinder and shooting ...
Before shooting, make sure that the display in the viewfinder is in clear focus. 1 Remove the lens cap and turn the camera on. 2 Slide the diopter adjustment control up and down until the focus brackets are in your eye. When operating the diopter adjustment control ...with your fingers or fingernails in sharp focus. Press the shutter-release button halfway to put your eye to the viewfinder, be adjusted using Custom Setting 15 (Auto off timers; 78). 14 Introduction: First Steps Focus brackets Auto Meter Off At default settings, the viewfinder and shooting ...
User Manual
Page 28
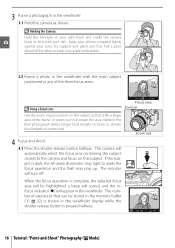
...the subject closest to zoom out). When the focus operation is complete, the selected focus area will appear in , shorter focal lengths to the camera and focus on the subject so that can be highlighted, a beep will sound, and the infocus indicator (z) will be stored in the ... lightly against your left. Zoom out 4 Focus and shoot. 4.1 Press the shutter-release button halfway. The camera will turn off. Using a Zoom Lens Focus area Zoom in the viewfinder. 3.1 Hold the camera as shown. The number of exposures that it fills a larger area of the three focus areas. 3 Frame...
...the subject closest to zoom out). When the focus operation is complete, the selected focus area will appear in , shorter focal lengths to the camera and focus on the subject so that can be highlighted, a beep will sound, and the infocus indicator (z) will be stored in the ... lightly against your left. Zoom out 4 Focus and shoot. 4.1 Press the shutter-release button halfway. The camera will turn off. Using a Zoom Lens Focus area Zoom in the viewfinder. 3.1 Hold the camera as shown. The number of exposures that it fills a larger area of the three focus areas. 3 Frame...
User Manual
Page 29
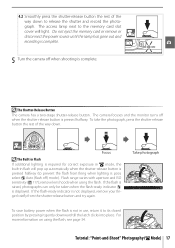
...the photograph. The Shutter-Release Button The camera has a two-stage shutter-release button. If the flash-ready indicator is not displayed, remove your finger briefly from firing when lighting is required for correct exposure in mode, the built-in use, return it gently downward till the latch... clicks into place. The camera focuses and the monitor turns off when the shutter-release button is displayed. Flash range varies with aperture...
...the photograph. The Shutter-Release Button The camera has a two-stage shutter-release button. If the flash-ready indicator is not displayed, remove your finger briefly from firing when lighting is required for correct exposure in mode, the built-in use, return it gently downward till the latch... clicks into place. The camera focuses and the monitor turns off when the shutter-release button is displayed. Flash range varies with aperture...
User Manual
Page 30
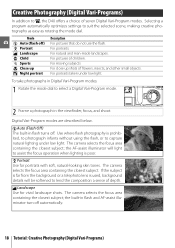
... light. The camera selects the focus area containing the closest subject; Creative Photography (Digital Vari-Programs) In addition to lend the composition a sense of depth. Digital Vari-Program modes are described below. the AF-assist illuminator will be softened to , the D40 offers a choice of children. Portrait Use for vivid landscape shots. Landscape Use for portraits...
... light. The camera selects the focus area containing the closest subject; Creative Photography (Digital Vari-Programs) In addition to lend the composition a sense of depth. Digital Vari-Program modes are described below. the AF-assist illuminator will be softened to , the D40 offers a choice of children. Portrait Use for vivid landscape shots. Landscape Use for portraits...

User Manual
Page 31
...given a soft, natural finish. The camera focuses continuously while the shutter-release button is pressed halfway. The built-in Flash" for information on the subject in portraits taken under low light. Tutorial: Creative Photography (Digital Vari-Programs) 19 Child Use for snapshots of a tripod is ...recommended to prevent blur. Close Up Use for close-up shots of a tripod is recommended to prevent blur. The Built-in...
...given a soft, natural finish. The camera focuses continuously while the shutter-release button is pressed halfway. The built-in Flash" for information on the subject in portraits taken under low light. Tutorial: Creative Photography (Digital Vari-Programs) 19 Child Use for snapshots of a tripod is ...recommended to prevent blur. Close Up Use for close-up shots of a tripod is recommended to prevent blur. The Built-in...


