
User Manual
Page 4
... product regulations. Use appropriate cables When connecting cables to the input and output jacks, use only the cables provided or sold by Nikon for an extended period, the batteries may become hot. Observe caution when operating the flash Using the flash close to your subject's...camera. Playing CD-ROMs on audio CD equipment. Notices/For Your Safety • Do not expose batteries to flame or to excessive heat. • Do not immerse in or expose to water. • Do not transport or store with metal objects such as discoloration or deformation. Removing memory cards Memory cards...
... product regulations. Use appropriate cables When connecting cables to the input and output jacks, use only the cables provided or sold by Nikon for an extended period, the batteries may become hot. Observe caution when operating the flash Using the flash close to your subject's...camera. Playing CD-ROMs on audio CD equipment. Notices/For Your Safety • Do not expose batteries to flame or to excessive heat. • Do not immerse in or expose to water. • Do not transport or store with metal objects such as discoloration or deformation. Removing memory cards Memory cards...
User Manual
Page 5
... the batteries while the product is connected. Handle the lens and all moving parts with the monitor, damage data stored on the memory card, or affect the product's internal circuitry. Do not drop The product may cause deterioration in the CCD image sensor, producing a ...transmitters could result in temperature. Notices/For Your Safety Cautions To ensure continued enjoyment of your Nikon product, observe the following precautions when storing or using or storing the camera. Keep away from one place to damage. iii Avoid sudden changes in temperature Sudden changes in...
... the batteries while the product is connected. Handle the lens and all moving parts with the monitor, damage data stored on the memory card, or affect the product's internal circuitry. Do not drop The product may cause deterioration in the CCD image sensor, producing a ...transmitters could result in temperature. Notices/For Your Safety Cautions To ensure continued enjoyment of your Nikon product, observe the following precautions when storing or using or storing the camera. Keep away from one place to damage. iii Avoid sudden changes in temperature Sudden changes in...
User Manual
Page 9
...up Mode 27 Assist and Scene Modes 28 Framing Assist 30 e Scene Mode 35 More on Playback 42 Viewing Pictures on the Camera 42 Cropping Pictures 44 Adjusting a picture tone automatically 45 Voice Memos: Recording and Playback (E5600 only 47 Viewing Pictures on TV... Safety i Cautions ...iii Notices ...iv Before You Begin 1 Introduction 1 Parts of the Camera 2 The Monitor 4 The Mode Dial 6 Navigating the Menus 7 The Shutter-Release Button 7 First Steps 8 Inserting Batteries 8 Inserting Memory Cards 10 Checking the Battery Level 12 Basic Setup 14 Basic Photography 16 Step 1 -
...up Mode 27 Assist and Scene Modes 28 Framing Assist 30 e Scene Mode 35 More on Playback 42 Viewing Pictures on the Camera 42 Cropping Pictures 44 Adjusting a picture tone automatically 45 Voice Memos: Recording and Playback (E5600 only 47 Viewing Pictures on TV... Safety i Cautions ...iii Notices ...iv Before You Begin 1 Introduction 1 Parts of the Camera 2 The Monitor 4 The Mode Dial 6 Navigating the Menus 7 The Shutter-Release Button 7 First Steps 8 Inserting Batteries 8 Inserting Memory Cards 10 Checking the Battery Level 12 Basic Setup 14 Basic Photography 16 Step 1 -
User Manual
Page 10
... Set-up Menu 87 Welcome Screen 89 Date ...90 Monitor Settings 92 Date Imprint 93 Sound Settings 94 Blur Warning 95 Auto Off...96 Format memory/card 97 Language ...99 Interface...99 Auto Transfer 100 Reset All ...100 Battery Type 102 Menus...103 Firmware Version 104 Technical Notes 105 Optional Accessories 105...
... Set-up Menu 87 Welcome Screen 89 Date ...90 Monitor Settings 92 Date Imprint 93 Sound Settings 94 Blur Warning 95 Auto Off...96 Format memory/card 97 Language ...99 Interface...99 Auto Transfer 100 Reset All ...100 Battery Type 102 Menus...103 Firmware Version 104 Technical Notes 105 Optional Accessories 105...

User Manual
Page 11
...from the actual display. This icon indicates that you should read before using the product. Internal Memory and SD Memory Card This camera uses both an internal memory and an SD memory card for contact information: http://nikonimaging.com/ 1 Additional information may find the information you need, ...questions (FAQs), and general advice on the card instead of in the Quick Start Guide. Life-Long Learning As part of a Nikon COOLPIX5600 (E5600)/COOLPIX4600 (E4600) digital camera. To make it handy when using your purchase of Nikon's "Life-Long Learning" commitment to find...
...from the actual display. This icon indicates that you should read before using the product. Internal Memory and SD Memory Card This camera uses both an internal memory and an SD memory card for contact information: http://nikonimaging.com/ 1 Additional information may find the information you need, ...questions (FAQs), and general advice on the card instead of in the Quick Start Guide. Life-Long Learning As part of a Nikon COOLPIX5600 (E5600)/COOLPIX4600 (E4600) digital camera. To make it handy when using your purchase of Nikon's "Life-Long Learning" commitment to find...

User Manual
Page 12
Before You Begin Parts of the Camera Power switch Power-on lamp (Q 12) (Q 12) Shutter-release button (Q 7) Microphone (E5600 only) (Q 47) Built-in Speedlight (Q 24) Viewfinder (Q 18) Self-timer lamp (Q 26) Eyelet for camera strap Memory card slot cover (Q 10) Lens (Q 18) Power connector cover for AC adapter Attaching the Camera Strap 2
Before You Begin Parts of the Camera Power switch Power-on lamp (Q 12) (Q 12) Shutter-release button (Q 7) Microphone (E5600 only) (Q 47) Built-in Speedlight (Q 24) Viewfinder (Q 18) Self-timer lamp (Q 26) Eyelet for camera strap Memory card slot cover (Q 10) Lens (Q 18) Power connector cover for AC adapter Attaching the Camera Strap 2

User Manual
Page 14
... 10 10 11 AUTO 999 13 12 1 Shooting mode 16 2 AE-L1 40 3 Focus indicator2 20 4 Zoom indicator2 18 5 Battery level indicator3 12 6 Internal memory/memory card indicator 16 7 Camera shake icon4 25 8 "Date not set" icon5 14 9 Time zone 91 10 Self-timer indicator 26 11 Date imprint indicator 93 1 Appears when taking... shooting mode . . . . . 72 18 Best Shot Selector (BSS 73 19 White balance 69 20 Color options 74 21 Macro close-up mode 27 5 Appears when camera clock has not been set. 6 Indicates that...
... 10 10 11 AUTO 999 13 12 1 Shooting mode 16 2 AE-L1 40 3 Focus indicator2 20 4 Zoom indicator2 18 5 Battery level indicator3 12 6 Internal memory/memory card indicator 16 7 Camera shake icon4 25 8 "Date not set" icon5 14 9 Time zone 91 10 Self-timer indicator 26 11 Date imprint indicator 93 1 Appears when taking... shooting mode . . . . . 72 18 Best Shot Selector (BSS 73 19 White balance 69 20 Color options 74 21 Macro close-up mode 27 5 Appears when camera clock has not been set. 6 Indicates that...

User Manual
Page 15
....01 16 12:00 100NIKON 1 0008.JPG 2 3 15 12 14 13 5M 11 10 4 5 6 7 8 10 8 START 9 1 Current folder 23 2 File number and type 23 3 Internal memory/memory card indicator 16 4 Battery level indicator1 12 5 Volume indicator2 64 6 Voice memo recording guide2 . . .47 7 Voice memo playback guide2 . . . 47 8 Current frame number/total number of...
....01 16 12:00 100NIKON 1 0008.JPG 2 3 15 12 14 13 5M 11 10 4 5 6 7 8 10 8 START 9 1 Current folder 23 2 File number and type 23 3 Internal memory/memory card indicator 16 4 Battery level indicator1 12 5 Volume indicator2 64 6 Voice memo recording guide2 . . .47 7 Voice memo playback guide2 . . . 47 8 Current frame number/total number of...
User Manual
Page 20
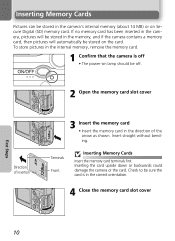
... Digital (SD) memory card. To store pictures in the internal memory, remove the memory card. 1 Confirm that the camera is in the direction of the arrow as shown. Terminals Front Inserting Memory Cards Insert the memory card terminals first. Check to be stored on the card. If no memory card has been inserted in the camera, pictures will be stored in the memory, and if the camera...
... Digital (SD) memory card. To store pictures in the internal memory, remove the memory card. 1 Confirm that the camera is in the direction of the arrow as shown. Terminals Front Inserting Memory Cards Insert the memory card terminals first. Check to be stored on the card. If no memory card has been inserted in the camera, pictures will be stored in the memory, and if the camera...
User Manual
Page 21
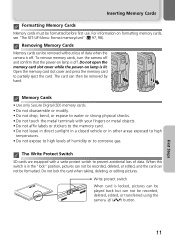
... hand. Removing Memory Cards Memory cards can then be removed without loss of data when the camera is off . Do not lock the card when taking, deleting, or editing pictures. To remove memory cards, turn the camera off and confirm that the power-on formatting memory cards, see "The SET-UP Menu: Format memory/card" (Q 97, 98). Memory Cards • Use only Secure Digital (SD) memory cards. •...
... hand. Removing Memory Cards Memory cards can then be removed without loss of data when the camera is off . Do not lock the card when taking, deleting, or editing pictures. To remove memory cards, turn the camera off and confirm that the power-on formatting memory cards, see "The SET-UP Menu: Format memory/card" (Q 97, 98). Memory Cards • Use only Secure Digital (SD) memory cards. •...

User Manual
Page 26
...most situations. 1 Rotate the mode dial to P 2 Turn the camera on • The power-on lighting and your creative intent (Q 24). When the camera contains a memory card, / is displayed, and when there is no card in P (auto) mode. Memory/memory card Shooting mode/scene mode P indicates auto mode. Basic Photography Step ...when the monitor shows the view through the camera lens. The default setting is ready to use the picture (Q 67). The camera is !# (auto). 16 5M AUTO 10 Number of exposures remaining The number of the memory or memory card and the option chosen for Image mode ...
...most situations. 1 Rotate the mode dial to P 2 Turn the camera on • The power-on lighting and your creative intent (Q 24). When the camera contains a memory card, / is displayed, and when there is no card in P (auto) mode. Memory/memory card Shooting mode/scene mode P indicates auto mode. Basic Photography Step ...when the monitor shows the view through the camera lens. The default setting is ready to use the picture (Q 67). The camera is !# (auto). 16 5M AUTO 10 Number of exposures remaining The number of the memory or memory card and the option chosen for Image mode ...

User Manual
Page 27
... Select P Mode Number of Exposures Remaining If the number of exposures remaining is zero, the message "OUT OF MEMORY" will be taken until you: • choose a lower Image mode setting (Q 67) • insert a new memory card (Q 10) • delete some pictures (Q 22-23, 78-79) Shooting Menu Pressing ^ button in the monitor. Step...
... Select P Mode Number of Exposures Remaining If the number of exposures remaining is zero, the message "OUT OF MEMORY" will be taken until you: • choose a lower Image mode setting (Q 67) • insert a new memory card (Q 10) • delete some pictures (Q 22-23, 78-79) Shooting Menu Pressing ^ button in the monitor. Step...
User Manual
Page 31
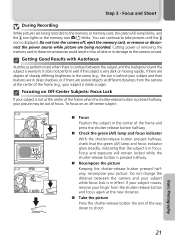
... until the < icon is contrast between the camera and your picture. Basic Photography 21 q Take the picture Press the shutter-release button the rest of the frame and press the shutter-release button halfway. Cutting power or removing the memory card in these circumstances could result in loss of ... memory card, the green (AF) lamp blinks, and the < icon lights or the memory icon }// blinks. It does not perform well if the subject is very dark or moving rapidly, if there are objects of focus. If your subject moves, remove your finger from the camera at the new distance. ...
... until the < icon is contrast between the camera and your picture. Basic Photography 21 q Take the picture Press the shutter-release button the rest of the frame and press the shutter-release button halfway. Cutting power or removing the memory card in these circumstances could result in loss of ... memory card, the green (AF) lamp blinks, and the < icon lights or the memory icon }// blinks. It does not perform well if the subject is very dark or moving rapidly, if there are objects of focus. If your subject moves, remove your finger from the camera at the new distance. ...

User Manual
Page 33
...is visible when the picture is displayed takes you take you can be created by "NIKON" (e.g., "100NIKON"). Folders can hold up or left when the first picture in folders created automatically by the camera and named with the D-Lighting function FSCN .JPG 45 Voice memo appended to 200 ...Copy created with a three-digit folder number followed by adding one to delete the last picture taken. No Yes :Set Playback Tip The first and last pictures in the top right corner of files reaches 200 or file numbering reaches 9999 when the memory or memory card contains a folder numbered 999...
...is visible when the picture is displayed takes you take you can be created by "NIKON" (e.g., "100NIKON"). Folders can hold up or left when the first picture in folders created automatically by the camera and named with the D-Lighting function FSCN .JPG 45 Voice memo appended to 200 ...Copy created with a three-digit folder number followed by adding one to delete the last picture taken. No Yes :Set Playback Tip The first and last pictures in the top right corner of files reaches 200 or file numbering reaches 9999 when the memory or memory card contains a folder numbered 999...

User Manual
Page 47
...set to capture vivid colors in close -up shots of flowers, insects, and other modes can be selected. œ Camera focuses continuously, even when shutter-release button is not pressed halfway. mum focus distance varies with the background artistically blurred. ... at infinity. œœ Pictures taken at slow shutter speeds are processed to improve quality, slightly increasing time before pictures are saved to memory or memory card. ! $ Y OFF* & OFF FNIGHT LANDSCAPE A slow shutter speed is used to produce stunning night landscapes. other small objects, with ...
...set to capture vivid colors in close -up shots of flowers, insects, and other modes can be selected. œ Camera focuses continuously, even when shutter-release button is not pressed halfway. mum focus distance varies with the background artistically blurred. ... at infinity. œœ Pictures taken at slow shutter speeds are processed to improve quality, slightly increasing time before pictures are saved to memory or memory card. ! $ Y OFF* & OFF FNIGHT LANDSCAPE A slow shutter speed is used to produce stunning night landscapes. other small objects, with ...
User Manual
Page 52
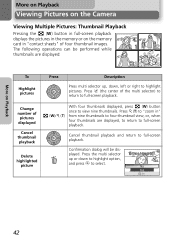
... the multi selector Erase 1 image (s)? More on Playback More on Playback Viewing Pictures on the Camera Viewing Multiple Pictures: Thumbnail Playback Pressing the l (W) button in full-screen playback displays the pictures in the memory or on the memory card in " from nine thumbnails to four-thumbnail view, or, when four thumbnails are displayed: To...
... the multi selector Erase 1 image (s)? More on Playback More on Playback Viewing Pictures on the Camera Viewing Multiple Pictures: Thumbnail Playback Pressing the l (W) button in full-screen playback displays the pictures in the memory or on the memory card in " from nine thumbnails to four-thumbnail view, or, when four thumbnails are displayed: To...

User Manual
Page 54
... on the memory card with the same recording date and time as the original. • Resized copies and cropped copies can not be cropped. • If a cropped copy created using the E5600/E4600 is displayed. Viewing Pictures on the Camera Cropping Pictures This option lets you crop part of a picture and ...save it as a separate file. 1 1.2 2 4.0 More on a different digital camera, the picture may not be displayed or may not be 2,592 × 1,944 (E5600 only) 2,288 × 1,712, 2,048 × 1,536 , 1,600 × 1,200, 1,...
... on the memory card with the same recording date and time as the original. • Resized copies and cropped copies can not be cropped. • If a cropped copy created using the E5600/E4600 is displayed. Viewing Pictures on the Camera Cropping Pictures This option lets you crop part of a picture and ...save it as a separate file. 1 1.2 2 4.0 More on a different digital camera, the picture may not be displayed or may not be 2,592 × 1,944 (E5600 only) 2,288 × 1,712, 2,048 × 1,536 , 1,600 × 1,200, 1,...

User Manual
Page 55
Using D-Lighting, backlit or insufficient flash light volumes can not be tone adjusted with non-E5600/E4600 digital cameras. 45 Please see the D-Lighting samples on a different digital camera, the picture may not be displayed or may not be transferred to a computer. • D-Lighting ...Camera Adjusting a picture tone automatically Press I (the center of the multi selector) in full-screen playback. JPG Save this image as a separate picture. The tone adjusted picture is created automatically as displayed? 5M 11 Select picture in full-screen playback. ory or on the memory card...
Using D-Lighting, backlit or insufficient flash light volumes can not be tone adjusted with non-E5600/E4600 digital cameras. 45 Please see the D-Lighting samples on a different digital camera, the picture may not be displayed or may not be transferred to a computer. • D-Lighting ...Camera Adjusting a picture tone automatically Press I (the center of the multi selector) in full-screen playback. JPG Save this image as a separate picture. The tone adjusted picture is created automatically as displayed? 5M 11 Select picture in full-screen playback. ory or on the memory card...

User Manual
Page 59
...mode :Set USB PTP Mass storage :Set Pictures transferred using: Operating system Camera I (V) button can not be copied from the camera memory and Mass storage is selected for the USB option • When the memory card write-protect switch is Mass storage. Use the PictureProject button. • ...When transferring pictures from the camera to the computer by sliding the switch to your computer, see the Quick Start ...
...mode :Set USB PTP Mass storage :Set Pictures transferred using: Operating system Camera I (V) button can not be copied from the camera memory and Mass storage is selected for the USB option • When the memory card write-protect switch is Mass storage. Use the PictureProject button. • ...When transferring pictures from the camera to the computer by sliding the switch to your computer, see the Quick Start ...

User Manual
Page 62
...Pictures Pictures stored in the memory or on the memory card can be printed in the same way as follows. • By printer or at a photo lab Pictures can be printed by inserting a memory card containing pictures into a printer or having prints made at a digital photo lab. Copy the ...pictures before creating a print order. • By a printer that supports PictBridge (Q 56) Connect the camera to a printer that supports PictBridge to a PC and...
...Pictures Pictures stored in the memory or on the memory card can be printed in the same way as follows. • By printer or at a photo lab Pictures can be printed by inserting a memory card containing pictures into a printer or having prints made at a digital photo lab. Copy the ...pictures before creating a print order. • By a printer that supports PictBridge (Q 56) Connect the camera to a printer that supports PictBridge to a PC and...

