

L10 / L11 User's Manual
Page 11
... taking pictures with brackets ([ ]). This icon marks tips, addi- Screen Samples In this manual are indicated with your purchase of buttons or messages displayed in the camera's internal memory or on the memory card and delete, playback, and format operations will read before use the product will apply only to as the "default setting." • The names of menu items displayed in the camera monitor, and the names of a Nikon COOLPIX L11/COOLPIX L10 digital camera. era. The memory card must be removed...
... taking pictures with brackets ([ ]). This icon marks tips, addi- Screen Samples In this manual are indicated with your purchase of buttons or messages displayed in the camera's internal memory or on the memory card and delete, playback, and format operations will read before use the product will apply only to as the "default setting." • The names of menu items displayed in the camera monitor, and the names of a Nikon COOLPIX L11/COOLPIX L10 digital camera. era. The memory card must be removed...
L10 / L11 User's Manual
Page 24
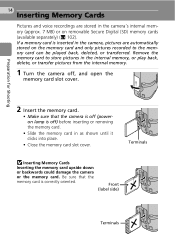
...) Terminals Remove the memory card to the memory card can be played back, deleted, or transferred. Terminals j Inserting Memory Cards Inserting the memory card upside down or backwards could damage the camera or the memory card. Preparation for Shooting 14 Inserting Memory Cards Pictures and voice recordings are stored in the camera's internal memory (approx. 7 MB) or on the memory card and only pictures recorded to store pictures in the internal memory, or play back, delete, or transfer pictures from the internal memory. 1 Turn the camera off ) before...
...) Terminals Remove the memory card to the memory card can be played back, deleted, or transferred. Terminals j Inserting Memory Cards Inserting the memory card upside down or backwards could damage the camera or the memory card. Preparation for Shooting 14 Inserting Memory Cards Pictures and voice recordings are stored in the camera's internal memory (approx. 7 MB) or on the memory card and only pictures recorded to store pictures in the internal memory, or play back, delete, or transfer pictures from the internal memory. 1 Turn the camera off ) before...
L10 / L11 User's Manual
Page 25
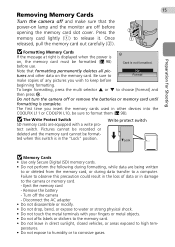
... 2 memory card lightly (1) to a computer. Card is on lamp and the monitor are off before beginning formatting. j Memory Cards • Use only Secure Digital (SD) memory cards. • Do not perform the following during data transfer to release it. Preparation for Shooting 15 Removing Memory Cards Turn the camera off and make copies of data or in damage to the camera or memory card. - j The Write Protect Switch Write protect switch SD memory cards are being written to or deleted from the memory card, or during formatting...
... 2 memory card lightly (1) to a computer. Card is on lamp and the monitor are off before beginning formatting. j Memory Cards • Use only Secure Digital (SD) memory cards. • Do not perform the following during data transfer to release it. Preparation for Shooting 15 Removing Memory Cards Turn the camera off and make copies of data or in damage to the camera or memory card. - j The Write Protect Switch Write protect switch SD memory cards are being written to or deleted from the memory card, or during formatting...
L10 / L11 User's Manual
Page 27
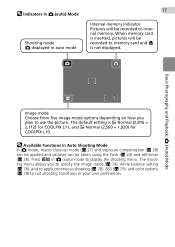
... continuous shooting (c 78), BSS (c 79), and color options (c 79) to use the picture. Press m in Auto Shooting Mode In L mode, macro close-up mode (c 27) and exposure compensation (c 28) can be applied and pictures can be recorded to display the shooting menu. When memory card is inserted, pictures will be taken using the flash (c 24) and self-timer (c 26). The shooting menu allows you plan to suit shooting conditions or your own preferences. l Available Functions in L (auto) mode to internal memory. The default setting...
... continuous shooting (c 78), BSS (c 79), and color options (c 79) to use the picture. Press m in Auto Shooting Mode In L mode, macro close-up mode (c 27) and exposure compensation (c 28) can be applied and pictures can be recorded to display the shooting menu. When memory card is inserted, pictures will be taken using the flash (c 24) and self-timer (c 26). The shooting menu allows you plan to suit shooting conditions or your own preferences. l Available Functions in L (auto) mode to internal memory. The default setting...
L10 / L11 User's Manual
Page 33
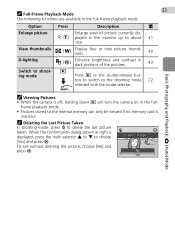
... and Playback: L (Auto) Mode k Viewing Pictures • When the camera is inserted. No Yes frame playback mode. • Pictures stored to shoot- Option Press Description c Enlarge picture Enlarge view of the pictures. 43 Switch to the internal memory can only be viewed if no memory card is off, holding down i will turn the camera on in the monitor up to the shooting mode 22 selected with the mode selector. k (v) played in the full- View thumbnails j (t) Display four...
... and Playback: L (Auto) Mode k Viewing Pictures • When the camera is inserted. No Yes frame playback mode. • Pictures stored to shoot- Option Press Description c Enlarge picture Enlarge view of the pictures. 43 Switch to the internal memory can only be viewed if no memory card is off, holding down i will turn the camera on in the monitor up to the shooting mode 22 selected with the mode selector. k (v) played in the full- View thumbnails j (t) Display four...

L10 / L11 User's Manual
Page 35
..., increasing recording time. Note the fol- Picture is equipped with an advanced red-eye reduction system. k Red-eye Reduction The COOLPIX L11/COOLPIX L10 is blurred. Pre-flashes are fired several times at right is displayed after a picture is taken, Nikon's own In-Camera Red-Eye Fix processes the image as bright spots in on a flat, level surface or use a tri- Red-eye reduction may process pictures to minimize blur caused by slow shutter speeds. L lowing...
..., increasing recording time. Note the fol- Picture is equipped with an advanced red-eye reduction system. k Red-eye Reduction The COOLPIX L11/COOLPIX L10 is blurred. Pre-flashes are fired several times at right is displayed after a picture is taken, Nikon's own In-Camera Red-Eye Fix processes the image as bright spots in on a flat, level surface or use a tri- Red-eye reduction may process pictures to minimize blur caused by slow shutter speeds. L lowing...
L10 / L11 User's Manual
Page 50
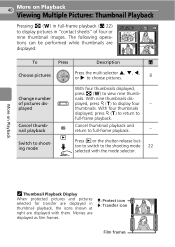
... choose pictures. 8 Change number of four or nine thumbnail images. i Switch to shooting mode Press i or the shutter-release button to switch to full-frame playback. nails. thumbnails. More on Playback Viewing Multiple Pictures: Thumbnail Playback Pressing j (t) in full-frame playback (c 22) 15/05/2007 1 to display pictures in thumbnail playback, the icons shown at right are displayed with the mode selector. 40 More on Playback k Thumbnail Playback Display When protected pictures and pictures selected for transfer are displayed in "contact...
... choose pictures. 8 Change number of four or nine thumbnail images. i Switch to shooting mode Press i or the shutter-release button to switch to full-frame playback. nails. thumbnails. More on Playback Viewing Multiple Pictures: Thumbnail Playback Pressing j (t) in full-frame playback (c 22) 15/05/2007 1 to display pictures in thumbnail playback, the icons shown at right are displayed with the mode selector. 40 More on Playback k Thumbnail Playback Display When protected pictures and pictures selected for transfer are displayed in "contact...

L10 / L11 User's Manual
Page 52
... make or model of digital camera. • It may not be possible to view copies created with your camera on the memory card. l Original Pictures and Edited Pictures • Copies created with editing functions are not deleted if the original pictures are stored with editing functions are deleted. • Edited copies are deleted. The original pictures are not deleted if copies created with the same recording date and time as the original. • Copies created using crop, D-Lighting...
... make or model of digital camera. • It may not be possible to view copies created with your camera on the memory card. l Original Pictures and Edited Pictures • Copies created with editing functions are not deleted if the original pictures are stored with editing functions are deleted. • Edited copies are deleted. The original pictures are not deleted if copies created with the same recording date and time as the original. • Copies created using crop, D-Lighting...
L10 / L11 User's Manual
Page 58
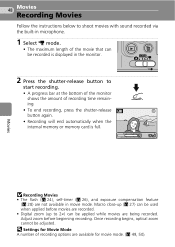
... recorded is displayed in movie mode. Movies 48 Movies Recording Movies Follow the instructions below to shoot movies with sound recorded via the built-in microphone. 1 Select T mode. • The maximum length of recording time remaining. • To end recording, press the shutter-release F button again. • Recording will end automatically when the internal memory or memory card is full. 17s j Recording Movies • The flash (c 24), self-timer (c 26), and exposure compensation feature (c 28) are available for movie mode. (c 49, 50). Macro...
... recorded is displayed in movie mode. Movies 48 Movies Recording Movies Follow the instructions below to shoot movies with sound recorded via the built-in microphone. 1 Select T mode. • The maximum length of recording time remaining. • To end recording, press the shutter-release F button again. • Recording will end automatically when the internal memory or memory card is full. 17s j Recording Movies • The flash (c 24), self-timer (c 26), and exposure compensation feature (c 28) are available for movie mode. (c 49, 50). Macro...
L10 / L11 User's Manual
Page 62
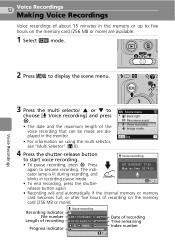
SCN Scene menu L Back light Panorama assist Voice recording Image mode MENU Exit ? 4 Press the shutter-release button Voice recording to resume recording. Max. Recording indicator File number Length of recording Progress indicator Voice recording 001 15/05/2007 17:30 00:00:04/00:14:16 Index: 0 1 Date of recording Time remaining Index number S release button again. • Recording will end automatically if the internal memory or memory card becomes full, or after five hours of recording on the memory card (256...
SCN Scene menu L Back light Panorama assist Voice recording Image mode MENU Exit ? 4 Press the shutter-release button Voice recording to resume recording. Max. Recording indicator File number Length of recording Progress indicator Voice recording 001 15/05/2007 17:30 00:00:04/00:14:16 Index: 0 1 Date of recording Time remaining Index number S release button again. • Recording will end automatically if the internal memory or memory card becomes full, or after five hours of recording on the memory card (256...

L10 / L11 User's Manual
Page 83
... Use the "best shot selector" to the light source. d Color Options* c 79 Apply color effects to pictures as they are available in a sequence. Shooting, Playback, and Setup Menus 73 Shooting Options: The Shooting Menu Shooting, Playback, and Setup Menus The following options are recorded. * See the information on restrictions that may apply to [White balance], [Continuous], [BSS], and [Color Options] settings (c 80). Displaying the Shooting Menu Set the mode selector to L (auto) and press m to display the shooting menu. Z Set up Image mode White balance G Continuous...
... Use the "best shot selector" to the light source. d Color Options* c 79 Apply color effects to pictures as they are available in a sequence. Shooting, Playback, and Setup Menus 73 Shooting Options: The Shooting Menu Shooting, Playback, and Setup Menus The following options are recorded. * See the information on restrictions that may apply to [White balance], [Continuous], [BSS], and [Color Options] settings (c 80). Displaying the Shooting Menu Set the mode selector to L (auto) and press m to display the shooting menu. Z Set up Image mode White balance G Continuous...
L10 / L11 User's Manual
Page 86
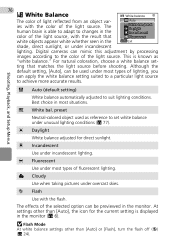
... the light source before shooting. At settings other than [Auto], the icon for direct sunlight. ting that G Auto White bal. Although the default setting, [Auto], can mimic this adjustment by processing images according to suit lighting conditions. j Cloudy Use when taking pictures under incandescent lighting. l Flash Use with the color of the light source. 76 d White Balance White balance The color of light reflected from an object varies with the flash. Digital cameras can be previewed in the MENU Exit shade, direct sunlight...
... the light source before shooting. At settings other than [Auto], the icon for direct sunlight. ting that G Auto White bal. Although the default setting, [Auto], can mimic this adjustment by processing images according to suit lighting conditions. j Cloudy Use when taking pictures under incandescent lighting. l Flash Use with the color of the light source. 76 d White Balance White balance The color of light reflected from an object varies with the flash. Digital cameras can be previewed in the MENU Exit shade, direct sunlight...

L10 / L11 User's Manual
Page 87
... color cast (for example, to make pictures taken under a lamp with a red shade look as though they had been taken under white light). 1 Place white or gray reference object under the lighting that will not fire when d is set. • No pictures are recorded. White bal. preset] and press d. • The camera zooms in step 5. White balance G Auto White bal. White bal. preset Cancel Measure MENU Exit k Notes on using the...
... color cast (for example, to make pictures taken under a lamp with a red shade look as though they had been taken under white light). 1 Place white or gray reference object under the lighting that will not fire when d is set. • No pictures are recorded. White bal. preset] and press d. • The camera zooms in step 5. White balance G Auto White bal. White bal. preset Cancel Measure MENU Exit k Notes on using the...

L10 / L11 User's Manual
Page 88
... shutter-release button is held down, pictures are determined by the first picture in each time the shutter-release button is pressed. This rate is maintained for the current setting is displayed in the monitor (c 6). At setting other than [Single], focus, and white balance for all photos are taken continuously at a maximum rate of pictures. Continuous Single Continuous Multi-shot 16 MENU Exit r Single (default setting) One shot is taken each series. Shooting, Playback, and Setup...
... shutter-release button is held down, pictures are determined by the first picture in each time the shutter-release button is pressed. This rate is maintained for the current setting is displayed in the monitor (c 6). At setting other than [Single], focus, and white balance for all photos are taken continuously at a maximum rate of pictures. Continuous Single Continuous Multi-shot 16 MENU Exit r Single (default setting) One shot is taken each series. Shooting, Playback, and Setup...

L10 / L11 User's Manual
Page 95
... supplied USB cable and E (d) is pressed to transfer the pictures. At the default setting, all images. If more than 999 pictures can be marked for Transfer • No more information on All off Remove transfer marking from all pictures are recognized by the E icon (c 7) in full-frame playback, and by the P icon (c 40) in thumbnail playback. All off Select image(s) marked with another make or model of digital camera. Shooting, Playback, and Setup Menus...
... supplied USB cable and E (d) is pressed to transfer the pictures. At the default setting, all images. If more than 999 pictures can be marked for Transfer • No more information on All off Remove transfer marking from all pictures are recognized by the E icon (c 7) in full-frame playback, and by the P icon (c 40) in thumbnail playback. All off Select image(s) marked with another make or model of digital camera. Shooting, Playback, and Setup Menus...
L10 / L11 User's Manual
Page 108
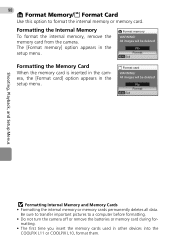
... All images will be deleted! 98 M Format Memory/O Format Card Use this option to a computer before formatting. • Do not turn the camera off or remove the batteries or memory card during formatting. • The first time you insert the memory cards used in other devices into the COOLPIX L11 or COOLPIX L10, format them. No Format MENU Exit Shooting, Playback, and Setup Menus j Formatting Internal Memory and Memory Cards • Formatting the internal memory or memory cards permanently deletes all data. Be sure to transfer important pictures to format the internal memory or...
... All images will be deleted! 98 M Format Memory/O Format Card Use this option to a computer before formatting. • Do not turn the camera off or remove the batteries or memory card during formatting. • The first time you insert the memory cards used in other devices into the COOLPIX L11 or COOLPIX L10, format them. No Format MENU Exit Shooting, Playback, and Setup Menus j Formatting Internal Memory and Memory Cards • Formatting the internal memory or memory cards permanently deletes all data. Be sure to transfer important pictures to format the internal memory or...
L10 / L11 User's Manual
Page 111
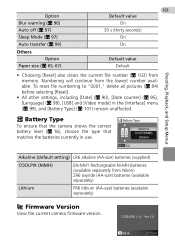
... warning (c 96) Auto off (c 97) Sleep Mode (c 97) Auto transfer (c 99) Others Option Paper size (c 65, 67) 101 Default value On 30 s (thirty seconds) On On Default value Default Shooting, Playback, and Setup Menus LR6 LR6 • Choosing [Reset] also clears the current file number (c 103) from memory. To reset file numbering to "0001," delete all pictures (c 84) before selecting [Reset]. • All other settings, including [Date] (c 90), [Date counter] (c 95), [Language] (c 99), [USB] and [Video mode] in use.
... warning (c 96) Auto off (c 97) Sleep Mode (c 97) Auto transfer (c 99) Others Option Paper size (c 65, 67) 101 Default value On 30 s (thirty seconds) On On Default value Default Shooting, Playback, and Setup Menus LR6 LR6 • Choosing [Reset] also clears the current file number (c 103) from memory. To reset file numbering to "0001," delete all pictures (c 84) before selecting [Reset]. • All other settings, including [Date] (c 90), [Date counter] (c 95), [Language] (c 99), [USB] and [Video mode] in use.

L10 / L11 User's Manual
Page 117
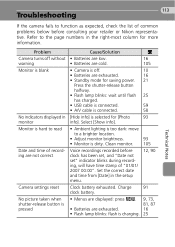
... both hands with them. Set clock. Batteries exhausted. tions until recording matically when is write protected. Error accessing memory card. c 90 10, 101 Camera cannot focus. 107 Error Messages The following table lists the error messages and other opera- Pictures may be used. plete. Write-protect switch is correctly inserted. 102 - 14 Technical Notes Recompose picture. 20, 21 Slow shutter speed. from display auto- Battery exhausted. I This card cannot be blurred. Display S (blinks) K Warning! Please wait for dealing...
... both hands with them. Set clock. Batteries exhausted. tions until recording matically when is write protected. Error accessing memory card. c 90 10, 101 Camera cannot focus. 107 Error Messages The following table lists the error messages and other opera- Pictures may be used. plete. Write-protect switch is correctly inserted. 102 - 14 Technical Notes Recompose picture. 20, 21 Slow shutter speed. from display auto- Battery exhausted. I This card cannot be blurred. Display S (blinks) K Warning! Please wait for dealing...
L10 / L11 User's Manual
Page 123
... until flash 25 has charged. • USB cable is connected. 59 • A/V cable is connected. 58 [Hide info] is selected for more information. 113 Troubleshooting If the camera fails to function as expected, check the list of common problems below before clock has been set, and "Date not set" indicator blinks during recording, will have time stamp of recording are not correct Camera settings reset No picture taken when shutter-release button is pressed Cause/Solution c • Batteries...
... until flash 25 has charged. • USB cable is connected. 59 • A/V cable is connected. 58 [Hide info] is selected for more information. 113 Troubleshooting If the camera fails to function as expected, check the list of common problems below before clock has been set, and "Date not set" indicator blinks during recording, will have time stamp of recording are not correct Camera settings reset No picture taken when shutter-release button is pressed Cause/Solution c • Batteries...
L10 / L11 User's Manual
Page 126
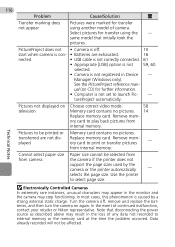
... size. Use the printer to print or transfer pictures - Note that initially took the pictures. Data already recorded will not be printed or Memory card contains no pictures. 14 Replace memory card. j Electronically Controlled Cameras In extremely rare instances, unusual characters may stop functioning. In the event of any data not recorded to internal memory or the memory card at the time the problem occurred. selects the page size. Turn the camera off . 10 start when camera is con- • Batteries are not displayed Replace memory card...
... size. Use the printer to print or transfer pictures - Note that initially took the pictures. Data already recorded will not be printed or Memory card contains no pictures. 14 Replace memory card. j Electronically Controlled Cameras In extremely rare instances, unusual characters may stop functioning. In the event of any data not recorded to internal memory or the memory card at the time the problem occurred. selects the page size. Turn the camera off . 10 start when camera is con- • Batteries are not displayed Replace memory card...
