User Manual
Page 3
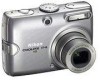
... a Nikon COOLPIX P4 digital camera. Illustrations and on the Camera Recording and Viewing Movies TV, Computer or Printer Connection Advanced Camera Settings Technical Notes 1 This icon marks tips, additional information that should be helpful when using the product. Before You Begin First Steps Basic Photography and Playback Selecting Scene Mode Additional Shooting Options Symbols Used in this manual. • The settings for your Nikon digital camera. This manual has been written to help you for the various functions...
... a Nikon COOLPIX P4 digital camera. Illustrations and on the Camera Recording and Viewing Movies TV, Computer or Printer Connection Advanced Camera Settings Technical Notes 1 This icon marks tips, additional information that should be helpful when using the product. Before You Begin First Steps Basic Photography and Playback Selecting Scene Mode Additional Shooting Options Symbols Used in this manual. • The settings for your Nikon digital camera. This manual has been written to help you for the various functions...

User Manual
Page 13
... battery chargers, batteries, AC adapters, and flashes) certified by Nikon specifically for damages or lost profits that the camera is available on-line at weddings or before taking pictures on digital imaging and photography. Holographic seal For more information about Nikon brand accessories, contact a local authorized Nikon dealer. * Holographic seal: Identifies this Nikon digital camera are designed to ongoing product support and education, continually-updated information is functioning normally. THE USE OF...
... battery chargers, batteries, AC adapters, and flashes) certified by Nikon specifically for damages or lost profits that the camera is available on-line at weddings or before taking pictures on digital imaging and photography. Holographic seal For more information about Nikon brand accessories, contact a local authorized Nikon dealer. * Holographic seal: Identifies this Nikon digital camera are designed to ongoing product support and education, continually-updated information is functioning normally. THE USE OF...

User Manual
Page 16
... 6 Flash mode 28 7 Flash indicator 29 8 Internal memory/Memory card indicator 26 9 Battery level indicator4 24 10 ISO Sensitivity 45 11 Vibration reduction (VR 48 12 Self-timer indicator 30 13 Time zone indicator5 100 14 "Date not set" icon6 113 15 Date imprint indicator 102 16 Date counter/Stored date number 103 17 Number of exposures remaining/ Length of movie 58, 121 18 Aperture 42 19 Focus area7 26, 86 20 Shutter speed 41 21 Image quality 43 22 Image size...
... 6 Flash mode 28 7 Flash indicator 29 8 Internal memory/Memory card indicator 26 9 Battery level indicator4 24 10 ISO Sensitivity 45 11 Vibration reduction (VR 48 12 Self-timer indicator 30 13 Time zone indicator5 100 14 "Date not set" icon6 113 15 Date imprint indicator 102 16 Date counter/Stored date number 103 17 Number of exposures remaining/ Length of movie 58, 121 18 Aperture 42 19 Focus area7 26, 86 20 Shutter speed 41 21 Image quality 43 22 Image size...

User Manual
Page 17
... folder 123 2 File number and type 123 3 Internal memory/Memory card indicator 26 4 Battery level indicator1 24 5 Volume indicator 60 6 Voice memo recording guide 55 7 Voice memo playback guide 55 8 Current frame number/Total number of frames 49 9 Length of movie 60 10 D-Lighting icon 92 11 Movie playback icon 60 12 Voice memo indicator 55 13 Image quality 43 14 Image size 43 15 Movie indicator 58 16 Protect icon 94 17 Print order icon 72 18 Transfer marking icon 95 19 Recording time 22 20 Recording date...
... folder 123 2 File number and type 123 3 Internal memory/Memory card indicator 26 4 Battery level indicator1 24 5 Volume indicator 60 6 Voice memo recording guide 55 7 Voice memo playback guide 55 8 Current frame number/Total number of frames 49 9 Length of movie 60 10 D-Lighting icon 92 11 Movie playback icon 60 12 Voice memo indicator 55 13 Image quality 43 14 Image size 43 15 Movie indicator 58 16 Protect icon 94 17 Print order icon 72 18 Transfer marking icon 95 19 Recording time 22 20 Recording date...

User Manual
Page 27
... make the subject appear larger. • When the camera is magnified up to save power. To reactivate the camera, press the shutter-release button halfway. Frame picture. 3 .1 Ready camera. imately two seconds will turn yellow when digital zoom is in effect. • To cancel digital zoom, press j (t) until the zoom indicator turns white. If no operations are performed in optical zoom, holding k (v) down for approximately one minute (default setting), the camera enters Standby mode...
... make the subject appear larger. • When the camera is magnified up to save power. To reactivate the camera, press the shutter-release button halfway. Frame picture. 3 .1 Ready camera. imately two seconds will turn yellow when digital zoom is in effect. • To cancel digital zoom, press j (t) until the zoom indicator turns white. If no operations are performed in optical zoom, holding k (v) down for approximately one minute (default setting), the camera enters Standby mode...

User Manual
Page 28
... Press shutter-release button the rest of the frame (P.86). Available Functions in Auto Shooting Mode Flash, self-timer, focus, and exposure compensation can also be outlined in this position. • In X mode, the camera focuses on the subject at the center of the way down to Z mode. Image quality and Image size (P.43) can be set to take picture. • The flash may affect pictures or damage the camera or card. Focus and exposure are being...
... Press shutter-release button the rest of the frame (P.86). Available Functions in Auto Shooting Mode Flash, self-timer, focus, and exposure compensation can also be outlined in this position. • In X mode, the camera focuses on the subject at the center of the way down to Z mode. Image quality and Image size (P.43) can be set to take picture. • The flash may affect pictures or damage the camera or card. Focus and exposure are being...

User Manual
Page 31
..., set the flash to B (Flash Cancel) or zoom in the picture as bright spots. Checking the Flash Status The flash lamp and flash indicator (P.14) on the monitor show the flash status when the shutter-release button is pressed halfway. • On : The flash fires when a picture is taken. • Blinks : The flash is taken. Selected flash option is indicated by icon on monitor. • To exit without changing the flash mode...
..., set the flash to B (Flash Cancel) or zoom in the picture as bright spots. Checking the Flash Status The flash lamp and flash indicator (P.14) on the monitor show the flash status when the shutter-release button is pressed halfway. • On : The flash fires when a picture is taken. • Blinks : The flash is taken. Selected flash option is indicated by icon on monitor. • To exit without changing the flash mode...

User Manual
Page 32
... be released. 30 set. 1/60 F2.7 120 Press shutter-release button the rest of the way down to start timer. • Pictures are taken 3 or 10 seconds after the shutter-release button is pressed. • The countdown timer on a flat, level surface. Set focus and exposure. • To exit without setting the self-timer, Press the shutter-release button halfway to appear in your own pictures. Self-timer OK Self-timer OK Display Self-timer menu.
... be released. 30 set. 1/60 F2.7 120 Press shutter-release button the rest of the way down to start timer. • Pictures are taken 3 or 10 seconds after the shutter-release button is pressed. • The countdown timer on a flat, level surface. Set focus and exposure. • To exit without setting the self-timer, Press the shutter-release button halfway to appear in your own pictures. Self-timer OK Self-timer OK Display Self-timer menu.

User Manual
Page 42
... the previous picture. Take next shot. Note on Panorama Assist Settings for white balance and exposure are determined by changing the series have been taken. mately 1/3 of the picture is shown superimposed. • Settings for the flash, self-timer, focus, exposure, and zoom position cannot be adjusted after the first picture is displayed and approxi- mode or entering Standby mode. Selecting Scene Mode Take next shot. Using F PANORAMA ASSIST Mode PANORAMA ASSIST Exit OK Help 1/60 F2.7 120 Highlight F (PANORAMA ASSIST) in the • Shooting will...
... the previous picture. Take next shot. Note on Panorama Assist Settings for white balance and exposure are determined by changing the series have been taken. mately 1/3 of the picture is shown superimposed. • Settings for the flash, self-timer, focus, exposure, and zoom position cannot be adjusted after the first picture is displayed and approxi- mode or entering Standby mode. Selecting Scene Mode Take next shot. Using F PANORAMA ASSIST Mode PANORAMA ASSIST Exit OK Help 1/60 F2.7 120 Highlight F (PANORAMA ASSIST) in the • Shooting will...

User Manual
Page 69
...-compatible printer via a direct USB connection: P.68) Print pictures one at a time (P.69) Print multiple pictures (P.70) Printing is complete. To print pictures using Print set , check that the photo lab supports DPOF. • Transfer the pictures to a digital photo lab. For more information, see "Connecting to a Computer" (P.62) and the manual for the printer. • Take the memory card containing the pictures to a computer. Take pictures Set printing settings in Print set (P.72) Connect the camera and printer (printing via the UC-E6 USB cable, selected pictures...
...-compatible printer via a direct USB connection: P.68) Print pictures one at a time (P.69) Print multiple pictures (P.70) Printing is complete. To print pictures using Print set , check that the photo lab supports DPOF. • Transfer the pictures to a digital photo lab. For more information, see "Connecting to a Computer" (P.62) and the manual for the printer. • Take the memory card containing the pictures to a computer. Take pictures Set printing settings in Print set (P.72) Connect the camera and printer (printing via the UC-E6 USB cable, selected pictures...

User Manual
Page 77
... displayed, check the printer and resolve the problem as follows: • Setting Date in the PRINT SET menu of the picture. - If an Error Occurs If an error message is fixed at the bottom right hand corner of the Playback menu (P.72 - 74). • Transfer the pictures to resume printing. Resume may not be set before taking pictures. - For more information, see the PictureProject Reference Manual (on the image itself, but recorded in the PRINT SET menu...
... displayed, check the printer and resolve the problem as follows: • Setting Date in the PRINT SET menu of the picture. - If an Error Occurs If an error message is fixed at the bottom right hand corner of the Playback menu (P.72 - 74). • Transfer the pictures to resume printing. Resume may not be set before taking pictures. - For more information, see the PictureProject Reference Manual (on the image itself, but recorded in the PRINT SET menu...

User Manual
Page 100
... the recording date/time on . P.106 j Language Select a language for more infor- P.106 k Interface Set USB and Video mode options. See "Using the Menus" (P.76) for the camera menus and messages. P.100 Z Monitor settings Display the current settings and adjust the brightness of menu display for the Shooting, Movie, Playback and Set-up sounds. Advanced Camera Settings - P.108 B Firmware version Displays the firmware version of shutter and start-up P.99 menus. P.107 E Auto transfer Set all Restore camera settings to save power. P.105 M/O Format memory/card...
... the recording date/time on . P.106 j Language Select a language for more infor- P.106 k Interface Set USB and Video mode options. See "Using the Menus" (P.76) for the camera menus and messages. P.100 Z Monitor settings Display the current settings and adjust the brightness of menu display for the Shooting, Movie, Playback and Set-up sounds. Advanced Camera Settings - P.108 B Firmware version Displays the firmware version of shutter and start-up P.99 menus. P.107 E Auto transfer Set all Restore camera settings to save power. P.105 M/O Format memory/card...

User Manual
Page 116
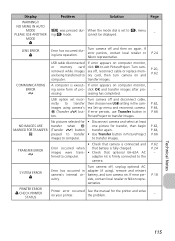
... for copying picture. • • Format destination. File created by computer or different make of images that can be viewed on the camera. View file on memory card. • • Format memory card using Format option in internal memory or memory sists, contact your local retailer or Nikon representative. Display IMAGE CANNOT BE SAVED M or O CANNOT RECORD MOVIE. O MEMORY CONTAINS NO IMAGES r FILE CONTAINS NO IMAGE DATA r ALL IMAGES ARE HIDDEN r THIS IMAGE CANNOT BE DELETED r NEW CITY IS IN THE CURRENT TIME ZONE u WARNING! u Problem Solution...
... for copying picture. • • Format destination. File created by computer or different make of images that can be viewed on the camera. View file on memory card. • • Format memory card using Format option in internal memory or memory sists, contact your local retailer or Nikon representative. Display IMAGE CANNOT BE SAVED M or O CANNOT RECORD MOVIE. O MEMORY CONTAINS NO IMAGES r FILE CONTAINS NO IMAGE DATA r ALL IMAGES ARE HIDDEN r THIS IMAGE CANNOT BE DELETED r NEW CITY IS IN THE CURRENT TIME ZONE u WARNING! u Problem Solution...
User Manual
Page 117
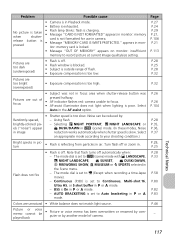
.... adapter kit is fully charged. the problem. P.24 P.20, P.62 - NO MENU IN AUTO MODE PLEASE USE ANOTHER MODE u m was pressed dur- USB cable disconnected or memory card removed while images are being transferred to computer. images were trans- • Check that battery is firmly connected to transfer images using ), remove and reinsert battery, and turn camera on . If error persists, contact local retailer or Nikon representative. cessing. NO IMAGES ARE MARKED FOR TRANSFER s No pictures selected for transfer when d (Transfer g) button pressed...
.... adapter kit is fully charged. the problem. P.24 P.20, P.62 - NO MENU IN AUTO MODE PLEASE USE ANOTHER MODE u m was pressed dur- USB cable disconnected or memory card removed while images are being transferred to computer. images were trans- • Check that battery is firmly connected to transfer images using ), remove and reinsert battery, and turn camera on . If error persists, contact local retailer or Nikon representative. cessing. NO IMAGES ARE MARKED FOR TRANSFER s No pictures selected for transfer when d (Transfer g) button pressed...

User Manual
Page 118
.../video cable is not properly connected. • Standby mode; P.24 P.112 P.101 P.111 P.101 P.111 Technical Notes 116 Refer to the internal memory or memory card at the time the problem occurred. Note that disconnecting the power source as expected, check the list of any data not recorded to the page numbers listed in monitor • Hide info is too bright; Camera turns off , remove and replace the battery...
.../video cable is not properly connected. • Standby mode; P.24 P.112 P.101 P.111 P.101 P.111 Technical Notes 116 Refer to the internal memory or memory card at the time the problem occurred. Note that disconnecting the power source as expected, check the list of any data not recorded to the page numbers listed in monitor • Hide info is too bright; Camera turns off , remove and replace the battery...
User Manual
Page 119
... recording a time-lapse movie). - Continuous (P.80) is slow. Colors are out of focus • • pressed halfway. Technical Notes 117 Turn flash off automatically when: - BSS is too slow. Select Auto in the AF assist option. • Shutter speed is On in the Scene menu. - Using flash brightly-colored pix- - The mode dial is poor. AF-assist illuminator does not light when lighting is set to focus. AUTO BRACKETING is taken when shutter- No picture...
... recording a time-lapse movie). - Continuous (P.80) is slow. Colors are out of focus • • pressed halfway. Technical Notes 117 Turn flash off automatically when: - BSS is too slow. Select Auto in the AF assist option. • Shutter speed is On in the Scene menu. - Using flash brightly-colored pix- - The mode dial is poor. AF-assist illuminator does not light when lighting is set to focus. AUTO BRACKETING is taken when shutter- No picture...

User Manual
Page 127
... the camera enters Standby mode and the power-on lamp blinks, perform one of the following cases: • When a menu is displayed with the flash. Options for the selected mode is displayed) The length of time is fixed in the following operations to reactivate the camera: • Pressing the power switch • Pressing the shutter-release button halfway • Pressing i • Pressing m (the menu for ISO Sensitivity (P.45) Auto (default setting) 50...
... the camera enters Standby mode and the power-on lamp blinks, perform one of the following cases: • When a menu is displayed with the flash. Options for the selected mode is displayed) The length of time is fixed in the following operations to reactivate the camera: • Pressing the power switch • Pressing the shutter-release button halfway • Pressing i • Pressing m (the menu for ISO Sensitivity (P.45) Auto (default setting) 50...

User Manual
Page 129
... Media Internal memory (approx. 23 MB) SD (Secure Digital) Memory cards File system Compliant with lens cover Vibration reduction Lens shift Digital zoom Up to 4× (Picture angle: Equivalent to 35 mm [135] format is approx. 36 - 126 mm) f/-number f/2.7 - 5.3 (Seven elements in six groups), with Design Rule for Camera File System (DCF), Exif 2.2, and Digital Print Order Format (DPOF) File formats Compressed: JPEG-baseline-compliant (1:4, 1:8, 1:16) Movies: QuickTime Sound files: WAV Exposure Metering...
... Media Internal memory (approx. 23 MB) SD (Secure Digital) Memory cards File system Compliant with lens cover Vibration reduction Lens shift Digital zoom Up to 4× (Picture angle: Equivalent to 35 mm [135] format is approx. 36 - 126 mm) f/-number f/2.7 - 5.3 (Seven elements in six groups), with Design Rule for Camera File System (DCF), Exif 2.2, and Digital Print Order Format (DPOF) File formats Compressed: JPEG-baseline-compliant (1:4, 1:8, 1:16) Movies: QuickTime Sound files: WAV Exposure Metering...
User Manual
Page 132
... used for optimal color reproduction when images are subject to ensure compatibility among different makes of this product and its specifications are output on the memory card. Exif Version 2.2 This camera supports Exif (Exchangeable Image File Format for Digital Still Cameras) version 2.2, a standard that allows information stored with pictures to be used in the digital camera industry to change without notice. Specifications • Nikon will not be held liable for any errors this manual...
... used for optimal color reproduction when images are subject to ensure compatibility among different makes of this product and its specifications are output on the memory card. Exif Version 2.2 This camera supports Exif (Exchangeable Image File Format for Digital Still Cameras) version 2.2, a standard that allows information stored with pictures to be used in the digital camera industry to change without notice. Specifications • Nikon will not be held liable for any errors this manual...

User Manual
Page 135
... PRINT MENU, 70 DPOF printing, 70, 75 Paper size, 69, 70 Print all images, 70 Print selection, 70 Print set, 72 Printer, 67 Printing pictures, 69, 70-71 see also Date imprint, DPOF Protect, 94 Protected pictures, 94, 97 Q Quality, see Image mode Quick format, 106 Quick Playback Zoom, 52 QuickTime, see Movies R Reset all, 108, 119 Resizing pictures, 96, 126 RSCN, 123 S Saturation, 85 Saturation control, 85 Scene mode, 33-40 Secure Digital (SD), see Memory card Self-portraits, 30 Self-timer, 30 Self-timer...
... PRINT MENU, 70 DPOF printing, 70, 75 Paper size, 69, 70 Print all images, 70 Print selection, 70 Print set, 72 Printer, 67 Printing pictures, 69, 70-71 see also Date imprint, DPOF Protect, 94 Protected pictures, 94, 97 Q Quality, see Image mode Quick format, 106 Quick Playback Zoom, 52 QuickTime, see Movies R Reset all, 108, 119 Resizing pictures, 96, 126 RSCN, 123 S Saturation, 85 Saturation control, 85 Scene mode, 33-40 Secure Digital (SD), see Memory card Self-portraits, 30 Self-timer, 30 Self-timer...

