User Manual
Page 2
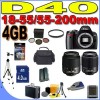
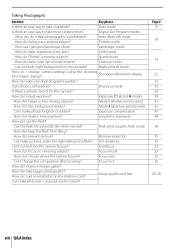
... solution here. See page 3 for help on menu items and other topics. Find it from the "question and answer" index. Troubleshooting See pages 108-110 Camera behaving unexpectedly? The Index Search by function or menu name. See pages 123-125 Error Messages See pages 111-112 If a warning is displayed in... and learn" manuals in the viewfinder or monitor, find the solution here. Digitutor Digitutor, a series of Contents Find items by key word. Help Use the camera's on-board help feature for details.
... solution here. See page 3 for help on menu items and other topics. Find it from the "question and answer" index. Troubleshooting See pages 108-110 Camera behaving unexpectedly? The Index Search by function or menu name. See pages 123-125 Error Messages See pages 111-112 If a warning is displayed in... and learn" manuals in the viewfinder or monitor, find the solution here. Digitutor Digitutor, a series of Contents Find items by key word. Help Use the camera's on-board help feature for details.

User Manual
Page 3
Introduction Tutorial Photography and Playback More on Photography (All Modes) Reference P, S, A, and M Modes More on Playback Connecting to a Computer, Printer, or TV Playback Options: The Playback Menu Shooting Options: The Shooting Menu Menu Guide Custom Settings Basic Camera Settings: The Setup Menu Creating Retouched Copies: The Retouch Menu Technical Notes i
Introduction Tutorial Photography and Playback More on Photography (All Modes) Reference P, S, A, and M Modes More on Playback Connecting to a Computer, Printer, or TV Playback Options: The Playback Menu Shooting Options: The Shooting Menu Menu Guide Custom Settings Basic Camera Settings: The Setup Menu Creating Retouched Copies: The Retouch Menu Technical Notes i
User Manual
Page 4
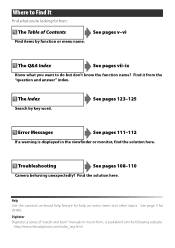
... entirety before using this equipment. To avoid damage to the product, be removed with wet hands. Before removing the battery turn the camera off and allow the battery to cool. • Discontinue use immediately should be sure to remove the battery when no charge remains....a qualified technician. Observe proper precautions when handling batteries Batteries may be damaged and the wires become exposed, take the equipment to a Nikon-authorized service center for inspection. Keep out of reach of malfunction, the product should be sure it to heat or flame. Failure to...
... entirety before using this equipment. To avoid damage to the product, be removed with wet hands. Before removing the battery turn the camera off and allow the battery to cool. • Discontinue use immediately should be sure to remove the battery when no charge remains....a qualified technician. Observe proper precautions when handling batteries Batteries may be damaged and the wires become exposed, take the equipment to a Nikon-authorized service center for inspection. Keep out of reach of malfunction, the product should be sure it to heat or flame. Failure to...
User Manual
Page 6
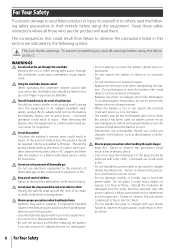
... passes, or The copying or reproduction of paper money, coins, or securities which are trademarks or registered trademarks of a scanner, digital camera, or other device may be recovered from being in possession of material that deleting images or formatting memory cards or other trade names... by law from discarded storage devices using commercial deletion software, or format the device and then completely refill it with your Nikon product are circulated in the malicious use this manual or the other documentation provided with images containing no private information (for ...
... passes, or The copying or reproduction of paper money, coins, or securities which are trademarks or registered trademarks of a scanner, digital camera, or other device may be recovered from being in possession of material that deleting images or formatting memory cards or other trade names... by law from discarded storage devices using commercial deletion software, or format the device and then completely refill it with your Nikon product are circulated in the malicious use this manual or the other documentation provided with images containing no private information (for ...

User Manual
Page 7
... 1 Getting to Know the Camera 2 First Steps 8 Attaching a Lens 8 Charging and Inserting the Battery 9 Basic Setup 11 Inserting Memory Cards 12 Adjusting Viewfinder Focus 14 Tutorial 15 "Point-and-Shoot" Photography ( Mode 15 Creative Photography (Digital Vari-Programs).........18 Basic Playback ...45 Autoexposure Lock 46 Exposure Compensation 47 Flash Compensation 48 White Balance 49 More on Playback 50 Viewing Photographs on the Camera 50 Photo Information 51 Viewing Multiple Images: Thumbnail Playback ...........52 Taking a Closer Look: Playback Zoom 53 Protecting Photographs...
... 1 Getting to Know the Camera 2 First Steps 8 Attaching a Lens 8 Charging and Inserting the Battery 9 Basic Setup 11 Inserting Memory Cards 12 Adjusting Viewfinder Focus 14 Tutorial 15 "Point-and-Shoot" Photography ( Mode 15 Creative Photography (Digital Vari-Programs).........18 Basic Playback ...45 Autoexposure Lock 46 Exposure Compensation 47 Flash Compensation 48 White Balance 49 More on Playback 50 Viewing Photographs on the Camera 50 Photo Information 51 Viewing Multiple Images: Thumbnail Playback ...........52 Taking a Closer Look: Playback Zoom 53 Protecting Photographs...

User Manual
Page 8
... Overlay 94 Technical Notes 96 Optional Accessories 96 Lenses ...97 Optional Flash Units (Speedlights 99 Other Accessories 102 Accessories for the D40 103 Caring for the Camera 104 Caring for the Camera and Battery: Cautions 106 Troubleshooting 108 Camera Error Messages and Displays 111 Appendix 113 Specifications 119 Index 123 vi Table of Contents
... Overlay 94 Technical Notes 96 Optional Accessories 96 Lenses ...97 Optional Flash Units (Speedlights 99 Other Accessories 102 Accessories for the D40 103 Caring for the Camera 104 Caring for the Camera and Battery: Cautions 106 Troubleshooting 108 Camera Error Messages and Displays 111 Appendix 113 Specifications 119 Index 123 vi Table of Contents

User Manual
Page 9
... level 15 Exposure 39 Self timer, remote control 33 Optional flash units 99 Lenses 97 Accessories for the D40 96 Approved memory cards 102 Accessories for the D40 103 Servicing the camera x Cleaning the camera 104 Camera Setup Question Key phrase How do I change time zones when I change the remote delay? What memory cards can...
... level 15 Exposure 39 Self timer, remote control 33 Optional flash units 99 Lenses 97 Accessories for the D40 96 Approved memory cards 102 Accessories for the D40 103 Servicing the camera x Cleaning the camera 104 Camera Setup Question Key phrase How do I change time zones when I change the remote delay? What memory cards can...
User Manual
Page 10
...? Red-eye reduction Can I shoot a self-portrait? Image quality and size Can I take photos at a reduced size for this camera? Digital Vari-Program modes What do I focus on the memory card? Night portrait mode How do I use the flash? Long time-exposures... the composition after focusing? Autofocus How do if flash photography is prohibited? Focus area Can I get more creative shots? How can I change camera information display? Auto (flash off ) mode How do I bring out a portrait subject? Child mode How do I "freeze" a moving subject...
...? Red-eye reduction Can I shoot a self-portrait? Image quality and size Can I take photos at a reduced size for this camera? Digital Vari-Program modes What do I focus on the memory card? Night portrait mode How do I use the flash? Long time-exposures... the composition after focusing? Autofocus How do if flash photography is prohibited? Focus area Can I get more creative shots? How can I change camera information display? Auto (flash off ) mode How do I bring out a portrait subject? Child mode How do I "freeze" a moving subject...

User Manual
Page 11
..., and Retouching Photographs Question Can I view my photographs on my photographs? Can I protect photos from accidental deletion? Can I print the date on the camera? Can I print photos without a computer? Can I get rid of red eye? How do I create a copy with different colors? Can I bring..., 61 61 90 91 91 92 92 92 94 Q&A Index ix Can I make a small copy of my photos blink? Key phrase Camera playback Photo info Photo info, highlights Deleting individual photos Delete Playback zoom Protect Slide show ") option? Why parts of a photograph? How do...
..., and Retouching Photographs Question Can I view my photographs on my photographs? Can I protect photos from accidental deletion? Can I print the date on the camera? Can I print photos without a computer? Can I get rid of red eye? How do I create a copy with different colors? Can I bring..., 61 61 90 91 91 92 92 92 94 Q&A Index ix Can I make a small copy of my photos blink? Key phrase Camera playback Photo info Photo info, highlights Deleting individual photos Delete Playback zoom Protect Slide show ") option? Why parts of a photograph? How do...
User Manual
Page 13
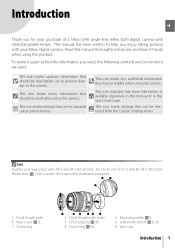
... marks tips, additional information that can be read before use , and keep it easier to help you enjoy taking pictures with your purchase of a Nikon D40 single-lens reflex (SLR) digital camera with AF-S and AF-I lenses only. This icon marks settings that may be finetuned from the Custom Settings menu. Rear cover: 8 7. CPU contacts...
... marks tips, additional information that can be read before use , and keep it easier to help you enjoy taking pictures with your purchase of a Nikon D40 single-lens reflex (SLR) digital camera with AF-S and AF-I lenses only. This icon marks settings that may be finetuned from the Custom Settings menu. Rear cover: 8 7. CPU contacts...
User Manual
Page 14
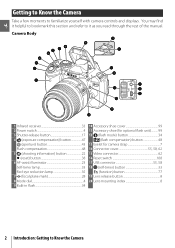
You may find it helpful to bookmark this section and refer to Know the Camera Camera Body µ ¸ ¹ Ƹ ᕡ ƺ ƹ ƻ Ƽ ƽ ƾ ƿ 1 Infrared receiver 33 2 Power switch 4 3 Shutter-release button 17 4 (exposure compensation) button ... 10 Accessory shoe cover 99 11 Accessory shoe (for optional flash unit).......... 99 12 (flash mode) button 34 (flash compensation) button 48 13 Eyelet for camera strap 7 14 Connector cover 55, 58, 62 15 Video connector 62 16 Reset switch 108 17 USB connector 55, 58 18 (self-timer) button 33...
You may find it helpful to bookmark this section and refer to Know the Camera Camera Body µ ¸ ¹ Ƹ ᕡ ƺ ƹ ƻ Ƽ ƽ ƾ ƿ 1 Infrared receiver 33 2 Power switch 4 3 Shutter-release button 17 4 (exposure compensation) button ... 10 Accessory shoe cover 99 11 Accessory shoe (for optional flash unit).......... 99 12 (flash mode) button 34 (flash compensation) button 48 13 Eyelet for camera strap 7 14 Connector cover 55, 58, 62 15 Video connector 62 16 Reset switch 108 17 USB connector 55, 58 18 (self-timer) button 33...

User Manual
Page 15
... other problem can be viewed in the monitor while the button is displayed in the monitor by pressing the button. Introduction: Getting to Know the Camera 3 Help is pressed; ᕢ ᕡ ƾ ƽ Ƽ ƻ ƺ ᕣ ƹ ¸ ¹ Ƹ 1 DK-16 viewfinder eyepiece cup ...7 2 Viewfinder eyepiece 5, 14 3 Diopter adjustment control 14 4 (AE-L/AF-L) button 46, 77 (protect) button 54 5 Command dial 115 6 Eyelet for camera strap 7 7 Multi selector * 8 Memory card slot cover 12 9 (delete) button 20, 54 10 Memory card access lamp 12 11 Power connector cover for...
... other problem can be viewed in the monitor while the button is displayed in the monitor by pressing the button. Introduction: Getting to Know the Camera 3 Help is pressed; ᕢ ᕡ ƾ ƽ Ƽ ƻ ƺ ᕣ ƹ ¸ ¹ Ƹ 1 DK-16 viewfinder eyepiece cup ...7 2 Viewfinder eyepiece 5, 14 3 Diopter adjustment control 14 4 (AE-L/AF-L) button 46, 77 (protect) button 54 5 Command dial 115 6 Eyelet for camera strap 7 7 Multi selector * 8 Memory card slot cover 12 9 (delete) button 20, 54 10 Memory card access lamp 12 11 Power connector cover for...
User Manual
Page 16
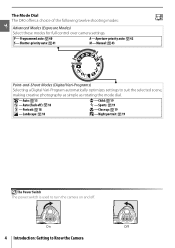
...Shutter-priority auto: 41 A -Aperture-priority auto: 42 M-Manual: 43 Point-and-Shoot Modes (Digital Vari-Programs) Selecting a Digital Vari-Program automatically optimizes settings to Know the Camera On Off 4 Introduction: Getting to suit the selected scene, making creative photography as simple as rotating... the mode dial. -Auto: 15 - Auto (flash off . The Mode Dial The D40 offers a ...
...Shutter-priority auto: 41 A -Aperture-priority auto: 42 M-Manual: 43 Point-and-Shoot Modes (Digital Vari-Programs) Selecting a Digital Vari-Program automatically optimizes settings to Know the Camera On Off 4 Introduction: Getting to suit the selected scene, making creative photography as simple as rotating... the mode dial. -Auto: 15 - Auto (flash off . The Mode Dial The D40 offers a ...

User Manual
Page 17
Introduction: Getting to Know the Camera 5 Large-Capacity Memory Cards When enough memory remains on the memory card to record a thousand or more pictures at current settings, the number of the ...
Introduction: Getting to Know the Camera 5 Large-Capacity Memory Cards When enough memory remains on the memory card to record a thousand or more pictures at current settings, the number of the ...

User Manual
Page 18
... monitor. Fast shutter speed, large aperture (small f/-number) 6 Introduction: Getting to Know the Camera Slow shutter speed, small aperture (large f/-number) The Shooting Information Display To view camera settings, press the button. See page 81 for information on changing camera settings. 25 24 23 22 21 1 5 20 19 2 6 18 4 17 16 7 15 8 14...
... monitor. Fast shutter speed, large aperture (small f/-number) 6 Introduction: Getting to Know the Camera Slow shutter speed, small aperture (large f/-number) The Shooting Information Display To view camera settings, press the button. See page 81 for information on changing camera settings. 25 24 23 22 21 1 5 20 19 2 6 18 4 17 16 7 15 8 14...
User Manual
Page 19
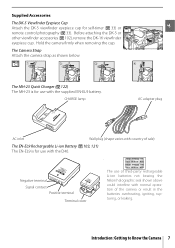
... Cap Attach the DK-5 viewfinder eyepiece cap for use with the D40. . Before attaching the DK-5 or other viewfinder accessories ( 102), remove the DK-16 viewfinder eyepiece cup. The Camera Strap Attach the camera strap as shown below. Negative terminal Signal contact Positive terminal Terminal ...cover The use of third-party rechargeable Li-ion batteries not bearing the Nikon holographic seal shown above could interfere with the ...
... Cap Attach the DK-5 viewfinder eyepiece cap for use with the D40. . Before attaching the DK-5 or other viewfinder accessories ( 102), remove the DK-16 viewfinder eyepiece cup. The Camera Strap Attach the camera strap as shown below. Negative terminal Signal contact Positive terminal Terminal ...cover The use of third-party rechargeable Li-ion batteries not bearing the Nikon holographic seal shown above could interfere with the ...

User Manual
Page 20
Remove the rear lens cap from entering the camera when exchanging lenses. 1 Turn the camera off when removing or exchanging lenses. After removing the lens, replace the camera body cap and rear lens cover. See the lens manual for details. 8 Introduction: First Steps Aperture Ring If the ...at the minimum setting (highest f/-number). Detaching Lenses Be sure the camera is equipped with an A-M or M/A-M switch, select A (autofocus) or M/A (autofocus with the mounting index on the camera body, position the lens in the camera's bayonet mount and rotate the lens in the direction shown until it...
Remove the rear lens cap from entering the camera when exchanging lenses. 1 Turn the camera off when removing or exchanging lenses. After removing the lens, replace the camera body cap and rear lens cover. See the lens manual for details. 8 Introduction: First Steps Aperture Ring If the ...at the minimum setting (highest f/-number). Detaching Lenses Be sure the camera is equipped with an A-M or M/A-M switch, select A (autofocus) or M/A (autofocus with the mounting index on the camera body, position the lens in the camera's bayonet mount and rotate the lens in the direction shown until it...
User Manual
Page 22
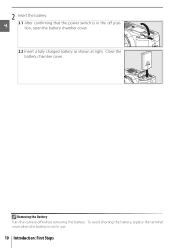
Close the battery chamber cover. To avoid shorting the battery, replace the terminal cover when the battery is in use. 10 Introduction: First Steps 2 Insert the battery. 2.1 After confirming that the power switch is not in the off before removing the battery. Removing the Battery Turn the camera off position, open the battery chamber cover. 2.2 Insert a fully charged battery as shown at right.
Close the battery chamber cover. To avoid shorting the battery, replace the terminal cover when the battery is in use. 10 Introduction: First Steps 2 Insert the battery. 2.1 After confirming that the power switch is not in the off before removing the battery. Removing the Battery Turn the camera off position, open the battery chamber cover. 2.2 Insert a fully charged battery as shown at right.
User Manual
Page 23
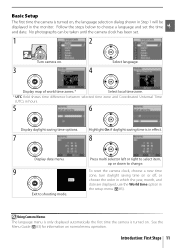
... . No photographs can be displayed in Step 1 will be taken until the camera clock has been set the time and date. Using Camera Menus The language menu is only displayed automatically the first time the camera is turned on . 3 Select language. 4 Display map of world time zones.* Select local time zone....difference between selected time zone and Coordinated Universal Time (UTC), in the setup menu ( 83). Follow the steps below to change. To reset the camera clock, choose a new time zone, turn daylight saving time on or off, or choose the order in which the year, month, and date are...
... . No photographs can be displayed in Step 1 will be taken until the camera clock has been set the time and date. Using Camera Menus The language menu is only displayed automatically the first time the camera is turned on . 3 Select language. 4 Display map of world time zones.* Select local time zone....difference between selected time zone and Coordinated Universal Time (UTC), in the setup menu ( 83). Follow the steps below to change. To reset the camera clock, choose a new time zone, turn daylight saving time on or off, or choose the order in which the year, month, and date are...
User Manual
Page 24
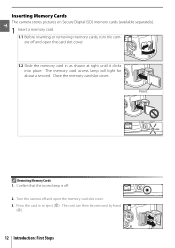
...the memory card slot cover. Front Removing Memory Cards 1. Press the card in as shown at right until it clicks into place. Turn the camera off and open the card slot cover. 1.2 Slide the memory card in to eject (c). Confirm that the access lamp is off. 2. ...then be removed by hand (d). 12 Introduction: First Steps Inserting Memory Cards The camera stores pictures on Secure Digital (SD) memory cards (available separately). 1 Insert a memory card. 1.1 Before inserting or removing memory cards, turn the camera off and open the memory card slot cover. 3. The memory card access ...
...the memory card slot cover. Front Removing Memory Cards 1. Press the card in as shown at right until it clicks into place. Turn the camera off and open the card slot cover. 1.2 Slide the memory card in to eject (c). Confirm that the access lamp is off. 2. ...then be removed by hand (d). 12 Introduction: First Steps Inserting Memory Cards The camera stores pictures on Secure Digital (SD) memory cards (available separately). 1 Insert a memory card. 1.1 Before inserting or removing memory cards, turn the camera off and open the memory card slot cover. 3. The memory card access ...


