X3 - Quick Start Guide
Page 1
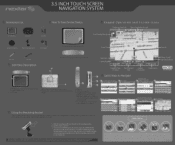
...) aia:o C orirurirrte-r; • kfrATATArArryNev benebeurnrdiertir' 9rAlrATATATIW-ar Using the Mounting Bracket 4 ifilWrrigher bleirbearWlines bratotafregAll uolorNr"rnirartr, beintota*-ressries ler r t.. n exto 3.5 INCH TOUCH SCREEN NAVIGATION SYSTEM Accessories List How To Turn On the Device GP3Devise C-ty Powth MIA `Ah1.I,•4 1., Mar:.
...) aia:o C orirurirrte-r; • kfrATATArArryNev benebeurnrdiertir' 9rAlrATATATIW-ar Using the Mounting Bracket 4 ifilWrrigher bleirbearWlines bratotafregAll uolorNr"rnirartr, beintota*-ressries ler r t.. n exto 3.5 INCH TOUCH SCREEN NAVIGATION SYSTEM Accessories List How To Turn On the Device GP3Devise C-ty Powth MIA `Ah1.I,•4 1., Mar:.

X3-02 Hardware Manual
Page 3
... blades and a third grounding prong. Servicing is provided for long periods of time. 14) Refer all instructions. 5) Do not use attachments/accessories specified by the manufacturer. 12) Use only with a cart, stand, tripod, bracket, or table specified by the manufacturer, or sold with the ... Important Safety Instructions NOTES 1) Read these instructions. 2) Keep these instructions. 3) Heed all warnings. 4) Follow all servicing to keep the GPS out of the ventilation openings. When a cart is damaged, liquid has been spilled or objects have fallen into your safety. To prevent the...
... blades and a third grounding prong. Servicing is provided for long periods of time. 14) Refer all instructions. 5) Do not use attachments/accessories specified by the manufacturer. 12) Use only with a cart, stand, tripod, bracket, or table specified by the manufacturer, or sold with the ... Important Safety Instructions NOTES 1) Read these instructions. 2) Keep these instructions. 3) Heed all warnings. 4) Follow all servicing to keep the GPS out of the ventilation openings. When a cart is damaged, liquid has been spilled or objects have fallen into your safety. To prevent the...
X3-02 Hardware Manual
Page 6
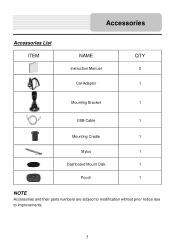
Accessories Accessories List ITEM NAME Instruction Manual Car Adaptor QTY 2 1 Mounting Bracket 1 USB Cable 1 Mounting Cradle 1 Stylus 1 Dashboard Mount Disk 1 Pouch 1 NOTE Accessories and their parts numbers are subject to modification without prior notice due to improvements. 5
Accessories Accessories List ITEM NAME Instruction Manual Car Adaptor QTY 2 1 Mounting Bracket 1 USB Cable 1 Mounting Cradle 1 Stylus 1 Dashboard Mount Disk 1 Pouch 1 NOTE Accessories and their parts numbers are subject to modification without prior notice due to improvements. 5
X3-02 Hardware Manual
Page 7
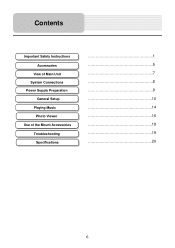
Contents Important Safety Instructions Accessories View of Main Unit System Connections Power Supply Preparation General Setup Playing Music Photo Viewer Use of the Mount Accessories Troubleshooting Specifications 1 5 7 8 9 10 14 16 18 19 20 6
Contents Important Safety Instructions Accessories View of Main Unit System Connections Power Supply Preparation General Setup Playing Music Photo Viewer Use of the Mount Accessories Troubleshooting Specifications 1 5 7 8 9 10 14 16 18 19 20 6

X3-02 Hardware Manual
Page 10
... Power Plug to the unit's power jack and plug the other end to the vehicle's 5V accessory/ cigarette socket, as shown on a bed, sofa or anything that may block ventilation to avoid overheating. Your portable GPS unit comes with a Car Adaptor for viewing. Disconnect the unit from the Car Adaptor...
... Power Plug to the unit's power jack and plug the other end to the vehicle's 5V accessory/ cigarette socket, as shown on a bed, sofa or anything that may block ventilation to avoid overheating. Your portable GPS unit comes with a Car Adaptor for viewing. Disconnect the unit from the Car Adaptor...
X3-02 Hardware Manual
Page 19
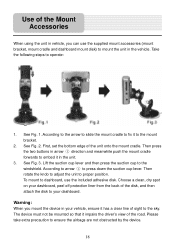
...Lift the suction cup lever and then press the suction cup to the mount bracket. 2. According to arrow ① to dashboard, use the supplied mount accessories (mount bracket, mount cradle and dashboard mount disk) to operate: 1. See Fig. 3. To mount to press down the suction cup lever. Please take ...Warning: When you can use the included adhesive disk. Take the following steps to mount the unit in the vehicle. Use of the Mount Accessories When using the unit in vehicle, you mount the device in your dashboard. First, set the bottom edge of the road. The device must...
...Lift the suction cup lever and then press the suction cup to the mount bracket. 2. According to arrow ① to dashboard, use the supplied mount accessories (mount bracket, mount cradle and dashboard mount disk) to operate: 1. See Fig. 3. To mount to press down the suction cup lever. Please take ...Warning: When you can use the included adhesive disk. Take the following steps to mount the unit in the vehicle. Use of the Mount Accessories When using the unit in vehicle, you mount the device in your dashboard. First, set the bottom edge of the road. The device must...