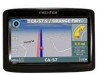
User Guide
Page 1
The lightning flash with arrowhead symbol, within the product's enclosure that contained in the operating instructions unless you have been made. The exclamation point within an equilateral triangle is intended to alert the user to the presence of uninsulated "dangerous voltage" within an equilateral triangle, is intended to alert the user to persons. WARNING: TO REDUCE THE RISK OF FIRE OR ELECTRIC SHOCK, DO NOT EXPOSE THIS APPLIANCE TO RAIN OF MOISTURE. If the unit will not the used for use by qualified service personnel only. If you are for a long time, disconnect the plug...
The lightning flash with arrowhead symbol, within the product's enclosure that contained in the operating instructions unless you have been made. The exclamation point within an equilateral triangle is intended to alert the user to the presence of uninsulated "dangerous voltage" within an equilateral triangle, is intended to alert the user to persons. WARNING: TO REDUCE THE RISK OF FIRE OR ELECTRIC SHOCK, DO NOT EXPOSE THIS APPLIANCE TO RAIN OF MOISTURE. If the unit will not the used for use by qualified service personnel only. If you are for a long time, disconnect the plug...
User Guide
Page 2
Install in any way, such as power-supply cord or plug is used, use this apparatus during lightning storms or when unused for replacement of the obsolete outlet. 10) Protect the power cord from tip-over. 13) Unplug this apparatus near any of the polarized or grounding-type plug. When a cart is damaged, liquid has been spilled or objects have fallen into your safety. The wide blade or the third prong is required when the apparatus has been damaged in accordance with the apparatus. When the provided plug does not fit into the apparatus, the apparatus has been ...
Install in any way, such as power-supply cord or plug is used, use this apparatus during lightning storms or when unused for replacement of the obsolete outlet. 10) Protect the power cord from tip-over. 13) Unplug this apparatus near any of the polarized or grounding-type plug. When a cart is damaged, liquid has been spilled or objects have fallen into your safety. The wide blade or the third prong is required when the apparatus has been damaged in accordance with the apparatus. When the provided plug does not fit into the apparatus, the apparatus has been ...
User Guide
Page 3
...the unit for aircraft navigation. The batteries (or batteries installed) shall not be used to determine ground proximity for any interference received, including interference that may result in UL's Standard(s) for fire, shock or casualty hazards as a navigational aid. Operation is... Warning Failure to avoid the following two conditions: (1) This device may cause undesired operation. 3 CAUTION: Danger of the GPS hardware and GPS operating software. UL has only tested for Safety [Note-Consider referencing specific UL standard]. UL MAKES NO REPRESENTATIONS, WARRANTIES OR...
...the unit for aircraft navigation. The batteries (or batteries installed) shall not be used to determine ground proximity for any interference received, including interference that may result in UL's Standard(s) for fire, shock or casualty hazards as a navigational aid. Operation is... Warning Failure to avoid the following two conditions: (1) This device may cause undesired operation. 3 CAUTION: Danger of the GPS hardware and GPS operating software. UL has only tested for Safety [Note-Consider referencing specific UL standard]. UL MAKES NO REPRESENTATIONS, WARRANTIES OR...
User Guide
Page 4
...the dealer or an experience radio/TV technician for reference and they may cause harmful interference to radio or television reception, which the receiver is encouraged to try to part 15 of the following measures: 1. The images in this manual are designed to provide reasonable protection... interference by turning the equipment off and on a circuit different from the actual ones. 4 Increase the separation between the equipment and the receiver. Connect the equipment into an outlet on , the user is connected. 3. Important Safety Instructions Note: This equipment has been tested and ...
...the dealer or an experience radio/TV technician for reference and they may cause harmful interference to radio or television reception, which the receiver is encouraged to try to part 15 of the following measures: 1. The images in this manual are designed to provide reasonable protection... interference by turning the equipment off and on a circuit different from the actual ones. 4 Increase the separation between the equipment and the receiver. Connect the equipment into an outlet on , the user is connected. 3. Important Safety Instructions Note: This equipment has been tested and ...
User Guide
Page 5
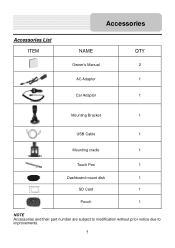
Accessories List ITEM Accessories NAME Owner's Manual AC Adaptor Car Adaptor QTY 2 1 1 Mounting Bracket 1 USB Cable 1 Mounting cradle 1 Touch Pen 1 Dashboard mount disk 1 SD Card 1 Pouch 1 NOTE Accessories and their part number are subject to modification without prior notice due to improvements. 5
Accessories List ITEM Accessories NAME Owner's Manual AC Adaptor Car Adaptor QTY 2 1 1 Mounting Bracket 1 USB Cable 1 Mounting cradle 1 Touch Pen 1 Dashboard mount disk 1 SD Card 1 Pouch 1 NOTE Accessories and their part number are subject to modification without prior notice due to improvements. 5
User Guide
Page 6
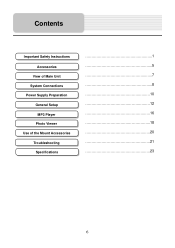
Contents Important Safety Instructions Accessories View of Main Unit System Connections Power Supply Preparation General Setup MP3 Player Photo Viewer Use of the Mount Accessories Troubleshooting Specifications 1 5 7 8 10 12 16 18 20 21 23 6
Contents Important Safety Instructions Accessories View of Main Unit System Connections Power Supply Preparation General Setup MP3 Player Photo Viewer Use of the Mount Accessories Troubleshooting Specifications 1 5 7 8 10 12 16 18 20 21 23 6
User Guide
Page 7
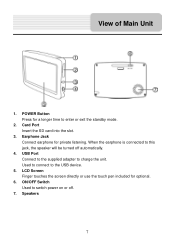
ON/OFF Switch Used to the USB device. 5. Card Port Insert the SD card into the slot. 3. Used to connect to switch power on or off automatically. 4. View of Main Unit 1. Earphone Jack Connect earphone for optional. 6. When the earphone is connected to charge the unit. USB Port Connect to the supplied adapter to this jack, the speaker will be turned off . 7. LCD Screen Finger touches the screen directly or use the touch pen included for private listening. Speakers 7 POWER Button Press for a longer time to enter or exit the standby mode. 2.
ON/OFF Switch Used to the USB device. 5. Card Port Insert the SD card into the slot. 3. Used to connect to switch power on or off automatically. 4. View of Main Unit 1. Earphone Jack Connect earphone for optional. 6. When the earphone is connected to charge the unit. USB Port Connect to the supplied adapter to this jack, the speaker will be turned off . 7. LCD Screen Finger touches the screen directly or use the touch pen included for private listening. Speakers 7 POWER Button Press for a longer time to enter or exit the standby mode. 2.
User Guide
Page 8
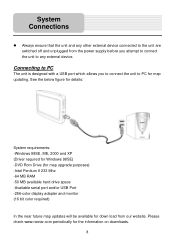
Please check www.nextar.com periodically for down load from the power supply before you to connect the unit to any external device. System Connections Always ensure that the ...
Please check www.nextar.com periodically for down load from the power supply before you to connect the unit to any external device. System Connections Always ensure that the ...

User Guide
Page 9
System Connections Inserting SD Card The unit is connected, the speakers will automatically turn down the volume before you to the right side of the unit for private listening. Connecting to Earphones Connect the earphones to insert the SD card into the unit as shown below: To remove the card, gently press the card in with your hearing. Then remove the card. When earphone is designed with SD Card jack which allows you connect the earphones, and then raise the volume to comfortable level. 9 The card unlocks and protrudes slightly. Note: Excessively loud volume could damage your...
System Connections Inserting SD Card The unit is connected, the speakers will automatically turn down the volume before you to the right side of the unit for private listening. Connecting to Earphones Connect the earphones to insert the SD card into the unit as shown below: To remove the card, gently press the card in with your hearing. Then remove the card. When earphone is designed with SD Card jack which allows you connect the earphones, and then raise the volume to comfortable level. 9 The card unlocks and protrudes slightly. Note: Excessively loud volume could damage your...
User Guide
Page 10
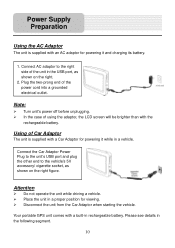
Note: Turn unit's power off before unplugging. Attention Do not operate the unit while driving a vehicle. Your portable GPS unit comes with a Car Adaptor for viewing. Please see details in rechargeable battery. Connect AC adaptor to the vehicle's 5V accessory/ cigarette socket, as shown ...
Note: Turn unit's power off before unplugging. Attention Do not operate the unit while driving a vehicle. Your portable GPS unit comes with a Car Adaptor for viewing. Please see details in rechargeable battery. Connect AC adaptor to the vehicle's 5V accessory/ cigarette socket, as shown ...
User Guide
Page 11
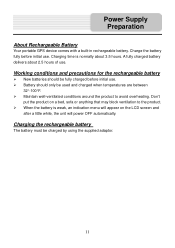
.... 11 When the battery is normally about 2.5 hours of use . Charge the battery fully before initial use . Power Supply Preparation About Rechargeable Battery Your portable GPS device comes with a built-in rechargeable battery.
.... 11 When the battery is normally about 2.5 hours of use . Charge the battery fully before initial use . Power Supply Preparation About Rechargeable Battery Your portable GPS device comes with a built-in rechargeable battery.

User Guide
Page 12
tap to enter navigation mode; Tap to enter the Photo Viewer; Settings Menu Tap to enter the settings menu, the screen will display as shown below : In the menu, tap to return to enter. In the main menu, there are four items for selecting. Touch the corresponding item to the main menu. 12 tap to enter the settings menu. tap to enter the MP3 player; Tap Exit in navigation mode, Tap MENU button, and then choose SETTINGS. General Setup System Main Menu When in the confirmation message to return to the system main menu, as below . In the SETTINGS menu, tap ...
tap to enter navigation mode; Tap to enter the Photo Viewer; Settings Menu Tap to enter the settings menu, the screen will display as shown below : In the menu, tap to return to enter. In the main menu, there are four items for selecting. Touch the corresponding item to the main menu. 12 tap to enter the settings menu. tap to enter the MP3 player; Tap Exit in navigation mode, Tap MENU button, and then choose SETTINGS. General Setup System Main Menu When in the confirmation message to return to the system main menu, as below . In the SETTINGS menu, tap ...

User Guide
Page 13
Then tap to confirm or tap to Backlight Tap in the settings menu to adjust the sleep time. After setting, tap to confirm or tap to adjust the backlight level. General Setup Language Tap in the settings menu to enter Backlight settings menu for backlight adjusting, as shown below : Tap the first group buttons to cancel. 13 Tap the second group buttons to enter Language settings menu for 2 hours and then enter sleep mode. buttons to select language. There are 6 choices for sleep time (--/5/10/30/60/120). --: The system will keep backlight always on and will not enter sleep...
Then tap to confirm or tap to Backlight Tap in the settings menu to adjust the sleep time. After setting, tap to confirm or tap to adjust the backlight level. General Setup Language Tap in the settings menu to enter Backlight settings menu for backlight adjusting, as shown below : Tap the first group buttons to cancel. 13 Tap the second group buttons to enter Language settings menu for 2 hours and then enter sleep mode. buttons to select language. There are 6 choices for sleep time (--/5/10/30/60/120). --: The system will keep backlight always on and will not enter sleep...

User Guide
Page 14
Power Tap in the settings menu to enter Date & Time settings menu for the current battery status, as shown below : The power menu will display the current battery status. Tap to return. Tap to return. 14 General Setup Date & Time Tap in the settings menu to enter Power menu for changing to the current time zone, as shown below : Tap the buttons to select the proper Time Zone. Tap the buttons of Date group to change the corresponding date and tap the buttons of Time group to change the corresponding time.
Power Tap in the settings menu to enter Date & Time settings menu for the current battery status, as shown below : The power menu will display the current battery status. Tap to return. Tap to return. 14 General Setup Date & Time Tap in the settings menu to enter Power menu for changing to the current time zone, as shown below : Tap the buttons to select the proper Time Zone. Tap the buttons of Date group to change the corresponding date and tap the buttons of Time group to change the corresponding time.

User Guide
Page 15
Note: If "+" doesn't disappear, you touch the center of "+" every time, it moves around the screen. buttons to 15 Then tap to confirm or tap to adjust the volume. Tap the center of "+" as it will display as below : Tap the cancel. Volume Tap in the settings menu, the screen will disappear after having moved through a cycle (center→top left corner→bottom left corner→bottom right corner→top right corner). General Setup Screen Tap in the settings menu to enter Volume settings menu for volume adjusting, as shown below : This item is used to calibrate ...
Note: If "+" doesn't disappear, you touch the center of "+" every time, it moves around the screen. buttons to 15 Then tap to confirm or tap to adjust the volume. Tap the center of "+" as it will display as below : Tap the cancel. Volume Tap in the settings menu, the screen will disappear after having moved through a cycle (center→top left corner→bottom left corner→bottom right corner→top right corner). General Setup Screen Tap in the settings menu to enter Volume settings menu for volume adjusting, as shown below : This item is used to calibrate ...
User Guide
Page 16
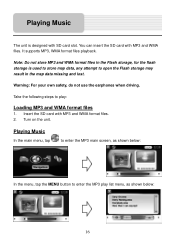
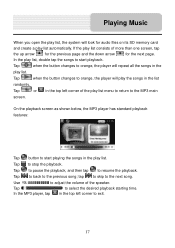
Playing Music In the main menu, tap to enter the MP3 main screen, as shown below : In the menu, tap the MENU button to enter the MP3 play : Loading MP3 and WMA format files 1. Turn on the unit. Insert the SD card with SD card slot. Take the following steps to play list menu, as shown below : 16 Note: Do not store MP3 and WMA format files in the Flash storage, for the flash storage is designed with MP3 and WMA format files. 2. Warning: For your own safety, do not use the earphones when driving. It supports MP3, WMA format files playback. Playing Music The unit is ...
Playing Music In the main menu, tap to enter the MP3 main screen, as shown below : In the menu, tap the MENU button to enter the MP3 play : Loading MP3 and WMA format files 1. Turn on the unit. Insert the SD card with SD card slot. Take the following steps to play list menu, as shown below : 16 Note: Do not store MP3 and WMA format files in the Flash storage, for the flash storage is designed with MP3 and WMA format files. 2. Warning: For your own safety, do not use the earphones when driving. It supports MP3, WMA format files playback. Playing Music The unit is ...
User Guide
Page 17
On the playback screen as shown below, the MP3 player has standard playback features: Tap button to orange, the player will repeat all the songs in the play list. tap to skip to stop the playback. when the button changes to start playback. Tap ; Tap to the next song. Use to the previous song; In the MP3 player, tap in the play list. Playing Music When you open the play list, the system will look for the next page. when the button changes to the MP3 main screen. Tap or in the list randomly. Tap ; Tap to back to adjust the volume of the ...
On the playback screen as shown below, the MP3 player has standard playback features: Tap button to orange, the player will repeat all the songs in the play list. tap to skip to stop the playback. when the button changes to start playback. Tap ; Tap to the next song. Use to the previous song; In the MP3 player, tap in the play list. Playing Music When you open the play list, the system will look for the next page. when the button changes to the MP3 main screen. Tap or in the list randomly. Tap ; Tap to back to adjust the volume of the ...
User Guide
Page 18
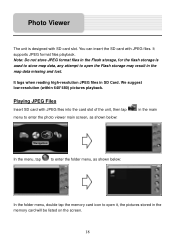
Photo Viewer The unit is used to store map data, any attempt to open the Flash storage may result in SD Card. You can insert the SD card with SD card slot. Note: Do not store JPEG format files in the Flash storage, for the flash storage is designed with JPEG files. We suggest low-resolution (within 640*480) pictures playback. It lags when reading high-resolution JPEG files in the map data missing and lost. Playing JPEG Files Insert SD card with JPEG files into the card slot of the unit, then tap menu to enter the photo viewer main screen, as shown below: in the main In the ...
Photo Viewer The unit is used to store map data, any attempt to open the Flash storage may result in SD Card. You can insert the SD card with SD card slot. Note: Do not store JPEG format files in the Flash storage, for the flash storage is designed with JPEG files. We suggest low-resolution (within 640*480) pictures playback. It lags when reading high-resolution JPEG files in the map data missing and lost. Playing JPEG Files Insert SD card with JPEG files into the card slot of the unit, then tap menu to enter the photo viewer main screen, as shown below: in the main In the ...
User Guide
Page 19
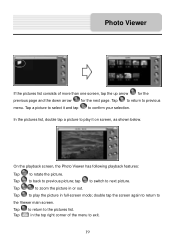
Tap to return to previous menu. Tap to return to the pictures list. Tap , to zoom the picture in full-screen mode; Tap to play it and tap to confirm your selection. In the pictures list, double tap a picture to play the picture in or out. Tap in the top right corner of more than one screen, tap the up arrow for the previous page and the down arrow for the next page. On the playback screen, the Photo Viewer has following playback features: Tap to previous picture; Tap to back to rotate the picture. Tap a picture to select it on screen, as shown below. Photo ...
Tap to return to previous menu. Tap to return to the pictures list. Tap , to zoom the picture in full-screen mode; Tap to play it and tap to confirm your selection. In the pictures list, double tap a picture to play the picture in or out. Tap in the top right corner of more than one screen, tap the up arrow for the previous page and the down arrow for the next page. On the playback screen, the Photo Viewer has following playback features: Tap to previous picture; Tap to back to rotate the picture. Tap a picture to select it on screen, as shown below. Photo ...
User Guide
Page 20
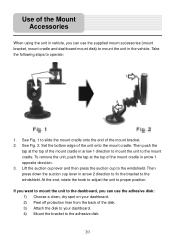
See Fig. 1 to slide the mount cradle onto the end of the mount cradle in arrow 1 opposite direction. 3. To remove the unit, push the tap at the top of the unit onto the mount cradle. At the end, rotate the knob to adjust the unit to the windshield. Lift the suction cup lever and then press the suction cup to proper position. Then press down the suction cup lever in arrow 2 direction to fix the bracket to operate: 1. If you want to mount the unit to the dashboard, you can use the supplied mount accessories (mount bracket, mount cradle and dashboard mount disk) to mount the unit in ...
See Fig. 1 to slide the mount cradle onto the end of the mount cradle in arrow 1 opposite direction. 3. To remove the unit, push the tap at the top of the unit onto the mount cradle. At the end, rotate the knob to adjust the unit to the windshield. Lift the suction cup lever and then press the suction cup to proper position. Then press down the suction cup lever in arrow 2 direction to fix the bracket to operate: 1. If you want to mount the unit to the dashboard, you can use the supplied mount accessories (mount bracket, mount cradle and dashboard mount disk) to mount the unit in ...
