User Manual
Page 2
... RISK OF ELECTRIC SHOCK, DO NOT REMOVE COVER (OR BACK). REFER SERVICING TO QUALIFIED SERVICE PERSONNEL. POWER SUPPLY: Connect the supplied adapter to the side of the unit in the operating instructions unless you have been made. NOTE: Before plugging the power cord into an AC outlet, make sure that may be used for a long time, disconnect the plug from the outlet...
... RISK OF ELECTRIC SHOCK, DO NOT REMOVE COVER (OR BACK). REFER SERVICING TO QUALIFIED SERVICE PERSONNEL. POWER SUPPLY: Connect the supplied adapter to the side of the unit in the operating instructions unless you have been made. NOTE: Before plugging the power cord into an AC outlet, make sure that may be used for a long time, disconnect the plug from the outlet...

User Manual
Page 3
...prong. Important Safety Instructions NOTES 1) Read these instructions. 2) Keep these instructions. 3) Heed all warnings. 4) Follow all servicing to qualified service personnel. When the provided plug does not fit into the apparatus, the apparatus has been exposed to rain or moisture, does not operate normally, or ... your outlet, consult an electrician for long periods of time. 14) Refer all instructions. 5) Do not use this apparatus during lightning storms or when unused for replacement of the obsolete outlet. 10) Protect the power cord from being walked on the apparatus. 2 A polarized...
...prong. Important Safety Instructions NOTES 1) Read these instructions. 2) Keep these instructions. 3) Heed all warnings. 4) Follow all servicing to qualified service personnel. When the provided plug does not fit into the apparatus, the apparatus has been exposed to rain or moisture, does not operate normally, or ... your outlet, consult an electrician for long periods of time. 14) Refer all instructions. 5) Do not use this apparatus during lightning storms or when unused for replacement of the obsolete outlet. 10) Protect the power cord from being walked on the apparatus. 2 A polarized...
User Manual
Page 4
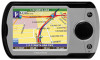
..., weather conditions, or other factors that may cause undesired operation. Operation is designed to provide you with part 15 of direction, distance, location, or topography. This product should not be different from the actual ones. 3 Do not attempt to use the unit for aircraft navigation. Use the unit only as a navigational aid. Important Safety Instructions Warning Failure to avoid the following two conditions: (1) This device...
..., weather conditions, or other factors that may cause undesired operation. Operation is designed to provide you with part 15 of direction, distance, location, or topography. This product should not be different from the actual ones. 3 Do not attempt to use the unit for aircraft navigation. Use the unit only as a navigational aid. Important Safety Instructions Warning Failure to avoid the following two conditions: (1) This device...
User Manual
Page 5
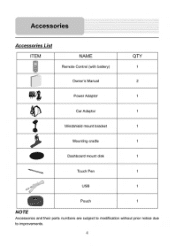
Touch Pen 1 ' l_P USB 1 Pouch 1 NOTE Accessories and their parts numbers are subject to modification without prior notice due to improvements. 4 Dashboard mount disk 1 --,, z2... Accessories Accessories List ITEM W--- NAME Remote Control (with battery) 1 11 ..,p Owner's Manual Power Adaptor Car Adaptor QTY 1 2 1 1 Windshield mount bracket 1 Mounting cradle 1 ) I.
Touch Pen 1 ' l_P USB 1 Pouch 1 NOTE Accessories and their parts numbers are subject to modification without prior notice due to improvements. 4 Dashboard mount disk 1 --,, z2... Accessories Accessories List ITEM W--- NAME Remote Control (with battery) 1 11 ..,p Owner's Manual Power Adaptor Car Adaptor QTY 1 2 1 1 Windshield mount bracket 1 Mounting cradle 1 ) I.
User Manual
Page 6
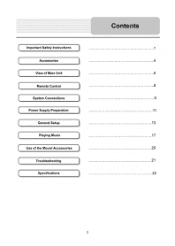
Important Safety Instructions Accessories ) View of Main Unit Remote Control ) System Connections Power Supply Preparation General Setup Playing Music Use of the Mount Accessories Troubleshooting Specifications Contents 1 4 6 8 9 11 13 17 20 21 22 5
Important Safety Instructions Accessories ) View of Main Unit Remote Control ) System Connections Power Supply Preparation General Setup Playing Music Use of the Mount Accessories Troubleshooting Specifications Contents 1 4 6 8 9 11 13 17 20 21 22 5

User Manual
Page 7
LCD Screen 6. View of Main Unit Front View 6 1. Remote Sensor Receive signal from remote control for operation. 6 POWER button Press the power button to enter the main menu. 2. When the battery is red. MENU button Press to enter or exit the standby mode. 4. Charge Indicator When charging the battery, it is fully charged, it turns green. 5. Speaker 3.
LCD Screen 6. View of Main Unit Front View 6 1. Remote Sensor Receive signal from remote control for operation. 6 POWER button Press the power button to enter the main menu. 2. When the battery is red. MENU button Press to enter or exit the standby mode. 4. Charge Indicator When charging the battery, it is fully charged, it turns green. 5. Speaker 3.
User Manual
Page 8
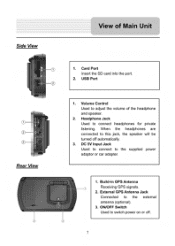
.... 2. USB Port 0 1 I Rear View 1. Volume Control Used to connect headphones for private listening. Diu 2 1. Headphone Jack Used to adjust the volume of Main Unit 1. ON/OFF Switch Used to this jack, the speaker will be turned off . 7 External GPS Antenna Jack Connected to the supplied power adaptor or car adapter. DC 5V Input Jack Used to connect to the external antenna (optional). 3. When the headphones are connected to switch power on or off automatically. 3. Build-in GPS Antenna Receiving GPS signals. 2. Side View O View...
.... 2. USB Port 0 1 I Rear View 1. Volume Control Used to connect headphones for private listening. Diu 2 1. Headphone Jack Used to adjust the volume of Main Unit 1. ON/OFF Switch Used to this jack, the speaker will be turned off . 7 External GPS Antenna Jack Connected to the supplied power adaptor or car adapter. DC 5V Input Jack Used to connect to the external antenna (optional). 3. When the headphones are connected to switch power on or off automatically. 3. Build-in GPS Antenna Receiving GPS signals. 2. Side View O View...

User Manual
Page 9
direction buttons Press to select items in the setup menu. 3. 1 ► direction buttons Press to zoom in the setup menu. 4. OK button Press to turn on or off the speaker output. 9. MUTE button Press to confirm selection. 5. POWER button Press to zoom out the map. 7. button Press to enter or exit standby mode. 2. BACK button Press to return to the previous menu. 10. + button Press to adjust items in the map. 8 MENU button Press to enter the map view. 8. 0 3 O id 1. MAP button Press to enter the main setup menu. 6. -
direction buttons Press to select items in the setup menu. 3. 1 ► direction buttons Press to zoom in the setup menu. 4. OK button Press to turn on or off the speaker output. 9. MUTE button Press to confirm selection. 5. POWER button Press to zoom out the map. 7. button Press to enter or exit standby mode. 2. BACK button Press to return to the previous menu. 10. + button Press to adjust items in the map. 8 MENU button Press to enter the map view. 8. 0 3 O id 1. MAP button Press to enter the main setup menu. 6. -

User Manual
Page 10
... www.nextar.com periodically for down load from another devise, such as PC, etc. Once connected, you may use the device for downloading files from our website. Connecting to External USB Device The unit is designed with a USB port which allows you attempt to connect the unit to any other external device connected to the unit are switched off and unplugged from the power supply before you to connect to a USB device via the USB cable...
... www.nextar.com periodically for down load from another devise, such as PC, etc. Once connected, you may use the device for downloading files from our website. Connecting to External USB Device The unit is designed with a USB port which allows you attempt to connect the unit to any other external device connected to the unit are switched off and unplugged from the power supply before you to connect to a USB device via the USB cable...
User Manual
Page 12
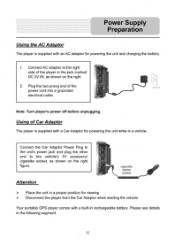
...: Turn player's power off before unplugging. Disconnect the player from the Car Adaptor when starting the vehicle. Your portable GPS player comes with a Car Adaptor for powering the unit while in a vehicle. Attention cigarette lighter socket Place the unit in a proper position for powering the unit and charging the battery. 1. Using of Car Adaptor The player is supplied with an AC adaptor for viewing. Power Supply Preparation Using...
...: Turn player's power off before unplugging. Disconnect the player from the Car Adaptor when starting the vehicle. Your portable GPS player comes with a Car Adaptor for powering the unit while in a vehicle. Attention cigarette lighter socket Place the unit in a proper position for powering the unit and charging the battery. 1. Using of Car Adaptor The player is supplied with an AC adaptor for viewing. Power Supply Preparation Using...
User Manual
Page 13
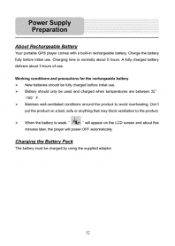
.... Charge the battery fully before initial use. Battery should be fully charged before initial use . When the battery is normally about 3 hours of use . Charging the Battery Pack The battery must be used and charged when temperatures are between 32' -100° F. Working conditions and precautions for the rechargeable battery New batteries should only be charged by using the supplied adaptor. 12 Power Supply Preparation About Rechargeable Battery Your portable GPS...
.... Charge the battery fully before initial use. Battery should be fully charged before initial use . When the battery is normally about 3 hours of use . Charging the Battery Pack The battery must be used and charged when temperatures are between 32' -100° F. Working conditions and precautions for the rechargeable battery New batteries should only be charged by using the supplied adaptor. 12 Power Supply Preparation About Rechargeable Battery Your portable GPS...

User Manual
Page 14
General Setup General Setup When turn on the unit, the screen will display as shown below : Navigation In the menu, tap "- Tap k to the main menu. Settings Menu Tap k- Press the MENU button to return to enter the settings menu. IIit dolmasbolo oo P.A.hd.l.orto opening this software *trope Woe no rasp:mildly late ccessplances dry use thl Ineould.rdMI) twi; or Ina and userpron.* Tap I Agree to enter navigation mode. In...
General Setup General Setup When turn on the unit, the screen will display as shown below : Navigation In the menu, tap "- Tap k to the main menu. Settings Menu Tap k- Press the MENU button to return to enter the settings menu. IIit dolmasbolo oo P.A.hd.l.orto opening this software *trope Woe no rasp:mildly late ccessplances dry use thl Ineould.rdMI) twi; or Ina and userpron.* Tap I Agree to enter navigation mode. In...

User Manual
Page 15
... shown below : Eno• CO Settings Tap the i e buttons to select language. After setting, tap to confirm or tap X to adjust the backlight level. Backlight Tap in the settings menu to enter Language settings menu for 2 hours and then enter sleep mode. General Setup Language Tap ',` in the settings menu to enter Backlight settings menu for backlight adjusting, as shown below : 9 40 • 40 41).o O Settings 4313 • Backlight Tap the first group 4 ►...
... shown below : Eno• CO Settings Tap the i e buttons to select language. After setting, tap to confirm or tap X to adjust the backlight level. Backlight Tap in the settings menu to enter Language settings menu for 2 hours and then enter sleep mode. General Setup Language Tap ',` in the settings menu to enter Backlight settings menu for backlight adjusting, as shown below : 9 40 • 40 41).o O Settings 4313 • Backlight Tap the first group 4 ►...
User Manual
Page 16
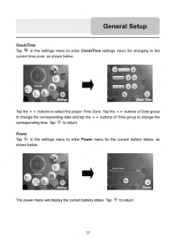
... the settings menu to enter Clock/Time settings menu for the current battery status, as shown below : B.cry Status 100% 0 O Settings The power menu will display the current battery status. to return. Tap the buttons of Date group to change the corresponding date and tap the buttons of Time group to change the corresponding time. Tap t- Tap t- General Setup Clock/Time Tap O in the settings menu to enter Power menu for changing to the current time zone...
... the settings menu to enter Clock/Time settings menu for the current battery status, as shown below : B.cry Status 100% 0 O Settings The power menu will display the current battery status. to return. Tap the buttons of Date group to change the corresponding date and tap the buttons of Time group to change the corresponding time. Tap t- Tap t- General Setup Clock/Time Tap O in the settings menu to enter Power menu for changing to the current time zone...
User Manual
Page 17
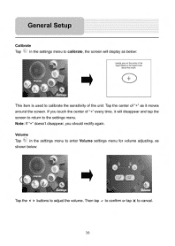
...'t disappear, you touch the center of "+" every time, it moves around the screen. I6 If you should rectify again. Tap the center of "+" as it will display as below : 1, OO Settings • • CICD Volume Tap the 4 ► buttons to adjust the volume. General Setup Calibrate Tap in the settings menu to enter Volume settings menu for volume adjusting, as shown below : Comity Gross en tho coftor...
...'t disappear, you touch the center of "+" every time, it moves around the screen. I6 If you should rectify again. Tap the center of "+" as it will display as below : 1, OO Settings • • CICD Volume Tap the 4 ► buttons to adjust the volume. General Setup Calibrate Tap in the settings menu to enter Volume settings menu for volume adjusting, as shown below : Comity Gross en tho coftor...
User Manual
Page 18
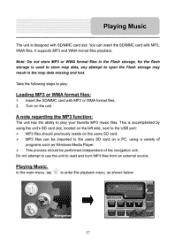
... to the USB port: MP3 files should be performed independent of programs such as shown below: Navigation 17 TIT r re, Turn on the users SD card. This is accomplished by using a variety of the navigation unit. MP3 files can insert the SD/MMC card with MP3 or WMA format files. 2. to play your favorite MP3 music files. Take the following steps to enter the playback menu, as...
... to the USB port: MP3 files should be performed independent of programs such as shown below: Navigation 17 TIT r re, Turn on the users SD card. This is accomplished by using a variety of the navigation unit. MP3 files can insert the SD/MMC card with MP3 or WMA format files. 2. to play your favorite MP3 music files. Take the following steps to enter the playback menu, as...
User Manual
Page 20
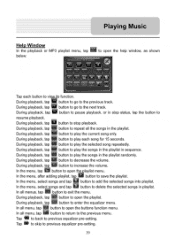
... playback, tap button to increase the volume. In the menu, select songs and tap T' button to resume playback. MI During playback, tap button to the next track. El During playback, tap button to decrease the volume. In the menu, tap button to previous equalizer pre-setting. Tap to back to open th il.laylist menu. Tap r to skip to add the selected songs...
... playback, tap button to increase the volume. In the menu, select songs and tap T' button to resume playback. MI During playback, tap button to the next track. El During playback, tap button to decrease the volume. In the menu, tap button to previous equalizer pre-setting. Tap to back to open th il.laylist menu. Tap r to skip to add the selected songs...
User Manual
Page 21
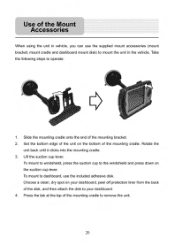
... cup to dashboard, use the supplied mount accessories (mount bracket, mount cradle and dashboard mount disk) to remove the unit. 20 Use of the Mount Accessories When using the unit in the vehicle. Rotate the unit back until it clicks into the mounting cradle. 3. Press the tab at the top of the mounting cradle to mount the unit in vehicle, you can use the included adhesive disk...
... cup to dashboard, use the supplied mount accessories (mount bracket, mount cradle and dashboard mount disk) to remove the unit. 20 Use of the Mount Accessories When using the unit in the vehicle. Rotate the unit back until it clicks into the mounting cradle. 3. Press the tab at the top of the mounting cradle to mount the unit in vehicle, you can use the included adhesive disk...
User Manual
Page 22
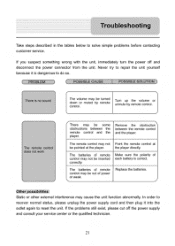
... the remote control and the player. If the problems still exist, please cut off and disconnect the power connector from the unit. The remote control may be turned down or muted by remote control. The batteries of each battery is no sound The volume may not Point the remote control at the player. Make sure the polarity of remote Replace the batteries. Remove the obstruction between the remote control and the player. Troubleshooting Take...
... the remote control and the player. If the problems still exist, please cut off and disconnect the power connector from the unit. The remote control may be turned down or muted by remote control. The batteries of each battery is no sound The volume may not Point the remote control at the player. Make sure the polarity of remote Replace the batteries. Remove the obstruction between the remote control and the player. Troubleshooting Take...

User Manual
Page 23
DC 5V < 8W 130mmX76mmX33mm (L*W*D) About 0.25kg DESIGN AND SPECIFICATIONS ARE SUBJECT TO CHANGE WITHOUT NOTICE 22 Specifications TFT screen size Frequency Response Audio Signal-to-noise Rate Audio distortion or noise Channel Separation Dynamic Range Power Power Consumption Dimensions Weight 3.5 inches 20Hz-20kHz ?.- 65dB .-C.. -20dB (1kHz) ..≥-70dB (1kHz) .≥-.-80dB (1kHz) AC 100-240V - 50/60Hz;
DC 5V < 8W 130mmX76mmX33mm (L*W*D) About 0.25kg DESIGN AND SPECIFICATIONS ARE SUBJECT TO CHANGE WITHOUT NOTICE 22 Specifications TFT screen size Frequency Response Audio Signal-to-noise Rate Audio distortion or noise Channel Separation Dynamic Range Power Power Consumption Dimensions Weight 3.5 inches 20Hz-20kHz ?.- 65dB .-C.. -20dB (1kHz) ..≥-70dB (1kHz) .≥-.-80dB (1kHz) AC 100-240V - 50/60Hz;


