
ReadyNAS 2100 Installation Guide
Page 1
... media servers, printers, VLAN, or user accounts and quotas. Also, if you will use a static IP configuration, you do not have to use the first workgroup name it on installing disks and configuring RAID. On the Security Mode tab page, accept the default option of the ReadyNAS to your DHCP server, reserve the IP address assigned for instructions on user or group accounts. Click Next to the ReadyNAS 2100 User Manual for instructions on . Refer to proceed. 8. Next, you through setting up accounts. NETGEAR...
... media servers, printers, VLAN, or user accounts and quotas. Also, if you will use a static IP configuration, you do not have to use the first workgroup name it on installing disks and configuring RAID. On the Security Mode tab page, accept the default option of the ReadyNAS to your DHCP server, reserve the IP address assigned for instructions on user or group accounts. Click Next to the ReadyNAS 2100 User Manual for instructions on . Refer to proceed. 8. Next, you through setting up accounts. NETGEAR...

ReadyNAS 2100 Installation Guide
Page 2
... the shares. Depending on using a UPS. The ReadyNAS 2100 User Manual provides instructions on the size of the first disk (there's no protection from a Windows PC 1. When prompted, enter the user name and password to connect to power off the unit). Redundancy and Expansion A one-disk device has no redundancy and provides no need for worldwide regional customer support centers are unobstructed. This assures an orderly shutdown. Accessing Shares from a disk failure.
... the shares. Depending on using a UPS. The ReadyNAS 2100 User Manual provides instructions on the size of the first disk (there's no protection from a Windows PC 1. When prompted, enter the user name and password to connect to power off the unit). Redundancy and Expansion A one-disk device has no redundancy and provides no need for worldwide regional customer support centers are unobstructed. This assures an orderly shutdown. Accessing Shares from a disk failure.
ReadyNAS 2100 User Manual
Page 5
... the Status Displays, Ports, and Drive Bay 1-4 Front Panel ...1-4 Disk Tray Release and Tray Latch 1-4 Control Panel ...1-5 Rear Panel ...1-7 Initial Setup ...1-7 Default IP Address, Login Name, and Password 1-8 The RAIDar Setup Utility 1-8 The FrontView Management Console 1-9 NETGEAR ReadyNAS Community 1-10 Chapter 2 Setting Up and Managing Your ReadyNAS 2100 Customizing Network Settings 2-1 Ethernet Interfaces 2-2 Global Network Settings 2-6 WINS ...2-7 DHCP ...2-7 Route: A Manual Routing Table 2-8 Updating the Admin Password 2-8 Selecting Services for Share Access 2-10...
... the Status Displays, Ports, and Drive Bay 1-4 Front Panel ...1-4 Disk Tray Release and Tray Latch 1-4 Control Panel ...1-5 Rear Panel ...1-7 Initial Setup ...1-7 Default IP Address, Login Name, and Password 1-8 The RAIDar Setup Utility 1-8 The FrontView Management Console 1-9 NETGEAR ReadyNAS Community 1-10 Chapter 2 Setting Up and Managing Your ReadyNAS 2100 Customizing Network Settings 2-1 Ethernet Interfaces 2-2 Global Network Settings 2-6 WINS ...2-7 DHCP ...2-7 Route: A Manual Routing Table 2-8 Updating the Admin Password 2-8 Selecting Services for Share Access 2-10...
ReadyNAS 2100 User Manual
Page 6
... 2-26 Clock, System Time, and NTP Options 2-27 Alerts, Alert Contacts, Alert Settings, SNMP, and SMTP 2-27 Language Settings 2-30 Updating ReadyNAS 2100 2-31 Configuration Backup 2-34 Chapter 3 Managing User Access Understanding Disk Share Security Access Modes 3-1 User Security Mode 3-2 Domain Security Mode 3-4 Setting Up User and Group Accounts 3-5 Managing Groups ...3-5 Managing Users ...3-7 Setting Accounts Preferences 3-9 Changing User Passwords 3-9 Managing Your Shares 3-10 Adding Shares ...3-10 Managing Shares 3-11 Web Browser ...3-16 FTP/FTPS ...3-18 Rsync ...3-19 vi...
... 2-26 Clock, System Time, and NTP Options 2-27 Alerts, Alert Contacts, Alert Settings, SNMP, and SMTP 2-27 Language Settings 2-30 Updating ReadyNAS 2100 2-31 Configuration Backup 2-34 Chapter 3 Managing User Access Understanding Disk Share Security Access Modes 3-1 User Security Mode 3-2 Domain Security Mode 3-4 Setting Up User and Group Accounts 3-5 Managing Groups ...3-5 Managing Users ...3-7 Setting Accounts Preferences 3-9 Changing User Passwords 3-9 Managing Your Shares 3-10 Adding Shares ...3-10 Managing Shares 3-11 Web Browser ...3-16 FTP/FTPS ...3-18 Rsync ...3-19 vi...
ReadyNAS 2100 User Manual
Page 11
... II hard drives via lockable, hot-swappable disk trays. NETGEAR ReadyNAS gigabit network storage products provide small and medium sized businesses with easy-to-use and setup, ReadyNAS features status indicators that can also allocate iSCSI target volumes on current drive capacities, the ReadyNAS provides up to back up and share data from Windows, Macintosh, and Linux systems. ReadyNAS offers extensible robust highavailability data protection. Topics discussed in a compact rack mount form factor, the ReadyNAS 2100 supports...
... II hard drives via lockable, hot-swappable disk trays. NETGEAR ReadyNAS gigabit network storage products provide small and medium sized businesses with easy-to-use and setup, ReadyNAS features status indicators that can also allocate iSCSI target volumes on current drive capacities, the ReadyNAS provides up to back up and share data from Windows, Macintosh, and Linux systems. ReadyNAS offers extensible robust highavailability data protection. Topics discussed in a compact rack mount form factor, the ReadyNAS 2100 supports...
ReadyNAS 2100 User Manual
Page 18
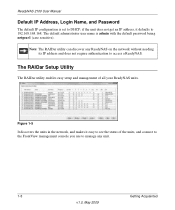
... access a ReadyNAS. The default administrator user name is set to see the status of all your ReadyNAS units. The RAIDar Setup Utility The RAIDar utility enables easy setup and management of the units, and connect to the FrontView management console you use to manage any ReadyNAS on the network without needing its IP address and does not require authentication to 192.168.168.168. ReadyNAS 2100 User Manual Default IP Address, Login Name, and Password The default IP configuration is admin...
... access a ReadyNAS. The default administrator user name is set to see the status of all your ReadyNAS units. The RAIDar Setup Utility The RAIDar utility enables easy setup and management of the units, and connect to the FrontView management console you use to manage any ReadyNAS on the network without needing its IP address and does not require authentication to 192.168.168.168. ReadyNAS 2100 User Manual Default IP Address, Login Name, and Password The default IP configuration is admin...
ReadyNAS 2100 User Manual
Page 28
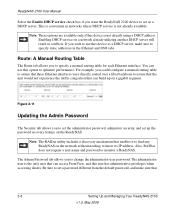
... set the administrator password, administer security, and set a password different from the default password, and make sure to specify a manual routing table for each Ethernet interface. Enabling DHCP service on the ReadyNAS. Figure 2-11 Updating the Admin Password The Security tab allows you to assure that the unit would not experience the traffic congestion that 2-8 Setting Up and Managing Your ReadyNAS 2100 v1.0, May 2009 The Admin Password tab allows you to act as a DHCP server...
... set the administrator password, administer security, and set a password different from the default password, and make sure to specify a manual routing table for each Ethernet interface. Enabling DHCP service on the ReadyNAS. Figure 2-11 Updating the Admin Password The Security tab allows you to assure that the unit would not experience the traffic congestion that 2-8 Setting Up and Managing Your ReadyNAS 2100 v1.0, May 2009 The Admin Password tab allows you to act as a DHCP server...
ReadyNAS 2100 User Manual
Page 33
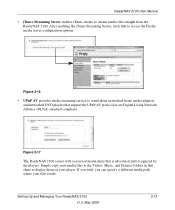
... ReadyNAS 2100. If you wish, you can specify a different media path where your player. Setting Up and Managing Your ReadyNAS 2100 v1.0, May 2009 2-13 Figure 2-16 • UPnP AV provides media streaming service to display them on your files reside. ReadyNAS 2100 User Manual • iTunes Streaming Server enables iTunes clients to access the Firefly media server configuration options. Simply copy your media files to the Videos, Music, and Pictures folders in that share to stand-alone networked home media adapters and networked DVD...
... ReadyNAS 2100. If you wish, you can specify a different media path where your player. Setting Up and Managing Your ReadyNAS 2100 v1.0, May 2009 2-13 Figure 2-16 • UPnP AV provides media streaming service to display them on your files reside. ReadyNAS 2100 User Manual • iTunes Streaming Server enables iTunes clients to access the Firefly media server configuration options. Simply copy your media files to the Videos, Music, and Pictures folders in that share to stand-alone networked home media adapters and networked DVD...

ReadyNAS 2100 User Manual
Page 41
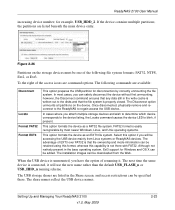
... hot-swap the disk without powering down several times to sync, and reboot. Replacing All Your Disks for more disk space and 2 TB disks are available at an attractive price, you can switch between X-RAID2 and Flex-RAID Modes You can use the ReadyNAS while the new disk synchronizes. Changing between X-RAID2 and Flex-X-RAID modes. The process involves setting the ReadyNAS 2100 to configure the volume during a 10minute delay window during boot. Unlike Fibre Channel...
... hot-swap the disk without powering down several times to sync, and reboot. Replacing All Your Disks for more disk space and 2 TB disks are available at an attractive price, you can switch between X-RAID2 and Flex-RAID Modes You can use the ReadyNAS while the new disk synchronizes. Changing between X-RAID2 and Flex-X-RAID modes. The process involves setting the ReadyNAS 2100 to configure the volume during a 10minute delay window during boot. Unlike Fibre Channel...
ReadyNAS 2100 User Manual
Page 43
... file system is properly closed. Setting Up and Managing Your ReadyNAS 2100 v1.0, May 2009 2-23 ReadyNAS 2100 User Manual increasing device number; FAT32 format is not there with FAT32. To the right of the following commands are listed beneath the main device entry. This option formats the device as an EXT3 file system. The share names reflect the USB device names. Figure 2-26 Partitions on the device. In most newer Windows, Linux...
... file system is properly closed. Setting Up and Managing Your ReadyNAS 2100 v1.0, May 2009 2-23 ReadyNAS 2100 User Manual increasing device number; FAT32 format is not there with FAT32. To the right of the following commands are listed beneath the main device entry. This option formats the device as an EXT3 file system. The share names reflect the USB device names. Figure 2-26 Partitions on the device. In most newer Windows, Linux...
ReadyNAS 2100 User Manual
Page 44
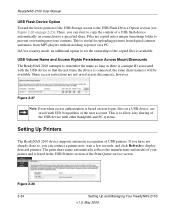
... without needing to power on connection to set the ownership of the Print Queue service screen. In User security mode, an additional option to a specified share. Share access restrictions are copied into a unique timestamp folder to copy the content of a USB flash device automatically on a PC. The print share name automatically reflects the manufacturer and model of your printer and is listed in the USB Printers section of the copied files is available. If...
... without needing to power on connection to set the ownership of the Print Queue service screen. In User security mode, an additional option to a specified share. Share access restrictions are copied into a unique timestamp folder to copy the content of a USB flash device automatically on a PC. The print share name automatically reflects the manufacturer and model of your printer and is listed in the USB Printers section of the copied files is available. If...
ReadyNAS 2100 User Manual
Page 53
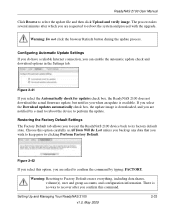
... the Download updates automatically check box, the update image is no way to recover after which you are notified by e-mail to reboot the device to confirm the command by typing: FACTORY. Figure 2-42 If you select this option, you are requested to its factory default state. ReadyNAS 2100 User Manual Click Browse to Factory Default erases everything, including data shares, volume(s), user and group accounts, and configuration information. Warning: Resetting to select the update file...
... the Download updates automatically check box, the update image is no way to recover after which you are notified by e-mail to reboot the device to confirm the command by typing: FACTORY. Figure 2-42 If you select this option, you are requested to its factory default state. ReadyNAS 2100 User Manual Click Browse to Factory Default erases everything, including data shares, volume(s), user and group accounts, and configuration information. Warning: Resetting to select the update file...

ReadyNAS 2100 User Manual
Page 55
... following sections: • "Understanding Disk Share Security Access Modes" • "Setting Up User and Group Accounts" • "Changing User Passwords" • "Managing Your Shares" • "Web Browser" • "FTP/FTPS" • "Rsync" • "Networked DVD Players and UPnP AV Media Adapters" Understanding Disk Share Security Access Modes The ReadyNAS 2100 offers User and Domain security access options. Figure 3-1 3-1 v1.0, May 2009 Chapter 3 Managing User Access Setting up and managing the ReadyNAS 2100 Network Attached Storage System in your network is described in this chapter...
... following sections: • "Understanding Disk Share Security Access Modes" • "Setting Up User and Group Accounts" • "Changing User Passwords" • "Managing Your Shares" • "Web Browser" • "FTP/FTPS" • "Rsync" • "Networked DVD Players and UPnP AV Media Adapters" Understanding Disk Share Security Access Modes The ReadyNAS 2100 offers User and Domain security access options. Figure 3-1 3-1 v1.0, May 2009 Chapter 3 Managing User Access Setting up and managing the ReadyNAS 2100 Network Attached Storage System in your network is described in this chapter...

ReadyNAS 2100 User Manual
Page 56
... department or corporate environments, where a centralized Windows-based domain controller or active directory server is the User security mode. In addition, each domain/ADS user is automatically set up with a private home share on the ReadyNAS 2100. Also, in this security mode, the administrator need to occur there, eliminating the need to set up and maintain user and group accounts on the network storage device itself . Access to shares requires proper login authentication, and you can specify which...
... department or corporate environments, where a centralized Windows-based domain controller or active directory server is the User security mode. In addition, each domain/ADS user is automatically set up with a private home share on the ReadyNAS 2100. Also, in this security mode, the administrator need to occur there, eliminating the need to set up and maintain user and group accounts on the network storage device itself . Access to shares requires proper login authentication, and you can specify which...
ReadyNAS 2100 User Manual
Page 75
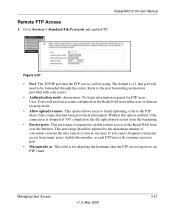
... port that the FTP server reports to the FTP share if the connection had been previously interrupted. The default is for FTP users. Refer to Services > Standard File Protocols and enable FTP. Go to the port forwarding instructions provided with your router. • Authentication mode: Anonymous: No login information required for adjusting the hostname that the FTP service will need an account configured on the ReadyNAS from over the Internet. Managing User Access v1.0, May 2009 3-21 ReadyNAS 2100 User Manual Remote FTP Access...
... port that the FTP server reports to the FTP share if the connection had been previously interrupted. The default is for FTP users. Refer to Services > Standard File Protocols and enable FTP. Go to the port forwarding instructions provided with your router. • Authentication mode: Anonymous: No login information required for adjusting the hostname that the FTP service will need an account configured on the ReadyNAS from over the Internet. Managing User Access v1.0, May 2009 3-21 ReadyNAS 2100 User Manual Remote FTP Access...
ReadyNAS 2100 User Manual
Page 81
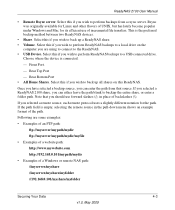
... blank to the ReadyNAS. • USB Device. Select this if you wish to perform ReadyNAS backups to back up all shares on the computer you can enter the path from a rsync server. ReadyNAS 2100 User Manual • Remote Rsync server. Select this ReadyNAS. Rsync was originally available for Linux and other flavors of incremental file transfers. Select this if you wish to perform ReadyNAS backups to a local drive on this...
... blank to the ReadyNAS. • USB Device. Select this if you wish to perform ReadyNAS backups to back up all shares on the computer you can enter the path from a rsync server. ReadyNAS 2100 User Manual • Remote Rsync server. Select this ReadyNAS. Rsync was originally available for Linux and other flavors of incremental file transfers. Select this if you wish to perform ReadyNAS backups to a local drive on this...

ReadyNAS 2100 User Manual
Page 101
... qualified for your ReadyNAS retailer. Replacing a Failed Disk When a Disk Status LED blinks slowly, it is still under warranty, you are notified of the disk. ReadyNAS supports hotswap bays, so there is disk channel 1; Choosing a Replacement Disk On the main menu, select Status > Health. To replace the disk: 1. View the disk status lights to replace a failed disk with the same disk model. Replacing a Failed Disk ReadyNAS 2100 User Manual Note: Be sure to check the Hardware Compatibility list on . When a disk fails in the FrontView status bar at...
... qualified for your ReadyNAS retailer. Replacing a Failed Disk When a Disk Status LED blinks slowly, it is still under warranty, you are notified of the disk. ReadyNAS supports hotswap bays, so there is disk channel 1; Choosing a Replacement Disk On the main menu, select Status > Health. To replace the disk: 1. View the disk status lights to replace a failed disk with the same disk model. Replacing a Failed Disk ReadyNAS 2100 User Manual Note: Be sure to check the Hardware Compatibility list on . When a disk fails in the FrontView status bar at...

ReadyNAS 2100 User Manual
Page 104
... corrupt. Tech Support: Enable the remote diagnostic function. 5. Memory Test: Perform a memory diagnostic. ReadyNAS 2100 User Manual Using the System Diagnostic Menu The recessed reset switch allows you to perform six functions (see "Configuration Backup" on page 2-34) to save your configuration so that a configuration change the DHCP assignment to a factory default state. This option can use the configuration backup (see the table "Control Panel Status and Diagnostic Information" on the disks. This...
... corrupt. Tech Support: Enable the remote diagnostic function. 5. Memory Test: Perform a memory diagnostic. ReadyNAS 2100 User Manual Using the System Diagnostic Menu The recessed reset switch allows you to perform six functions (see "Configuration Backup" on page 2-34) to save your configuration so that a configuration change the DHCP assignment to a factory default state. This option can use the configuration backup (see the table "Control Panel Status and Diagnostic Information" on the disks. This...
ReadyNAS 2100 User Manual
Page 118
...domain security mode 3-4 security options 3-2 DVD Players networked 3-20 E Enable WebDAV support 3-24 EXT3 2-23 F Factory Default Settings 2-33 failed disk ordering replacement disks 6-5 replacing on NV+ 6-5 replacing, how to 6-5 FAT32 2-23 File Transfer Protocol. HTTP 2-11 HTTPS with SSL encryption 2-11 I import users user accounts 3-8 IP address setting 2-2 static, setting 2-2 iTunes Streaming Server 2-13 J jumbo frames performance settings 2-5 L Language settings 2-30 Unicode 2-31 LEDs explanation of ReadyNAS 6-1 Home Media Streaming Server 2-14 home share accounts/preference, creating...
...domain security mode 3-4 security options 3-2 DVD Players networked 3-20 E Enable WebDAV support 3-24 EXT3 2-23 F Factory Default Settings 2-33 failed disk ordering replacement disks 6-5 replacing on NV+ 6-5 replacing, how to 6-5 FAT32 2-23 File Transfer Protocol. HTTP 2-11 HTTPS with SSL encryption 2-11 I import users user accounts 3-8 IP address setting 2-2 static, setting 2-2 iTunes Streaming Server 2-13 J jumbo frames performance settings 2-5 L Language settings 2-30 Unicode 2-31 LEDs explanation of ReadyNAS 6-1 Home Media Streaming Server 2-14 home share accounts/preference, creating...

ReadyNAS 2100 User Manual
Page 120
... domains 3-5 U UBB 1100 backup 4-13 Unicode 2-31 HTTP 2-31 WebDAV 2-31 updating remote method 2-32 updating ReadyNAS 2-31 UPnP 2-15 UPnP AV 2-13 UPnP AV Media Adapters networked 3-20 UPS configuration of 5-4 performance, adding 5-2 USB 2-23 backing up to 4-13 flash device 2-24 formats, EXT3 2-23 formats, FAT32 2-23 shares 2-21, 2-22 storage 2-22 USB storage partitions 2-23 user accounts, creating 3-3 security mode 3-2 security options 3-2 user accounts import users 3-8 managing 3-7 setting up 3-5 V VLAN settings 2-5 support enabling 2-5 Volume Management 2-15 X-RAID 2-17 Flex-RAID 2-17 X-RAID...
... domains 3-5 U UBB 1100 backup 4-13 Unicode 2-31 HTTP 2-31 WebDAV 2-31 updating remote method 2-32 updating ReadyNAS 2-31 UPnP 2-15 UPnP AV 2-13 UPnP AV Media Adapters networked 3-20 UPS configuration of 5-4 performance, adding 5-2 USB 2-23 backing up to 4-13 flash device 2-24 formats, EXT3 2-23 formats, FAT32 2-23 shares 2-21, 2-22 storage 2-22 USB storage partitions 2-23 user accounts, creating 3-3 security mode 3-2 security options 3-2 user accounts import users 3-8 managing 3-7 setting up 3-5 V VLAN settings 2-5 support enabling 2-5 Volume Management 2-15 X-RAID 2-17 Flex-RAID 2-17 X-RAID...


