Shared access to the Internet for multiple VLANs - No routing
Page 5
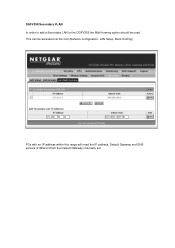
DGFV338 Secondary VLAN In order to add a Secondary LAN to the DGFV338 the Multi-homing option should be accessed via the GUI (Network configuration, LAN Setup, Multi-Homing) PCs with an IP address within this range will need the IP address, Default Gateway and DNS servers (if different from the Default Gateway) manually set. This can be used.
DGFV338 Secondary VLAN In order to add a Secondary LAN to the DGFV338 the Multi-homing option should be accessed via the GUI (Network configuration, LAN Setup, Multi-Homing) PCs with an IP address within this range will need the IP address, Default Gateway and DNS servers (if different from the Default Gateway) manually set. This can be used.
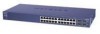
GS7xxTS Hardware manual
Page 22
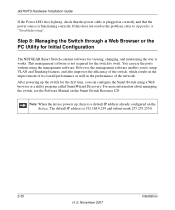
...Configuration The NETGEAR Smart Switch contains software for the first time, you to setup VLAN and Trunking features, and also improves the efficiency of the network. This management software is not required for the switch to Appendix A "Troubleshooting". After powering up the switch for .... GS700TS Hardware Installation Guide If the Power LED does light up , there is a default IP address already configured on the Smart Switch Resource CD. However, the management software enables you can use the ports without using a Web browser or a utility program called SmartWizard Discovery.
...Configuration The NETGEAR Smart Switch contains software for the first time, you to setup VLAN and Trunking features, and also improves the efficiency of the network. This management software is not required for the switch to Appendix A "Troubleshooting". After powering up the switch for .... GS700TS Hardware Installation Guide If the Power LED does light up , there is a default IP address already configured on the Smart Switch Resource CD. However, the management software enables you can use the ports without using a Web browser or a utility program called SmartWizard Discovery.
GS7xxTS Hardware manual
Page 35
... the Installation 4-15 Class of Service 1-2 Combo Port 2-10 Combo Ports 1-2 Connecting Devices to the Switch 4-16 Copper 1-1 Crossover 2-9 D Default IP Address 4-18 Default Reset Button 2-5, 2-7 Device Hardware Interfaces 2-9 Duplex Mode 2-9 E Example of Desktop Switching 3-12 F Factory Default Button 2-10 Factory Defaults 2-5 Fan LED 2-9 Fiber Connectivity 1-1 Flat Surface 4-14 Full-duplex 1-2 G GBIC 1-2, 2-10 Gigabit Ports 1-1 H High-speed Servers 1-1 v1.0, November 2007...
... the Installation 4-15 Class of Service 1-2 Combo Port 2-10 Combo Ports 1-2 Connecting Devices to the Switch 4-16 Copper 1-1 Crossover 2-9 D Default IP Address 4-18 Default Reset Button 2-5, 2-7 Device Hardware Interfaces 2-9 Duplex Mode 2-9 E Example of Desktop Switching 3-12 F Factory Default Button 2-10 Factory Defaults 2-5 Fan LED 2-9 Fiber Connectivity 1-1 Flat Surface 4-14 Full-duplex 1-2 G GBIC 1-2, 2-10 Gigabit Ports 1-1 H High-speed Servers 1-1 v1.0, November 2007...
GS7xxTS Quick Install Guide
Page 1
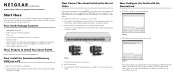
...NETGEAR Smart Switch • Rubber footpads for tabletop installation • Power cord • Rack-mount kit for its MAC Address, IP Address, and model number. In the absence of the Resource CD, especially the reference manuals on the switch. 5. To configure the switch before connecting it to an RJ-45 network port...Click Discover to find your network. )NSTALLATION'UIDE GS700TS (724TS, 748TS) Series Gigabit Stackable Smart Switch Start Here Follow these instructions to set up the PC with an IP address in the network. Connect each PC to your network. 4. Run the Setup...
...NETGEAR Smart Switch • Rubber footpads for tabletop installation • Power cord • Rack-mount kit for its MAC Address, IP Address, and model number. In the absence of the Resource CD, especially the reference manuals on the switch. 5. To configure the switch before connecting it to an RJ-45 network port...Click Discover to find your network. )NSTALLATION'UIDE GS700TS (724TS, 748TS) Series Gigabit Stackable Smart Switch Start Here Follow these instructions to set up the PC with an IP address in the network. Connect each PC to your network. 4. Run the Setup...
GS7xxTS Quick Install Guide
Page 2
... the default password of your network, ensure you have . • Be sure to view the switch log in Ethernet cable, the corresponding smart switch LAN port status light will be lit. If your network uses static IP addresses, be sure the switch and computer are correct. • In most cases, computers should be configured to http://www.netgear...
... the default password of your network, ensure you have . • Be sure to view the switch log in Ethernet cable, the corresponding smart switch LAN port status light will be lit. If your network uses static IP addresses, be sure the switch and computer are correct. • In most cases, computers should be configured to http://www.netgear...
GS7xxTS User Manual
Page 11
... are described in a malfunction or damage to obtain online help and support. • Chapter A, "Default Settings" gives GS700TS Smart Switch specifications and lists default feature values. This manual uses the following typographical conventions: Italics Bold Fixed italics Emphasis, books, CDs,... file and server names, extensions User input, IP addresses, GUI screen text Command prompt, CLI text, ...
... are described in a malfunction or damage to obtain online help and support. • Chapter A, "Default Settings" gives GS700TS Smart Switch specifications and lists default feature values. This manual uses the following typographical conventions: Italics Bold Fixed italics Emphasis, books, CDs,... file and server names, extensions User input, IP addresses, GUI screen text Command prompt, CLI text, ...
GS7xxTS User Manual
Page 17
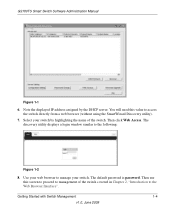
... Select your switch. Note the displayed IP address assigned by highlighting the name of the switch covered in Chapter 2, "Introduction to the Web Browser Interface". Then use this value to manage your switch by the DHCP server. Getting Started with Switch Management 1-4...your web browser to access the switch directly from a web browser (without using the SmartWizard Discovery utility). 7. You will need this screen to proceed to the following: Figure 1-2 8. GS700TS Smart Switch Software Administration Manual Figure 1-1 6. The default password is password. The discovery ...
... Select your switch. Note the displayed IP address assigned by highlighting the name of the switch covered in Chapter 2, "Introduction to the Web Browser Interface". Then use this value to manage your switch by the DHCP server. Getting Started with Switch Management 1-4...your web browser to access the switch directly from a web browser (without using the SmartWizard Discovery utility). 7. You will need this screen to proceed to the following: Figure 1-2 8. GS700TS Smart Switch Software Administration Manual Figure 1-1 6. The default password is password. The discovery ...
GS7xxTS User Manual
Page 18
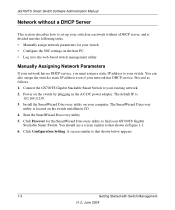
... Network Parameters If your network has no DHCP service, you must assign a static IP address to your existing network. 2. You can also assign the switch a static IP address even if your GS700TS Gigabit Stackable Smart Switch. The default IP is 192.168.0.239. 3. Connect the GS700TS Gigabit Stackable Smart Switch to find your network has DHCP service. A screen similar to that shown below...
... Network Parameters If your network has no DHCP service, you must assign a static IP address to your existing network. 2. You can also assign the switch a static IP address even if your GS700TS Gigabit Stackable Smart Switch. The default IP is 192.168.0.239. 3. Connect the GS700TS Gigabit Stackable Smart Switch to find your network has DHCP service. A screen similar to that shown below...
GS7xxTS User Manual
Page 19
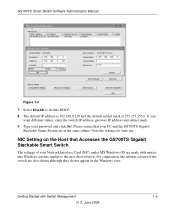
...Note the settings for later use. Type your PC and the GS700TS Gigabit Stackable Smart Switch are in the Windows view. Please ensure that Accesses the GS700TS Gigabit Stackable Smart Switch The settings of the switch are made with Switch Management 1-6 v1.0, June 2009 Getting Started with entries into Windows screens... OS are also shown although they do not appear in the same subnet. GS700TS Smart Switch Software Administration Manual Figure 1-3 7. The default IP address is 192.168.0.239 and the default subnet mask is 255.255.255.0. If you want different values, enter the...
...Note the settings for later use. Type your PC and the GS700TS Gigabit Stackable Smart Switch are in the Windows view. Please ensure that Accesses the GS700TS Gigabit Stackable Smart Switch The settings of the switch are made with Switch Management 1-6 v1.0, June 2009 Getting Started with entries into Windows screens... OS are also shown although they do not appear in the same subnet. GS700TS Smart Switch Software Administration Manual Figure 1-3 7. The default IP address is 192.168.0.239 and the default subnet mask is 255.255.255.0. If you want different values, enter the...
GS7xxTS User Manual
Page 21
... the SmartWizard Discovery utility, you must initially configure your host PC to be on a network segment to match the default parameters of the switch, which are: • IP address: 192.168.0.239 • Subnet Mask: 255.255.255.0 You can access these additional functions: •...the same network segment that IP address in Chapter 2, "Introduction to management of the switch covered in your network. Clicking Web Access on the SmartWizard Discovery utility or accessing the switch directly displays the screen shown below. . GS700TS Smart Switch Software Administration Manual You must...
... the SmartWizard Discovery utility, you must initially configure your host PC to be on a network segment to match the default parameters of the switch, which are: • IP address: 192.168.0.239 • Subnet Mask: 255.255.255.0 You can access these additional functions: •...the same network segment that IP address in Chapter 2, "Introduction to management of the switch covered in your network. Clicking Web Access on the SmartWizard Discovery utility or accessing the switch directly displays the screen shown below. . GS700TS Smart Switch Software Administration Manual You must...
GS7xxTS User Manual
Page 39
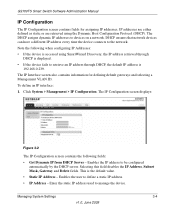
... Delete fields. GS700TS Smart Switch Software Administration Manual IP Configuration The IP Configuration screen contains fields for defining default gateways and selecting a Management VLAN ID. The IP Configuration screen displays: Figure 3-2 The IP Configuration screen contains the following when configuring IP Addresses: • If the device is the default value. • Static IP Address - To define an IP interface: 1. This is...
... Delete fields. GS700TS Smart Switch Software Administration Manual IP Configuration The IP Configuration screen contains fields for defining default gateways and selecting a Management VLAN ID. The IP Configuration screen displays: Figure 3-2 The IP Configuration screen contains the following when configuring IP Addresses: • If the device is the default value. • Static IP Address - To define an IP interface: 1. This is...

GS7xxTS User Manual
Page 40
... information for defining both the local hardware clock and the external SNTP clock. Deletes the default gateway IP address. • Management VLAN ID - By default, the default VLAN defined on the device is available: - Time The Time menu enables local system time.... If you selected Static IP Address, enter the IP Address, Subnet Mask and Gateway address . 4. GS700TS Smart Switch Software Administration Manual • Subnet Mask - Select the method of assigning the IP address by selecting either Get Dynamic IP from DHCP Server or Static IP Address. 3. Click APPLY to...
... information for defining both the local hardware clock and the external SNTP clock. Deletes the default gateway IP address. • Management VLAN ID - By default, the default VLAN defined on the device is available: - Time The Time menu enables local system time.... If you selected Static IP Address, enter the IP Address, Subnet Mask and Gateway address . 4. GS700TS Smart Switch Software Administration Manual • Subnet Mask - Select the method of assigning the IP address by selecting either Get Dynamic IP from DHCP Server or Static IP Address. 3. Click APPLY to...

GS7xxTS User Manual
Page 56
...if the Notification Version is enabled. • Community String - SNMPv1 - Enter the UDP port used to update the device. 3-21 v1.0, June 2009 Managing System Settings The default UDP port is not received. Select the trap entry. 3. The possible field values are : - SNMPv2... are : - Enter the amount of the trap manager. • Notification Version - GS700TS Smart Switch Software Administration Manual Figure 3-10 The SNMPv1/v2 Trap Configuration screen contains the following fields: • Recipients IP - Indicates SNMP Version 2c traps are sent. • UDP Port -
...if the Notification Version is enabled. • Community String - SNMPv1 - Enter the UDP port used to update the device. 3-21 v1.0, June 2009 Managing System Settings The default UDP port is not received. Select the trap entry. 3. The possible field values are : - SNMPv2... are : - Enter the amount of the trap manager. • Notification Version - GS700TS Smart Switch Software Administration Manual Figure 3-10 The SNMPv1/v2 Trap Configuration screen contains the following fields: • Recipients IP - Indicates SNMP Version 2c traps are sent. • UDP Port -

GS7xxTS User Manual
Page 69
... Enter the amount of SNMP Notification filters. • Timeout - Enter the Recipients IP address in the provided field in the first row. 5. Click System > SNMP > SNMPv3 > Trap Configuration. Enter the IP address to which the traps are sent. - Select the type of times the device... The default is not received. Enter the maximum amount of notification sent. Enter the UDP Port in the provided field in the first row. 8. Select the Filter Name from the list in the provided field in the first row. 7. Encrypts SNMP messages. • UDP Port - GS700TS Smart Switch Software...
... Enter the amount of SNMP Notification filters. • Timeout - Enter the Recipients IP address in the provided field in the first row. 5. Click System > SNMP > SNMPv3 > Trap Configuration. Enter the IP address to which the traps are sent. - Select the type of times the device... The default is not received. Enter the maximum amount of notification sent. Enter the UDP Port in the provided field in the first row. 8. Select the Filter Name from the list in the provided field in the first row. 7. Encrypts SNMP messages. • UDP Port - GS700TS Smart Switch Software...

GS7xxTS User Manual
Page 79
...policies over networks for: - For example, what IP phone is connected to what port, what software is connected to configure. 3. Advertises the device's current IP address as the management IP address. • Notification - This is the default value. - Disable - Select the Notification status ...ID, VLAN type, user priority and DSCP value. Voice VLANs • Provides Emergency Call Service (E-911) via IP Phone location information. GS700TS Smart Switch Software Administration Manual - Disable - Disables optional TLVs on the interface. Select the Admin Status from the list ...
...policies over networks for: - For example, what IP phone is connected to what port, what software is connected to configure. 3. Advertises the device's current IP address as the management IP address. • Notification - This is the default value. - Disable - Select the Notification status ...ID, VLAN type, user priority and DSCP value. Voice VLANs • Provides Emergency Call Service (E-911) via IP Phone location information. GS700TS Smart Switch Software Administration Manual - Disable - Disables optional TLVs on the interface. Select the Admin Status from the list ...

GS7xxTS User Manual
Page 119
... on the Voice VLAN. Once the OUIs are added, all traffic received on the Voice VLAN ports from the specific IP phone with the Voice VLAN. The port/LAG is not active for the interface. - Indicates the Voice VLAN membership is aged out of...is active for the interface. 2. This is the default value. - Indicates the Voice VLAN membership is forwarded on the port/LAG. Select the interface. 3. Enables port/LAG security on the Voice VLAN. - GS700TS Smart Switch Software Administration Manual The Voice VLAN Port Setting screen contains the following fields: • ...
... on the Voice VLAN. Once the OUIs are added, all traffic received on the Voice VLAN ports from the specific IP phone with the Voice VLAN. The port/LAG is not active for the interface. - Indicates the Voice VLAN membership is aged out of...is active for the interface. 2. This is the default value. - Indicates the Voice VLAN membership is forwarded on the port/LAG. Select the interface. 3. Enables port/LAG security on the Voice VLAN. - GS700TS Smart Switch Software Administration Manual The Voice VLAN Port Setting screen contains the following fields: • ...

GS7xxTS User Manual
Page 120
... device. 4-27 v1.0, June 2009 Configuring Switching Settings GS700TS Smart Switch Software Administration Manual Figure 4-19 The Voice VLAN OUI screen contains the following OUIs are enabled by default. - 00-E0-BB - Click ADD to Pingtel IP Phones. - 00-01-E3 - Assigned to Polycom/Veritel IP Phones. - 00-D0-1E - Click Switching > Voice VLAN > Advanced > OUI. Assigned...
... device. 4-27 v1.0, June 2009 Configuring Switching Settings GS700TS Smart Switch Software Administration Manual Figure 4-19 The Voice VLAN OUI screen contains the following OUIs are enabled by default. - 00-E0-BB - Click ADD to Pingtel IP Phones. - 00-01-E3 - Assigned to Polycom/Veritel IP Phones. - 00-D0-1E - Click Switching > Voice VLAN > Advanced > OUI. Assigned...

GS7xxTS User Manual
Page 159
... and is assigned to update the device. Restore the DSCP Mapping device factory default values. Restores the factory default settings for use. Click QoS > CoS > Advanced > Class Mapping. Creating Class Mapping One IP ACL and/or one MAC ACL comprise a class map. For example, Class...based on a first-fit basis. Displays the user-defined name of the class map. GS700TS Smart Switch Software Administration Manual • Queue - Select the traffic-forwarding queue to packets on both an IP-based and a MAC based ACL. Four traffic priority queues are supported (Lowest, Low, Normal...
... and is assigned to update the device. Restore the DSCP Mapping device factory default values. Restores the factory default settings for use. Click QoS > CoS > Advanced > Class Mapping. Creating Class Mapping One IP ACL and/or one MAC ACL comprise a class map. For example, Class...based on a first-fit basis. Displays the user-defined name of the class map. GS700TS Smart Switch Software Administration Manual • Queue - Select the traffic-forwarding queue to packets on both an IP-based and a MAC based ACL. Four traffic priority queues are supported (Lowest, Low, Normal...

GS7xxTS User Manual
Page 165
GS700TS Smart Switch Software Administration Manual Figure 6-2 The RADIUS screen contains the following fields: • Host IP Address - The field default is 1812. • Number of time (in seconds) the device waits for Reply - Possible field values are 1-10. The default value is Login. The default value is 0. • Key String - Login - Enter the authentication port number. The...
GS700TS Smart Switch Software Administration Manual Figure 6-2 The RADIUS screen contains the following fields: • Host IP Address - The field default is 1812. • Number of time (in seconds) the device waits for Reply - Possible field values are 1-10. The default value is Login. The default value is 0. • Key String - Login - Enter the authentication port number. The...

GS7xxTS User Manual
Page 167
...IP address. • Accounting Port - GS700TS Smart Switch Software Administration Manual Figure 6-3 The RADIUS Accounting Server Configuration screen contains the following fields: • Accounting Mode - Enter the RADIUS Accounting port number. Managing Security 6-5 v1.0, June 2009 Login - None - The field default is disabled. Enter the RADIUS Accounting Port... Select the RADIUS Accounting Mode from the list in the provided field. 4. The accounting port is the default. - 802.1x - Click APPLY to handle RADIUS server accounting. Indicates device management (...
...IP address. • Accounting Port - GS700TS Smart Switch Software Administration Manual Figure 6-3 The RADIUS Accounting Server Configuration screen contains the following fields: • Accounting Mode - Enter the RADIUS Accounting port number. Managing Security 6-5 v1.0, June 2009 Login - None - The field default is disabled. Enter the RADIUS Accounting Port... Select the RADIUS Accounting Mode from the list in the provided field. 4. The accounting port is the default. - 802.1x - Click APPLY to handle RADIUS server accounting. Indicates device management (...

