
GS716Tv2/GS724Tv3 Hardware manual
Page 15
... SFP GBIC module. If both copper and fiber port cannot be active. Factory Defaults Button The Smart Switch has a Factory Default button so that you enable the Factory Default button, all settings, including the password, VLAN settings and port configurations will be used at any given time. Physical Description... (such as when connecting the port to a PC) or an "uplink" connection (such as the AGM731F, AGM732F, or AGM733 from NETGEAR, allowing fiber connections on the network. SFP GBIC Module The GBIC module bays accommodate standard SFP GBIC modules, such as when connecting the ...
... SFP GBIC module. If both copper and fiber port cannot be active. Factory Defaults Button The Smart Switch has a Factory Default button so that you enable the Factory Default button, all settings, including the password, VLAN settings and port configurations will be used at any given time. Physical Description... (such as when connecting the port to a PC) or an "uplink" connection (such as the AGM731F, AGM732F, or AGM733 from NETGEAR, allowing fiber connections on the network. SFP GBIC Module The GBIC module bays accommodate standard SFP GBIC modules, such as when connecting the ...
GS716Tv2/GS724Tv3 Installation Guide
Page 2
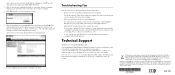
..., that came with the laws of your product, and use our telephone support service. Enter the default password of your switch. Turn off the switch and computer. First, turn on the switch and wait two minutes. Next, turn on the computer. • Make sure the Ethernet cables... automatically via our website is on the Resource CD or the online help with valid IP addresses. Configure the switch for selecting NETGEAR products. Troubleshooting Tips Here are trademarks or registered trademarks of the computer are securely plugged in accordance with configuration procedures...
..., that came with the laws of your product, and use our telephone support service. Enter the default password of your switch. Turn off the switch and computer. First, turn on the switch and wait two minutes. Next, turn on the computer. • Make sure the Ethernet cables... automatically via our website is on the Resource CD or the online help with valid IP addresses. Configure the switch for selecting NETGEAR products. Troubleshooting Tips Here are trademarks or registered trademarks of the computer are securely plugged in accordance with configuration procedures...
GS716Tv2/GS724Tv3 Software Admin Manual
Page 18
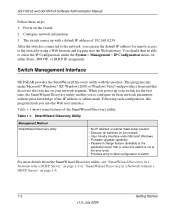
... Windows • Firmware upgrade capability • Password change feature (available at the application level, that discovers the switches on page 1-4. 1-2 Getting Started v1.0, July 2009 This program runs under the System Management IP Configuration menu, for the first...this product. GS716Tv2 and GS724Tv3 Software Administration Manual Follow these steps: 1. Power on page 1-3 or "SmartWizard Discovery in to the switch by using a Web browser and logging in a Network without prior knowledge of 192.168.0.239. Switch Management Interface NETGEAR provides the ...
... Windows • Firmware upgrade capability • Password change feature (available at the application level, that discovers the switches on page 1-4. 1-2 Getting Started v1.0, July 2009 This program runs under the System Management IP Configuration menu, for the first...this product. GS716Tv2 and GS724Tv3 Software Administration Manual Follow these steps: 1. Power on page 1-3 or "SmartWizard Discovery in to the switch by using a Web browser and logging in a Network without prior knowledge of 192.168.0.239. Switch Management Interface NETGEAR provides the ...

GS716Tv2/GS724Tv3 Software Admin Manual
Page 20
GS716Tv2 and GS724Tv3 Software Administration Manual Figure 1-2 Use your Web browser to manage your switch in a network without a DHCP Server This section describes how to management of the switch covered in a Network without a DHCP server, and is password. SmartWizard Discovery in "Using the Web Interface" on page 1-6 1-4 Getting Started v1.0, July 2009 The default password is divided into the...
GS716Tv2 and GS724Tv3 Software Administration Manual Figure 1-2 Use your Web browser to manage your switch in a network without a DHCP Server This section describes how to management of the switch covered in a Network without a DHCP server, and is password. SmartWizard Discovery in "Using the Web Interface" on page 1-6 1-4 Getting Started v1.0, July 2009 The default password is divided into the...
GS716Tv2/GS724Tv3 Software Admin Manual
Page 21
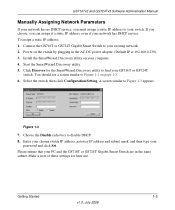
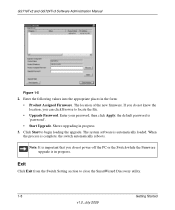
...your PC and the GS716T or GS724T Gigabit Smart Switch are in the AC-DC power adapter. (Default IP is 192.168.0.239), 3. Enter your chosen switch IP address, gateway IP address and... subnet mask, and then type your computer. 4. Make a note of these settings for the SmartWizard Discovery utility to disable DHCP. 8. Install the SmartWizard Discovery utility on page 1-3. 6. Select the switch, then click Configuration Setting. GS716Tv2... Figure 1-1 on your password and click Set. Figure 1-3 7.
...your PC and the GS716T or GS724T Gigabit Smart Switch are in the AC-DC power adapter. (Default IP is 192.168.0.239), 3. Enter your chosen switch IP address, gateway IP address and... subnet mask, and then type your computer. 4. Make a note of these settings for the SmartWizard Discovery utility to disable DHCP. 8. Install the SmartWizard Discovery utility on page 1-3. 6. Select the switch, then click Configuration Setting. GS716Tv2... Figure 1-1 on your password and click Set. Figure 1-3 7.
GS716Tv2/GS724Tv3 Software Admin Manual
Page 24
... the location, you do not power-off the PC or the Switch while the Firmware upgrade is complete, the switch automatically reboots. the default password is automatically loaded. Enter the following values into the appropriate places in progress. 3. Enter your password, then click Apply; GS716Tv2 and GS724Tv3 Software Administration Manual Figure 1-5 2. Shows upgrading in the form...
... the location, you do not power-off the PC or the Switch while the Firmware upgrade is complete, the switch automatically reboots. the default password is automatically loaded. Enter the following values into the appropriate places in progress. 3. Enter your password, then click Apply; GS716Tv2 and GS724Tv3 Software Administration Manual Figure 1-5 2. Shows upgrading in the form...

GS716Tv2/GS724Tv3 Software Admin Manual
Page 25
... the Web interface: 1. The factory default password is password. The method you to manage the system depends on your network size and requirements, and on page 1-10, and then click Login. The GS716Tv2 and GS724Tv3 Software Administration Manual describes how to use to configure and monitor the components of the switch in Figure 1-6 on your preference.
... the Web interface: 1. The factory default password is password. The method you to manage the system depends on your network size and requirements, and on page 1-10, and then click Login. The GS716Tv2 and GS724Tv3 Software Administration Manual describes how to use to configure and monitor the components of the switch in Figure 1-6 on your preference.
GS716Tv2/GS724Tv3 Software Admin Manual
Page 128
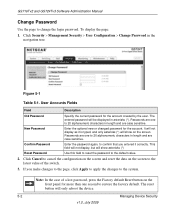
... second to the latest value of a lost password, press the Factory default Reset button on the screen. New Password Enter the optional new or changed password for the account created by the user. GS716Tv2 and GS724Tv3 Software Administration Manual Change Password Use the page to the system. Click Security Management Security User Configuration Change...
... second to the latest value of a lost password, press the Factory default Reset button on the screen. New Password Enter the optional new or changed password for the account created by the user. GS716Tv2 and GS724Tv3 Software Administration Manual Change Password Use the page to the system. Click Security Management Security User Configuration Change...
GS716Tv2/GS724Tv3 Software Admin Manual
Page 225
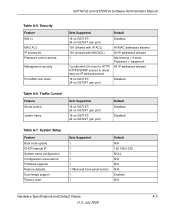
... 1 1 1 (Web and front-panel button) 1 1 Default N/A 192.168.0.239 NULL N/A N/A N/A Enabled N/A Hardware Specifications and Default Values A-3 v1.0, July 2009 Security Feature 802.1x MAC ACL IP access list Password control access Management security Port MAC lock down Sets Supported Default 16 on GS716T/ 24 on GS724T (per port) 100 (Shared.../ 24 on GS724T (per port) Disabled All MAC addresses allowed All IP addresses allowed Idle timeout = 5 mins. GS716Tv2 and GS724Tv3 Software Administration Manual Table A-5. Password = "password" All IP addresses allowed Disabled Table A-6.
... 1 1 1 (Web and front-panel button) 1 1 Default N/A 192.168.0.239 NULL N/A N/A N/A Enabled N/A Hardware Specifications and Default Values A-3 v1.0, July 2009 Security Feature 802.1x MAC ACL IP access list Password control access Management security Port MAC lock down Sets Supported Default 16 on GS716T/ 24 on GS724T (per port) 100 (Shared.../ 24 on GS724T (per port) Disabled All MAC addresses allowed All IP addresses allowed Idle timeout = 5 mins. GS716Tv2 and GS724Tv3 Software Administration Manual Table A-5. Password = "password" All IP addresses allowed Disabled Table A-6.
GS716Tv2/GS724Tv3 Software Admin Manual
Page 243
GS716Tv2 and GS724Tv3 Software Administration Manual Index A Alert 6-18, 6-20 authentication enable 1-15 C Certificate 5-18 Changing the password...30 Management Access 5-15 MST Port 3-27 Network Settings on the Administrative System 1-6 password 5-2... Port Security 5-34 Port VLAN ID 3-14 QoS 4-1 RADIUS 5-3 Global 5-3 Secure HTTP 5-16 SNMP v3 User 2-21 SNTP Server 2-10 Standard IP ACL Example B-6 STP 3-16 TACACS+ 5-10 Time 2-6 Trap 2-19 VLAN 3-10 VLAN example B-2 VLAN Port Membership 3-12 CoS 4-2 Critical 6-18, 6-20 Customer support 1-ii D Debug 6-18, 6-20 Default Gateway 2-4 defaults...
GS716Tv2 and GS724Tv3 Software Administration Manual Index A Alert 6-18, 6-20 authentication enable 1-15 C Certificate 5-18 Changing the password...30 Management Access 5-15 MST Port 3-27 Network Settings on the Administrative System 1-6 password 5-2... Port Security 5-34 Port VLAN ID 3-14 QoS 4-1 RADIUS 5-3 Global 5-3 Secure HTTP 5-16 SNMP v3 User 2-21 SNTP Server 2-10 Standard IP ACL Example B-6 STP 3-16 TACACS+ 5-10 Time 2-6 Trap 2-19 VLAN 3-10 VLAN example B-2 VLAN Port Membership 3-12 CoS 4-2 Critical 6-18, 6-20 Customer support 1-ii D Debug 6-18, 6-20 Default Gateway 2-4 defaults...

GS716Tv2/GS724Tv3 Software Admin Manual
Page 245
GS716Tv2 and GS724Tv3 Software Administration Manual P password change 5-2 login 5-2 new 5-2 reset 5-2 Ping 7-13 port authentication 5-22 summary 5-28 Profiles 5-13 Q QoS 4-1 802.1p to Queue Mapping 4-6 R RADIUS 5-1 authentication port 5-8 authentication server 5-6 server 5-3 registering 1-ii Reset 7-1 button 5-2 Configuration to Defaults 7-2 Password 5-2 Switch 7-1 RSTP 3-16 S Security MAC Address 5-37 server HTTP 5-15 Simple Network Time Protocol 2-5 slot/port...
GS716Tv2 and GS724Tv3 Software Administration Manual P password change 5-2 login 5-2 new 5-2 reset 5-2 Ping 7-13 port authentication 5-22 summary 5-28 Profiles 5-13 Q QoS 4-1 802.1p to Queue Mapping 4-6 R RADIUS 5-1 authentication port 5-8 authentication server 5-6 server 5-3 registering 1-ii Reset 7-1 button 5-2 Configuration to Defaults 7-2 Password 5-2 Switch 7-1 RSTP 3-16 S Security MAC Address 5-37 server HTTP 5-15 Simple Network Time Protocol 2-5 slot/port...

