

Hardware Installation Guide
Page 3
... Description 10 Front Panel...10 Back Panel...11 LEDs...11 Switch Hardware Interfaces 12 RJ-45 Ports for 10/100/1000M BASE-T Connectivity 13 Reset Button 13 Factory Defaults Button 13 Chapter 3 Installation Step 1: Prepare the site 15 Step 2: Protect Against Electrostatic Discharge 15 Step 3: Unpack the Switch 16 Step 4: Install the...
... Description 10 Front Panel...10 Back Panel...11 LEDs...11 Switch Hardware Interfaces 12 RJ-45 Ports for 10/100/1000M BASE-T Connectivity 13 Reset Button 13 Factory Defaults Button 13 Chapter 3 Installation Step 1: Prepare the site 15 Step 2: Protect Against Electrostatic Discharge 15 Step 3: Unpack the Switch 16 Step 4: Install the...

Hardware Installation Guide
Page 10
Reset Recessed Factory Defaults button RJ-45 and PoE LEDs that correspond to the individual ports. Fan PoE Max LED (see LEDs on page 11). Eight independent 10/100/1000M BASE-T RJ-45 and PoE ports 1000M SFP Ports Figure 2. The bottom row of LEDs provides the PoE status. GS510TPP front ...view Number 1 2 3 4 Description Power and PoE LEDs (see LEDs on page 11). Reset Hardware Overview 10 GS510TLP front view Number 1 2 3 4 5 6 7 Description Power PoE Max LED (see...
Reset Recessed Factory Defaults button RJ-45 and PoE LEDs that correspond to the individual ports. Fan PoE Max LED (see LEDs on page 11). Eight independent 10/100/1000M BASE-T RJ-45 and PoE ports 1000M SFP Ports Figure 2. The bottom row of LEDs provides the PoE status. GS510TPP front ...view Number 1 2 3 4 Description Power and PoE LEDs (see LEDs on page 11). Reset Hardware Overview 10 GS510TLP front view Number 1 2 3 4 5 6 7 Description Power PoE Max LED (see...

Hardware Installation Guide
Page 13
... such as a straightened paper clip into the opening . 2. Reset Button The switch provides a Reset button on the front panel so that you can support 1G fiber optical modules. Factory Defaults Button The switch provides a Factory Defaults button on the front panel so that you can reboot... Hardware Overview 13 When you press the Reset button. The switch reboots and returns to its factory settings. To simplify the procedure for about three seconds. The Auto Uplink technology compensates for about whether to its factory settings. Save the configuration before you insert...
... such as a straightened paper clip into the opening . 2. Reset Button The switch provides a Reset button on the front panel so that you can support 1G fiber optical modules. Factory Defaults Button The switch provides a Factory Defaults button on the front panel so that you can reboot... Hardware Overview 13 When you press the Reset button. The switch reboots and returns to its factory settings. To simplify the procedure for about three seconds. The Auto Uplink technology compensates for about whether to its factory settings. Save the configuration before you insert...
User Manual
Page 8
ProSAFE 8-Port or 16-Port Gigabit Smart Managed Switch Model GS418TPP, GS510TLP, and GS510TPP View Port Statistics 376 View Detailed Port Statistics 378 View EAP Statistics 385 Perform a Cable Test 386 Configure and View Logs 388 Manage the Memory ... Trap Logs 395 View the Event Log 396 Format of the Messages 398 Configure Port Mirroring 398 Chapter 8 Maintenance Reboot the Switch 402 Reset the Switch to Its Factory Default Settings 402 Export a File From the Switch 403 Export a File to the TFTP Server 404 HTTP File Export 405 Export a File From...
ProSAFE 8-Port or 16-Port Gigabit Smart Managed Switch Model GS418TPP, GS510TLP, and GS510TPP View Port Statistics 376 View Detailed Port Statistics 378 View EAP Statistics 385 Perform a Cable Test 386 Configure and View Logs 388 Manage the Memory ... Trap Logs 395 View the Event Log 396 Format of the Messages 398 Configure Port Mirroring 398 Chapter 8 Maintenance Reboot the Switch 402 Reset the Switch to Its Factory Default Settings 402 Export a File From the Switch 403 Export a File to the TFTP Server 404 HTTP File Export 405 Export a File From...
User Manual
Page 282
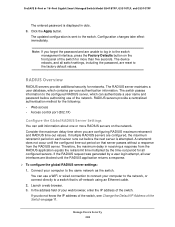
... security for all user interfaces are unable to the switch management interface, press the Factory Defaults button on the network. Consider the maximum delay time when you are reset to the factory default values. Launch a web browser. 3. Note: If you do not know ...per-user authentication information. Manage Device Security 282 ProSAFE 8-Port or 16-Port Gigabit Smart Managed Switch Model GS418TPP, GS510TLP, and GS510TPP The entered password is attempted. Configuration changes take effect immediately. The RADIUS server maintains a user database, which can authenticate a user...
... security for all user interfaces are unable to the switch management interface, press the Factory Defaults button on the network. Consider the maximum delay time when you are reset to the factory default values. Launch a web browser. 3. Note: If you do not know ...per-user authentication information. Manage Device Security 282 ProSAFE 8-Port or 16-Port Gigabit Smart Managed Switch Model GS418TPP, GS510TLP, and GS510TPP The entered password is attempted. Configuration changes take effect immediately. The RADIUS server maintains a user database, which can authenticate a user...
User Manual
Page 401
8. Maintenance This chapter covers the following topics: • Reboot the Switch • Reset the Switch to Its Factory Default Settings • Export a File From the Switch • Download a File to the Switch • Manage Files • Troubleshooting 8 401
8. Maintenance This chapter covers the following topics: • Reboot the Switch • Reset the Switch to Its Factory Default Settings • Export a File From the Switch • Download a File to the Switch • Manage Files • Troubleshooting 8 401
User Manual
Page 402
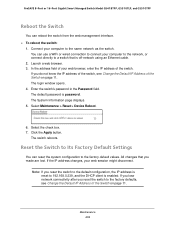
... in the Password field. Click the Apply button. All changes that is off-network using an Ethernet cable. 2. Note: If you reset the switch to the factory defaults, see Change the Default IP Address of the Switch on page 11. The login window opens. 4. The default password is enabled...Change the Default IP Address of the switch. ProSAFE 8-Port or 16-Port Gigabit Smart Managed Switch Model GS418TPP, GS510TLP, and GS510TPP Reboot the Switch You can reset the system configuration to the same network as the switch. You can use a WiFi or wired connection to connect your computer...
... in the Password field. Click the Apply button. All changes that is off-network using an Ethernet cable. 2. Note: If you reset the switch to the factory defaults, see Change the Default IP Address of the Switch on page 11. The login window opens. 4. The default password is enabled...Change the Default IP Address of the switch. ProSAFE 8-Port or 16-Port Gigabit Smart Managed Switch Model GS418TPP, GS510TLP, and GS510TPP Reboot the Switch You can reset the system configuration to the same network as the switch. You can use a WiFi or wired connection to connect your computer...
User Manual
Page 403
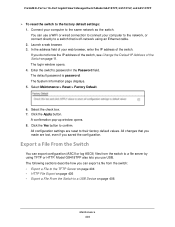
... cable. 2. The login window opens. 4. A confirmation pop-up window opens. 8. Select Maintenance > Reset > Factory Default. 6. Click the Apply button. All changes that is password. ProSAFE 8-Port or 16-Port Gigabit Smart Managed Switch Model GS418TPP, GS510TLP, and GS510TPP To reset the switch to confirm. The default password is off-network using TFTP or...
... cable. 2. The login window opens. 4. A confirmation pop-up window opens. 8. Select Maintenance > Reset > Factory Default. 6. Click the Apply button. All changes that is password. ProSAFE 8-Port or 16-Port Gigabit Smart Managed Switch Model GS418TPP, GS510TLP, and GS510TPP To reset the switch to confirm. The default password is off-network using TFTP or...
User Manual
Page 455
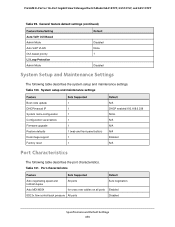
ProSAFE 8-Port or 16-Port Gigabit Smart Managed Switch Model GS418TPP, GS510TLP, and GS510TPP Table 99. System setup and maintenance settings Feature Boot code update DHCP/manual IP System name configuration Configuration save/restore Firmware upgrade Restore defaults Dual image support Factory reset Sets Supported 1 1 1 1 1 1 (web and front-panel button) 1 1 Default N/A DHCP enabled/192...
ProSAFE 8-Port or 16-Port Gigabit Smart Managed Switch Model GS418TPP, GS510TLP, and GS510TPP Table 99. System setup and maintenance settings Feature Boot code update DHCP/manual IP System name configuration Configuration save/restore Firmware upgrade Restore defaults Dual image support Factory reset Sets Supported 1 1 1 1 1 1 (web and front-panel button) 1 1 Default N/A DHCP enabled/192...

