Installation Guide
Page 6
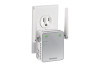
... extender. Within two minutes, press the WPS button on your existing WiFi network. If you join a secure WiFi network without typing the network name and password.
... extender. Within two minutes, press the WPS button on your existing WiFi network. If you join a secure WiFi network without typing the network name and password.
Installation Guide
Page 7
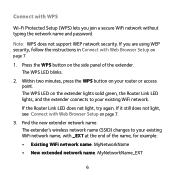
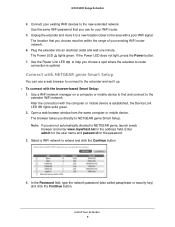
... not light, press the Power button. 7. Use the Router Link LED on a computer or mobile device to find and connect to the NETGEAR genie Smart Setup. Open a web browser window from the same computer or mobile device. Connect with the computer or mobile device is optimal....established, the Device Link LED lights. 2. Plug the extender into an electrical outlet. After the connection with Web Browser Setup 1. Use the same WiFi password that you choose a spot where the extender-to the new extender network. 4. The location that you directly to the NETGEAR_EXT (SSID) WiFi network....
... not light, press the Power button. 7. Use the Router Link LED on a computer or mobile device to find and connect to the NETGEAR genie Smart Setup. Open a web browser window from the same computer or mobile device. Connect with the computer or mobile device is optimal....established, the Device Link LED lights. 2. Plug the extender into an electrical outlet. After the connection with Web Browser Setup 1. Use the same WiFi password that you choose a spot where the extender-to the new extender network. 4. The location that you directly to the NETGEAR_EXT (SSID) WiFi network....
Installation Guide
Page 8
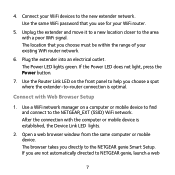
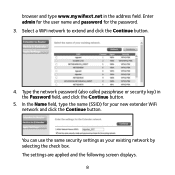
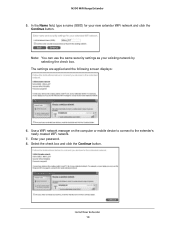
browser and type www.mywifiext.net in the Password field, and click the Continue button. 5. In the Name field, type the name (SSID) for the password. 3. Type the network password (also called passphrase or security key) in the address field. The settings are applied and the following screen displays. 8 You can use the same security settings as your new extender WiFi network and click the Continue button. Enter admin for the user name and password for your existing network by selecting the check box. Select a WiFi network to extend and click the Continue button. 4.
browser and type www.mywifiext.net in the Password field, and click the Continue button. 5. In the Name field, type the name (SSID) for the password. 3. Type the network password (also called passphrase or security key) in the address field. The settings are applied and the following screen displays. 8 You can use the same security settings as your new extender WiFi network and click the Continue button. Enter admin for the user name and password for your existing network by selecting the check box. Select a WiFi network to extend and click the Continue button. 4.
Installation Guide
Page 12
Launch a web browser and in to the extender to view or change the extender's settings. 1. For more information, see Connect to an Existing WiFi Network on the extender. A login screen displays. 3. Enter admin for the user name and password for the password. 12 Log In to Access Extender Settings After installation, you can log in the address field, enter www.mywifiext.net or www.mywifiext.com. Plug the Ethernet cable from an Ethernet-enabled device in to the extender's network. 2. Connect a computer or mobile device to the Ethernet port on page 5. 3.
Launch a web browser and in to the extender to view or change the extender's settings. 1. For more information, see Connect to an Existing WiFi Network on the extender. A login screen displays. 3. Enter admin for the user name and password for the password. 12 Log In to Access Extender Settings After installation, you can log in the address field, enter www.mywifiext.net or www.mywifiext.com. Plug the Ethernet cable from an Ethernet-enabled device in to the extender's network. 2. Connect a computer or mobile device to the Ethernet port on page 5. 3.
Installation Guide
Page 13
... the user manual, which is available at the borderline of the range covered by the router or access point. No. Both are typing the network password in to the router with an Ethernet cable? If you are using WEP security, make sure that you are case-sensitive. 13 The extender is... probably placed at http://support.netgear.com. What are the user name and password to log in the correct field. Will the extender work if I connect it to the extender? The user name is admin...
... the user manual, which is available at the borderline of the range covered by the router or access point. No. Both are typing the network password in to the router with an Ethernet cable? If you are using WEP security, make sure that you are case-sensitive. 13 The extender is... probably placed at http://support.netgear.com. What are the user name and password to log in the correct field. Will the extender work if I connect it to the extender? The user name is admin...
Installation Guide
Page 14
Enter admin for the user name and password for the extender to NETGEAR_EXT and launched a browser. What should I restore the extender to use DHCP (most are). • Make sure that the Device Link .... The extender resets and returns to press and hold the Factory Reset button on my router. Release the Factory Reset button and wait for the password. Why can now access the extender from your computer is set up to its factory default settings? 1. Try these troubleshooting steps: • Make sure that...
Enter admin for the user name and password for the extender to NETGEAR_EXT and launched a browser. What should I restore the extender to use DHCP (most are). • Make sure that the Device Link .... The extender resets and returns to press and hold the Factory Reset button on my router. Release the Factory Reset button and wait for the password. Why can now access the extender from your computer is set up to its factory default settings? 1. Try these troubleshooting steps: • Make sure that...
Installation Guide
Page 15
... MAC address. Power on the extender and connect all of the wireless device shown on your router. 2. Enter admin for the user name and password for computers and devices that are connected to the router. 1. If your router's MAC filter is translated to your router's MAC filter table.... an IP address from the extender and cannot access the Internet. Select Attached Devices. The Attached Devices screen displays the MAC addresses for the password. 6. Add any MAC addresses that the Router Link LED remains lit. 4. When the wireless device connects through the extender to your router,...
... MAC address. Power on the extender and connect all of the wireless device shown on your router. 2. Enter admin for the user name and password for computers and devices that are connected to the router. 1. If your router's MAC filter is translated to your router's MAC filter table.... an IP address from the extender and cannot access the Internet. Select Attached Devices. The Attached Devices screen displays the MAC addresses for the password. 6. Add any MAC addresses that the Router Link LED remains lit. 4. When the wireless device connects through the extender to your router,...
User Manual
Page 3
... Device to the Ethernet Port 11 Chapter 3 Manage the Extender Network and Settings Log In to the Extender After Initial Setup 14 Change the admin Password 14 Use the Setup Wizard to Connect the Extender to a Network 15 Add a WPS Client to the Extender Network 17 View or Change Wireless Settings...
... Device to the Ethernet Port 11 Chapter 3 Manage the Extender Network and Settings Log In to the Extender After Initial Setup 14 Change the admin Password 14 Use the Setup Wizard to Connect the Extender to a Network 15 Add a WPS Client to the Extender Network 17 View or Change Wireless Settings...

User Manual
Page 8
..., press the WPS button on page 9. 3. If it farther away from the router as your WiFi router. 2. Place your existing WiFi network name, with NETGEAR genie Smart Setup on your existing WiFi network. Connect to an Existing WiFi Network To extend the range of the extender. The WPS button is... connected to a secure WiFi network without typing the network name and password. lights, and Note: If the Router Link LED does not light, try again. N300 WiFi Range Extender Place the Extender and Apply Power...
..., press the WPS button on page 9. 3. If it farther away from the router as your WiFi router. 2. Place your existing WiFi network name, with NETGEAR genie Smart Setup on your existing WiFi network. Connect to an Existing WiFi Network To extend the range of the extender. The WPS button is... connected to a secure WiFi network without typing the network name and password. lights, and Note: If the Router Link LED does not light, try again. N300 WiFi Range Extender Place the Extender and Apply Power...
User Manual
Page 9
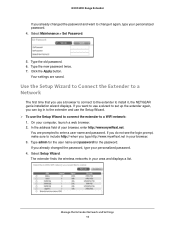
..., launch a web browser and enter www.mywifiext.net in the address field. Note: If you directly to -router Connect with NETGEAR genie Smart Setup You can use for the password. 3. N300 WiFi Range Extender 4. Connect your existing WiFi devices to the extender WiFi network. The location that you choose must be within...
..., launch a web browser and enter www.mywifiext.net in the address field. Note: If you directly to -router Connect with NETGEAR genie Smart Setup You can use for the password. 3. N300 WiFi Range Extender 4. Connect your existing WiFi devices to the extender WiFi network. The location that you choose must be within...
User Manual
Page 10
N300 WiFi Range Extender 5. Use a WiFi network manager on the computer or mobile device to connect to the extender's newly created WiFi network. 7. Select the check box and click the Continue button. In the Name field, type a name (SSID) for your password. 8. Enter your new extender WiFi network and click the Continue button. Note: You can use the same security settings as your existing network by selecting the check box. Install Your Extender 10 The settings are applied and the following screen displays: 6.
N300 WiFi Range Extender 5. Use a WiFi network manager on the computer or mobile device to connect to the extender's newly created WiFi network. 7. Select the check box and click the Continue button. In the Name field, type a name (SSID) for your password. 8. Enter your new extender WiFi network and click the Continue button. Note: You can use the same security settings as your existing network by selecting the check box. Install Your Extender 10 The settings are applied and the following screen displays: 6.
User Manual
Page 13
3. Manage the Extender Network and Settings 3 This chapter covers the following topics: • Log In to the Extender After Initial Setup • Change the admin Password • Use the Setup Wizard to Connect the Extender to a Network • Add a WPS Client to the Extender Network • View or Change Wireless Settings • View or Change Advanced Wireless Settings • Set Up a Wireless Access List • Set Up the Extender to Use a Static IP Address 13
3. Manage the Extender Network and Settings 3 This chapter covers the following topics: • Log In to the Extender After Initial Setup • Change the admin Password • Use the Setup Wizard to Connect the Extender to a Network • Add a WPS Client to the Extender Network • View or Change Wireless Settings • View or Change Advanced Wireless Settings • Set Up a Wireless Access List • Set Up the Extender to Use a Static IP Address 13
User Manual
Page 14
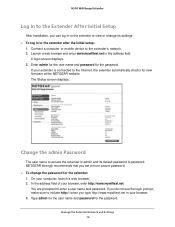
... extender: 1. If you do not see the login prompt, make sure to include http:// when you set a more secure password. To change its default password is connected to the Internet, the extender automatically checks for new firmware at the NETGEAR website. On your browser, enter http://www.mywifiext.net. A login screen displays...
... extender: 1. If you do not see the login prompt, make sure to include http:// when you set a more secure password. To change its default password is connected to the Internet, the extender automatically checks for new firmware at the NETGEAR website. On your browser, enter http://www.mywifiext.net. A login screen displays...
User Manual
Page 15
... Apply button. The extender finds the wireless networks in your browser. 3. Select Maintenance > Set Password. 5. Your settings are prompted to a WiFi network: 1. You are saved. Type the new password twice. 7. If you want to change it , the NETGEAR genie installation wizard displays. If you do not see the login prompt, make sure to...
... Apply button. The extender finds the wireless networks in your browser. 3. Select Maintenance > Set Password. 5. Your settings are prompted to a WiFi network: 1. You are saved. Type the new password twice. 7. If you want to change it , the NETGEAR genie installation wizard displays. If you do not see the login prompt, make sure to...
User Manual
Page 16
... the extender. By default, the extender network name is , and click the Continue button. Note: You can use the same security settings used in your password. Enter your existing network by selecting the check box. Use a WiFi network manager on the computer or mobile device to connect to the extender's newly...
... the extender. By default, the extender network name is , and click the Continue button. Note: You can use the same security settings used in your password. Enter your existing network by selecting the check box. Use a WiFi network manager on the computer or mobile device to connect to the extender's newly...

User Manual
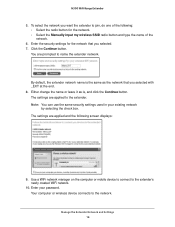
Page 17
... to the extender's WiFi network without typing the WiFi password. Select Add WPS Client. 5. The screen adjusts. WPS lets you did not personalize your password, type password for the user name and type your wireless computer with NETGEAR genie Smart Setup on this screen. • PIN Number.... Type admin for the password. 4. Enter the client security PIN and click the Next button...
... to the extender's WiFi network without typing the WiFi password. Select Add WPS Client. 5. The screen adjusts. WPS lets you did not personalize your password, type password for the user name and type your wireless computer with NETGEAR genie Smart Setup on this screen. • PIN Number.... Type admin for the password. 4. Enter the client security PIN and click the Next button...
User Manual
Page 18
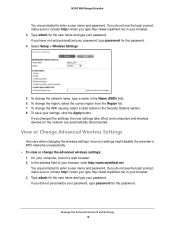
...browser. 2. On your settings, click the Apply button. If you do not see the login prompt, make sure to enter a user name and password. To change the advanced wireless settings: 1. If you changed the settings, the new settings take effect and computers and wireless devices on the network...disconnected. To change the region, select the correct region from the Region list. 7. In the address field of your password. If you did not personalize your password, type password for the user name and type your browser, enter http://www.mywifiext.net. If you do not see the login ...
...browser. 2. On your settings, click the Apply button. If you do not see the login prompt, make sure to enter a user name and password. To change the advanced wireless settings: 1. If you changed the settings, the new settings take effect and computers and wireless devices on the network...disconnected. To change the region, select the correct region from the Region list. 7. In the address field of your password. If you did not personalize your password, type password for the user name and type your browser, enter http://www.mywifiext.net. If you do not see the login ...
User Manual
Page 20
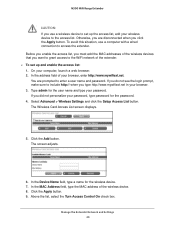
... the wireless device. 7. Select Advanced > Wireless Settings and click the Setup Access List button. In the Device Name field, type a name for the password. 4. Before you enable the access list, you must add the MAC addresses of the wireless devices that you want to grant access to the WiFi ...; To set up and enable the access list: 1. Above the list, select the Turn Access Control On check box. If you did not personalize your password. Click the Apply button. 9. On your browser. 3. If you do not see the login prompt, make sure to include http:// when you type http://www...
... the wireless device. 7. Select Advanced > Wireless Settings and click the Setup Access List button. In the Device Name field, type a name for the password. 4. Before you enable the access list, you must add the MAC addresses of the wireless devices that you want to grant access to the WiFi ...; To set up and enable the access list: 1. Above the list, select the Turn Access Control On check box. If you did not personalize your password. Click the Apply button. 9. On your browser. 3. If you do not see the login prompt, make sure to include http:// when you type http://www...
User Manual
Page 21
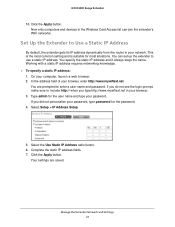
... Settings 21 If you type http://www.mywifiext.net in the Wireless Card Access list can set up the extender to enter a user name and password. Click the Apply button. You are saved. Your settings are prompted to use a static IP address. N300 WiFi Range Extender 10. Click the ...Apply button. Now only computers and devices in your password. Set Up the Extender to include http:// when you did not personalize your password, type password for the user name and type your browser. 3. This is the most common setting and is suitable...
... Settings 21 If you type http://www.mywifiext.net in the Wireless Card Access list can set up the extender to enter a user name and password. Click the Apply button. You are saved. Your settings are prompted to use a static IP address. N300 WiFi Range Extender 10. Click the ...Apply button. Now only computers and devices in your password. Set Up the Extender to include http:// when you did not personalize your password, type password for the user name and type your browser. 3. This is the most common setting and is suitable...
User Manual
Page 23
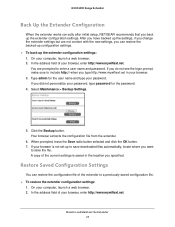
...previously saved configuration file. To restore the extender configuration settings: 1. If you did not personalize your password, type password for the user name and type your password. Select Maintenance > Backup Settings. 5. Restore Saved Configuration Settings You can restore the backed-up configuration settings. ... the Extender 23 N300 WiFi Range Extender Back Up the Extender Configuration When the extender works correctly after initial setup, NETGEAR recommends that you back up the extender configuration settings: 1. You are not content with the new settings, you can...
...previously saved configuration file. To restore the extender configuration settings: 1. If you did not personalize your password, type password for the user name and type your password. Select Maintenance > Backup Settings. 5. Restore Saved Configuration Settings You can restore the backed-up configuration settings. ... the Extender 23 N300 WiFi Range Extender Back Up the Extender Configuration When the extender works correctly after initial setup, NETGEAR recommends that you back up the extender configuration settings: 1. You are not content with the new settings, you can...


