
User Manual
Page 4
... NETGEAR Armor settings using the Nighthawk app 46 Enable access control to allow or block access to the Internet....47 Use keywords to block Internet sites 48 Delete keywords from the blocked list 49 Block services from the Internet 50 Prevent blocking on a trusted computer 51 Manage network access control lists 52 Schedule when to block Internet sites and services 52 Set up security event email notifications 53 Chapter 5 Manage Network Settings View or change the WAN settings 56 Set up a default DMZ server 57 Change the Router's Device Name 58 Change the LAN...
... NETGEAR Armor settings using the Nighthawk app 46 Enable access control to allow or block access to the Internet....47 Use keywords to block Internet sites 48 Delete keywords from the blocked list 49 Block services from the Internet 50 Prevent blocking on a trusted computer 51 Manage network access control lists 52 Schedule when to block Internet sites and services 52 Set up security event email notifications 53 Chapter 5 Manage Network Settings View or change the WAN settings 56 Set up a default DMZ server 57 Change the Router's Device Name 58 Change the LAN...
User Manual
Page 5
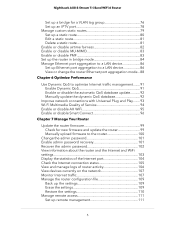
... firmware and update the router 99 Manually upload firmware to the router 100 Change the admin password 101 Enable admin password recovery 101 Recover the admin password 102 View information about the router and the Internet and WiFi settings 103 Display the statistics of the Internet port 104 Check the Internet connection status 105 View and manage logs of router activity 106 View devices currently on the network 107 Monitor Internet traffic 107 Manage the router configuration file 109 Back up the settings 109 Erase the settings 109 Restore the settings 110 Manage remote access...
... firmware and update the router 99 Manually upload firmware to the router 100 Change the admin password 101 Enable admin password recovery 101 Recover the admin password 102 View information about the router and the Internet and WiFi settings 103 Display the statistics of the Internet port 104 Check the Internet connection status 105 View and manage logs of router activity 106 View devices currently on the network 107 Monitor Internet traffic 107 Manage the router configuration file 109 Back up the settings 109 Erase the settings 109 Restore the settings 110 Manage remote access...
User Manual
Page 7
... an iOS device 142 Install OpenVPN software on an Android device 142 Use a VPN tunnel on your Windows computer 143 Use VPN to access the router's USB device and media 145 Use VPN to access your Internet service at home 145 Set up VPN client Internet access in the router 146 Block VPN client Internet access in the router 146 Use a VPN tunnel to access your Internet service at home....147 Chapter 11 Use a VPN client to connect to a VPN server Set up a VPN client 150 Enable a VPN client 150 View your VPN connection status 151 View VPN client longs 152 Chapter 12 Manage port forwarding...
... an iOS device 142 Install OpenVPN software on an Android device 142 Use a VPN tunnel on your Windows computer 143 Use VPN to access the router's USB device and media 145 Use VPN to access your Internet service at home 145 Set up VPN client Internet access in the router 146 Block VPN client Internet access in the router 146 Use a VPN tunnel to access your Internet service at home....147 Chapter 11 Use a VPN client to connect to a VPN server Set up a VPN client 150 Enable a VPN client 150 View your VPN connection status 151 View VPN client longs 152 Chapter 12 Manage port forwarding...
User Manual
Page 21
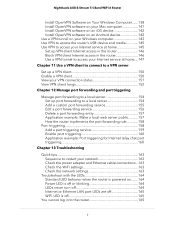
... code to the router with an Ethernet cable (wired) or over WiFi with an Ethernet cable), you in the network are using the settings described here. Installation and basic setup takes about 15 minutes to the network and 21 access the router User Manual When your Internet connection is powered on your DSL account • ISP login name and password • Fixed or static IP address setting (special deployment by ISP; Make sure that your router: 1. For DSL service...
... code to the router with an Ethernet cable (wired) or over WiFi with an Ethernet cable), you in the network are using the settings described here. Installation and basic setup takes about 15 minutes to the network and 21 access the router User Manual When your Internet connection is powered on your DSL account • ISP login name and password • Fixed or static IP address setting (special deployment by ISP; Make sure that your router: 1. For DSL service...

User Manual
Page 29
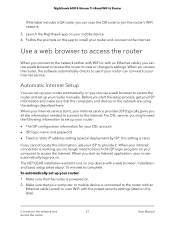
... a web browser from a computer or mobile device that is connected to a LAN device on your modem, see Manage Ethernet port aggregation to the router network. To set up Internet port aggregation on page 86. Enter http://www.routerlogin.net. Your settings are now using. Enter the router admin user name and password. A login window opens. For information about port aggregation to a LAN device, see the documentation that support static Link Aggregation Control Protocol (LACP), for example, a NETGEAR Nighthawk multi-speed cable modem, model CM1200. Use the default MAC address...
... a web browser from a computer or mobile device that is connected to a LAN device on your modem, see Manage Ethernet port aggregation to the router network. To set up Internet port aggregation on page 86. Enter http://www.routerlogin.net. Your settings are now using. Enter the router admin user name and password. A login window opens. For information about port aggregation to a LAN device, see the documentation that support static Link Aggregation Control Protocol (LACP), for example, a NETGEAR Nighthawk multi-speed cable modem, model CM1200. Use the default MAC address...
User Manual
Page 55
...; Disable the DHCP server feature in the router • Manage reserved LAN IP addresses • Use the WPS Wizard for WiFi connections • Specify basic WiFi settings • Change the WiFi mode • Change the WiFi password or the WiFi security • Set up a guest WiFi network • Control the WiFi radios • Set up a WiFi schedule • Specify WPS settings • Set up the router as a WiFi access point • Set up a bridge for a port group or VLAN tag group • Manage custom static routes • Enable or disable airtime fairness • Enable or disable...
...; Disable the DHCP server feature in the router • Manage reserved LAN IP addresses • Use the WPS Wizard for WiFi connections • Specify basic WiFi settings • Change the WiFi mode • Change the WiFi password or the WiFi security • Set up a guest WiFi network • Control the WiFi radios • Set up a WiFi schedule • Specify WPS settings • Set up the router as a WiFi access point • Set up a bridge for a port group or VLAN tag group • Manage custom static routes • Enable or disable airtime fairness • Enable or disable...
User Manual
Page 56
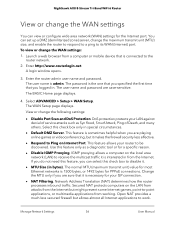
... WAN Setup page displays. Use this check box to -point applications, or multimedia applications from a computer or mobile device that is necessary for PPPoE connections. IGMP proxying allows a computer on Internet Port. Manage Network Settings 56 User Manual Launch a web browser from working. This feature allows your ISP connection. • NAT Filtering. Enter the router admin user name and password. Open NAT provides a much less secured firewall but it is connected to Ping on the local area network (LAN) to receive the multicast traffic...
... WAN Setup page displays. Use this check box to -point applications, or multimedia applications from a computer or mobile device that is necessary for PPPoE connections. IGMP proxying allows a computer on Internet Port. Manage Network Settings 56 User Manual Launch a web browser from working. This feature allows your ISP connection. • NAT Filtering. Enter the router admin user name and password. Open NAT provides a much less secured firewall but it is connected to Ping on the local area network (LAN) to receive the multicast traffic...
User Manual
Page 60
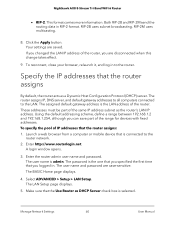
... the pool of the router, you logged in. The password is the one that you specified the first time that the Use Router as DHCP Server check box is the LAN address of the range for devices with fixed addresses. The assigned default gateway address is selected. Enter http://www.routerlogin.net. Manage Network Settings 60 User Manual If you changed the LAN IP address of IP addresses that is admin. Select ADVANCED > Setup > LAN Setup. A login window opens. 3. Both RIP-2B and...
... the pool of the router, you logged in. The password is the one that you specified the first time that the Use Router as DHCP Server check box is the LAN address of the range for devices with fixed addresses. The assigned default gateway address is selected. Enter http://www.routerlogin.net. Manage Network Settings 60 User Manual If you changed the LAN IP address of IP addresses that is admin. Select ADVANCED > Setup > LAN Setup. A login window opens. 3. Both RIP-2B and...
User Manual
Page 68
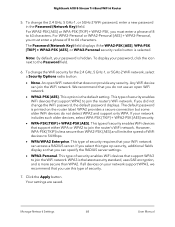
... the WiFi network. This type of security. 7. If you can specify the RADIUS server settings. • WPA3-Personal. Note: By default, your password, click the icon next to 54 Mbps. • WPA/WPA2 Enterprise. Manage Network Settings 68 User Manual Any WiFi device can access a RADIUS server. This option is selected. If your WiFi network can join the WiFi network. If you select this type of security enables WiFi devices that you did not change the WiFi password, the default password...
... the WiFi network. This type of security. 7. If you can specify the RADIUS server settings. • WPA3-Personal. Note: By default, your password, click the icon next to 54 Mbps. • WPA/WPA2 Enterprise. Manage Network Settings 68 User Manual Any WiFi device can access a RADIUS server. This option is selected. If your WiFi network can join the WiFi network. If you select this type of security enables WiFi devices that you did not change the WiFi password, the default password...
User Manual
Page 74
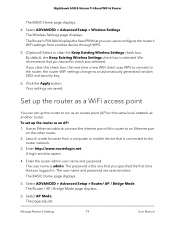
... Wireless Settings page displays. Enter the router admin user name and password. The Router / AP / Bridge Mode page displays. 6. We recommend that you logged in. The page adjusts. Manage Network Settings 74 User Manual If you leave this check box, the next time a new WiFi client uses WPS to connect to the router, the router WiFi settings change to run as an access point (AP) on the other router. 2. Use an Ethernet cable to connect the Internet port of this router to the router network. 3. The user name and password...
... Wireless Settings page displays. Enter the router admin user name and password. The Router / AP / Bridge Mode page displays. 6. We recommend that you logged in. The page adjusts. Manage Network Settings 74 User Manual If you leave this check box, the next time a new WiFi client uses WPS to connect to the router, the router WiFi settings change to run as an access point (AP) on the other router. 2. Use an Ethernet cable to connect the Internet port of this router to the router network. 3. The user name and password...
User Manual
Page 75
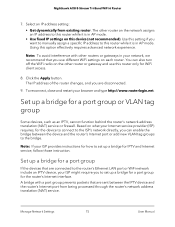
... the router changes, and you are sent between the device and the router's Internet port or add new VLAN tag groups to the bridge. Set up a bridge for a port group If the devices that are connected to the router's Ethernet LAN port or WiFi network include an IPTV device, your ISP might require you can also turn off the WiFi radio on the other routers or gateways in your Internet service provider (ISP) requires, for the router's Internet interface. Set up a bridge for WiFi client access. 8. Manage Network Settings 75 User Manual...
... the router changes, and you are sent between the device and the router's Internet port or add new VLAN tag groups to the bridge. Set up a bridge for a port group If the devices that are connected to the router's Ethernet LAN port or WiFi network include an IPTV device, your ISP might require you can also turn off the WiFi radio on the other routers or gateways in your Internet service provider (ISP) requires, for the router's Internet interface. Set up a bridge for WiFi client access. 8. Manage Network Settings 75 User Manual...
User Manual
Page 78
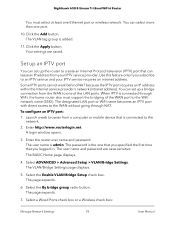
... port. 10. Launch a web browser from a computer or mobile device that is admin. The user name is connected to the WiFi network name (SSID). The password is connected through NAT. The BASIC Home page displays. 4. Select the Enable VLAN/Bridge Setup check box. Select a Wired Ports check box or a Wireless check box: Manage Network Settings 78 User Manual Click the Apply button. The page expands. 7. Use this feature only if you logged in. A login window opens. 3. The VLAN/Bridge Settings page displays. 5. Click the Add button...
... port. 10. Launch a web browser from a computer or mobile device that is admin. The user name is connected to the WiFi network name (SSID). The password is connected through NAT. The BASIC Home page displays. 4. Select the Enable VLAN/Bridge Setup check box. Select a Wired Ports check box or a Wireless check box: Manage Network Settings 78 User Manual Click the Apply button. The page expands. 7. Use this feature only if you logged in. A login window opens. 3. The VLAN/Bridge Settings page displays. 5. Click the Add button...

User Manual
Page 94
.... Type the advertisement time to receive the Optimize Performance 94 User Manual Click the Apply button. The password is the one that you specified the first time that you notice that control points receive current device status at the expense of Service (WMM QoS) prioritizes WiFi voice and video traffic over the WiFi link. Wi-Fi Multimedia Quality of Service Wi-Fi Multimedia Quality of more network traffic. The number of the device status...
.... Type the advertisement time to receive the Optimize Performance 94 User Manual Click the Apply button. The password is the one that you specified the first time that you notice that control points receive current device status at the expense of Service (WMM QoS) prioritizes WiFi voice and video traffic over the WiFi link. Wi-Fi Multimedia Quality of Service Wi-Fi Multimedia Quality of more network traffic. The number of the device status...
User Manual
Page 108
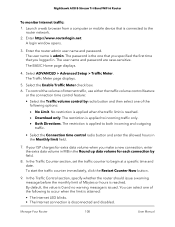
... Counter Now button. 9. Manage Your Router 108 User Manual Enter the router admin user name and password. Enter http://www.routerlogin.net. To control the volume of Internet traffic, use either the traffic volume control feature or the connection time control feature: • Select the Traffic volume control by field. 8. No restriction is applied when the traffic limit is applied to the router network. 2. The restriction is reached. • Download only. In the Traffic Control section...
... Counter Now button. 9. Manage Your Router 108 User Manual Enter the router admin user name and password. Enter http://www.routerlogin.net. To control the volume of Internet traffic, use either the traffic volume control feature or the connection time control feature: • Select the Traffic volume control by field. 8. No restriction is applied when the traffic limit is applied to the router network. 2. The restriction is reached. • Download only. In the Traffic Control section...
User Manual
Page 116
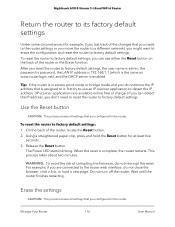
... factory default settings. To reset the router to factory default settings, the user name is admin, the password is password, the LAN IP address is 192.168.1.1 (which is the same as www.routerlogin.net), and the DHCP server is complete, the router restarts. When the reset is enabled. Wait until the router finishes restarting. Release the Reset button. WARNING: To avoid the risk of the router, locate the Reset button. 2. The Power LED starts blinking. After you reset the router...
... factory default settings. To reset the router to factory default settings, the user name is admin, the password is password, the LAN IP address is 192.168.1.1 (which is the same as www.routerlogin.net), and the DHCP server is complete, the router restarts. When the reset is enabled. Wait until the router finishes restarting. Release the Reset button. WARNING: To avoid the risk of the router, locate the Reset button. 2. The Power LED starts blinking. After you reset the router...
User Manual
Page 132
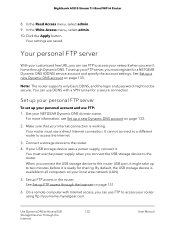
... 8-Stream Tri-Band WiFi 6 Router 8. See Set up FTP access in the router. Make sure that your local area network (LAN). 5. Connect a storage device to Access USB 132 Storage Devices Through the Internet User Manual Set up a new Dynamic DNS account on your Internet connection is available to the router. Your personal FTP server With your USB storage device uses a power supply, connect it might not be secure. If your customized free URL, you connect the USB storage...
... 8-Stream Tri-Band WiFi 6 Router 8. See Set up FTP access in the router. Make sure that your local area network (LAN). 5. Connect a storage device to Access USB 132 Storage Devices Through the Internet User Manual Set up a new Dynamic DNS account on your Internet connection is available to the router. Your personal FTP server With your USB storage device uses a power supply, connect it might not be secure. If your customized free URL, you connect the USB storage...
User Manual
Page 137
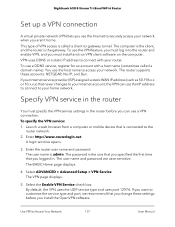
... the router is connected to the router network. 2. To use the Internet to securely access your router. Launch a web browser from a computer or mobile device that you change these accounts: NETGEAR, No-IP, and Dyn. VPN uses DDNS or a static IP address to connect with a host name (sometimes called a client-to-gateway tunnel. The BASIC Home page displays. 4. The router supports these settings before you can use the host name to access your home network. The user...
... the router is connected to the router network. 2. To use the Internet to securely access your router. Launch a web browser from a computer or mobile device that you change these accounts: NETGEAR, No-IP, and Dyn. VPN uses DDNS or a static IP address to connect with a host name (sometimes called a client-to-gateway tunnel. The BASIC Home page displays. 4. The router supports these settings before you can use the host name to access your home network. The user...
User Manual
Page 164
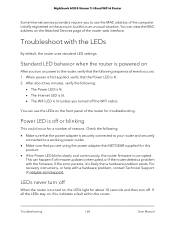
... securely connected to your router and securely connected to a working power outlet. • Make sure that you turn off the WiFi radio). Troubleshoot with a hardware problem, contact Technical Support at netgear.com/support. For recovery instructions, or help with the LEDs By default, the router uses standard LED settings. Troubleshooting 164 User Manual You can use the MAC address of the computer initially registered on the front panel of the router for a number of events occurs: 1. Nighthawk AX8 8-Stream Tri-Band WiFi 6 Router Some Internet service...
... securely connected to your router and securely connected to a working power outlet. • Make sure that you turn off the WiFi radio). Troubleshoot with a hardware problem, contact Technical Support at netgear.com/support. For recovery instructions, or help with the LEDs By default, the router uses standard LED settings. Troubleshooting 164 User Manual You can use the MAC address of the computer initially registered on the front panel of the router for a number of events occurs: 1. Nighthawk AX8 8-Stream Tri-Band WiFi 6 Router Some Internet service...
User Manual
Page 168
... a DNS address, as www addresses) to load any DNS server addresses. If your Internet service provider (ISP) sets a usage limit, they might charge you in the router web interface, do the following reasons: • The traffic meter is enabled, and the limit was reached. It is possible that the router address (www.routerlogin.net) is listed by DHCP, reboot the computer and verify the gateway address. • You might be configured as the default gateway address...
... a DNS address, as www addresses) to load any DNS server addresses. If your Internet service provider (ISP) sets a usage limit, they might charge you in the router web interface, do the following reasons: • The traffic meter is enabled, and the limit was reached. It is possible that the router address (www.routerlogin.net) is listed by DHCP, reboot the computer and verify the gateway address. • You might be configured as the default gateway address...
User Manual
Page 173
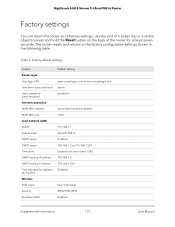
The router resets and returns to its factory settings. Factory default settings Feature Router login User login URL User name (case-sensitive) Login password (case-sensitive) Internet connection WAN MAC address WAN MTU size Local network (LAN) LAN IP Subnet mask DHCP server DHCP range Time zone DHCP starting IP address DHCP ending IP address Time adjusted for at least seven seconds. Table 3. Use the end of the router for daylight saving time Wireless SSID name Security Broadcast SSID Default setting www.routerlogin.com or www.routerlogin.net admin password Use default hardware address...
The router resets and returns to its factory settings. Factory default settings Feature Router login User login URL User name (case-sensitive) Login password (case-sensitive) Internet connection WAN MAC address WAN MTU size Local network (LAN) LAN IP Subnet mask DHCP server DHCP range Time zone DHCP starting IP address DHCP ending IP address Time adjusted for at least seven seconds. Table 3. Use the end of the router for daylight saving time Wireless SSID name Security Broadcast SSID Default setting www.routerlogin.com or www.routerlogin.net admin password Use default hardware address...


