
Product Manual
Page 13
... Call time info...62 Call options ...62 Making calls ...63 Video calls ...64 Camera settings ...65 Video call options ...65 Screen settings ...66 Network setup ...67 Security ...68 Locks ...68 Set codes ...68 Supplementary ...69 Date and time ...70 Language ...71 Clear settings ...71 Using the Browser to Access the Internet 72 Browser Menus ...72 To End a Browser session ...76 To Download and Save a File in your e228 File Manager 76 To Bookmark ...76 Using your e228's Advanced Features 78 Photo/Video Camera ...78 To Take and Send a Photo/Video in a Message 78...
... Call time info...62 Call options ...62 Making calls ...63 Video calls ...64 Camera settings ...65 Video call options ...65 Screen settings ...66 Network setup ...67 Security ...68 Locks ...68 Set codes ...68 Supplementary ...69 Date and time ...70 Language ...71 Clear settings ...71 Using the Browser to Access the Internet 72 Browser Menus ...72 To End a Browser session ...76 To Download and Save a File in your e228 File Manager 76 To Bookmark ...76 Using your e228's Advanced Features 78 Photo/Video Camera ...78 To Take and Send a Photo/Video in a Message 78...
Product Manual
Page 14
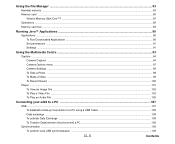
... Settings ...91 Using the Multimedia Centre ...93 Capture ...94 Camera Capture ...94 Camera Options menu ...97 Camera Settings ...98 To Take a Photo ...98 To Make a Video ...99 To Record Sound ...100 Player ...101 To View an Image File ...102 To Play a Video File ...103 To Play an Audio File ...105 Connecting your e228 to a PC ...107 USB ...107 To Establish a Dial-up Connection to a PC using a USB Cable 108 Data exchange ...108 To activate Data Exchange ...109 To Transfer Data between the phone...
... Settings ...91 Using the Multimedia Centre ...93 Capture ...94 Camera Capture ...94 Camera Options menu ...97 Camera Settings ...98 To Take a Photo ...98 To Make a Video ...99 To Record Sound ...100 Player ...101 To View an Image File ...102 To Play a Video File ...103 To Play an Audio File ...105 Connecting your e228 to a PC ...107 USB ...107 To Establish a Dial-up Connection to a PC using a USB Cable 108 Data exchange ...108 To activate Data Exchange ...109 To Transfer Data between the phone...
Product Manual
Page 21
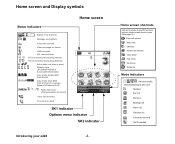
... the Home screen shortcut icons. (See page 16.) Video call options Music files Calendar Missed call is on Server USB connected SSL communication PS Connected/Communicating (Internal) PS Connected/Communicating (External) Active tasks (one-three or more) Memory card (Available/Protected/ Accessed/Unformatted) Area mode (single SIM) 3G/2.5G/2G Area mode (dual SIM) 3G/2.5G/Out of coverage/ Manual 3G/Manual 2.5G Radio field level (strong-weak/out of service) Voice call received The call Indicator Video folder Play music My photos Ringtunes Mode...
... the Home screen shortcut icons. (See page 16.) Video call options Music files Calendar Missed call is on Server USB connected SSL communication PS Connected/Communicating (Internal) PS Connected/Communicating (External) Active tasks (one-three or more) Memory card (Available/Protected/ Accessed/Unformatted) Area mode (single SIM) 3G/2.5G/2G Area mode (dual SIM) 3G/2.5G/Out of coverage/ Manual 3G/Manual 2.5G Radio field level (strong-weak/out of service) Voice call received The call Indicator Video folder Play music My photos Ringtunes Mode...

Product Manual
Page 32
... highlighted shortcut to add the shortcut, in the Quick menu or on the Home screen. Quick Menu and Home Screen Shortcut You can create shortcuts to an application or a function that you frequently use in the Quick menu list or on the Home screen. • Quick menu The Quick menu is available on the SK1. Pressing the Enter key followed by pressing the Up and Down keys and then press Enter key to applications/functions on Main Menu displays the Quick menu...
... highlighted shortcut to add the shortcut, in the Quick menu or on the Home screen. Quick Menu and Home Screen Shortcut You can create shortcuts to an application or a function that you frequently use in the Quick menu list or on the Home screen. • Quick menu The Quick menu is available on the SK1. Pressing the Enter key followed by pressing the Up and Down keys and then press Enter key to applications/functions on Main Menu displays the Quick menu...

Product Manual
Page 33
...68. Setting the Home screen type Press the Options menu key and select Home screen type. To focus on the Home screen, press the SK2 (Add). Sending a text message to select. Select Standard or Show calendar (the monthly view calendar). Accessing the Quick menu Press the Options menu key and select Quick menu. Deleting a Home screen shortcut Select the Home screen shortcut, press the SK2 (Delete). Saving the input/copied phone number in Contact list After you input/copy a phone number on a home screen shortcut, press the Enter key. Task Steps Activating a Home screen...
...68. Setting the Home screen type Press the Options menu key and select Home screen type. To focus on the Home screen, press the SK2 (Add). Sending a text message to select. Select Standard or Show calendar (the monthly view calendar). Accessing the Quick menu Press the Options menu key and select Quick menu. Deleting a Home screen shortcut Select the Home screen shortcut, press the SK2 (Delete). Saving the input/copied phone number in Contact list After you input/copy a phone number on a home screen shortcut, press the Enter key. Task Steps Activating a Home screen...

Product Manual
Page 36
...phone number. From the Home screen, press the Left key. Select the phone number on the list. Alternatively press the Options menu key, Call logs then Outgoing calls. To find the Speed dial screen, press the MENU key, select Contacts, press the Options menu key and select Speed dial. Alternatively press the Options menu key, Call logs then Incoming calls. Select the phone number on the list. Select the phone number on the list. Press the Start key to display a "+" symbol. Making and Receiving Calls Task Making an international call Making a call using the Contact list Making...
...phone number. From the Home screen, press the Left key. Select the phone number on the list. Alternatively press the Options menu key, Call logs then Outgoing calls. To find the Speed dial screen, press the MENU key, select Contacts, press the Options menu key and select Speed dial. Alternatively press the Options menu key, Call logs then Incoming calls. Select the phone number on the list. Select the phone number on the list. Press the Start key to display a "+" symbol. Making and Receiving Calls Task Making an international call Making a call using the Contact list Making...

Product Manual
Page 45
... locked, you can only set the Key lock on/off To 1 Set the Key lock on page 18 for answering voice/video calls. Even when some tasks are open, you cannot switch it off. Note: The screen below to prevent your phone from the Home screen. The confirmation message is made. -28- Remember to unlock it before switching it continues even after you enter the designated emergency number correctly. To set the key lock from being used...
... locked, you can only set the Key lock on/off To 1 Set the Key lock on page 18 for answering voice/video calls. Even when some tasks are open, you cannot switch it off. Note: The screen below to prevent your phone from the Home screen. The confirmation message is made. -28- Remember to unlock it before switching it continues even after you enter the designated emergency number correctly. To set the key lock from being used...

Product Manual
Page 46
... shows the data that you send video calls. for details). The maximum number of fields used in the Contact list: Data Phone Contact List USIM Contact List Name (32 single-byte characters max.) (This item can be registered, edited and deleted.) Nickname (32 single-byte characters max.) - single-byte characters max). -29- Phone number Up to 3 email addresses - Image One image file - URL One homepage address (256 - Contact group Choose from the phone Contact list. Setting up...
... shows the data that you send video calls. for details). The maximum number of fields used in the Contact list: Data Phone Contact List USIM Contact List Name (32 single-byte characters max.) (This item can be registered, edited and deleted.) Nickname (32 single-byte characters max.) - single-byte characters max). -29- Phone number Up to 3 email addresses - Image One image file - URL One homepage address (256 - Contact group Choose from the phone Contact list. Setting up...

Product Manual
Page 48
... default memory, used memory and free entry numbers are displayed. -31- Search and select the entry and press the Options menu key and select Copy or Move. Note: Available only when you can also open the message screen by pressing the Start key. Highlight the phone number or email address and press the SK2 (Msg). Press the Options menu key, select Settings, Sort records. Useful Tips Task Quickly displaying Contact numbers 1 to 99 Sorting contact entries Editing a contact entry Deleting a contact entry Writing a message...
... default memory, used memory and free entry numbers are displayed. -31- Search and select the entry and press the Options menu key and select Copy or Move. Note: Available only when you can also open the message screen by pressing the Start key. Highlight the phone number or email address and press the SK2 (Msg). Press the Options menu key, select Settings, Sort records. Useful Tips Task Quickly displaying Contact numbers 1 to 99 Sorting contact entries Editing a contact entry Deleting a contact entry Writing a message...

Product Manual
Page 64
contacts) The selected phone number/email address is transferred in the Delivery time field. Sending messages manually Press the Options menu key on the New/Edit message screen sending and select Preview message. VME Setting the delivery date and Set the delivery time in to clear from the Press the SK2 (Find) on the Composer screen also displays the preview. Using Messaging Clearing the subject/address/ Press the Options menu key and select Clear fields. Select the (T) V (M) E text/attachment field to To. T VME...
contacts) The selected phone number/email address is transferred in the Delivery time field. Sending messages manually Press the Options menu key on the New/Edit message screen sending and select Preview message. VME Setting the delivery date and Set the delivery time in to clear from the Press the SK2 (Find) on the Composer screen also displays the preview. Using Messaging Clearing the subject/address/ Press the Options menu key and select Clear fields. Select the (T) V (M) E text/attachment field to To. T VME...

Product Manual
Page 65
... default setting is inserted before ). Adding a slide Press the Options menu key and select Add slide (after the selected slide. Press Options Menu key and select Add address. Press the Enter key to 60 seconds). Press SK1 (Use). A new slide is On bottom line. Input/edit text on the New message screen. The slides are displayed within the set time (one to display the Handset memory screen. Select the attachment file name to display the Address list. Inserting an image/music/video/sound file...
... default setting is inserted before ). Adding a slide Press the Options menu key and select Add slide (after the selected slide. Press Options Menu key and select Add address. Press the Enter key to 60 seconds). Press SK1 (Use). A new slide is On bottom line. Input/edit text on the New message screen. The slides are displayed within the set time (one to display the Handset memory screen. Select the attachment file name to display the Address list. Inserting an image/music/video/sound file...

Product Manual
Page 70
... Use the selection and Add to Contacts. Use Add to Contacts to save the phone number/email address. (Refer to contacts. Press the Options menu key and select Open in the message text to the contact list Select the message and press the Enter key to bookmark. Press Options menu key and select Add to Contacts section on Add to Contacts. (Refer to the contact list Select the message and press the Enter key. Register the phone number/email address on page 29 for details.) Note: To stop...
... Use the selection and Add to Contacts. Use Add to Contacts to save the phone number/email address. (Refer to contacts. Press the Options menu key and select Open in the message text to the contact list Select the message and press the Enter key to bookmark. Press Options menu key and select Add to Contacts section on Add to Contacts. (Refer to the contact list Select the message and press the Enter key. Register the phone number/email address on page 29 for details.) Note: To stop...

Product Manual
Page 79
... inserted. Call options Item Receiver volume Quality alarm Any key answer Dial pause setting Description Sets the volume level for calls. Turns the any key to a pager, etc. Pause dial entry function is deleted when registered. Under the following items, the call ), Up and Down keys. Video calls Displays video call information. Edits a string of numbers while calling with the touch tone service, you can send out the numbers you use keypad characters (0-9, # and ) and pause (press and hold the # key: displayed as p). This function enables sending...
... inserted. Call options Item Receiver volume Quality alarm Any key answer Dial pause setting Description Sets the volume level for calls. Turns the any key to a pager, etc. Pause dial entry function is deleted when registered. Under the following items, the call ), Up and Down keys. Video calls Displays video call information. Edits a string of numbers while calling with the touch tone service, you can send out the numbers you use keypad characters (0-9, # and ) and pause (press and hold the # key: displayed as p). This function enables sending...

Product Manual
Page 85
... making emergency calls, answering a call with the Start key, rejecting a call restrictions on /off the automatic lock function. Item Description Activate PIN1 Selects Enable or Disable. Changing the Settings on your PIN incorrectly three times in Set codes on /off from the Home screen. You can also change any key operation except for confirmation. You can unlock it by Dial lock automatically when you enter your e228 -68- Locks Item Dial Lock Auto lock Description This cancels any call with the End key, using your e228. Turns...
... making emergency calls, answering a call with the Start key, rejecting a call restrictions on /off the automatic lock function. Item Description Activate PIN1 Selects Enable or Disable. Changing the Settings on your PIN incorrectly three times in Set codes on /off from the Home screen. You can also change any key operation except for confirmation. You can unlock it by Dial lock automatically when you enter your e228 -68- Locks Item Dial Lock Auto lock Description This cancels any call with the End key, using your e228. Turns...

Product Manual
Page 106
... (always displayed), attribute, copy permission and message transfer permission. Selects memory to display from thumbnail or list display. Please contact 3 for your data. Using the File Manager Deletes all original data in both the handset and the memory card. -89- Switches to Quick Menu. Create shortcut on the list screen also creates a shortcut for a file/folder name. Available for data errors in the Quick menu list. card Checks for H M H M H M H M H M H M Memory card tool Memory card is available as follows: Item Description Format mem...
... (always displayed), attribute, copy permission and message transfer permission. Selects memory to display from thumbnail or list display. Please contact 3 for your data. Using the File Manager Deletes all original data in both the handset and the memory card. -89- Switches to Quick Menu. Create shortcut on the list screen also creates a shortcut for a file/folder name. Available for data errors in the Quick menu list. card Checks for H M H M H M H M H M H M Memory card tool Memory card is available as follows: Item Description Format mem...
Product Manual
Page 124
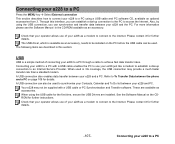
... Transfer software. When using the USB cable for the first time, ensure the USB Drivers are available as an accessory, needs to be installed on page 109 for further details. A USB connection can be used to synchronise your Contacts, Calendar and To Do list between your e228 and a PC. Please contact 3 for details. A USB connection also enables data transfer between your e228 and PC. Connecting your e228 to a PC Press the MENU key Æ Select External connection...
... Transfer software. When using the USB cable for the first time, ensure the USB Drivers are available as an accessory, needs to be installed on page 109 for further details. A USB connection can be used to synchronise your Contacts, Calendar and To Do list between your e228 and a PC. Please contact 3 for details. A USB connection also enables data transfer between your e228 and PC. Connecting your e228 to a PC Press the MENU key Æ Select External connection...

Product Manual
Page 125
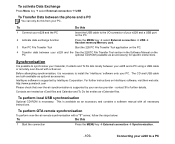
... for the e228 is used to make the connection is set to *99# Note: This procedure only needs to be created on the phone during data exchange. To Establish a Dial-up Connection to a PC using this dial-up connection After connection is made, start the dial-up 3 Disconnect Insert the USB cable to the I/O connector of data files between your e228 and a PC. To install the software, refer to dial is the NEC e228 Modem. Please...
... for the e228 is used to make the connection is set to *99# Note: This procedure only needs to be created on the phone during data exchange. To Establish a Dial-up Connection to a PC using this dial-up connection After connection is made, start the dial-up 3 Disconnect Insert the USB cable to the I/O connector of data files between your e228 and a PC. To install the software, refer to dial is the NEC e228 Modem. Please...
Product Manual
Page 126
.... 4 Transfer data between your PC. Contacts are both available as an accessory and contains a software manual with a "3" server, follow the steps below: To Do this 1 Start the connection Press the MENU key Æ External connection Æ Synchronisation. -109- Intellisync software is supported by Intellisync Corporation. To perform local USB synchronisation Optional CD-ROM is available as optional accessories. Connecting your e228 to install the 'Intellisync' software onto your service...
.... 4 Transfer data between your PC. Contacts are both available as an accessory and contains a software manual with a "3" server, follow the steps below: To Do this 1 Start the connection Press the MENU key Æ External connection Æ Synchronisation. -109- Intellisync software is supported by Intellisync Corporation. To perform local USB synchronisation Optional CD-ROM is available as optional accessories. Connecting your e228 to install the 'Intellisync' software onto your service...

Product Manual
Page 148
...Keys Shortcut Keys Shortcut keys can use them for international call Options menu Displays the Options menu list -131- Mode Key Function In Home screen SK1 Activates the camera function SK2 Activates the Messaging function Up Displays the Contact list Down Displays the Contact list Left Incoming calls list Right Missed calls list Start Outgoing calls list Enter Activates the desktop Triangle Activates the browser Triangle (long) Switches to 3G coverage Note: Available only when Dual USIM is inserted and you access some things more easily. MENU Displays Main Menu...
...Keys Shortcut Keys Shortcut keys can use them for international call Options menu Displays the Options menu list -131- Mode Key Function In Home screen SK1 Activates the camera function SK2 Activates the Messaging function Up Displays the Contact list Down Displays the Contact list Left Incoming calls list Right Missed calls list Start Outgoing calls list Enter Activates the desktop Triangle Activates the browser Triangle (long) Switches to 3G coverage Note: Available only when Dual USIM is inserted and you access some things more easily. MENU Displays Main Menu...

Product Manual
Page 151
... the text box: Deletes one character to the left of the cursor No character is in the text box: Cancels the deletion and returns to the saved data In Delete mode: Deletes all the characters after the cursor In Backspace mode: Deletes all the characters before the cursor Enters 0-9 Inserts symbols Inserts a space Displays the symbol menu Starts a new line Specifies the character and switches between lower case, shift and caps lock mode Shortcut Keys...
... the text box: Deletes one character to the left of the cursor No character is in the text box: Cancels the deletion and returns to the saved data In Delete mode: Deletes all the characters after the cursor In Backspace mode: Deletes all the characters before the cursor Enters 0-9 Inserts symbols Inserts a space Displays the symbol menu Starts a new line Specifies the character and switches between lower case, shift and caps lock mode Shortcut Keys...


