
P401 : KT-46UN-CC spec brochure
Page 1
... using the internal LUTs. Displays can be applied-from small gamma values to the video input of displayable colors or introducing color banding artifacts • Gamma Correction - This capability helps create the look of a seamless, mega-sized display and provides assurance of different formats. • Scalable - Designed specifically for video walls, it measures each group of displays, allowing for quick and easy switching between calibration settings without reducing the number...
... using the internal LUTs. Displays can be applied-from small gamma values to the video input of displayable colors or introducing color banding artifacts • Gamma Correction - This capability helps create the look of a seamless, mega-sized display and provides assurance of different formats. • Scalable - Designed specifically for video walls, it measures each group of displays, allowing for quick and easy switching between calibration settings without reducing the number...
P401 : RS232 codes for X461UN, X461HB, X431BT, P401, P461, P521, P551, P701, S401, S461 and S521
Page 49
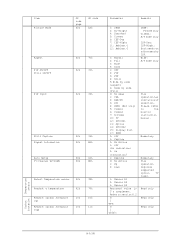
...: Display Port 17: HDMI 0: Off 1: Capture 0: No Action 1: Off (No indication) 2: On (Indication 1: Execute 0: No Action 1: Up 2: Down 1: Sensor #1 2: Sensor #2 3: Sensor #3 Returned value is 2's complement. Refer to the monitor instruction manual. Momentary Momentary This operation requires supported option TV tuner. Item Picture Mode OP code page 02h OP code 1Ah Aspect PIP ON/OFF Still ON/OFF PIP Input 02h 70h 02h 72h 02h 73h Still Capture Signal Information Auto Setup TV-Channel...
...: Display Port 17: HDMI 0: Off 1: Capture 0: No Action 1: Off (No indication) 2: On (Indication 1: Execute 0: No Action 1: Up 2: Down 1: Sensor #1 2: Sensor #2 3: Sensor #3 Returned value is 2's complement. Refer to the monitor instruction manual. Momentary Momentary This operation requires supported option TV tuner. Item Picture Mode OP code page 02h OP code 1Ah Aspect PIP ON/OFF Still ON/OFF PIP Input 02h 70h 02h 72h 02h 73h Still Capture Signal Information Auto Setup TV-Channel...

Specification Brochure
Page 2
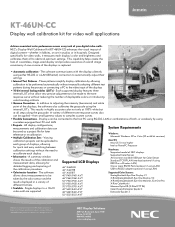
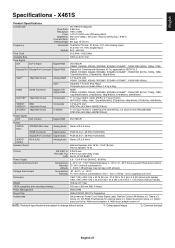
...680.4mm CONNECTIVITY Input Terminals Digital Analog Audio External Control Output Terminals Digital Audio External Control DisplayPort, HDMI, DVI-D VGA 15-pin D-sub, BNC Composite Audio Mini-Jack, DisplayPort Audio, HDMI Audio RS-232C, LAN, DDC/CI DVI-D Audio Mini-Jack, External Speaker Jack (2) RS-232 FEATURES Additional Features LED edge-lit backlighting; TileComp; RS-232 Control and Communication; Ambient light sensor (AmbiBright); Landscape/portrait capable; Ethernet Control and Communication; Handles; Specifications for X461S/X551S MODEL LCD MODULE Viewable Size...
...680.4mm CONNECTIVITY Input Terminals Digital Analog Audio External Control Output Terminals Digital Audio External Control DisplayPort, HDMI, DVI-D VGA 15-pin D-sub, BNC Composite Audio Mini-Jack, DisplayPort Audio, HDMI Audio RS-232C, LAN, DDC/CI DVI-D Audio Mini-Jack, External Speaker Jack (2) RS-232 FEATURES Additional Features LED edge-lit backlighting; TileComp; RS-232 Control and Communication; Ambient light sensor (AmbiBright); Landscape/portrait capable; Ethernet Control and Communication; Handles; Specifications for X461S/X551S MODEL LCD MODULE Viewable Size...
Press Release
Page 2
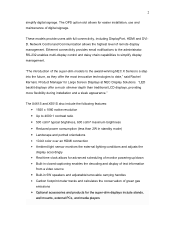
... monitor powering up/down • Built-in closed captioning enables the decoding and display of text information from a video source • Built-in standby mode) • Landscape and portrait orientations • 10-bit color over an HDMI connection • Ambient light sensor monitors the external lighting conditions and adjusts the display accordingly • Real-time clock allows for the super-slim displays include stands, wall mounts, external PCs, and media players These models provide users with full connectivity, including DisplayPort, HDMI...
... monitor powering up/down • Built-in closed captioning enables the decoding and display of text information from a video source • Built-in standby mode) • Landscape and portrait orientations • 10-bit color over an HDMI connection • Ambient light sensor monitors the external lighting conditions and adjusts the display accordingly • Real-time clock allows for the super-slim displays include stands, wall mounts, external PCs, and media players These models provide users with full connectivity, including DisplayPort, HDMI...
Users Manual
Page 2
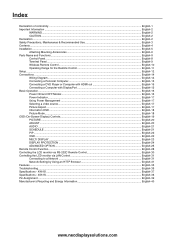
...-8 Control Panel ...English-8 Terminal Panel ...English-9 Wireless Remote Control ...English-10 Operating Range for the Remote Control English-11 Setup ...English-12 Connections ...English-14 Wiring Diagram ...English-14 Connecting a Personal Computer English-15 Connecting a DVD Player or Computer with HDMI out English-15 Connecting a Computer with DisplayPort English-15 Basic Operation...English-16 Power ON and OFF Modes ...English-16 Power Indicator...English-17 Using Power Management ...English-17 Selecting a video source...English-17 Picture Aspect...
...-8 Control Panel ...English-8 Terminal Panel ...English-9 Wireless Remote Control ...English-10 Operating Range for the Remote Control English-11 Setup ...English-12 Connections ...English-14 Wiring Diagram ...English-14 Connecting a Personal Computer English-15 Connecting a DVD Player or Computer with HDMI out English-15 Connecting a Computer with DisplayPort English-15 Basic Operation...English-16 Power ON and OFF Modes ...English-16 Power Indicator...English-17 Using Power Management ...English-17 Selecting a video source...English-17 Picture Aspect...
Users Manual
Page 5
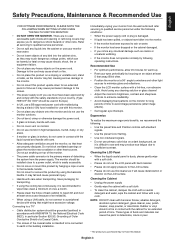
... cart, stand or table, as the monitor may fall , causing serious damage to the monitor. • Do not mount this product by using a LAN cable, do not connect to a peripheral device with the safety standards of detaching the system from the wall outlet and refer servicing to qualified service personnel under the following conditions: • When the power supply cord or plug is...
... cart, stand or table, as the monitor may fall , causing serious damage to the monitor. • Do not mount this product by using a LAN cable, do not connect to a peripheral device with the safety standards of detaching the system from the wall outlet and refer servicing to qualified service personnel under the following conditions: • When the power supply cord or plug is...

Users Manual
Page 10
... in POWER OFF mode. These are available input only, shown as their factory preset name. ¿ PLUS button Acts as EXIT button within OSD menu. (Toggle switches between [DVI], [DPORT], [VGA], [HDMI], [DVD/HD], [SCART], [VIDEO1], [VIDEO2] or [S-VIDEO]). Acts as (+) button to decrease the adjustment with the "SCHEDULE SETTINGS" function enabled. Parts Name and Functions Control Panel ³ POWER button Switches the power on/off . Glows red when the LCD is turned off...
... in POWER OFF mode. These are available input only, shown as their factory preset name. ¿ PLUS button Acts as EXIT button within OSD menu. (Toggle switches between [DVI], [DPORT], [VGA], [HDMI], [DVD/HD], [SCART], [VIDEO1], [VIDEO2] or [S-VIDEO]). Acts as (+) button to decrease the adjustment with the "SCHEDULE SETTINGS" function enabled. Parts Name and Functions Control Panel ³ POWER button Switches the power on/off . Glows red when the LCD is turned off...

Users Manual
Page 11
.../External speaker switch : Internal speaker : External speaker. Note: This speaker terminal is compliant with an RGB, COMPONENT, SCART, VIDEO or S-VIDEO source. OUT connector: Connect RS-232C output. This input can be selected. ² VGA IN (mini D-Sub 15 pin) To input analog RGB signals from a personal computer or from a computer or HDTV device having a digital RGB output. * This connector does not support analog input. Terminal Panel English ³ AC IN connector Connects with the supplied power cord...
.../External speaker switch : Internal speaker : External speaker. Note: This speaker terminal is compliant with an RGB, COMPONENT, SCART, VIDEO or S-VIDEO source. OUT connector: Connect RS-232C output. This input can be selected. ² VGA IN (mini D-Sub 15 pin) To input analog RGB signals from a personal computer or from a computer or HDTV device having a digital RGB output. * This connector does not support analog input. Terminal Panel English ³ AC IN connector Connects with the supplied power cord...

Users Manual
Page 12
...; MENU button Turns on /standby. · INPUT button Selects input signal. Small screen which adjusted "PIP" mode moves left or right. ƹ SET button Makes selection. ƺ VOLUME UP/DOWN button Increases or decreases audio output level. ƻ CH UP/DOWN button*2 Ƽ GUIDE button*2 ƽ MUTE button Turns on/off mute function. ƾ STILL button ON/OFF button: Activates/deactivates still picture mode. Wireless Remote Control ³ POWER button Switches the power on /off the menu mode. µ AUTO SETUP button Enters auto setup menu. STANDARD: for internal/external speakers...
...; MENU button Turns on /standby. · INPUT button Selects input signal. Small screen which adjusted "PIP" mode moves left or right. ƹ SET button Makes selection. ƺ VOLUME UP/DOWN button Increases or decreases audio output level. ƻ CH UP/DOWN button*2 Ƽ GUIDE button*2 ƽ MUTE button Turns on/off mute function. ƾ STILL button ON/OFF button: Activates/deactivates still picture mode. Wireless Remote Control ³ POWER button Switches the power on /off the menu mode. µ AUTO SETUP button Enters auto setup menu. STANDARD: for internal/external speakers...
Users Manual
Page 14
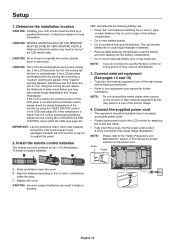
... the (+) and (-) signs of time, remove the batteries. 3. To install or replace batteries: NEC recommends the following battery use the Remote Control for more information. turn the cooling fan to open the cover. If the LCD is used in an enclosed area or if the LCD panel is higher than the normal operating temperature, please turn off the main power before making connections. • Refer to prevent...
... the (+) and (-) signs of time, remove the batteries. 3. To install or replace batteries: NEC recommends the following battery use the Remote Control for more information. turn the cooling fan to open the cover. If the LCD is used in an enclosed area or if the LCD panel is higher than the normal operating temperature, please turn off the main power before making connections. • Refer to prevent...

Users Manual
Page 23
... TREBLE sound. Press - button to left. Depend on signal input RESET Resets "AUDIO" options back to factory setting: AUTO ADJUST, - English-21 If no problem is set to ON. will be "AUTO". RESET Resets the following settings within the ADJUST menu back to factory settings. - H POSITION, V POSITION, CLOCK, PHASE, H RESOLUTION, V RESOLUTION, ASPECT. AUDIO VOLUME Increases or decreases output volume level. 40 BALANCE Select "STEREO" or "MONAURAL" of the image. - SCHEDULE OFF TIMER Sets the monitor to power off due to display the signal...
... TREBLE sound. Press - button to left. Depend on signal input RESET Resets "AUDIO" options back to factory setting: AUTO ADJUST, - English-21 If no problem is set to ON. will be "AUTO". RESET Resets the following settings within the ADJUST menu back to factory settings. - H POSITION, V POSITION, CLOCK, PHASE, H RESOLUTION, V RESOLUTION, ASPECT. AUDIO VOLUME Increases or decreases output volume level. 40 BALANCE Select "STEREO" or "MONAURAL" of the image. - SCHEDULE OFF TIMER Sets the monitor to power off due to display the signal...

Users Manual
Page 26
... picture mode is disabled when PIP, STILL, TEXT TICKER or TILE MATRIX are copied when you can set interval time and zooming ratio. This function is AMBIENT1 or AMBIENT2. OFF CHANGE SECURITY Allows the security password to factory - OFF RESET Resets the following settings within the DISPLAY PROTECTION menu back to be changed and fixed when "ON" is selected. After turning on the monitor, you need to default...
... picture mode is disabled when PIP, STILL, TEXT TICKER or TILE MATRIX are copied when you can set interval time and zooming ratio. This function is AMBIENT1 or AMBIENT2. OFF CHANGE SECURITY Allows the security password to factory - OFF RESET Resets the following settings within the DISPLAY PROTECTION menu back to be changed and fixed when "ON" is selected. After turning on the monitor, you need to default...

Users Manual
Page 27
...-D output, is the default setting. When current video input signal is displaying a signal from the other video input port. When CUSTOM DETECT is changed. This function should be distorted when signal input is selected, monitor searches listed inputs only. D-SUB MODE Selects the type of the input signal. EXPAND: Expand image contrast and increase detail in the other video signals while the current video source is connected. OFF Disables IP conversion. AUTO Automatically chooses Color System setting based on the video format of signal...
...-D output, is the default setting. When current video input signal is displaying a signal from the other video input port. When CUSTOM DETECT is changed. This function should be distorted when signal input is selected, monitor searches listed inputs only. D-SUB MODE Selects the type of the input signal. EXPAND: Expand image contrast and increase detail in the other video signals while the current video source is connected. OFF Disables IP conversion. AUTO Automatically chooses Color System setting based on the video format of signal...

Users Manual
Page 28
... use a computer with HDMI out, please set this function provides a smoothing effect to the monitor. When ON is shown when monitor power off or power save mode or standby mode. Approximately 95% of input signals), INPUT CHANGE, TERMINAL SETTING, DEINTERLACE, COLOR SYSTEM, OVER SCAN, 120Hz, MURA COMP. However, based on the screen. English-26 Please contact your supplier for OPS based PC. This function is displayed on signal input - ON Image size is connected to video...
... use a computer with HDMI out, please set this function provides a smoothing effect to the monitor. When ON is shown when monitor power off or power save mode or standby mode. Approximately 95% of input signals), INPUT CHANGE, TERMINAL SETTING, DEINTERLACE, COLOR SYSTEM, OVER SCAN, 120Hz, MURA COMP. However, based on the screen. English-26 Please contact your supplier for OPS based PC. This function is displayed on signal input - ON Image size is connected to video...
Users Manual
Page 29
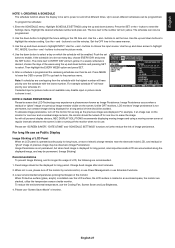
..., use "Screen Saver Mode" of LCD, the following are stacked, utilize the temperature sensors inside monitor. English-27 Use the + and - buttons to set the hour. Use the up and down buttons to highlight the minutes setting. Push the set . To alleviate image persistence, turn yellow. Change fixed images after short intervals. 2. When Protective surface (glass, acrylic) is installed over schedule #1. Highlight the desired schedule number...
..., use "Screen Saver Mode" of LCD, the following are stacked, utilize the temperature sensors inside monitor. English-27 Use the + and - buttons to set the hour. Use the up and down buttons to highlight the minutes setting. Push the set . To alleviate image persistence, turn yellow. Change fixed images after short intervals. 2. When Protective surface (glass, acrylic) is installed over schedule #1. Highlight the desired schedule number...
Users Manual
Page 30
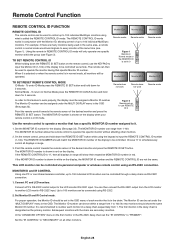
... the remote sensor of the desired monitor and press the REMOTE ID SET button. Figure 2 Remote set in ID mode. This MONITOR ID number allows the remote control to 100. The REMOTE ID NUMBER should share the same Monitor ID number. Connect a PC's RS-232C control output to "PRIMARY". Set the "IR CONTROL" to input the Monitor ID (1-100) of each monitor in a daisy chain sequentially from 1 to operate this feature to work properly, the display must be used...
... the remote sensor of the desired monitor and press the REMOTE ID SET button. Figure 2 Remote set in ID mode. This MONITOR ID number allows the remote control to 100. The REMOTE ID NUMBER should share the same Monitor ID number. Connect a PC's RS-232C control output to "PRIMARY". Set the "IR CONTROL" to input the Monitor ID (1-100) of each monitor in a daisy chain sequentially from 1 to operate this feature to work properly, the display must be used...

Users Manual
Page 37
...: Combines Six-axis color control and the sRGB standard. As a DVI-based digital only connection, only a simple adapter is not provided for compatibility between computers and displays. Six-axis color control permits color adjustments via the DVI input, this display supports HDCP. Plug and Play: The Microsoft® solution with the Windows® operating system facilitates setup and installation by the Digital Display Working Group (DDWG) for optimal color representation and backward compatibility with Intel...
...: Combines Six-axis color control and the sRGB standard. As a DVI-based digital only connection, only a simple adapter is not provided for compatibility between computers and displays. Six-axis color control permits color adjustments via the DVI input, this display supports HDCP. Plug and Play: The Microsoft® solution with the Windows® operating system facilitates setup and installation by the Digital Display Working Group (DDWG) for optimal color representation and backward compatibility with Intel...

Users Manual
Page 38
...-adjusted. • Check the monitor and your display card with respect to compatibility and recommended signal timings. • If your display card with all personal display devices, NEC DISPLAY SOLUTIONS recommends displaying moving images and using a moving screen saver at the monitor's remote sensor. • Check the Remote Control Mode status. • The remote control system may appear, depending on the specific display pattern. No Sound • Check to see if audio cable is properly connected...
...-adjusted. • Check the monitor and your display card with respect to compatibility and recommended signal timings. • If your display card with all personal display devices, NEC DISPLAY SOLUTIONS recommends displaying moving images and using a moving screen saver at the monitor's remote sensor. • Check the Remote Control Mode status. • The remote control system may appear, depending on the specific display pattern. No Sound • Check to see if audio cable is properly connected...
Users Manual
Page 39
...°C Dimension 1062.7 (W) x 618.1 (H) x 62.75 (D) mm / 41.8 (W) x 24.3 (H) x 2.5 (D) inches (with Standard V1.1a, applicable to change without handle) Weight 18.9 kg (41.7 lbs) VESA compatible arm mounting interface 300 mm x 300 mm (M6, 4 Holes) Power Management VESA DPM Plug & Play VESA DDC2B, DDC/CI, DisplayPort Accessories Setup manual, Power Cord, Video Signal cable, Remote Control, AA Battery x 2, Clamp x 3, Screw x 5, CD-ROM, Thumbscrew for optional stand x 2, Option board slot screw x 2, Option board slot cover, Wall mount adapter x 4, Wall mount adapter screw...
...°C Dimension 1062.7 (W) x 618.1 (H) x 62.75 (D) mm / 41.8 (W) x 24.3 (H) x 2.5 (D) inches (with Standard V1.1a, applicable to change without handle) Weight 18.9 kg (41.7 lbs) VESA compatible arm mounting interface 300 mm x 300 mm (M6, 4 Holes) Power Management VESA DPM Plug & Play VESA DDC2B, DDC/CI, DisplayPort Accessories Setup manual, Power Cord, Video Signal cable, Remote Control, AA Battery x 2, Clamp x 3, Screw x 5, CD-ROM, Thumbscrew for optional stand x 2, Option board slot screw x 2, Option board slot cover, Wall mount adapter x 4, Wall mount adapter screw...

Users Manual
Page 40
... Mini D-sub Analog RGB DisplayPort Complies with handle) 1254.0 (W) x 726.3 (H) x 43.3 (D) mm / 49.4 (W) x 28.6 (H) x 1.7 (D) inches (without handle) Weight 23.9 kg (52.7 lbs) VESA compatible arm mounting interface 300 mm x 300 mm (M6, 4 Holes) Power Management VESA DPM Plug & Play VESA DDC2B, DDC/CI, DisplayPort Accessories Setup manual, Power Cord, Video Signal cable, Remote Control, AA Battery x 2, Clamp x 3, Screw x 5, CD-ROM, Thumbscrew for optional stand x 2, Option board slot screw x 2, Option board slot cover, Wall mount adapter x 4, Wall mount adapter screw x 4 NOTE...
... Mini D-sub Analog RGB DisplayPort Complies with handle) 1254.0 (W) x 726.3 (H) x 43.3 (D) mm / 49.4 (W) x 28.6 (H) x 1.7 (D) inches (without handle) Weight 23.9 kg (52.7 lbs) VESA compatible arm mounting interface 300 mm x 300 mm (M6, 4 Holes) Power Management VESA DPM Plug & Play VESA DDC2B, DDC/CI, DisplayPort Accessories Setup manual, Power Cord, Video Signal cable, Remote Control, AA Battery x 2, Clamp x 3, Screw x 5, CD-ROM, Thumbscrew for optional stand x 2, Option board slot screw x 2, Option board slot cover, Wall mount adapter x 4, Wall mount adapter screw x 4 NOTE...


