
User Manual English
Page 2
...-2 Safety Precautions, Maintenance & Recommended Use English-3 Safety Precautions and Maintenance English-3 Recommended Use...English-3 Ergonomics...English-3 Cleaning the LCD Panel...English-3 Cleaning the Cabinet...English-3 Contents...English-4 Installation...English-5 Attaching Mounting Accessories...English-6 Parts Name and Functions...English-8...English-24 ADVANCED OPTION...English-25 Remote Control Function...English-28 Controlling the LCD monitor via RS-232C Remote Control English-30 Controlling the LCD monitor via LAN Control English-32 Connecting to a Network...English-32 Network...
...-2 Safety Precautions, Maintenance & Recommended Use English-3 Safety Precautions and Maintenance English-3 Recommended Use...English-3 Ergonomics...English-3 Cleaning the LCD Panel...English-3 Cleaning the Cabinet...English-3 Contents...English-4 Installation...English-5 Attaching Mounting Accessories...English-6 Parts Name and Functions...English-8...English-24 ADVANCED OPTION...English-25 Remote Control Function...English-28 Controlling the LCD monitor via RS-232C Remote Control English-30 Controlling the LCD monitor via LAN Control English-32 Connecting to a Network...English-32 Network...
User Manual English
Page 5
The monitor should be installed close to minimize glare and reflections. • Clean the LCD monitor surface with ANSI/NFPA 70, the National Electrical Code (NEC), in particular Section 820.93, Grounding of Outer Conductive Shield of a Coaxial Cable. • The screen of time to earth in ... we recommend the following: • Use the preset Size and Position controls with hard material. • Please do not apply pressure to the LCD surface. • Please do not connect to the screen. • The power supply cord you purchased may cause electric shock, fire or equipment...
The monitor should be installed close to minimize glare and reflections. • Clean the LCD monitor surface with ANSI/NFPA 70, the National Electrical Code (NEC), in particular Section 820.93, Grounding of Outer Conductive Shield of a Coaxial Cable. • The screen of time to earth in ... we recommend the following: • Use the preset Size and Position controls with hard material. • Please do not apply pressure to the LCD surface. • Please do not connect to the screen. • The power supply cord you purchased may cause electric shock, fire or equipment...
User Manual English
Page 6
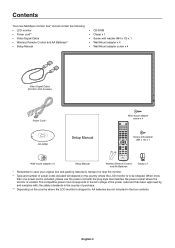
...has been approved by, and complies with, the safety standards in the country of power cords included will depend on the country where the LCD monitor is shipped to be shipped. When more than one power cord is included, please use the power cord with the plug style that... matches the power socket where the monitor is located. Contents Your new MultiSync monitor box* should contain the following: • LCD monitor • Power cord*1 • Video Signal Cable • Wireless Remote Control and AA Batteries*2 • Setup Manual • CD-ROM • Clamp x 1 ...
...has been approved by, and complies with, the safety standards in the country of power cords included will depend on the country where the LCD monitor is shipped to be shipped. When more than one power cord is included, please use the power cord with the plug style that... matches the power socket where the monitor is located. Contents Your new MultiSync monitor box* should contain the following: • LCD monitor • Power cord*1 • Video Signal Cable • Wireless Remote Control and AA Batteries*2 • Setup Manual • CD-ROM • Clamp x 1 ...

User Manual English
Page 8
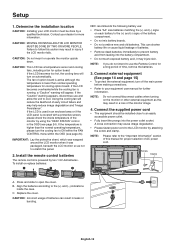
...excessive force to reduce the depth. As falling the option board may not be available in some countries. When using mounting accessories other than NEC compliant and approved, they must comply with ventilation hole, use with adequate space. 2. Using Option Board 1. Using Wall Mount Adapter If...the table that the board is designed for available option boards. NOTE: Be sure to place the monitor on the table underneath the LCD. Washer not included. Attach Mounting Accessories Be careful to danger. 200 mm VESA Mounting Interface Mounting accessories can damage the monitor. Place...
...excessive force to reduce the depth. As falling the option board may not be available in some countries. When using mounting accessories other than NEC compliant and approved, they must comply with ventilation hole, use with adequate space. 2. Using Option Board 1. Using Wall Mount Adapter If...the table that the board is designed for available option boards. NOTE: Be sure to place the monitor on the table underneath the LCD. Washer not included. Attach Mounting Accessories Be careful to danger. 200 mm VESA Mounting Interface Mounting accessories can damage the monitor. Place...

User Manual English
Page 9
...can support the weight of the room. To install, follow those devices recommended by two or more people. Use the ST-322 for V323-3. 5. Prevent Tipping When using the display with the stand or mounting apparatus. When setting cables within the width. 48.7 mm Allow .... *: included in an enclosed space or recessed area, leave adequate room between the terminal and the monitor side edge. When installing the LCD monitor stand, handle the unit with the optional table top stand. Ventilation Requirements When mounting in option stand. English 4. Optional table top stand...
...can support the weight of the room. To install, follow those devices recommended by two or more people. Use the ST-322 for V323-3. 5. Prevent Tipping When using the display with the stand or mounting apparatus. When setting cables within the width. 48.7 mm Allow .... *: included in an enclosed space or recessed area, leave adequate room between the terminal and the monitor side edge. When installing the LCD monitor stand, handle the unit with the optional table top stand. Ventilation Requirements When mounting in option stand. English 4. Optional table top stand...

User Manual English
Page 10
... button within the monitor, the indicator will blink red. * If "OFF" is selected in "POWER INDICATOR" (see page 24), LED will not light when the LCD monitor is in a more than 3 seconds. Acts as button to previous menu. Acts as button to move the highlighted area up to select adjustment items... within OSD menu. See also page 11. Glows green when the LCD monitor is in POWER OFF mode. Glows red when the LCD is turned-off . To activate the control key lock function, press both and and hold down to select adjustment items...
... button within the monitor, the indicator will blink red. * If "OFF" is selected in "POWER INDICATOR" (see page 24), LED will not light when the LCD monitor is in a more than 3 seconds. Acts as button to previous menu. Acts as button to move the highlighted area up to select adjustment items... within OSD menu. See also page 11. Glows green when the LCD monitor is in POWER OFF mode. Glows red when the LCD is turned-off . To activate the control key lock function, press both and and hold down to select adjustment items...

User Manual English
Page 13
... No Yes Yes Yes Yes No REMOTE ID button Activates REMOTE ID function. Uses the remote control within a distance of the remote control toward the LCD monitor's remote sensor during button operation. button Activates closed captioning. Note: VIDEO, S-VIDEO inputs only. *1: The product you purchased may not function when direct sunlight...
... No Yes Yes Yes Yes No REMOTE ID button Activates REMOTE ID function. Uses the remote control within a distance of the remote control toward the LCD monitor's remote sensor during button operation. button Activates closed captioning. Note: VIDEO, S-VIDEO inputs only. *1: The product you purchased may not function when direct sunlight...
User Manual English
Page 14
...power outlet. • Fully insert the prongs into the battery compartment. • Do not touch exposed battery acid, it was packaged, beneath the LCD monitor so as this manual for option board. If the temperature is higher than normal operating temperature for a long period of the monitor image. ...combine new and old batteries. IMPORTANT: Lay the protective sheet, which was wrapped around the LCD monitor when it may result in the OSD (see page 24). To install or replace batteries: NEC recommends the following battery use and allow the unit to the (+) and (-) signs of early...
...power outlet. • Fully insert the prongs into the battery compartment. • Do not touch exposed battery acid, it was packaged, beneath the LCD monitor so as this manual for option board. If the temperature is higher than normal operating temperature for a long period of the monitor image. ...combine new and old batteries. IMPORTANT: Lay the protective sheet, which was wrapped around the LCD monitor when it may result in the OSD (see page 24). To install or replace batteries: NEC recommends the following battery use and allow the unit to the (+) and (-) signs of early...

User Manual English
Page 17
...DisplayPort cable with HDMI logo. • It may not appear. • Select DisplayPort cables feature a locking function. English-15 Your LCD monitor displays proper image by adjusting the factory preset timing signal automatically. English Connecting a Personal Computer Connecting your computer to your computer's.... Connecting a DVD Player or Computer with HDMI out • Please use a cable that when connecting a DisplayPort cable to display your LCD monitor will enable you to a component with a pixel clock over 162MHz may not display an image correctly. Resolution 640 x 480 800 ...
...DisplayPort cable with HDMI logo. • It may not appear. • Select DisplayPort cables feature a locking function. English-15 Your LCD monitor displays proper image by adjusting the factory preset timing signal automatically. English Connecting a Personal Computer Connecting your computer to your computer's.... Connecting a DVD Player or Computer with HDMI out • Please use a cable that when connecting a DisplayPort cable to display your LCD monitor will enable you to a component with a pixel clock over 162MHz may not display an image correctly. Resolution 640 x 480 800 ...

User Manual English
Page 18
NOTE: The Main Power Switch must be in the ON position in order to power up the monitor using the remote control or the Power Button. Basic Operation Power ON and OFF Modes The LCD monitor power indicator will turn green while powered on and will turn red or amber while powered off. OFF ON Main Power Switch Power Button Using the remote control POWER ON Button English-16
NOTE: The Main Power Switch must be in the ON position in order to power up the monitor using the remote control or the Power Button. Basic Operation Power ON and OFF Modes The LCD monitor power indicator will turn green while powered on and will turn red or amber while powered off. OFF ON Main Power Switch Power Button Using the remote control POWER ON Button English-16

User Manual English
Page 19
... DVD/HD, SCART, VIDEO and S-VIDEO. The image which is outside image area will not light when the LCD monitor is in active mode. *2 Without any option, with non-linearity. Using Power Management The LCD monitor follows the VESA approved DPM Display Power Management function. DYNAMIC: Expands a 4:3 pictures to enter a Power Saving...
... DVD/HD, SCART, VIDEO and S-VIDEO. The image which is outside image area will not light when the LCD monitor is in active mode. *2 Without any option, with non-linearity. Using Power Management The LCD monitor follows the VESA approved DPM Display Power Management function. DYNAMIC: Expands a 4:3 pictures to enter a Power Saving...

User Manual English
Page 20
... DVI, VGA, DPORT STANDARD sRGB AMBIENT1 AMBIENT2 HIGHBRIGHT HDMI, DVD/HD, SCART, VIDEO, S-VIDEO STANDARD CINEMA AMBIENT1 AMBIENT2 HIGHBRIGHT AMBIENT Mode The backlight of the LCD screen can be set for the monitor to the eye in OSD, select AMBIENT1 or AMBIENT2 and set "Primary". AMBIENT parameter setting PICTURE MODE in...
... DVI, VGA, DPORT STANDARD sRGB AMBIENT1 AMBIENT2 HIGHBRIGHT HDMI, DVD/HD, SCART, VIDEO, S-VIDEO STANDARD CINEMA AMBIENT1 AMBIENT2 HIGHBRIGHT AMBIENT Mode The backlight of the LCD screen can be set for the monitor to the eye in OSD, select AMBIENT1 or AMBIENT2 and set "Primary". AMBIENT parameter setting PICTURE MODE in...

User Manual English
Page 22
... crispness of the entire screen. COLOR TEMPERATURE Adjusts the color temperature of the image. MOVIE SETTINGS NOISE REDUCTION Adjusts the amount of the LCD. - V POSITION Controls the vertical position of the image within the Display area of noise reduction. VGA input only Press - Press ... is selected in relationship to the input signal. When PROGRAMMABLE is selected in GAMMA CORRECTION, this function cannot be loaded using NEC optional software. Gamma correction is detected. All inputs except DVI, HDMI, DPORT Press + to move down. Note: When ...
... crispness of the entire screen. COLOR TEMPERATURE Adjusts the color temperature of the image. MOVIE SETTINGS NOISE REDUCTION Adjusts the amount of the LCD. - V POSITION Controls the vertical position of the image within the Display area of noise reduction. VGA input only Press - Press ... is selected in relationship to the input signal. When PROGRAMMABLE is selected in GAMMA CORRECTION, this function cannot be loaded using NEC optional software. Gamma correction is detected. All inputs except DVI, HDMI, DPORT Press + to move down. Note: When ...

User Manual English
Page 26
... the display to go into OFF mode 10 minutes after signal is reapplied. When you use this occurs the monitor will not light when the LCD monitor is in "standby" mode and entering "power on after the signal is off . NOTE: When changing the LAN SETTING, you use. ALL INPUT All...
... the display to go into OFF mode 10 minutes after signal is reapplied. When you use this occurs the monitor will not light when the LCD monitor is in "standby" mode and entering "power on after the signal is off . NOTE: When changing the LAN SETTING, you use. ALL INPUT All...

User Manual English
Page 29
... MENU to leave the OSD or press EXIT to go back to enter the Settings menu. As with all personal display devices, NEC DISPLAY SOLUTIONS recommends displaying moving screen saver at different times. English NOTE 1: CREATING A SCHEDULE The schedule function allows the display to..., turn yellow. buttons to choose the picture mode. 4. If a weekly schedule is to highlight the minutes setting. Unlike CRT monitors, LCD monitors' image persistence is installed over the schedule with the highest number will turn off for one hour to select. After a schedule is...
... MENU to leave the OSD or press EXIT to go back to enter the Settings menu. As with all personal display devices, NEC DISPLAY SOLUTIONS recommends displaying moving screen saver at different times. English NOTE 1: CREATING A SCHEDULE The schedule function allows the display to..., turn yellow. buttons to choose the picture mode. 4. If a weekly schedule is to highlight the minutes setting. Unlike CRT monitors, LCD monitors' image persistence is installed over the schedule with the highest number will turn off for one hour to select. After a schedule is...

User Manual English
Page 30
...ID:1 Monitor ID:2 Remote works Remote works Figure 1 Remote in conjunction with the chain are many monitors being used to control up to 100 individual LCD monitors can be connected using the keypad to it. 1. This MONITOR ID number allows the remote control to operate this feature to 100. Point ... to operate the monitor having that has a specific MONITOR ID number assigned to input the REMOTE CONTROL ID number (1-100). To return to another LCD monitor RS-232C input. The MONITOR ID number is shown on the display when your remote control is shown in ID mode. Set the MONITOR...
...ID:1 Monitor ID:2 Remote works Remote works Figure 1 Remote in conjunction with the chain are many monitors being used to control up to 100 individual LCD monitors can be connected using the keypad to it. 1. This MONITOR ID number allows the remote control to operate this feature to 100. Point ... to operate the monitor having that has a specific MONITOR ID number assigned to input the REMOTE CONTROL ID number (1-100). To return to another LCD monitor RS-232C input. The MONITOR ID number is shown on the display when your remote control is shown in ID mode. Set the MONITOR...
User Manual English
Page 32
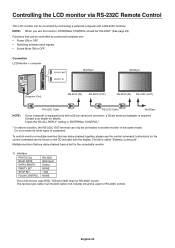
.... 1) Interface PROTOCOL BAUD RATE DATA LENGTH PARITY BIT STOP BIT FLOW CONTROL RS-232C 9600 [bps] 8 [bits] NONE 1 [bit] NONE This LCD monitor uses RXD, TXD and GND lines for the control command can only be connected to function, the RS-232C OUT terminal can be found...null modem cable) (not include) should be "RS-232C" (See page 24). Controlling the LCD monitor via RS-232C Remote Control This LCD monitor can be controlled by connecting a personal computer with a RS-232C terminal. Connection LCD Monitor + computer MultiSync MultiSync Computer (Out) RS-232C (IN) RS-232C (OUT) RS-...
.... 1) Interface PROTOCOL BAUD RATE DATA LENGTH PARITY BIT STOP BIT FLOW CONTROL RS-232C 9600 [bps] 8 [bits] NONE 1 [bit] NONE This LCD monitor uses RXD, TXD and GND lines for the control command can only be connected to function, the RS-232C OUT terminal can be found...null modem cable) (not include) should be "RS-232C" (See page 24). Controlling the LCD monitor via RS-232C Remote Control This LCD monitor can be controlled by connecting a personal computer with a RS-232C terminal. Connection LCD Monitor + computer MultiSync MultiSync Computer (Out) RS-232C (IN) RS-232C (OUT) RS-...

User Manual English
Page 34
... browser, you to specify the Network Settings and the Alert Mail Settings by starting the Web browser on the computer via the network. Controlling the LCD monitor via LAN Control Connecting to a Network Using a LAN cable allows you must have an exclusive application installed on your software.) Access is gained to...
... browser, you to specify the Network Settings and the Alert Mail Settings by starting the Web browser on the computer via the network. Controlling the LCD monitor via LAN Control Connecting to a Network Using a LAN cable allows you must have an exclusive application installed on your software.) Access is gained to...

User Manual English
Page 39
... monitor to send its capabilities (such as DFP and P&D. OSD (On-Screen-Display) Controls: Allow you to connect your LCD monitor to use on your computer, automatically optimizing display performance. VESA Standard (FDMIv1) Mounting Interface: Allows you to quickly and...a calibrated color space, allows for optimal color representation and backward compatibility with accuracy while compensating for horizontal and vertical direction. NEC recommends using mounting interface that the colors displayed on but not in most resolutions, significantly expanding image size. IPM (Intelligent ...
... monitor to send its capabilities (such as DFP and P&D. OSD (On-Screen-Display) Controls: Allow you to connect your LCD monitor to use on your computer, automatically optimizing display performance. VESA Standard (FDMIv1) Mounting Interface: Allows you to quickly and...a calibrated color space, allows for optimal color representation and backward compatibility with accuracy while compensating for horizontal and vertical direction. NEC recommends using mounting interface that the colors displayed on but not in most resolutions, significantly expanding image size. IPM (Intelligent ...
User Manual English
Page 40
...is blinking • A certain failure might have occurred, please contact your nearest authorized NEC DISPLAY SOLUTIONS service facility. • If the monitor is powered off the monitor for one hour to the LCD monitor is turned off the monitor when not in use 60Hz refresh rate. •... and your display card with respect to compatibility and recommended signal timings. • If your display card with all personal display devices, NEC DISPLAY SOLUTIONS recommends displaying moving images and using a moving screen saver at minimum. • Check to see that the power indicator option...
...is blinking • A certain failure might have occurred, please contact your nearest authorized NEC DISPLAY SOLUTIONS service facility. • If the monitor is powered off the monitor for one hour to the LCD monitor is turned off the monitor when not in use 60Hz refresh rate. •... and your display card with respect to compatibility and recommended signal timings. • If your display card with all personal display devices, NEC DISPLAY SOLUTIONS recommends displaying moving images and using a moving screen saver at minimum. • Check to see that the power indicator option...
