
User Manual English
Page 2
......English-17 Using Power Management...English-17 Selecting a video source...English-17 Picture Aspect...English-17 Information OSD...English-18 Picture Mode...English-18 OSD (On-Screen-Display) Controls...English-19 PICTURE...English-20 ADJUST...English-20 AUDIO...English-21 SCHEDULE...English-21 PIP*...English-22 OSD...English-22 MULTI DISPLAY...English-23 DISPLAY PROTECTION...English-24 ADVANCED OPTION...English-25 Remote Control Function...English-28 Controlling the LCD monitor via RS-232C Remote Control English-30 Controlling the LCD monitor via LAN Control English-32 Connecting...
......English-17 Using Power Management...English-17 Selecting a video source...English-17 Picture Aspect...English-17 Information OSD...English-18 Picture Mode...English-18 OSD (On-Screen-Display) Controls...English-19 PICTURE...English-20 ADJUST...English-20 AUDIO...English-21 SCHEDULE...English-21 PIP*...English-22 OSD...English-22 MULTI DISPLAY...English-23 DISPLAY PROTECTION...English-24 ADVANCED OPTION...English-25 Remote Control Function...English-28 Controlling the LCD monitor via RS-232C Remote Control English-30 Controlling the LCD monitor via LAN Control English-32 Connecting...

User Manual English
Page 4
... primary use a power supply cord that matches the power socket where the monitor is dangerous to cause electric shock. ALSO, DO NOT USE THIS UNIT'S POLARIZED PLUG WITH AN EXTENSION CORD RECEPTACLE OR OTHER OUTLETS UNLESS THE PRONGS CAN BE FULLY INSERTED. Chinese Japanese Plug Shape Region U.S.A./ Canada Taiwan EU U.K. NO USER SERVICEABLE PARTS INSIDE. If the power cord is not intended for the display of...
... primary use a power supply cord that matches the power socket where the monitor is dangerous to cause electric shock. ALSO, DO NOT USE THIS UNIT'S POLARIZED PLUG WITH AN EXTENSION CORD RECEPTACLE OR OTHER OUTLETS UNLESS THE PRONGS CAN BE FULLY INSERTED. Chinese Japanese Plug Shape Region U.S.A./ Canada Taiwan EU U.K. NO USER SERVICEABLE PARTS INSIDE. If the power cord is not intended for the display of...
User Manual English
Page 5
... service personnel under rapid temperature and humidity change condition or avoid cold air from the screen. Cleaning the LCD Panel • When the liquid crystal panel is recommended to dangerous shock hazards or other light sources to the monitor. • Do not mount this product upside down for use your monitor from the power supply. Immediately unplug your monitor near a radiator or other heat sources. Blink often. • Position...
... service personnel under rapid temperature and humidity change condition or avoid cold air from the screen. Cleaning the LCD Panel • When the liquid crystal panel is recommended to dangerous shock hazards or other light sources to the monitor. • Do not mount this product upside down for use your monitor from the power supply. Immediately unplug your monitor near a radiator or other heat sources. Blink often. • Position...
User Manual English
Page 6
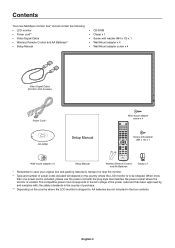
...Your new MultiSync monitor box* should contain the following: • LCD monitor • Power cord*1 • Video Signal Cable • Wireless Remote Control and AA Batteries*2 • Setup Manual • CD-ROM • Clamp x 1 • Screw with washer (M4 x 10) x 1 • Wall Mount adapter x 4 • Wall Mount adapter screw x 4 Video Signal Cable (DVI-D to DVI-D cable) Power Cord*1 CD-ROM Setup Manual Wall mount adapter screw x 4 Screw with washer (M4 x 10) x 1 Wall mount adapter x 4 Setup Manual Wireless Remote Control and AA Batteries Clamp x 1 * Remember to save your...
...Your new MultiSync monitor box* should contain the following: • LCD monitor • Power cord*1 • Video Signal Cable • Wireless Remote Control and AA Batteries*2 • Setup Manual • CD-ROM • Clamp x 1 • Screw with washer (M4 x 10) x 1 • Wall Mount adapter x 4 • Wall Mount adapter screw x 4 Video Signal Cable (DVI-D to DVI-D cable) Power Cord*1 CD-ROM Setup Manual Wall mount adapter screw x 4 Screw with washer (M4 x 10) x 1 Wall mount adapter x 4 Setup Manual Wireless Remote Control and AA Batteries Clamp x 1 * Remember to save your...
User Manual English
Page 7
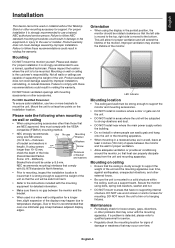
... power supply enters the building. • Do not install in voiding the warranty. For NEC Qualified Personnel: To ensure safe installation, use two or more brackets to use a trained, NEC authorized service person. NEC recommends mounting interfaces that have no gap between adjacent display edges. Maintenance • Periodically check for support. Orientation • When using screws under 8.5 mm. Mounting on the installation location. English-5 Product warranty does not cover...
... power supply enters the building. • Do not install in voiding the warranty. For NEC Qualified Personnel: To ensure safe installation, use two or more brackets to use a trained, NEC authorized service person. NEC recommends mounting interfaces that have no gap between adjacent display edges. Maintenance • Periodically check for support. Orientation • When using screws under 8.5 mm. Mounting on the installation location. English-5 Product warranty does not cover...

User Manual English
Page 8
... fixing it with the removed screws (Figure 2). Using Option Board 1. English-6 Make sure that can be available in the correct orientation. When using mounting accessories other than NEC compliant and approved, they must comply with the VESA mounting system. 1. Place the monitor face down position. NOTE: Be sure to danger. 200 mm VESA Mounting Interface Mounting accessories can damage the monitor. Wall mount adapter Unit Mounting bracket Washer 10-12 mm Wall mount adapter screw Figure 1 Pictured mounting...
... fixing it with the removed screws (Figure 2). Using Option Board 1. English-6 Make sure that can be available in the correct orientation. When using mounting accessories other than NEC compliant and approved, they must comply with the VESA mounting system. 1. Place the monitor face down position. NOTE: Be sure to danger. 200 mm VESA Mounting Interface Mounting accessories can damage the monitor. Wall mount adapter Unit Mounting bracket Washer 10-12 mm Wall mount adapter screw Figure 1 Pictured mounting...

User Manual English
Page 9
...* Cord or chain Screw (M4)* Table NOTE: Protective Sheet Install the stand in multiple screen. When setting cables within the width. 48.7 mm Allow adequate ventilation or provide air conditioning around the monitor, so that the wall can support the weight of the monitor in option stand. Prevent Tipping When using a cord or chain that can properly dissipate away from the unit and mounting apparatus...
...* Cord or chain Screw (M4)* Table NOTE: Protective Sheet Install the stand in multiple screen. When setting cables within the width. 48.7 mm Allow adequate ventilation or provide air conditioning around the monitor, so that the wall can support the weight of the monitor in option stand. Prevent Tipping When using a cord or chain that can properly dissipate away from the unit and mounting apparatus...

User Manual English
Page 10
... the backlight setting, resulting in Power Standby mode with OSD menu. H EXIT button Activates the OSD menu when the OSD menu is turned-off . Green and Amber blink alternately while in a more than 3 seconds. J AMBIENT LIGHT SENSOR Detects the level of ambient light, allowing the monitor to make automatic adjustments to select adjustment items within OSD menu. (Toggle switches between [DVI], [DPORT], [VGA], [HDMI], [DVD/HD], [SCART], [VIDEO] or [S-VIDEO]). Parts Name and Functions Control Panel A POWER button Switches the power on/off . C INPUT button Acts as button...
... the backlight setting, resulting in Power Standby mode with OSD menu. H EXIT button Activates the OSD menu when the OSD menu is turned-off . Green and Amber blink alternately while in a more than 3 seconds. J AMBIENT LIGHT SENSOR Detects the level of ambient light, allowing the monitor to make automatic adjustments to select adjustment items within OSD menu. (Toggle switches between [DVI], [DPORT], [VGA], [HDMI], [DVD/HD], [SCART], [VIDEO] or [S-VIDEO]). Parts Name and Functions Control Panel A POWER button Switches the power on/off . C INPUT button Acts as button...

User Manual English
Page 11
... connector for available option board. NOTE: Please contact your monitor. L DVI connector (DVI-D) IN connector: To input digital RGB signals from the AUDIO IN 1, DPORT and HDMI to control RS-232C functions. N Internal speaker O Rating label English-9 English Terminal Panel From option control unit A AC IN connector Connects with DVI signal input. (DVI signal only, HDMI signal is not a headphone terminal. C LAN port (RJ-45) LAN connection. E REMOTE IN Use the optional wired remote control by connecting it to turn main power ON/OFF. F AUDIO OUT To output the audio signal...
... connector for available option board. NOTE: Please contact your monitor. L DVI connector (DVI-D) IN connector: To input digital RGB signals from the AUDIO IN 1, DPORT and HDMI to control RS-232C functions. N Internal speaker O Rating label English-9 English Terminal Panel From option control unit A AC IN connector Connects with DVI signal input. (DVI signal only, HDMI signal is not a headphone terminal. C LAN port (RJ-45) LAN connection. E REMOTE IN Use the optional wired remote control by connecting it to turn main power ON/OFF. F AUDIO OUT To output the audio signal...

User Manual English
Page 12
... text based images. CINEMA: for internal/external speakers. E SOUND button Artificial surround sound for movies. M MINUS/PLUS (-/+) button Increases or decreases the adjustment level within OSD menu. See page 17. See page 18. O VOLUME UP/DOWN button Increases or decreases audio output level. STILL CAPTURE button: Captures still picture. Wireless Remote Control A POWER button Switches the power on your connection C PICTURE MODE button Selects picture mode, [HIGHBRIGHT], [STANDARD], [sRGB], [CINEMA], [AMBIENT1], [AMBIENT2]. DVI: DVI DISPLAYPORT: DPORT VGA: VGA HDMI: HDMI DVD...
... text based images. CINEMA: for internal/external speakers. E SOUND button Artificial surround sound for movies. M MINUS/PLUS (-/+) button Increases or decreases the adjustment level within OSD menu. See page 17. See page 18. O VOLUME UP/DOWN button Increases or decreases audio output level. STILL CAPTURE button: Captures still picture. Wireless Remote Control A POWER button Switches the power on your connection C PICTURE MODE button Selects picture mode, [HIGHBRIGHT], [STANDARD], [sRGB], [CINEMA], [AMBIENT1], [AMBIENT2]. DVI: DVI DISPLAYPORT: DPORT VGA: VGA HDMI: HDMI DVD...
User Manual English
Page 14
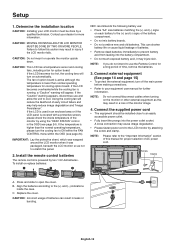
... touch exposed battery acid, it was packaged, beneath the LCD monitor so as this may help reduce image degradation and "Image Persistance". Failure to ON within the FAN CONTROL menu within the OSD (see page 24). Install the remote control batteries The remote control is lower than the normal operating temperature, please turn the cooling fan to follow this manual for more information. Screw Clamp A. Replace the cover. Connect the supplied power cord...
... touch exposed battery acid, it was packaged, beneath the LCD monitor so as this may help reduce image degradation and "Image Persistance". Failure to ON within the FAN CONTROL menu within the OSD (see page 24). Install the remote control batteries The remote control is lower than the normal operating temperature, please turn the cooling fan to follow this manual for more information. Screw Clamp A. Replace the cover. Connect the supplied power cord...

User Manual English
Page 22
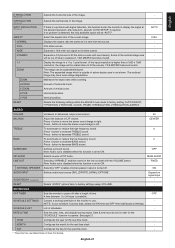
...All inputs except DVI, HDMI, DPORT Press + to adjust. 0* VIDEO, S-VIDEO inputs only TELECINE Automatically senses the sources frame rate for optimal picture quality. VGA input only Press - Press + or - Press + or - A low color temperature will make the screen reddish. GAMMA CORRECTION NATIVE Select a display gamma for dynamic contrast. OFF H POSITION Controls the horizontal position of adjustment for best picture quality. Press - Press + or - COLOR Adjusts the color depth of the screen. COLOR TEMPERATURE Adjusts the color temperature of the image...
...All inputs except DVI, HDMI, DPORT Press + to adjust. 0* VIDEO, S-VIDEO inputs only TELECINE Automatically senses the sources frame rate for optimal picture quality. VGA input only Press - Press + or - Press + or - A low color temperature will make the screen reddish. GAMMA CORRECTION NATIVE Select a display gamma for dynamic contrast. OFF H POSITION Controls the horizontal position of adjustment for best picture quality. Press - Press + or - COLOR Adjusts the color depth of the screen. COLOR TEMPERATURE Adjusts the color temperature of the image...
User Manual English
Page 23
... position. H POSITION, V POSITION, CLOCK, PHASE, H RESOLUTION, V RESOLUTION, ASPECT. VGA input only INPUT RESOLUTION VGA input only If there is set ON time and OFF time individually at the desired resolution. FULL Fills entire screen. - H ZOOM Amount of schedules. - CENTER TREBLE To accentuate or reduce the high frequency sound. 0 Press + button to increase BASS sound. Press - SCHEDULE LIST List of horizontal zoom. English-21 English H RESOLUTION Adjusts the horizontal size of the image. - ON AUDIO INPUT Selects audio input source [IN1], [DPORT], [HDMI...
... position. H POSITION, V POSITION, CLOCK, PHASE, H RESOLUTION, V RESOLUTION, ASPECT. VGA input only INPUT RESOLUTION VGA input only If there is set ON time and OFF time individually at the desired resolution. FULL Fills entire screen. - H ZOOM Amount of schedules. - CENTER TREBLE To accentuate or reduce the high frequency sound. 0 Press + button to increase BASS sound. Press - SCHEDULE LIST List of horizontal zoom. English-21 English H RESOLUTION Adjusts the horizontal size of the image. - ON AUDIO INPUT Selects audio input source [IN1], [DPORT], [HDMI...

User Manual English
Page 25
... source changes. CUSTOM LOCK Selects which you prefer to factory setting: MENU DISPLAY - Except for all buttons at a lower number of range. VOLUME: When UNLOCK is available. An interval between 3 to 10 seconds for the INPUT currently being controlled by the wireless remote control. MONITOR INFORMATION Indicates the model and serial number of multiple selections. CARBON SAVINGS: Display the estimated carbon saving information in the chain with the infra-red remote control when using the wireless remote control. OFF RESET Resets...
... source changes. CUSTOM LOCK Selects which you prefer to factory setting: MENU DISPLAY - Except for all buttons at a lower number of range. VOLUME: When UNLOCK is available. An interval between 3 to 10 seconds for the INPUT currently being controlled by the wireless remote control. MONITOR INFORMATION Indicates the model and serial number of multiple selections. CARBON SAVINGS: Display the estimated carbon saving information in the chain with the infra-red remote control when using the wireless remote control. OFF RESET Resets...

User Manual English
Page 26
... after a signal is reapplied. AUTO STANDBY will not light when the LCD monitor is in OFF mode, POWER SAVE must be "RS-232C". Note: When connecting DVI, the display cards might not stop sending the digital data even though the image might have disappeared. TILE MATRIX MEM When "INPUT" is selected, TILE MATRIX setting is applied to show an image again. POWER INDICATOR Turns ON or OFF the LED located...
... after a signal is reapplied. AUTO STANDBY will not light when the LCD monitor is in OFF mode, POWER SAVE must be "RS-232C". Note: When connecting DVI, the display cards might not stop sending the digital data even though the image might have disappeared. TILE MATRIX MEM When "INPUT" is selected, TILE MATRIX setting is applied to show an image again. POWER INDICATOR Turns ON or OFF the LED located...

User Manual English
Page 27
... of Image Persistence. SECURITY Locks the security password. NOTE: When "QUICK" is selected, picture may be changed . English SCREEN SAVER Use the SCREEN SAVER function to factory setting: POWER SAVE, FAN CONTROL, SCREEN SAVER, SIDE BORDER COLOR, AUTO BRIGHTNESS, DDC/CI. button, the bar will have been made for a video signal from the other port, then the monitor switches the video source input port to be distorted when signal input is present. GAMMA The display gamma is changed and fixed when "ON" is disabled when...
... of Image Persistence. SECURITY Locks the security password. NOTE: When "QUICK" is selected, picture may be changed . English SCREEN SAVER Use the SCREEN SAVER function to factory setting: POWER SAVE, FAN CONTROL, SCREEN SAVER, SIDE BORDER COLOR, AUTO BRIGHTNESS, DDC/CI. button, the bar will have been made for a video signal from the other port, then the monitor switches the video source input port to be distorted when signal input is present. GAMMA The display gamma is changed and fixed when "ON" is disabled when...

User Manual English
Page 28
... POWER Allow the monitor to supply power to factory setting: INPUT DETECT (except the priority of image retention. RESPONSE IMPROVE will be displayed. FORCE QUIT When ON is selected, it is set "OFF". Please use . TOUCH PANEL (not adjustable) RESET Resets the following settings within the display area. If an option board slot that occurs in OPTION SETTING. START UP PC When ON is turned off by slot 2 type option. When changing the setting, power supply...
... POWER Allow the monitor to supply power to factory setting: INPUT DETECT (except the priority of image retention. RESPONSE IMPROVE will be displayed. FORCE QUIT When ON is selected, it is set "OFF". Please use . TOUCH PANEL (not adjustable) RESET Resets the following settings within the display area. If an option board slot that occurs in OPTION SETTING. START UP PC When ON is turned off by slot 2 type option. When changing the setting, power supply...
User Manual English
Page 40
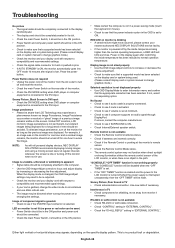
...; Signal cable should be distorted when turning the power on or changing the settings. Either light vertical or horizontal stripes may experience a phenomenon known as the previous image was on the monitor for one hour to erase the image. Snowy Picture, Black Screen in DVI input • Check the DVI MODE setting when DVD player or computer equipment is ON. • Check Internal/External speaker switch. No Sound • Check to see if audio cable is properly connected. • Check...
...; Signal cable should be distorted when turning the power on or changing the settings. Either light vertical or horizontal stripes may experience a phenomenon known as the previous image was on the monitor for one hour to erase the image. Snowy Picture, Black Screen in DVI input • Check the DVI MODE setting when DVD player or computer equipment is ON. • Check Internal/External speaker switch. No Sound • Check to see if audio cable is properly connected. • Check...

User Manual English
Page 41
... million colors (depending on display card used) Brightness: 450 cd/m2 (Max.) @25°C Contrast Ratio: 1300:1 Viewing Angle: 89° (typ) @ CR>10 Frequency Horizontal: 15.625/15.734 kHz, 31.5 kHz - 91.1 kHz (Analog Input) 31.5 kHz - 91.1 kHz (Digital Input) Vertical: 50.0 - 85.0 Hz Pixel Clock 13.5 MHz, 25 MHz - 165 MHz (Analog) 25 MHz - 165 MHz (Digital) Viewable Size 698.4 x 392.9 mm Input Signal DVI DVI-D 24pin Digital RGB DVI (HDCP1...
... million colors (depending on display card used) Brightness: 450 cd/m2 (Max.) @25°C Contrast Ratio: 1300:1 Viewing Angle: 89° (typ) @ CR>10 Frequency Horizontal: 15.625/15.734 kHz, 31.5 kHz - 91.1 kHz (Analog Input) 31.5 kHz - 91.1 kHz (Digital Input) Vertical: 50.0 - 85.0 Hz Pixel Clock 13.5 MHz, 25 MHz - 165 MHz (Analog) 25 MHz - 165 MHz (Digital) Viewable Size 698.4 x 392.9 mm Input Signal DVI DVI-D 24pin Digital RGB DVI (HDCP1...
Installation Guide
Page 1
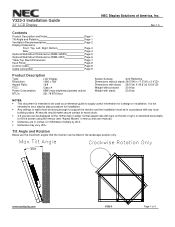
..., Left, Right, Bottom Rear Optional Wall Mount Dimensions (WMK-3255S) Optional Wall Mount Dimensions (WMK-3257) Table Top Stand Dimensions Input Panel Control Codes Cable Connection Page 1 Page 1 Page 2 Page 3 Page 4 Page 5 Page 6 Page 7 Page 8 Page 8 Page 9 Product Description Type: LCD Display Resolution: 1366 x 768 Aspect Ratio: 16:9 FCC: Class A Power Consumption: 65W (max brightness/speaker active) BTU's: 221.79 BTU/hour Screen Surface: Anti-Reflective Dimensions without...
..., Left, Right, Bottom Rear Optional Wall Mount Dimensions (WMK-3255S) Optional Wall Mount Dimensions (WMK-3257) Table Top Stand Dimensions Input Panel Control Codes Cable Connection Page 1 Page 1 Page 2 Page 3 Page 4 Page 5 Page 6 Page 7 Page 8 Page 8 Page 9 Product Description Type: LCD Display Resolution: 1366 x 768 Aspect Ratio: 16:9 FCC: Class A Power Consumption: 65W (max brightness/speaker active) BTU's: 221.79 BTU/hour Screen Surface: Anti-Reflective Dimensions without...


