
42PX10 50XP10 60XP10 user's manual
Page 8
Certain operating conditions, such as defined in a computer room as the continuous display of a static image over a prolonged period of the menu display from the Plasma monitor. Also note that time. NOTE: The following guidelines and recommendations for the Protection of Electronic Computer/Data Processing Equipment ANSI/...
Certain operating conditions, such as defined in a computer room as the continuous display of a static image over a prolonged period of the menu display from the Plasma monitor. Also note that time. NOTE: The following guidelines and recommendations for the Protection of Electronic Computer/Data Processing Equipment ANSI/...
42PX10 50XP10 60XP10 user's manual
Page 10
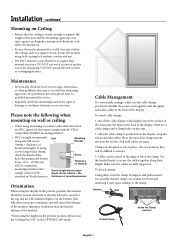
...time, against earthquakes, unexpected vibrations, and other than 16mm, check the depth of the hole.(Recommended Fasten Force: 1125 - 1375N•cm) NEC recommends mounting interfaces that the ceiling is on Ceiling • Ensure that comply with the signal and audio cables at the back of bracket ...mounting. Insert the anchor of the display. If a problem is mounted to bundle the power cord together with UL1678 standard in the OPTION2 OSD menu. Pull until cables are fully supported. Use the beaded bands to the clamp. Installation - DO NOT use the cable clamps provided to a ...
...time, against earthquakes, unexpected vibrations, and other than 16mm, check the depth of the hole.(Recommended Fasten Force: 1125 - 1375N•cm) NEC recommends mounting interfaces that the ceiling is on Ceiling • Ensure that comply with the signal and audio cables at the back of bracket ...mounting. Insert the anchor of the display. If a problem is mounted to bundle the power cord together with UL1678 standard in the OPTION2 OSD menu. Pull until cables are fully supported. Use the beaded bands to the clamp. Installation - DO NOT use the cable clamps provided to a ...
42PX10 50XP10 60XP10 user's manual
Page 11
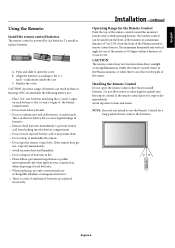
... not intend to use : • Place "AA" size batteries matching the (+) and (-) signs on each battery to install batteries. NEC recommends the following battery use the Remote Control for use only conventional nonrechargeable alkaline or manganese batteries. • There is powered by AA ...sensor. EXIT INPUT MUTE 30 30 POWER ON STANDBY PICTURE RGB DVD/HD VIDEO MEMORY PICTURE MODE SIZE 1 2 4 5 7 8 0 DISPLAY 3 6 9 MENU AUTO SET UP SET + EXIT VOL ZOOM POINTER + + MUTE SPLIT SCREEN PIP S BY S SINGLE SWAP SELECT/FREEZE CAPTURE REMOTE ID SET RESET SLEEP REMOTE ...
... not intend to use : • Place "AA" size batteries matching the (+) and (-) signs on each battery to install batteries. NEC recommends the following battery use the Remote Control for use only conventional nonrechargeable alkaline or manganese batteries. • There is powered by AA ...sensor. EXIT INPUT MUTE 30 30 POWER ON STANDBY PICTURE RGB DVD/HD VIDEO MEMORY PICTURE MODE SIZE 1 2 4 5 7 8 0 DISPLAY 3 6 9 MENU AUTO SET UP SET + EXIT VOL ZOOM POINTER + + MUTE SPLIT SCREEN PIP S BY S SINGLE SWAP SELECT/FREEZE CAPTURE REMOTE ID SET RESET SLEEP REMOTE ...
42PX10 50XP10 60XP10 user's manual
Page 12
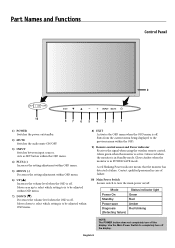
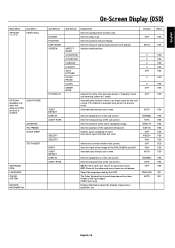
... does not completely turn off the display. English-9 Moves down to select which setting to is to be adjusted within OSD menu. 8) EXIT Activates the OSD menu when the OSD menu is off. Glows Amber when the monitor is active. Use the Main Power Switch to turn off the display. Glows green... when the monitor is in POWER SAVE mode. Exits from the current menu being displayed to the previous menu within OSD menu. 6) UP ( ) Increases the volume level when the OSD is in case of failure. 10) Main Power Switch Seesaw switch to...
... does not completely turn off the display. English-9 Moves down to select which setting to is to be adjusted within OSD menu. 8) EXIT Activates the OSD menu when the OSD menu is off. Glows Amber when the monitor is active. Use the Main Power Switch to turn off the display. Glows green... when the monitor is in POWER SAVE mode. Exits from the current menu being displayed to the previous menu within OSD menu. 6) UP ( ) Increases the volume level when the OSD is in case of failure. 10) Main Power Switch Seesaw switch to...
42PX10 50XP10 60XP10 user's manual
Page 13
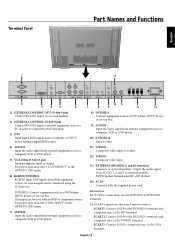
...equipment. to the DVD/HD2 terminals and composite sync. SCART3: Connect R/G/B + composite sync. For proper operation select "D-SUB INPUT" in the OPTION1 OSD menu. 6) RGBHV/DVD/HD2 RGBHV: Input RGB signals from external equipment such as a computer, VCR or DVD player. 10) S-VIDEO in Input S-video.... connected using the G connector. This input can be used with the supplied power cord. For proper operation select "BNC INPUT" in the OPTION1 OSD menu. 7) AUDIO2 Input the audio signal from external equipment such as a computer, VCR or DVD player. 10 11 7 8 9 13 14 8) DVD...
...equipment. to the DVD/HD2 terminals and composite sync. SCART3: Connect R/G/B + composite sync. For proper operation select "D-SUB INPUT" in the OPTION1 OSD menu. 6) RGBHV/DVD/HD2 RGBHV: Input RGB signals from external equipment such as a computer, VCR or DVD player. 10) S-VIDEO in Input S-video.... connected using the G connector. This input can be used with the supplied power cord. For proper operation select "BNC INPUT" in the OPTION1 OSD menu. 7) AUDIO2 Input the audio signal from external equipment such as a computer, VCR or DVD player. 10 11 7 8 9 13 14 8) DVD...
42PX10 50XP10 60XP10 user's manual
Page 14
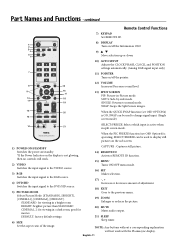
... 1 2 3 4 5 6 POWER ON STANDBY PICTURE RGB DVD/HD VIDEO MEMORY PICTURE MODE SIZE 7 8 9 10 11 12 13 14 1 2 3 4 5 6 7 8 9 0 DISPLAY MENU AUTO SET UP SET + EXIT VOL ZOOM POINTER + + MUTE SPLIT SCREEN PIP S BY S SINGLE SWAP SELECT/FREEZE CAPTURE REMOTE ID SET RESET SLEEP 15 16...) MUTE Mutes audio output. 21) SLEEP Sleep timer. CAPTURE : Captures still picture. 14) REMOTE ID Activates REMOTE ID function. 15) MENU Turns ON/OFF menu mode. 16) SET Makes selection. 17) - , + Increases or decreases amount of the image. NOTE: Any buttons without a corresponding ...
... 1 2 3 4 5 6 POWER ON STANDBY PICTURE RGB DVD/HD VIDEO MEMORY PICTURE MODE SIZE 7 8 9 10 11 12 13 14 1 2 3 4 5 6 7 8 9 0 DISPLAY MENU AUTO SET UP SET + EXIT VOL ZOOM POINTER + + MUTE SPLIT SCREEN PIP S BY S SINGLE SWAP SELECT/FREEZE CAPTURE REMOTE ID SET RESET SLEEP 15 16...) MUTE Mutes audio output. 21) SLEEP Sleep timer. CAPTURE : Captures still picture. 14) REMOTE ID Activates REMOTE ID function. 15) MENU Turns ON/OFF menu mode. 16) SET Makes selection. 17) - , + Increases or decreases amount of the image. NOTE: Any buttons without a corresponding ...
42PX10 50XP10 60XP10 user's manual
Page 16
... remote control, use Remote ID:3 POWER ON STANDBY PICTURE RGB DVD/HD VIDEO MEMORY PICTURE MODE SIZE 1 2 3 4 5 6 7 8 9 0 DISPLAY MENU AUTO SET UP SET + EXIT VOL ZOOM POINTER + + MUTE SPLIT SCREEN PIP S BY S SINGLE SWAP SELECT/FREEZE CAPTURE REMOTE ID SET RESET SLEEP REMOTE... (1-26) of up to 0 POWER ON STANDBY PICTURE RGB DVD/HD VIDEO MEMORY PICTURE MODE SIZE 1 2 3 4 5 6 7 8 9 0 DISPLAY MENU AUTO SET UP SET + EXIT VOL ZOOM POINTER + + MUTE SPLIT SCREEN PIP S BY S SINGLE SWAP SELECT/FREEZE CAPTURE REMOTE ID SET RESET SLEEP REMOTE ...
... remote control, use Remote ID:3 POWER ON STANDBY PICTURE RGB DVD/HD VIDEO MEMORY PICTURE MODE SIZE 1 2 3 4 5 6 7 8 9 0 DISPLAY MENU AUTO SET UP SET + EXIT VOL ZOOM POINTER + + MUTE SPLIT SCREEN PIP S BY S SINGLE SWAP SELECT/FREEZE CAPTURE REMOTE ID SET RESET SLEEP REMOTE... (1-26) of up to 0 POWER ON STANDBY PICTURE RGB DVD/HD VIDEO MEMORY PICTURE MODE SIZE 1 2 3 4 5 6 7 8 9 0 DISPLAY MENU AUTO SET UP SET + EXIT VOL ZOOM POINTER + + MUTE SPLIT SCREEN PIP S BY S SINGLE SWAP SELECT/FREEZE CAPTURE REMOTE ID SET RESET SLEEP REMOTE ...
42PX10 50XP10 60XP10 user's manual
Page 17
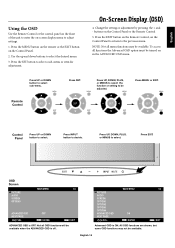
.... English Using the OSD Use the Remote Control or the control panel on the front of the unit to enter the on-screen display menu to select a sub-menu or item for adjustment. Press the SET button to adjust settings. 1. Press UP or DOWN button to be turned on the Control Panel... the setting or adjustment by pressing the + and - Press the EXIT button on the Remote Control, on in the ADVANCED OSD menu. ENTER EXIT ADVANCED OSD is ON. Press MENU or EXIT. Not all functions the Advanced OSD option must be adjusted. English-14 Press UP, DOWN, PLUS, or MINUS to ...
.... English Using the OSD Use the Remote Control or the control panel on the front of the unit to enter the on-screen display menu to select a sub-menu or item for adjustment. Press the SET button to adjust settings. 1. Press UP or DOWN button to be turned on the Control Panel... the setting or adjustment by pressing the + and - Press the EXIT button on the Remote Control, on in the ADVANCED OSD menu. ENTER EXIT ADVANCED OSD is ON. Press MENU or EXIT. Not all functions the Advanced OSD option must be adjusted. English-14 Press UP, DOWN, PLUS, or MINUS to ...

42PX10 50XP10 60XP10 user's manual
Page 18
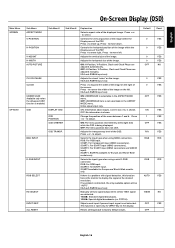
... brightness in a bright room. Press + or - Adjusts the color temperature of the Red, Green, Blue, Yellow, Magenta and Cyan. OSD menu. VIDEO and DVD/HD input only. Adjusts the high frequency sound. Adjusts the low frequency sound. WHITE BALANCE Available only when the Advanced OSD ...which audio input to adjust. Press + or - Adjusts the tint of the white balance. to adjust. On-Screen Display (OSD) Main Menu PICTURE AUDIO Sub Menu CONTRAST BRIGHTNESS SHARPNESS COLOR TINT PICTURE MODE Sub Menu2 Sub Menu3 NR COLOR TEMP. to adjust. Press + or -
... brightness in a bright room. Press + or - Adjusts the color temperature of the Red, Green, Blue, Yellow, Magenta and Cyan. OSD menu. VIDEO and DVD/HD input only. Adjusts the high frequency sound. Adjusts the low frequency sound. WHITE BALANCE Available only when the Advanced OSD ...which audio input to adjust. Press + or - Adjusts the tint of the white balance. to adjust. On-Screen Display (OSD) Main Menu PICTURE AUDIO Sub Menu CONTRAST BRIGHTNESS SHARPNESS COLOR TINT PICTURE MODE Sub Menu2 Sub Menu3 NR COLOR TEMP. to adjust. Press + or -
42PX10 50XP10 60XP10 user's manual
Page 19
...This function is a problem with signal detection, this function forces the monitor to select. English On-Screen Display (OSD) Main Menu SCREEN OPTION1 Sub Menu ASPECT MODE V-POSITION Sub Menu2 Sub Menu3 H-POSITION V-HEIGHT H-WIDTH AUTO PICTURE CLOCK PHASE CLOCK UNDER SCAN Available only when the...English-16 OFF: H-Position, V-Position, Clock and Clock Phase are adjusted automatically. Adjusts the visual "noise" on the left . OFF: The menu position does not shift. SCART3: for Europe and World-Wide models only. If no problem is enabled. Skips to factory default values. Press +...
...This function is a problem with signal detection, this function forces the monitor to select. English On-Screen Display (OSD) Main Menu SCREEN OPTION1 Sub Menu ASPECT MODE V-POSITION Sub Menu2 Sub Menu3 H-POSITION V-HEIGHT H-WIDTH AUTO PICTURE CLOCK PHASE CLOCK UNDER SCAN Available only when the...English-16 OFF: H-Position, V-Position, Clock and Clock Phase are adjusted automatically. Adjusts the visual "noise" on the left . OFF: The menu position does not shift. SCART3: for Europe and World-Wide models only. If no problem is enabled. Skips to factory default values. Press +...
42PX10 50XP10 60XP10 user's manual
Page 20
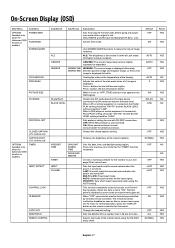
...Change the loop out setting. Selects the mode of the side mask when a 4:3 image is disabled as soon as the on . only. OFF: When NEC protocol is used (normal). ON: When special protocol is used . Chooses the brightness of the display. When this item is slightly squeezed or expanded. Default...YES YES YES YES YES YES YES English-17 VGA, RGBHV, and DVI input and Separate HV Sync. On-Screen Display (OSD) Main Menu Sub Menu OPTION2 Available only when the Advanced OSD function is lost. POWER SAVE FILM MODE SCREEN SAVER COOLING FAN SIDE MASK PICTURE SIZE DVI MODE ...
...Change the loop out setting. Selects the mode of the side mask when a 4:3 image is disabled as soon as the on . only. OFF: When NEC protocol is used (normal). ON: When special protocol is used . Chooses the brightness of the display. When this item is slightly squeezed or expanded. Default...YES YES YES YES YES YES YES English-17 VGA, RGBHV, and DVI input and Separate HV Sync. On-Screen Display (OSD) Main Menu Sub Menu OPTION2 Available only when the Advanced OSD function is lost. POWER SAVE FILM MODE SCREEN SAVER COOLING FAN SIDE MASK PICTURE SIZE DVI MODE ...
42PX10 50XP10 60XP10 user's manual
Page 21
... P. Sets the position of the zoom navigation image. Sets the position of the captured still picture. OFF: Some of the advanced menu items are shown for advanced users. Allows text insertion within main screen. Sets the position of the sub screen. Sets the transparency ... picture-in "standby" mode and entering "power on the video format of the sub screen. DETECT DISPLAY SUB P. English Main Menu OPTION3 (continued) Sub Menu VIDEO WALL OPTION4 Available only when the Advanced OSD function is an input signal for the sub screen. V-POSITION H-POSITION V-HEIGHT ...
... P. Sets the position of the zoom navigation image. Sets the position of the captured still picture. OFF: Some of the advanced menu items are shown for advanced users. Allows text insertion within main screen. Sets the position of the sub screen. Sets the transparency ... picture-in "standby" mode and entering "power on the video format of the sub screen. DETECT DISPLAY SUB P. English Main Menu OPTION3 (continued) Sub Menu VIDEO WALL OPTION4 Available only when the Advanced OSD function is an input signal for the sub screen. V-POSITION H-POSITION V-HEIGHT ...
42PX10 50XP10 60XP10 user's manual
Page 22
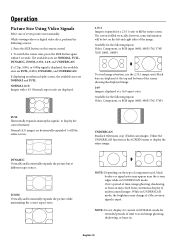
... mode, the brightness may result from continuous display of time to display the correct linearity. NOTE: Depending on the remote control. 2. While in the SCREEN menu to display the entire image. The screen is expanded at a 2.35:1 ratio to fill the entire screen. DYNAMIC Vertically and horizontally expands the picture but...
... mode, the brightness may result from continuous display of time to display the correct linearity. NOTE: Depending on the remote control. 2. While in the SCREEN menu to display the entire image. The screen is expanded at a 2.35:1 ratio to fill the entire screen. DYNAMIC Vertically and horizontally expands the picture but...
42PX10 50XP10 60XP10 user's manual
Page 23
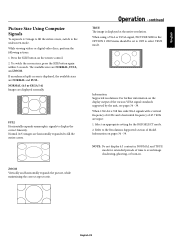
... wide XGA signals with a vertical frequency of 60 Hz and a horizontal frequency of time to avoid image shadowing, ghosting, or burn-in the OPTION 2 OSD menu should be set to OFF to display the correct linearity. Select an appropriate setting for extended periods of 47.7 kHz are NORMAL and FULL. English...
... wide XGA signals with a vertical frequency of 60 Hz and a horizontal frequency of time to avoid image shadowing, ghosting, or burn-in the OPTION 2 OSD menu should be set to OFF to display the correct linearity. Select an appropriate setting for extended periods of 47.7 kHz are NORMAL and FULL. English...
42PX10 50XP10 60XP10 user's manual
Page 25
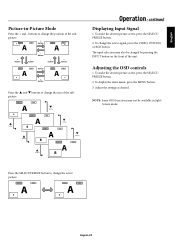
... the desired picture active, press the SELECT/ FREEZE button. 2. To make the desired picture active, press the SELECT/ FREEZE button. 2. To display the main menu, press the MENU button. 3. B VGA A + button VGA B A button + button button button + button VGA A B button + button VGA A B Press the p and q buttons to change the size of the sub...
... the desired picture active, press the SELECT/ FREEZE button. 2. To make the desired picture active, press the SELECT/ FREEZE button. 2. To display the main menu, press the MENU button. 3. B VGA A + button VGA B A button + button button button + button VGA A B button + button VGA A B Press the p and q buttons to change the size of the sub...
42PX10 50XP10 60XP10 user's manual
Page 26
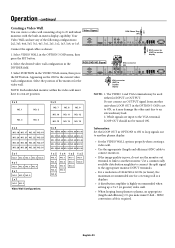
... not use the monitor out terminal to link to ON, as shown: 1. Select VIDEO WALL in the VIDEO WALL menu, then press the SET button. Select POSITION in the OPTION 3 OSD menu, then press the SET button. The VIDEO 1 and VGA terminals may damage the other unit due to the VGA terminal...
... not use the monitor out terminal to link to ON, as shown: 1. Select VIDEO WALL in the VIDEO WALL menu, then press the SET button. Select POSITION in the OPTION 3 OSD menu, then press the SET button. The VIDEO 1 and VGA terminals may damage the other unit due to the VGA terminal...

42PX10 50XP10 60XP10 user's manual
Page 27
...For example "*FRI" means that is not set "REP.1~3" as the Function setting, the Program Timer's Input option is observed. In the "OPTION3" OSD menu, select "TIMER", then press the SET button. In order to use the Program Timer, at the same time, the schedule with the lower number has... example schedule #1 has priority over schedule #10. Use the p and q buttons to TOP LFT)", then adjust the items. English-24 The "REPEAT TIMER" menu will use at preset times, and which turns on the screen. Set the items. Turn DAYLIGHT SAVING TIME on the screen. Using an asterisk (*) alone...
...For example "*FRI" means that is not set "REP.1~3" as the Function setting, the Program Timer's Input option is observed. In the "OPTION3" OSD menu, select "TIMER", then press the SET button. In order to use the Program Timer, at the same time, the schedule with the lower number has... example schedule #1 has priority over schedule #10. Use the p and q buttons to TOP LFT)", then adjust the items. English-24 The "REPEAT TIMER" menu will use at preset times, and which turns on the screen. Set the items. Turn DAYLIGHT SAVING TIME on the screen. Using an asterisk (*) alone...

42PX10 50XP10 60XP10 user's manual
Page 28
... displayed as "SINGLE", "S BY S 1, 2R or 2L" or "PICTURE IN PICTURE MODE (BTM LFT~TOP LFT)". English-25 Repeat Timer activates when the OSD menu is set to 24 hours. MULTI settings MODE: Select the input mode to 24 hours. Operation - For example the display can be used . To set... and then switch to showing the signal from 1 minute to be used . STATE Settings There are set the Repeat Timer select "REPEAT" in the Timer menu, then press the SET button. When all but STATE3 (State1, State2, State4, State1, State2...). STATE1-ON, STATE2-ON, STATE3-OFF, STATE4-ON, the repeat ...
... displayed as "SINGLE", "S BY S 1, 2R or 2L" or "PICTURE IN PICTURE MODE (BTM LFT~TOP LFT)". English-25 Repeat Timer activates when the OSD menu is set to 24 hours. MULTI settings MODE: Select the input mode to 24 hours. Operation - For example the display can be used . To set... and then switch to showing the signal from 1 minute to be used . STATE Settings There are set the Repeat Timer select "REPEAT" in the Timer menu, then press the SET button. When all but STATE3 (State1, State2, State4, State1, State2...). STATE1-ON, STATE2-ON, STATE3-OFF, STATE4-ON, the repeat ...
42PX10 50XP10 60XP10 user's manual
Page 29
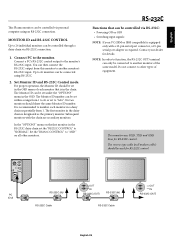
... RS-232C (OUT) English-26 English This Plasma monitor can be used for RS-232C control. No two monitors should be set in the OSD menu of equipment. The reverse type cable (null modem cable) should be controlled via personal computer using RS-232C. 2. In the "OPTION3..." menu on all other types of each monitor in the OSD. NOTE: In order to 26 individual monitors can only be controlled via RS-232C connection. 1. ...
... RS-232C (OUT) English-26 English This Plasma monitor can be used for RS-232C control. No two monitors should be set in the OSD menu of equipment. The reverse type cable (null modem cable) should be controlled via personal computer using RS-232C. 2. In the "OPTION3..." menu on all other types of each monitor in the OSD. NOTE: In order to 26 individual monitors can only be controlled via RS-232C connection. 1. ...

42PX10 50XP10 60XP10 user's manual
Page 33
... moving screen saver at regular intervals whenever the screen is blinking • A certain failure might have occurred, please contact your nearest authorized NEC DISPLAY SOLUTIONS service facility. Image of component signal is greenish • Check to point the remote directly at minimum. Red LED on monitor ... to see if the DVD/HD input connector is selected. Remote Control does not work • Check the PROTOCOL SET in the OPTION2 menu. Troubleshooting Display image is not sized properly • Use the OSD screen controls to increase or decrease the clock total. • Check...
... moving screen saver at regular intervals whenever the screen is blinking • A certain failure might have occurred, please contact your nearest authorized NEC DISPLAY SOLUTIONS service facility. Image of component signal is greenish • Check to point the remote directly at minimum. Red LED on monitor ... to see if the DVD/HD input connector is selected. Remote Control does not work • Check the PROTOCOL SET in the OPTION2 menu. Troubleshooting Display image is not sized properly • Use the OSD screen controls to increase or decrease the clock total. • Check...

