NP4100 : brochure
Page 2
...or product names are trademarks of NEC Display Solutions. IN THE BOX Remote control, batteries, power cord, 6-segment color wheel, user's manual on CD-ROM, quick start guide...cable Suspended ceiling plate Replacement lamp for 4th year including parts & labor Projector recycling program, disposal certificate Additional accessories are registered trademarks of Texas Instruments...2011 NEC Display Solutions of America, Inc. DLP by Texas Instruments NP4100: XGA 1024 x 768 NP4100W: WXGA 1280 x 800 NP4100/NP4100W: UXGA 1600 x 1200 NP4100: 6200 normal / Eco = approx. 80% of normal mode NP4100W: ...
...or product names are trademarks of NEC Display Solutions. IN THE BOX Remote control, batteries, power cord, 6-segment color wheel, user's manual on CD-ROM, quick start guide...cable Suspended ceiling plate Replacement lamp for 4th year including parts & labor Projector recycling program, disposal certificate Additional accessories are registered trademarks of Texas Instruments...2011 NEC Display Solutions of America, Inc. DLP by Texas Instruments NP4100: XGA 1024 x 768 NP4100W: WXGA 1280 x 800 NP4100/NP4100W: UXGA 1600 x 1200 NP4100: 6200 normal / Eco = approx. 80% of normal mode NP4100W: ...

NP4100 : user's manual
Page 1
Projector NP4100/NP4100W User's Manual
Projector NP4100/NP4100W User's Manual

NP4100 : user's manual
Page 2
... holders. Second edition, March 2009 • DLP, BrilliantColor and DynamicBlack are trademarks of Texas Instruments. • IBM is a trademark applied for any questionable points, errors or omissions, please contact us. (4) Notwithstanding article (3), NEC will not be responsible for trademark rights in ...part or whole without notice. (3) Great care has been taken in the U.S. tion. • Macintosh, Mac OS X and PowerBook are subject to result from using the Projector. Notes (1) The contents of this user's manual may ...
... holders. Second edition, March 2009 • DLP, BrilliantColor and DynamicBlack are trademarks of Texas Instruments. • IBM is a trademark applied for any questionable points, errors or omissions, please contact us. (4) Notwithstanding article (3), NEC will not be responsible for trademark rights in ...part or whole without notice. (3) Great care has been taken in the U.S. tion. • Macintosh, Mac OS X and PowerBook are subject to result from using the Projector. Notes (1) The contents of this user's manual may ...

NP4100 : user's manual
Page 3
... to remove the plug from power outlet. Therefore, it here: CAUTION: To turn off main power, be sure to make any part inside of your NEC NP4100/NP4100W projector and keep the manual handy for Canada only) This Class B digital apparatus meets all the prongs can be read this...
... to remove the plug from power outlet. Therefore, it here: CAUTION: To turn off main power, be sure to make any part inside of your NEC NP4100/NP4100W projector and keep the manual handy for Canada only) This Class B digital apparatus meets all the prongs can be read this...

NP4100 : user's manual
Page 5
... power cable with molded plug has a Black (five Amps) fuse installed for use with this manual. Please read them carefully and heed all warnings. Important Information RF Interference (for USA only) ...which the receiver is not supplied with this equipment. Installation • Do not place the projector in accordance with this equipment does cause harmful interference to Part 15 of paper or cloth, ...life of America, Inc. However, there is encouraged to try to correct the interference by NEC Display Solutions of your right to radio communications. Near water, baths or damp rooms. ...
... power cable with molded plug has a Black (five Amps) fuse installed for use with this manual. Please read them carefully and heed all warnings. Important Information RF Interference (for USA only) ...which the receiver is not supplied with this equipment. Installation • Do not place the projector in accordance with this equipment does cause harmful interference to Part 15 of paper or cloth, ...life of America, Inc. However, there is encouraged to try to correct the interference by NEC Display Solutions of your right to radio communications. Near water, baths or damp rooms. ...
NP4100 : user's manual
Page 8
... be used for an extended period of time. • When using the tilt foot to the projector. • Do not send the projector in this user's manual. Shifting the lens could cause premature lamp failure. • Do not place your hands near the lens opening while shifting the lens. ...Doing so could pinch your projector by qualified service personnel under the following conditions: When the power cable ...
... be used for an extended period of time. • When using the tilt foot to the projector. • Do not send the projector in this user's manual. Shifting the lens could cause premature lamp failure. • Do not place your hands near the lens opening while shifting the lens. ...Doing so could pinch your projector by qualified service personnel under the following conditions: When the power cable ...
NP4100 : user's manual
Page 13
... Select screen 39 SELECTING A SOURCE ...40 ADJUSTING THE PICTURE POSITION AND PICTURE SIZE 41 Adjusting Picture Position Manually 41 xi INSTALLATION AND CONNECTIONS 17 SETTING UP THE SCREEN AND THE PROJECTOR 17 SELECTING A LOCATION...18 INSTALLING OR REMOVING THE OPTIONAL LENS 19 Removing the Existing Lens From the... Projector 19 Installing the New Lens ...21 Installing the New Lens Using the anti-theft screw 21 THROW DISTANCE AND SCREEN SIZE 22 NP4100 Throw Distance and Screen Size Values 23 NP4100W Throw Distance and Screen Size Values 24 ...
... Select screen 39 SELECTING A SOURCE ...40 ADJUSTING THE PICTURE POSITION AND PICTURE SIZE 41 Adjusting Picture Position Manually 41 xi INSTALLATION AND CONNECTIONS 17 SETTING UP THE SCREEN AND THE PROJECTOR 17 SELECTING A LOCATION...18 INSTALLING OR REMOVING THE OPTIONAL LENS 19 Removing the Existing Lens From the... Projector 19 Installing the New Lens ...21 Installing the New Lens Using the anti-theft screw 21 THROW DISTANCE AND SCREEN SIZE 22 NP4100 Throw Distance and Screen Size Values 23 NP4100W Throw Distance and Screen Size Values 24 ...

NP4100 : user's manual
Page 14
... OFF THE IMAGE AND SOUND 50 FREEZING A PICTURE ...50 ADJUSTING THE FOCUS/ZOOM MANUALLY 51 Adjusting by Using the OSD Control Panel 51 CHANGING LAMP MODE ...52 Changing Lamp Mode by Using the Projector's OSD Control Panel 52 Changing Lamp Mode by Using the Remote Control 53 GETTING ... by Using the OSD Control Panel 55 Correcting Keystone by Using the Remote Control 56 PREVENTING THE UNAUTHORIZED USE OF THE PROJECTOR 58 Locking the Projector ...58 Unlocking the Projector ...60 USING THE PHYSICAL LOCK...61 Using the Kensington Lock ...61 Using the Security Chain Lock 61 5. Table of...
... OFF THE IMAGE AND SOUND 50 FREEZING A PICTURE ...50 ADJUSTING THE FOCUS/ZOOM MANUALLY 51 Adjusting by Using the OSD Control Panel 51 CHANGING LAMP MODE ...52 Changing Lamp Mode by Using the Projector's OSD Control Panel 52 Changing Lamp Mode by Using the Remote Control 53 GETTING ... by Using the OSD Control Panel 55 Correcting Keystone by Using the Remote Control 56 PREVENTING THE UNAUTHORIZED USE OF THE PROJECTOR 58 Locking the Projector ...58 Unlocking the Projector ...60 USING THE PHYSICAL LOCK...61 Using the Kensington Lock ...61 Using the Security Chain Lock 61 5. Table of...

NP4100 : user's manual
Page 16
..., or if the unit does not work. 1. CAUTION Avoid using the projector in Europe: You will find our current valid Guarantee Policy on our Web Site: www.nec-display-solutions.com CD-ROM (This User's manual) (79TD6131) 6 Segment Color Wheel (79TD5371) Lens Hole Cap (Installed)... Anti-Theft Screw for lens x 1 (79TD5811) Security Sticker Contact your dealer immediately if any items are included: NP4100/NP4100W Projector North America (AC 120V) ...
..., or if the unit does not work. 1. CAUTION Avoid using the projector in Europe: You will find our current valid Guarantee Policy on our Web Site: www.nec-display-solutions.com CD-ROM (This User's manual) (79TD6131) 6 Segment Color Wheel (79TD5371) Lens Hole Cap (Installed)... Anti-Theft Screw for lens x 1 (79TD5811) Security Sticker Contact your dealer immediately if any items are included: NP4100/NP4100W Projector North America (AC 120V) ...

NP4100 : user's manual
Page 28
...The buttons and keys on the projector have the same functions as projector screens. 3. Note: *To turn on the remote control. Avoid using the projector with bright fluorescent lighting turned on the remote control. This user's manual describes the functions based on the projector, press and hold the Power ...On button for a minimum of two seconds. 13 1. frequency fluorescent lights can bounce the remote signal off the projector, press the Power OFF button twice. ...
...The buttons and keys on the projector have the same functions as projector screens. 3. Note: *To turn on the remote control. Avoid using the projector with bright fluorescent lighting turned on the remote control. This user's manual describes the functions based on the projector, press and hold the Power ...On button for a minimum of two seconds. 13 1. frequency fluorescent lights can bounce the remote signal off the projector, press the Power OFF button twice. ...
NP4100 : user's manual
Page 49
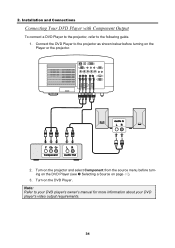
Turn on the Player or the projector. 2. 2. Connect the DVD Player to the projector as shown below before turning on the DVD Player (see Selecting a Source on page 40). 3. Turn on the projector and select Component from the source menu before turning on the DVD Player. Installation and Connections Connecting Your DVD Player with Component Output To connect a DVD Player to the projector, refer to your DVD player's owner's manual for more information about your DVD player's video output requirements. 34 Note: Refer to the following guide. 1.
Turn on the Player or the projector. 2. 2. Connect the DVD Player to the projector as shown below before turning on the DVD Player (see Selecting a Source on page 40). 3. Turn on the projector and select Component from the source menu before turning on the DVD Player. Installation and Connections Connecting Your DVD Player with Component Output To connect a DVD Player to the projector, refer to your DVD player's owner's manual for more information about your DVD player's video output requirements. 34 Note: Refer to the following guide. 1.

NP4100 : user's manual
Page 50
Images may not be displayed correctly when using an S-Video or Video connection to the following diagram. 2. Installation and Connections Connecting Your VCR To connect you VCR, refer to fast-forward or fast-rewind scanning. The AUDIO IN RCA jack is shared between VIDEO IN and S-VIDEO IN. 35 Note: Refer to your VCR owner's manual for more information about your device's requirements.
Images may not be displayed correctly when using an S-Video or Video connection to the following diagram. 2. Installation and Connections Connecting Your VCR To connect you VCR, refer to fast-forward or fast-rewind scanning. The AUDIO IN RCA jack is shared between VIDEO IN and S-VIDEO IN. 35 Note: Refer to your VCR owner's manual for more information about your device's requirements.

NP4100 : user's manual
Page 56
Press Enter. 41 3. Adjusting Picture Position Manually 1. Press the Select keypad in any direction to shift the image. Releasing the directional arrow will re-center the cursor. 3. Press the directional key as ... open the Adjust menu. Projecting an Image (Basic Operation) Adjusting the Picture Position and Picture Size The Picture Position and Picture Size can be adjusted manually from the lens control panel or from the remote control unit. Refer to the following guides to adjust Picture Position...
Press Enter. 41 3. Adjusting Picture Position Manually 1. Press the Select keypad in any direction to shift the image. Releasing the directional arrow will re-center the cursor. 3. Press the directional key as ... open the Adjust menu. Projecting an Image (Basic Operation) Adjusting the Picture Position and Picture Size The Picture Position and Picture Size can be adjusted manually from the lens control panel or from the remote control unit. Refer to the following guides to adjust Picture Position...

NP4100 : user's manual
Page 66
4. Refer to the following guides to the projected image. 51 Adjust the focus/zoom using the increase and decrease buttons as required. 3. Adjusting by Using the OSD Control Panel 1. Press Exit to return to adjust the focus and zoom manually. Press the Focus or Zoom button on the projector panel to display the appropriate window. 2. Convenient Features Adjusting the Focus/Zoom Manually The focus and zoom can be adjusted manually from the projector focus/zoom panel or from the remote control unit.
4. Refer to the following guides to the projected image. 51 Adjust the focus/zoom using the increase and decrease buttons as required. 3. Adjusting by Using the OSD Control Panel 1. Press Exit to return to adjust the focus and zoom manually. Press the Focus or Zoom button on the projector panel to display the appropriate window. 2. Convenient Features Adjusting the Focus/Zoom Manually The focus and zoom can be adjusted manually from the projector focus/zoom panel or from the remote control unit.

NP4100 : user's manual
Page 70
... Phase. 3. Convenient Features Adjusting Position/Clock The Position/Clock/Phase and Keystone Correction can be adjusted manually from the projector's control panel or from the remote control unit. Press Exit to return to adjust the Keystone Distortion manually. Select the Adjust menu using ▲or▼ and press Enter to display the Main...
... Phase. 3. Convenient Features Adjusting Position/Clock The Position/Clock/Phase and Keystone Correction can be adjusted manually from the projector's control panel or from the remote control unit. Press Exit to return to adjust the Keystone Distortion manually. Select the Adjust menu using ▲or▼ and press Enter to display the Main...

NP4100 : user's manual
Page 80
... Settings Options Standby Mode PC Control Auto Power On (AC) Desktop Front/Ceiling Rear/Desktop Rear/Ceiling Front 4800bps/9600bps/19200bps/38400bps Color/Monochrome Manual/Auto 5 sec/Auto 15 sec/Auto 45 sec Blue/Black/Logo Off/On Off/On Off/On Front/Back, Front, Back DHCP Enable/.../ Component/Video/S-Video Color System Video Auto/NTSC3.58/NTSC4.43/PAL/PAL-M/PAL-N/PAL60/SECAM S-Video WXGA Mode Source Display Auto/NTSC3.58/NTSC4.43/PAL/PAL-M/PAL-N/PAL60/SECAM NP4100: Off/On NP4100W: Off/ On Off/ On Control ID 1-254 Filter Message Lamp 1 Life Remaining, Lamp 2 Life Remaining ...
... Settings Options Standby Mode PC Control Auto Power On (AC) Desktop Front/Ceiling Rear/Desktop Rear/Ceiling Front 4800bps/9600bps/19200bps/38400bps Color/Monochrome Manual/Auto 5 sec/Auto 15 sec/Auto 45 sec Blue/Black/Logo Off/On Off/On Off/On Front/Back, Front, Back DHCP Enable/.../ Component/Video/S-Video Color System Video Auto/NTSC3.58/NTSC4.43/PAL/PAL-M/PAL-N/PAL60/SECAM S-Video WXGA Mode Source Display Auto/NTSC3.58/NTSC4.43/PAL/PAL-M/PAL-N/PAL60/SECAM NP4100: Off/On NP4100W: Off/ On Off/ On Control ID 1-254 Filter Message Lamp 1 Life Remaining, Lamp 2 Life Remaining ...

NP4100 : user's manual
Page 101
... Menu Color Select Select the menu color from four projection methods depending on pages 58 and 90). 86 Menu Display Time Select Display Time. Range: Manual, Auto 5s, Auto 15s, Auto 45s Background Select Background appearance when there is accessed through the Setup menu.
... Menu Color Select Select the menu color from four projection methods depending on pages 58 and 90). 86 Menu Display Time Select Display Time. Range: Manual, Auto 5s, Auto 15s, Auto 45s Background Select Background appearance when there is accessed through the Setup menu.

NP4100 : user's manual
Page 104
Menus stay on screen until the Menu button is displayed. Menu is displayed for 45 seconds. 89 Using On-Screen Display Monochrome Display Time Sets the amount of time a menu is pressed again. Auto 5 sec - Select from the following : Manual - Menu is displayed for 5 seconds. Menu is displayed for 15 seconds. Auto 15 sec - Auto 45 sec - Select from the following options: Color 5.
Menus stay on screen until the Menu button is displayed. Menu is displayed for 45 seconds. 89 Using On-Screen Display Monochrome Display Time Sets the amount of time a menu is pressed again. Auto 5 sec - Select from the following : Manual - Menu is displayed for 5 seconds. Menu is displayed for 15 seconds. Auto 15 sec - Auto 45 sec - Select from the following options: Color 5.
NP4100 : user's manual
Page 114
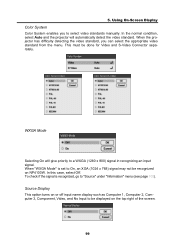
...Color System Color System enables you can select the appropriate video standard from the menu. When the projector has difficulty detecting the video standard, you to select video standards manually. Source Display This option turns on or off input name display such as Computer 1, Computer 2,... recognizing an input signal. WXGA Mode Selecting On will automatically detect the video standard. In the normal condition, select Auto and the projector will give priority to be done for Video and S-Video Connector separately. 5. This must be displayed on NP4100W. In this case, select...
...Color System Color System enables you can select the appropriate video standard from the menu. When the projector has difficulty detecting the video standard, you to select video standards manually. Source Display This option turns on or off input name display such as Computer 1, Computer 2,... recognizing an input signal. WXGA Mode Selecting On will automatically detect the video standard. In the normal condition, select Auto and the projector will give priority to be done for Video and S-Video Connector separately. 5. This must be displayed on NP4100W. In this case, select...
NP4100 : user's manual
Page 145
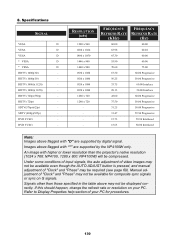
...Under some conditions of input signals, the auto adjustment of video images may not be available even though the AUTO ADJUST button is pressed, and manual adjustment of your PC for composite sync signals or sync on your PC. Images above may be compressed. HDTV (1080i)(1125i) - HDTV (...procedures. 130 HDTV (720p) - Specifications SIGNAL VESA D VESA D VESA D * VESA D * VESA D HDTV (1080p/60) - SDTV(576p)(625p) - Signals other than the projector's native resolution (1024 x 768: NP4100, 1280 x 800: NP4100W) will be required (see page 69). 8. DVD YCbCr -
...Under some conditions of input signals, the auto adjustment of video images may not be available even though the AUTO ADJUST button is pressed, and manual adjustment of your PC for composite sync signals or sync on your PC. Images above may be compressed. HDTV (1080i)(1125i) - HDTV (...procedures. 130 HDTV (720p) - Specifications SIGNAL VESA D VESA D VESA D * VESA D * VESA D HDTV (1080p/60) - SDTV(576p)(625p) - Signals other than the projector's native resolution (1024 x 768: NP4100, 1280 x 800: NP4100W) will be required (see page 69). 8. DVD YCbCr -


