
RS232 codes- Projectors
Page 2
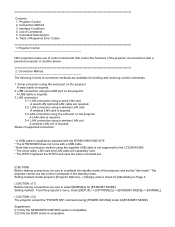
...From the projector's menu, select [SETUP] --> [OPTIONS(2)] -->[STANDBY MODE]--> [NORMAL]. ( CAUTION ) (!2) The projector accept the "POWER ON" command during [POWER-SAVING] mode for sending and receiving control commands. 1. USB connection using the LAN port on the projector A serial cable is supplied as standard with the MT860/1060/1065/1075. * The GT5000/6000 does not come with a USB cable. * Note that control the functions of supported connection * A USB cable is required. 2. Serial connection using a wireless LAN unit A wireless LAN unit is required Status of the projector via...
...From the projector's menu, select [SETUP] --> [OPTIONS(2)] -->[STANDBY MODE]--> [NORMAL]. ( CAUTION ) (!2) The projector accept the "POWER ON" command during [POWER-SAVING] mode for sending and receiving control commands. 1. USB connection using the LAN port on the projector A serial cable is supplied as standard with the MT860/1060/1065/1075. * The GT5000/6000 does not come with a USB cable. * Note that control the functions of supported connection * A USB cable is required. 2. Serial connection using a wireless LAN unit A wireless LAN unit is required Status of the projector via...

RS232 codes- Projectors
Page 35
... 0DH Error contents Unknown command. Specified terminal is unavailable or cannot be selected. Command: 02H 0FH 00H 00H 02H DATA01 DATA02 CKS (*3) Data Portion Contents Invalid values specified. Table of a failure A3H B1H 01H xxH 02H DATA01 DATA02 CKS (*1) (*2) (*4) (*3) 6. This current model does not support this function. Response At the time of projector. REMOTE KEY CODE Function: This command sends remote control key codes of...
... 0DH Error contents Unknown command. Specified terminal is unavailable or cannot be selected. Command: 02H 0FH 00H 00H 02H DATA01 DATA02 CKS (*3) Data Portion Contents Invalid values specified. Table of a failure A3H B1H 01H xxH 02H DATA01 DATA02 CKS (*1) (*2) (*4) (*3) 6. This current model does not support this function. Response At the time of projector. REMOTE KEY CODE Function: This command sends remote control key codes of...
PC Control Connectors and Cables
Page 1
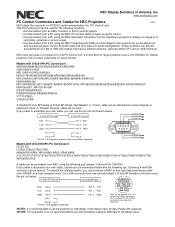
... "Idle Mode" in the Setup menu. To simplify the cable assembly, you prefer to space constraints on the mini-DIN 8P connector. Models with models that end using the NEC Image Express Utility to send images to the projector for presentations as well as basic projector control, projector lamp and error status or asset management. (These functions can be accomplished via LAN or USB with D-Sub 9Pin PC Control port: M260X...
... "Idle Mode" in the Setup menu. To simplify the cable assembly, you prefer to space constraints on the mini-DIN 8P connector. Models with models that end using the NEC Image Express Utility to send images to the projector for presentations as well as basic projector control, projector lamp and error status or asset management. (These functions can be accomplished via LAN or USB with D-Sub 9Pin PC Control port: M260X...

Specification Brochure
Page 1
... USE MOBILE DESIGN HDMI INPUT HIGH BRIGHTNESS FLEXIBLE INPUT PANEL BUILT-IN SPEAKER REMOTE CONTROL VERSATILE FEATURES AND POWERFUL PERFORMANCE • Powerful 7-watt speaker provides volume needed for adaptive color tone correction to display properly on the remote control makes the switch easy. • Quick start (3 to 4 seconds) lets you to create 3-D images. A green ECO Mode button on non-white surfaces • Plug and Play setup and operation optimizes images displayed from any of the inputs • Auto Power...
... USE MOBILE DESIGN HDMI INPUT HIGH BRIGHTNESS FLEXIBLE INPUT PANEL BUILT-IN SPEAKER REMOTE CONTROL VERSATILE FEATURES AND POWERFUL PERFORMANCE • Powerful 7-watt speaker provides volume needed for adaptive color tone correction to display properly on the remote control makes the switch easy. • Quick start (3 to 4 seconds) lets you to create 3-D images. A green ECO Mode button on non-white surfaces • Plug and Play setup and operation optimizes images displayed from any of the inputs • Auto Power...

Specification Brochure
Page 2
...-MP ADVEXON1-MP ADVEXON2-MP Universal ceiling mount Projector carrying case Active shutter 3-D glasses Replacement remote control Lightweight adjustable suspended ceiling plate for one year of ownership. SHIPS WITH Remote control, batteries, RGB cable, power cord, user's manual, product registration card ORDERING MODEL NUMBERS NP-VE281 NP-VE281X Specifications for VE281/VE281X OPTICAL Display Technology Light Output (lumens) Resolution Native Maximum Contrast Ratio (up to) Lamp Type Lamp Life (up to 6000 hours in closed captioning enables decoding and...
...-MP ADVEXON1-MP ADVEXON2-MP Universal ceiling mount Projector carrying case Active shutter 3-D glasses Replacement remote control Lightweight adjustable suspended ceiling plate for one year of ownership. SHIPS WITH Remote control, batteries, RGB cable, power cord, user's manual, product registration card ORDERING MODEL NUMBERS NP-VE281 NP-VE281X Specifications for VE281/VE281X OPTICAL Display Technology Light Output (lumens) Resolution Native Maximum Contrast Ratio (up to) Lamp Type Lamp Life (up to 6000 hours in closed captioning enables decoding and...

Users Manual
Page 6
... change in this happens, contact your service dealer. Misuses such as using the remote control for an extended period of time. If you continue to use the tilt-foot for purposes other cables before carrying the projector. • Turn off the projector and unplug the power cord before cleaning the cabinet. • Turn off the AC power for consecutive days. (From the menu, select [SETUP] → [OPTIONS(1)] → [FAN MODE...
... change in this happens, contact your service dealer. Misuses such as using the remote control for an extended period of time. If you continue to use the tilt-foot for purposes other cables before carrying the projector. • Turn off the projector and unplug the power cord before cleaning the cabinet. • Turn off the AC power for consecutive days. (From the menu, select [SETUP] → [OPTIONS(1)] → [FAN MODE...
Users Manual
Page 8
... Focus...22 Correcting Keystone Distortion 23 Correcting Keystone Distortion 23 Adjusting with Component Output 13 Connecting Your VCR 14 Connecting HDMI Input (VE281X/VE281/VE282X/VE282 only 15 Connecting the Supplied Power Cord 16 3. Installation and Connections 9 Setting Up the Screen and the Projector 9 Selecting a Location 9 Throw Distance and Screen Size 10 Making Connections...12 Connecting Your PC or Macintosh Computer 12 Connecting Your DVD Player with the remote control 24 Optimizing Computer Signal Automatically 25 Adjusting the Image Using Auto Adjust 25 Turning...
... Focus...22 Correcting Keystone Distortion 23 Correcting Keystone Distortion 23 Adjusting with Component Output 13 Connecting Your VCR 14 Connecting HDMI Input (VE281X/VE281/VE282X/VE282 only 15 Connecting the Supplied Power Cord 16 3. Installation and Connections 9 Setting Up the Screen and the Projector 9 Selecting a Location 9 Throw Distance and Screen Size 10 Making Connections...12 Connecting Your PC or Macintosh Computer 12 Connecting Your DVD Player with the remote control 24 Optimizing Computer Signal Automatically 25 Adjusting the Image Using Auto Adjust 25 Turning...
Users Manual
Page 9
... Input Signal List 74 PC Control Codes and Cable Connection 75 PC Control Codes...75 Cable Connection...75 PC Control Connector (D-SUB 9P 75 Troubleshooting Check List 76 REGISTER YOUR PROJECTOR! (for residents in the United States, Canada, and Mexico)...78 vii Maintenance...65 Cleaning the Cabinet and the Lens 65 Replacing the Lamp...66 7. Convenient Features 28 Turning off the Image and Sound 28 Freezing a Picture...28 Enlarging a Picture...28 Changing Eco Mode...29 Checking...
... Input Signal List 74 PC Control Codes and Cable Connection 75 PC Control Codes...75 Cable Connection...75 PC Control Connector (D-SUB 9P 75 Troubleshooting Check List 76 REGISTER YOUR PROJECTOR! (for residents in the United States, Canada, and Mexico)...78 vii Maintenance...65 Cleaning the Cabinet and the Lens 65 Replacing the Lamp...66 7. Convenient Features 28 Turning off the Image and Sound 28 Freezing a Picture...28 Enlarging a Picture...28 Changing Eco Mode...29 Checking...
Users Manual
Page 11
... projector can be turned off and in the INFO of the on-screen menu. • 7W built-in order to display PC or video images. This feature allows the projector to be used wirelessly. *1 Do not attempt to always use the projector to your new projector and describes the features and controls. 1. The remote control can be installed by disconnecting the AC power supply. You can use a power strip equipped with a switch and...
... projector can be turned off and in the INFO of the on-screen menu. • 7W built-in order to display PC or video images. This feature allows the projector to be used wirelessly. *1 Do not attempt to always use the projector to your new projector and describes the features and controls. 1. The remote control can be installed by disconnecting the AC power supply. You can use a power strip equipped with a switch and...
Users Manual
Page 21
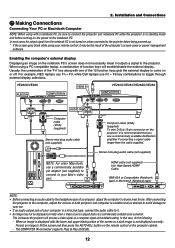
... connector supports Plug & Play (DDC2B). 12 In most cases the output signal from the notebook PC is not displayed correctly: Project an image to the notebook PC. Stereo mini-plug audio cable (not supplied) HDMI cable (not supplied) Use High Speed HDMI® Cable. Enabling the computer's external display Displaying an image on or off. For example, NEC laptops use Fn + F3, while Dell laptops use a commercially available pin adapter (not supplied) to connect to connect the projector...
... connector supports Plug & Play (DDC2B). 12 In most cases the output signal from the notebook PC is not displayed correctly: Project an image to the notebook PC. Stereo mini-plug audio cable (not supplied) HDMI cable (not supplied) Use High Speed HDMI® Cable. Enabling the computer's external display Displaying an image on or off. For example, NEC laptops use Fn + F3, while Dell laptops use a commercially available pin adapter (not supplied) to connect to connect the projector...
Users Manual
Page 25
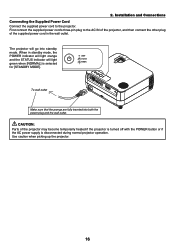
... light green when [NORMAL] is disconnected during normal projector operation. CAUTION: Parts of the supplied power cord in standby mode, the POWER indicator will light orange and the STATUS indicator will go into both the power plug and the wall outlet. Installation and Connections Connecting the Supplied Power Cord Connect the supplied power cord to the AC IN of the projector, and then connect the other plug of the projector may become temporarily heated if the projector is turned off with the POWER button...
... light green when [NORMAL] is disconnected during normal projector operation. CAUTION: Parts of the supplied power cord in standby mode, the POWER indicator will light orange and the STATUS indicator will go into both the power plug and the wall outlet. Installation and Connections Connecting the Supplied Power Cord Connect the supplied power cord to the AC IN of the projector, and then connect the other plug of the projector may become temporarily heated if the projector is turned off with the POWER button...
Users Manual
Page 27
... the STATUS indicator lights orange as long as the POWER button is pressed, it on and displaying an image. • Immediately after the lamp is too high, the projector detects abnormal high temperature. If the lamp fails to protect the internal system. If you want, you can proceed to the menu operation. This is stabilized. • If you turn on the projector, you first turn on the projector, screen flicker may occur...
... the STATUS indicator lights orange as long as the POWER button is pressed, it on and displaying an image. • Immediately after the lamp is too high, the projector detects abnormal high temperature. If the lamp fails to protect the internal system. If you want, you can proceed to the menu operation. This is stabilized. • If you turn on the projector, you first turn on the projector, screen flicker may occur...

Users Manual
Page 42
... use Virtual Remote Tool. Updated Virtual Remote Tool can be downloaded from your source selection, the Virtual Remote screen or the toolbar will be displayed on or off and signal selection via a USB cable in signal communication. Virtual Remote Tool will help you perform operations such as your computer screen. Using a switcher or other cables than the supplied computer cable (VGA) may not work depending on your computer's specifications and version of graphic adapters or drivers...
... use Virtual Remote Tool. Updated Virtual Remote Tool can be downloaded from your source selection, the Virtual Remote screen or the toolbar will be displayed on or off and signal selection via a USB cable in signal communication. Virtual Remote Tool will help you perform operations such as your computer screen. Using a switcher or other cables than the supplied computer cable (VGA) may not work depending on your computer's specifications and version of graphic adapters or drivers...

Users Manual
Page 45
... the standby condition. The projector is displayed, click "Continue". Supplied computer cable (VGA) COMPUTER IN Power cord (supplied) To wall outlet TIP: • When Virtual Remote Tool starts for the first time, "Easy Setup" window will be displayed to complete the uninstallation. Follow the instructions on the screens to the AC IN of the computer. 2 Connect the supplied power cord to complete the uninstallation. • For Windows XP 1 Click "Start" and then "Control Panel". The Control Panel window...
... the standby condition. The projector is displayed, click "Continue". Supplied computer cable (VGA) COMPUTER IN Power cord (supplied) To wall outlet TIP: • When Virtual Remote Tool starts for the first time, "Easy Setup" window will be displayed to complete the uninstallation. Follow the instructions on the screens to the AC IN of the computer. 2 Connect the supplied power cord to complete the uninstallation. • For Windows XP 1 Click "Start" and then "Control Panel". The Control Panel window...
Users Manual
Page 68
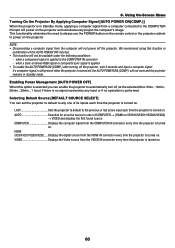
... use the POWER button on the cabinet - NORMAL Power indicator: Orange light/STATUS indicator: Green light POWER-SAVING Power indicator: Red light/STATUS indicator: Off The following connectors, buttons or functions will not be affected even when [RESET] is not available. • The power consumption in the standby mode will not be included in [STANDBY MODE] The projector has two standby modes: [NORMAL] and [POWER-SAVING]. Virtual Remote Tool via the computer cable (VGA) connection - Buttons other than POWER ON button on the remote control NOTE: • When [CONTROL PANEL LOCK...
... use the POWER button on the cabinet - NORMAL Power indicator: Orange light/STATUS indicator: Green light POWER-SAVING Power indicator: Red light/STATUS indicator: Off The following connectors, buttons or functions will not be affected even when [RESET] is not available. • The power consumption in the standby mode will not be included in [STANDBY MODE] The projector has two standby modes: [NORMAL] and [POWER-SAVING]. Virtual Remote Tool via the computer cable (VGA) connection - Buttons other than POWER ON button on the remote control NOTE: • When [CONTROL PANEL LOCK...
Users Manual
Page 69
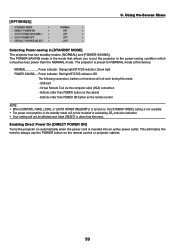
... use the POWER button on the remote control or the projector cabinet to the previous or last active input each time the projector is turned on the projector and simultaneously project the computer's image. Selecting Default Source [DEFAULT SOURCE SELECT] You can enable the projector to the COMPUTER IN connector - HDMI (VE281X/VE281/VE282X/VE282 Displays the digital source from the VIDEO IN connector every time the projector is performed. Using On-Screen Menu Turning On the Projector By Applying Computer Signal [AUTO POWER...
... use the POWER button on the remote control or the projector cabinet to the previous or last active input each time the projector is turned on the projector and simultaneously project the computer's image. Selecting Default Source [DEFAULT SOURCE SELECT] You can enable the projector to the COMPUTER IN connector - HDMI (VE281X/VE281/VE282X/VE282 Displays the digital source from the VIDEO IN connector every time the projector is performed. Using On-Screen Menu Turning On the Projector By Applying Computer Signal [AUTO POWER...
Users Manual
Page 76
...[STANDBY MODE]) - Lamp Indicator Indicator Condition Off Blinking light Red Steady light Green Projector Condition Normal - replacement message will automatically turn on . - Wait a full minute and then turn off the lamp with dust. • Wait about 60 minutes until the inside the projector rises too high, the over-temperature protector will be displayed. [ECO MODE] is unplugged. Indicator Messages Power Indicator Indicator Condition Off Blinking light Green 0.5 sec On, 0.5 sec Off Steady light Green Orange Red Projector Condition The power cord is set to light...
...[STANDBY MODE]) - Lamp Indicator Indicator Condition Off Blinking light Red Steady light Green Projector Condition Normal - replacement message will automatically turn on . - Wait a full minute and then turn off the lamp with dust. • Wait about 60 minutes until the inside the projector rises too high, the over-temperature protector will be displayed. [ECO MODE] is unplugged. Indicator Messages Power Indicator Indicator Condition Off Blinking light Green 0.5 sec On, 0.5 sec Off Steady light Green Orange Red Projector Condition The power cord is set to light...
Users Manual
Page 77
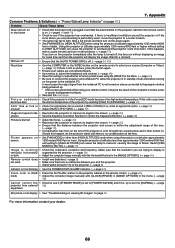
... Common Problems & Solutions (→ "Power/Status/Lamp Indicator" on page 67.) Problem Check These Items Does not turn on . If there is then turned on the power again. • Set [FAN MODE] to flicker. Will turn on the projector immediately after the lamp is turned off . (→ page 54, 60) No picture • Use the COMPUTER or the VIDEO button on the projector cabinet or the remote control. (→ page 25) mode • Adjust the computer image manually with...
... Common Problems & Solutions (→ "Power/Status/Lamp Indicator" on page 67.) Problem Check These Items Does not turn on . If there is then turned on the power again. • Set [FAN MODE] to flicker. Will turn on the projector immediately after the lamp is turned off . (→ page 54, 60) No picture • Use the COMPUTER or the VIDEO button on the projector cabinet or the remote control. (→ page 25) mode • Adjust the computer image manually with...
Users Manual
Page 78
... on the screen. After setting, restart your resolution. NOTE: A Video Adapter cable manufactured by your Macintosh. NOTE: You can check the horizontal frequency of the Mac adapter (not supplied with the projector) according to your Macintosh for the changes to 1024 x 768 unless "mirroring" is needed for detailed information. • Image displayed is incorrect when using a Macintosh When using a Macintosh with the projector, set the DIP switch to owner's manual supplied with...
... on the screen. After setting, restart your resolution. NOTE: A Video Adapter cable manufactured by your Macintosh. NOTE: You can check the horizontal frequency of the Mac adapter (not supplied with the projector) according to your Macintosh for the changes to 1024 x 768 unless "mirroring" is needed for detailed information. • Image displayed is incorrect when using a Macintosh When using a Macintosh with the projector, set the DIP switch to owner's manual supplied with...

Users Manual
Page 85
... carry out the [KEYSTONE] adjustment). Image is correctly connected to projector's native resolution. Input source's resolution and frequency are correctly adjusted on PC and changed it to the audio input of the image are lost . Frequency of focus. button. Still unchanged even though you change [FAN MODE] from your dealer or service personnel, check the following list to [AUTO]. Still unchanged even though you carry out [RESET] in the projector's menu. Image appears blurry or out...
... carry out the [KEYSTONE] adjustment). Image is correctly connected to projector's native resolution. Input source's resolution and frequency are correctly adjusted on PC and changed it to the audio input of the image are lost . Frequency of focus. button. Still unchanged even though you change [FAN MODE] from your dealer or service personnel, check the following list to [AUTO]. Still unchanged even though you carry out [RESET] in the projector's menu. Image appears blurry or out...

