
RS232 codes- Projectors
Page 2
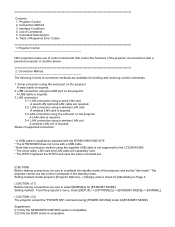
.... 3-3.LAN connection using a wireless LAN unit A wireless LAN unit is required Status of supported connection * A USB cable is supplied as standard with the MT860/1060/1065/1075. * The GT5000/6000 does not come with a USB cable. * Note that control the functions of the projector and set . (CAUTION) Before making connections, be sure to invalidate the standby mode of the projector via connection with a personal computer or another device. 2. Setting method : From the projector's menu, select [SETUP] --> [OPTIONS(2)] -->[STANDBY MODE...
.... 3-3.LAN connection using a wireless LAN unit A wireless LAN unit is required Status of supported connection * A USB cable is supplied as standard with the MT860/1060/1065/1075. * The GT5000/6000 does not come with a USB cable. * Note that control the functions of the projector and set . (CAUTION) Before making connections, be sure to invalidate the standby mode of the projector via connection with a personal computer or another device. 2. Setting method : From the projector's menu, select [SETUP] --> [OPTIONS(2)] -->[STANDBY MODE...

Specification Brochure
Page 1
... projector 6000-hour filter life NEC is required, thereby decreasing your total cost of ownership. A green ECO Mode button on the remote control makes the switch easy. • Quick start (3 to 4 seconds) lets you need to connect with ECO Mode™ technology increases lamp life up to 6000 hours, while lowering power consumption • Power management enables projector to automatically turn off the projector at set to 25% for easy lamp changes without removal of the projector...
... projector 6000-hour filter life NEC is required, thereby decreasing your total cost of ownership. A green ECO Mode button on the remote control makes the switch easy. • Quick start (3 to 4 seconds) lets you need to connect with ECO Mode™ technology increases lamp life up to 6000 hours, while lowering power consumption • Power management enables projector to automatically turn off the projector at set to 25% for easy lamp changes without removal of the projector...

Specification Brochure
Page 4
... for use with location control Countdown sleep timer can be set to change. ©2013 NEC Display Solutions of America, Inc. stereo 1/8 in . Advanced AccuBlend, ECO Mode and Virtual Remote are trademarks of HDMI Licensing LLC. 15.7" (398mm) 11.1" (282mm) 4.5" (115mm) UNIQUE FEATURES Advanced AccuBlend™ ensures detailed images when non-native resolution sources are connected to the projector 64-step image magnification with ceiling mount Replacement lamp Replacement remote control Extends term of parts...
... for use with location control Countdown sleep timer can be set to change. ©2013 NEC Display Solutions of America, Inc. stereo 1/8 in . Advanced AccuBlend, ECO Mode and Virtual Remote are trademarks of HDMI Licensing LLC. 15.7" (398mm) 11.1" (282mm) 4.5" (115mm) UNIQUE FEATURES Advanced AccuBlend™ ensures detailed images when non-native resolution sources are connected to the projector 64-step image magnification with ceiling mount Replacement lamp Replacement remote control Extends term of parts...
User's Manual
Page 5
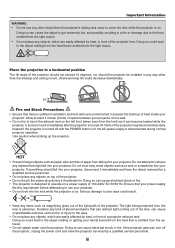
... the desktop and ceiling mount, otherwise lamp life could result. • Keep any items such as fire or injury to the eyes. • Do not place any other object than the projector's sliding lens cover to cover the lens while the projector is emitted from the exhaust. • Do not splash water over the projector. The light being projected from the lens is turned off. Doing...
... the desktop and ceiling mount, otherwise lamp life could result. • Keep any items such as fire or injury to the eyes. • Do not place any other object than the projector's sliding lens cover to cover the lens while the projector is emitted from the exhaust. • Do not splash water over the projector. The light being projected from the lens is turned off. Doing...

User's Manual
Page 9
...Battery Installation...9 Remote Control Precautions 9 Operating Range for Wireless Remote Control 9 ❺ Operating Environment for Software Included on Startup screen (Menu Language Select screen 16 ❹ Selecting a Source...17 Selecting the computer or video source 17 ❺ Adjusting the Picture Size and Position 19 Adjusting the vertical position of a projected image (Lens shift 20 Focus...21 Zoom...22 Adjust the Tilt Foot 23 ❻ Correcting Keystone Distortion [KEYSTONE 24 ❼ Optimizing Computer Signal Automatically 26 Adjusting the Image Using Auto Adjust 26...
...Battery Installation...9 Remote Control Precautions 9 Operating Range for Wireless Remote Control 9 ❺ Operating Environment for Software Included on Startup screen (Menu Language Select screen 16 ❹ Selecting a Source...17 Selecting the computer or video source 17 ❺ Adjusting the Picture Size and Position 19 Adjusting the vertical position of a projected image (Lens shift 20 Focus...21 Zoom...22 Adjust the Tilt Foot 23 ❻ Correcting Keystone Distortion [KEYSTONE 24 ❼ Optimizing Computer Signal Automatically 26 Adjusting the Image Using Auto Adjust 26...
User's Manual
Page 14
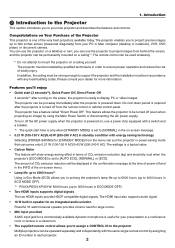
... supplied remote control allows you to prolong the projector's lamp life up to 6000 hours (up to 4000 hours in ECO MODE OFF). *3 P501X/PE501X/P451W: 6000 hours (up to 3500 hours in ECO MODE OFF). • Two HDMI inputs supports digital signals The two HDMI inputs provide HDCP compatible digital signals. The remote control can be put the projector in terms of the very best projectors available today. Features you to project precise images up to 6000 hours*3 Using...
... supplied remote control allows you to prolong the projector's lamp life up to 6000 hours (up to 4000 hours in ECO MODE OFF). *3 P501X/PE501X/P451W: 6000 hours (up to 3500 hours in ECO MODE OFF). • Two HDMI inputs supports digital signals The two HDMI inputs provide HDCP compatible digital signals. The remote control can be put the projector in terms of the very best projectors available today. Features you to project precise images up to 6000 hours*3 Using...

User's Manual
Page 26
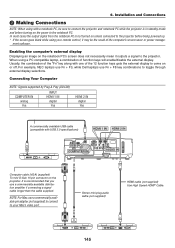
... connect the other connections, see "6. 2. Projecting an Image (Basic Operation) ❷ Connecting Your Computer/Connecting the Power Cord 1. This section will apply for a few seconds and then will light orange* (standby mode). Installation and Connections" on page 145. Connect the supplied power cord to the projector. Connect the computer cable (VGA) between the projector's COMPUTER IN connector and the computer's port (mini D-Sub 15 Pin). The projector's power indicator will flash for both indicators when [NORMAL] is disconnected during normal projector operation...
... connect the other connections, see "6. 2. Projecting an Image (Basic Operation) ❷ Connecting Your Computer/Connecting the Power Cord 1. This section will apply for a few seconds and then will light orange* (standby mode). Installation and Connections" on page 145. Connect the supplied power cord to the projector. Connect the computer cable (VGA) between the projector's COMPUTER IN connector and the computer's port (mini D-Sub 15 Pin). The projector's power indicator will flash for both indicators when [NORMAL] is disconnected during normal projector operation...
User's Manual
Page 28
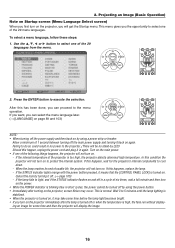
... the lamp fails to execute the selection. Projecting an Image (Basic Operation) Note on Startup screen (Menu Language Select screen) When you will display the image. 16 To select a menu language, follow these steps: 1. Press the ENTER button to light, and if the STATUS indicator flashes on , it off the power supply and then back on the projector immediately after turning on the projector, screen flicker may take some time before the lamp light becomes...
... the lamp fails to execute the selection. Projecting an Image (Basic Operation) Note on Startup screen (Menu Language Select screen) When you will display the image. 16 To select a menu language, follow these steps: 1. Press the ENTER button to light, and if the STATUS indicator flashes on , it off the power supply and then back on the projector immediately after turning on the projector, screen flicker may take some time before the lamp light becomes...

User's Manual
Page 54
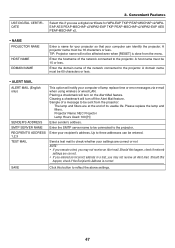
... a wired/wireless network, lamp replace time or error messages will vary depending on the version of browser. Setting Alert Mail (ALERT MAIL) When the projector is required. (→ page 152) To use wireless LAN connection, the optional USB Wireless LAN Unit is connected to the HTTP server function are available: • Start the Web browser on /off, selecting input, volume control and picture adjustments are possible. 4. Convenient Features ❾ Controlling the Projector by Using an...
... a wired/wireless network, lamp replace time or error messages will vary depending on the version of browser. Setting Alert Mail (ALERT MAIL) When the projector is required. (→ page 152) To use wireless LAN connection, the optional USB Wireless LAN Unit is connected to the HTTP server function are available: • Start the Web browser on /off, selecting input, volume control and picture adjustments are possible. 4. Convenient Features ❾ Controlling the Projector by Using an...
User's Manual
Page 59
... lamp and filters. Convenient Features USE DIGITAL CERTIFICATE Select this button to reflect the above settings. 47 SAVE Click this if you may not receive an Alert mail. A projector name must be 16 characters or less. Should this happen, check if the Recipient's Address is done from the projector: The lamp and filters are at the end of lamp replace time or error messages via e-mail when using wireless...
... lamp and filters. Convenient Features USE DIGITAL CERTIFICATE Select this button to reflect the above settings. 47 SAVE Click this if you may not receive an Alert mail. A projector name must be 16 characters or less. Should this happen, check if the Recipient's Address is done from the projector: The lamp and filters are at the end of lamp replace time or error messages via e-mail when using wireless...

User's Manual
Page 102
Using On-Screen Menu Menu Item SETUP MENU COLOR SELECT SOURCE DISPLAY ID DISPLAY ECO MESSAGE DISPLAY TIME BACKGROUND FILTER MESSAGE ORIENTATION INSTALLATION CONTROL PANEL LOCK SECURITY COMMUNICATION SPEED REMOTE SENSOR CONTROL ID CONTROL ID NUMBER CONTROL ID TEST PATTERN MIC GAIN NETWORK SETTINGS (not supported by PE501X) AUTO ADJUST FAN MODE COMPUTER SIGNAL SELECT VIDEO S-VIDEO OPTIONS(1) OPTIONS(2) WXGA MODE DEINTERLACE HDMI HDMI1 VIDEO LEVEL SETTINGS HDMI2 VIDEO LEVEL HDMI1 AUDIO SELECT HDMI2 NETWORK (not supported by PE501X) USB DISPLAY BEEP TOOLS (not ...
Using On-Screen Menu Menu Item SETUP MENU COLOR SELECT SOURCE DISPLAY ID DISPLAY ECO MESSAGE DISPLAY TIME BACKGROUND FILTER MESSAGE ORIENTATION INSTALLATION CONTROL PANEL LOCK SECURITY COMMUNICATION SPEED REMOTE SENSOR CONTROL ID CONTROL ID NUMBER CONTROL ID TEST PATTERN MIC GAIN NETWORK SETTINGS (not supported by PE501X) AUTO ADJUST FAN MODE COMPUTER SIGNAL SELECT VIDEO S-VIDEO OPTIONS(1) OPTIONS(2) WXGA MODE DEINTERLACE HDMI HDMI1 VIDEO LEVEL SETTINGS HDMI2 VIDEO LEVEL HDMI1 AUDIO SELECT HDMI2 NETWORK (not supported by PE501X) USB DISPLAY BEEP TOOLS (not ...

User's Manual
Page 119
... updated CONTROL ID screen will clear currently specified ID with batteries removed. Microphone volume can be adjusted with the VOL. (+) or (−) button on the remote control or the ◀ or ▶ on the projector cabinet. [NETWORKING SETTINGS] (not supported by PE501X) See "APPLICATION MENU" on page 120. [OPTIONS(1)] Setting Auto Adjust [AUTO ADJUST] This feature sets the Auto Adjust mode so that the computer signal can be cleared in fans run down the temperature...
... updated CONTROL ID screen will clear currently specified ID with batteries removed. Microphone volume can be adjusted with the VOL. (+) or (−) button on the remote control or the ◀ or ▶ on the projector cabinet. [NETWORKING SETTINGS] (not supported by PE501X) See "APPLICATION MENU" on page 120. [OPTIONS(1)] Setting Auto Adjust [AUTO ADJUST] This feature sets the Auto Adjust mode so that the computer signal can be cleared in fans run down the temperature...
User's Manual
Page 157
... projector is in standby mode and before being powered up. * If the screen goes blank while using a PC compatible laptop, a combination of the "Fn" key along with USB 2.0 specifications) Computer cable (VGA) (supplied) To mini D-Sub 15-pin connector on the power to the notebook PC. Connecting Your Computer NOTE: Signals supported by Plug & Play (DDC2B) COMPUTER IN analog Yes INPUT HDMI 1 IN digital Yes HDMI 2 IN digital Yes A commercially available USB cable...
... projector is in standby mode and before being powered up. * If the screen goes blank while using a PC compatible laptop, a combination of the "Fn" key along with USB 2.0 specifications) Computer cable (VGA) (supplied) To mini D-Sub 15-pin connector on the power to the notebook PC. Connecting Your Computer NOTE: Signals supported by Plug & Play (DDC2B) COMPUTER IN analog Yes INPUT HDMI 1 IN digital Yes HDMI 2 IN digital Yes A commercially available USB cable...
User's Manual
Page 180
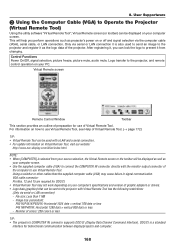
... perform operations such as your computer screen. Control Functions Power On/Off, signal selection, picture freeze, picture mute, audio mute, Logo transfer to use Virtual Remote Tool, see Help of the computer to the projector, and remote control operation on your computer screen. • Use the supplied computer cable (VGA) to connect the COMPUTER IN connector directly with a LAN and a serial connection. • For update information on Virtual Remote Tool, visit our website: http://www.nec-display.com...
... perform operations such as your computer screen. Control Functions Power On/Off, signal selection, picture freeze, picture mute, audio mute, Logo transfer to use Virtual Remote Tool, see Help of the computer to the projector, and remote control operation on your computer screen. • Use the supplied computer cable (VGA) to connect the COMPUTER IN connector directly with a LAN and a serial connection. • For update information on Virtual Remote Tool, visit our website: http://www.nec-display.com...

User's Manual
Page 207
... password. A screen like the one below is displayed when the software is started on computer 1 Click Windows [Start] → [All Programs] → [NEC Projector User Supportware] → [Desktop Control Utility 1.0] → [Desktop Control], in case you forget it. • The starting password must be displayed. • In case of the network devices connected to use and click [OK]. The "Startup password settings" window will be input each time Desktop Control Utility 1.0 is started first time Screen if starting password...
... password. A screen like the one below is displayed when the software is started on computer 1 Click Windows [Start] → [All Programs] → [NEC Projector User Supportware] → [Desktop Control Utility 1.0] → [Desktop Control], in case you forget it. • The starting password must be displayed. • In case of the network devices connected to use and click [OK]. The "Startup password settings" window will be input each time Desktop Control Utility 1.0 is started first time Screen if starting password...

User's Manual
Page 218
... life. Wait for - [STANDBY MODE]) Blinking light Red 1 cycle (0.5 sec Lamp cover error or lamp housing error Replace the lamp cover or lamp housing correctly. CONTROL ID error Remote control ID and projector ID are presenting is not working . - Appendix ❶ Troubleshooting This section helps you resolve problems you are not matched. On Timer is set to light. Orange 1 cycle (0.5 sec Network conflict Both the built-in wired LAN and wireless LAN at the same time. will not work correctly. MODE] Status Indicator Indicator Condition Projector Condition...
... life. Wait for - [STANDBY MODE]) Blinking light Red 1 cycle (0.5 sec Lamp cover error or lamp housing error Replace the lamp cover or lamp housing correctly. CONTROL ID error Remote control ID and projector ID are presenting is not working . - Appendix ❶ Troubleshooting This section helps you resolve problems you are not matched. On Timer is set to light. Orange 1 cycle (0.5 sec Network conflict Both the built-in wired LAN and wireless LAN at the same time. will not work correctly. MODE] Status Indicator Indicator Condition Projector Condition...

User's Manual
Page 219
... picture • Use the COMPUTER1, the COMPUTER2, the VIDEO or the S-VIDEO button on . After replacing the lamp, reset the lamp hours used. (→ page 160) • The lamp may be the result of the projector. (→ page 9) Indicator is installed correctly. (→ page 162) • Check to see if you turn off • Ensure that the lens cover is open. (→ page 5) • Reset the settings or adjustments to factory preset levels using your...
... picture • Use the COMPUTER1, the COMPUTER2, the VIDEO or the S-VIDEO button on . After replacing the lamp, reset the lamp hours used. (→ page 160) • The lamp may be the result of the projector. (→ page 9) Indicator is installed correctly. (→ page 162) • Check to see if you turn off • Ensure that the lens cover is open. (→ page 5) • Reset the settings or adjustments to factory preset levels using your...
User's Manual
Page 220
... a MacBook * When using the projector with the projector) according to next step) • Enabling the computer's external display. For example, NEC laptops use Fn + F3, while Dell laptops use . NOTE: A Video Adapter cable manufactured by your Mac. Refer to owner's manual supplied with one of the current signal in use Fn + F8 key combinations to the 13" fixed mode and then restart your Mac and the projector, changing the DIP switch on the notebook PC's screen...
... a MacBook * When using the projector with the projector) according to next step) • Enabling the computer's external display. For example, NEC laptops use Fn + F3, while Dell laptops use . NOTE: A Video Adapter cable manufactured by your Mac. Refer to owner's manual supplied with one of the current signal in use Fn + F8 key combinations to the 13" fixed mode and then restart your Mac and the projector, changing the DIP switch on the notebook PC's screen...

User's Manual
Page 227
... Full duplex NOTE: Depending on both ends of the PC Control Codes if needed. ❻ PC Control Codes and Cable Connection PC Control Codes Function POWER ON POWER OFF INPUT SELECT COMPUTER INPUT SELECT HDMI1 INPUT SELECT HDMI2 INPUT SELECT VIDEO INPUT SELECT S-VIDEO INPUT SELECT VIEWER INPUT SELECT NETWORK INPUT SELECT USB DISPLAY PICTURE MUTE ON PICTURE MUTE OFF SOUND MUTE ON SOUND MUTE OFF Code Data 02H 00H 00H 00H 00H 02H 02H 01H 00H 00H 00H...
... Full duplex NOTE: Depending on both ends of the PC Control Codes if needed. ❻ PC Control Codes and Cable Connection PC Control Codes Function POWER ON POWER OFF INPUT SELECT COMPUTER INPUT SELECT HDMI1 INPUT SELECT HDMI2 INPUT SELECT VIDEO INPUT SELECT S-VIDEO INPUT SELECT VIEWER INPUT SELECT NETWORK INPUT SELECT USB DISPLAY PICTURE MUTE ON PICTURE MUTE OFF SOUND MUTE ON SOUND MUTE OFF Code Data 02H 00H 00H 00H 00H 02H 02H 01H 00H 00H 00H...
User's Manual
Page 228
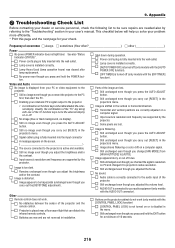
... [KEYSTONE] adjustment). Still unchanged even though you press the AUTO ADJUST button. Still unchanged even though you carry out [RESET] in the projector's menu. Still no display). Other Remote control does not work (only models with the AUDIO OUT connector). Some pixels are lost . Lamp Hours Used (lamp operation hours) was cleared after lamp replacement. Enabling your notebook PC's signal output to the audio input of occurrence always sometimes (How often other Power No power (POWER indicator...
... [KEYSTONE] adjustment). Still unchanged even though you press the AUTO ADJUST button. Still unchanged even though you carry out [RESET] in the projector's menu. Still no display). Other Remote control does not work (only models with the AUDIO OUT connector). Some pixels are lost . Lamp Hours Used (lamp operation hours) was cleared after lamp replacement. Enabling your notebook PC's signal output to the audio input of occurrence always sometimes (How often other Power No power (POWER indicator...

