
User Manual
Page 1
This may save you can skip it. If the section doesn't apply, you time later on. At the beginning of each section of the manual you'll find an overview. CD-ROM version Portable Projector LT260/LT240/LT220 User's Manual About this user's manual The fastest way to get started is to review the user's manual. Take a few minutes now to take your time and do everything right the first time.
This may save you can skip it. If the section doesn't apply, you time later on. At the beginning of each section of the manual you'll find an overview. CD-ROM version Portable Projector LT260/LT240/LT220 User's Manual About this user's manual The fastest way to get started is to review the user's manual. Take a few minutes now to take your time and do everything right the first time.
User Manual
Page 2
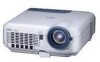
... so that the image is square even when projector is one of the very best projectors available today. The NEC optional wireless LAN card is required. You can be used wirelessly. *1 Do not attempt to mount the projector on Your Purchase of The LT260/LT240/ LT220 Projector The LT260/LT240/LT220 is positioned off center of bodily...
... so that the image is square even when projector is one of the very best projectors available today. The NEC optional wireless LAN card is required. You can be used wirelessly. *1 Do not attempt to mount the projector on Your Purchase of The LT260/LT240/ LT220 Projector The LT260/LT240/LT220 is positioned off center of bodily...
User Manual
Page 3
...technology - An XGA image (1024ן768) is not available at the site. • A high-bright 220 watt DC lamp. • The Standby mode reduces standby power consumption significantly. • The supplied wireless remote control that the projector will not project... The "Capture" enables you to the Projector Safety protect by Password and Security functions Password and Security features prevent the projector from being used by using your presentation even when a PC is displayed with NEC's Advanced AccuBlend on LT260/LT240/LT220. E-3 INTRODUCTION Ͼ Introduction ...
...technology - An XGA image (1024ן768) is not available at the site. • A high-bright 220 watt DC lamp. • The Standby mode reduces standby power consumption significantly. • The supplied wireless remote control that the projector will not project... The "Capture" enables you to the Projector Safety protect by Password and Security functions Password and Security features prevent the projector from being used by using your presentation even when a PC is displayed with NEC's Advanced AccuBlend on LT260/LT240/LT220. E-3 INTRODUCTION Ͼ Introduction ...

User Manual
Page 4
PAL: TV standard used in Western Europe. PAL-N: TV standard used in Argentine, Paraguay and Uruguay. E-4 TV standard for NTSC playback on PAL TVs. PAL60: TV standard used in Brazil. and Canada. NTSC4.43: TV standard used in France and Eastern Europe. PAL-M: TV standard used in U.S. SECAM: TV standard used for video in Middle East countries. INTRODUCTION Ͼ Introduction to the Projector NOTE: Composite video standards are as follows: NTSC: U.S.
PAL: TV standard used in Western Europe. PAL-N: TV standard used in Argentine, Paraguay and Uruguay. E-4 TV standard for NTSC playback on PAL TVs. PAL60: TV standard used in Brazil. and Canada. NTSC4.43: TV standard used in France and Eastern Europe. PAL-M: TV standard used in U.S. SECAM: TV standard used for video in Middle East countries. INTRODUCTION Ͼ Introduction to the Projector NOTE: Composite video standards are as follows: NTSC: U.S.

User Manual
Page 5
... the remote control to operate your PC's mouse wirelessly from across the room with the built-in remote mouse function. • You can control the projector with a PC using the PC Control port. • USB port allows USB mouse operation*4. *4 The USB ports meet the USB1.1 specification. • The contemporary cabinet...
... the remote control to operate your PC's mouse wirelessly from across the room with the built-in remote mouse function. • You can control the projector with a PC using the PC Control port. • USB port allows USB mouse operation*4. *4 The USB ports meet the USB1.1 specification. • The contemporary cabinet...

User Manual
Page 6
...rivet to attach the string to the bottom with the supplied string and rivet: 1. E-6 INTRODUCTION Ͼ Part Names of the Projector Part Names of the Projector Remote Sensor (See page E-20) Focus Ring (See page E-44) Controls (See page E-8) ON STAND BY PO SWTEALRTAUMSP ALIGNMENT ...AUTO ADJUST PC-CARD TER SELECT CANCE L SOURCE EN Ventilation (inlet) MEN U Ventilation (outlet) Heated air is a registered trademark of the projector. MicroSaver® is exhausted from here Adjustable Tilt Foot Lever (See page E-43) Adjustable Tilt Foot (See page E-43) Built-in the string...
...rivet to attach the string to the bottom with the supplied string and rivet: 1. E-6 INTRODUCTION Ͼ Part Names of the Projector Part Names of the Projector Remote Sensor (See page E-20) Focus Ring (See page E-44) Controls (See page E-8) ON STAND BY PO SWTEALRTAUMSP ALIGNMENT ...AUTO ADJUST PC-CARD TER SELECT CANCE L SOURCE EN Ventilation (inlet) MEN U Ventilation (outlet) Heated air is a registered trademark of the projector. MicroSaver® is exhausted from here Adjustable Tilt Foot Lever (See page E-43) Adjustable Tilt Foot (See page E-43) Built-in the string...

User Manual
Page 7
...) PC Card Eject Button Monaural Speaker (2W) Lamp cover (See page E-118) Ventilation (outlet) Lamp cover screw Rear Foot Rear Foot Rotate to make the projector level. (See page E-44) AC Input Connect the supplied power cable's three-pin plug here, and plug the other end into an active wall outlet... you plug the supplied power cable into an active wall outlet and turn on the Main Power switch, the POWER indicator turns orange and the projector is in standby mode. (See page E-37) E-7
...) PC Card Eject Button Monaural Speaker (2W) Lamp cover (See page E-118) Ventilation (outlet) Lamp cover screw Rear Foot Rear Foot Rotate to make the projector level. (See page E-44) AC Input Connect the supplied power cable's three-pin plug here, and plug the other end into an active wall outlet... you plug the supplied power cable into an active wall outlet and turn on the Main Power switch, the POWER indicator turns orange and the projector is in standby mode. (See page E-37) E-7

User Manual
Page 8
...2 6 7 8 12 1 3 1.POWER Button (ON / STAND BY) Use this button to turn on or off when the main power is supplied and the projector is in standby or idle mode. See the Status Indicator section on page E-123 for more details. POWER Indicator ( ) When this indicator is green, the... projector is not attached properly or the projector has overheated. See the Power Indicator section on page E-123 for more details. 3. E-8 STATUS Indicator If this light blinks red ...
...2 6 7 8 12 1 3 1.POWER Button (ON / STAND BY) Use this button to turn on or off when the main power is supplied and the projector is in standby or idle mode. See the Status Indicator section on page E-123 for more details. POWER Indicator ( ) When this indicator is green, the... projector is not attached properly or the projector has overheated. See the Power Indicator section on page E-123 for more details. 3. E-8 STATUS Indicator If this light blinks red ...

User Manual
Page 9
... → ... CANCEL Button Press this button quickly to adjust. Press and release this button to adjust Position-H/V and Pixel Clock/Phase for a minimum of the Projector Ͼ Top Features 4. SELECT Volume Buttons ̆̄ : Use these buttons work as a PC, VCR, DVD player, Viewer (PC card), or LAN. When no input...
... → ... CANCEL Button Press this button quickly to adjust. Press and release this button to adjust Position-H/V and Pixel Clock/Phase for a minimum of the Projector Ͼ Top Features 4. SELECT Volume Buttons ̆̄ : Use these buttons work as a PC, VCR, DVD player, Viewer (PC card), or LAN. When no input...

User Manual
Page 10
... the projection lamp has exceeded 1500 hours (up to correct the keystone (trapezoidal) distortion, and make the image square. INTRODUCTION Ͼ Part Names of the Projector Ͼ Top Features ̇̈ : Use these ̆̄̇̈ buttons move the cursor in Eco mode) of service.
... the projection lamp has exceeded 1500 hours (up to correct the keystone (trapezoidal) distortion, and make the image square. INTRODUCTION Ͼ Part Names of the Projector Ͼ Top Features ̇̈ : Use these ̆̄̇̈ buttons move the cursor in Eco mode) of service.

User Manual
Page 11
... RGB analog signal set on RGBOUT Terminal is where you to an external monitor from your computer image to connect a component video output of the Projector Ͼ Terminal Panel Features Terminal Panel Features 13 12 9 10 11 3 5 8 76 1 2 4 1. See page E-29 for more details. 2. This connector also supports SCART output signal...
... RGB analog signal set on RGBOUT Terminal is where you to an external monitor from your computer image to connect a component video output of the Projector Ͼ Terminal Panel Features Terminal Panel Features 13 12 9 10 11 3 5 8 76 1 2 4 1. See page E-29 for more details. 2. This connector also supports SCART output signal...

User Manual
Page 12
...player, laser disc player, or document camera here to control your left channel audio input for stereo sound from the VIDEO source. A cap is your projector via a serial cable. Note that there is no audio output from this port. This enables you must first have Dynamic Image Utility 2.0 installed on... an additional audio equipment here to listen to use your PC to project video. 8. If you connect the S-Video input from your PC. The NEC optional serial cable (CA03D) is where you are writing your own program, typical PC control codes are on your computer, Video or S-
...player, laser disc player, or document camera here to control your left channel audio input for stereo sound from the VIDEO source. A cap is your projector via a serial cable. Note that there is no audio output from this port. This enables you must first have Dynamic Image Utility 2.0 installed on... an additional audio equipment here to listen to use your PC to project video. 8. If you connect the S-Video input from your PC. The NEC optional serial cable (CA03D) is where you are writing your own program, typical PC control codes are on your computer, Video or S-

User Manual
Page 13
... 12. E-13 PC CARD Slot Insert a PC card, commercially available LAN card or NEC optional wireless LAN card here. PC CARD Eject Button Press to a computer and that there may be some brands of the Projector Ͼ Terminal Panel Features 10. INTRODUCTION Ͼ Part Names of USB mouse that the... projector does not support. 11. You can operate your PC using the supplied USB cable. You can ...
... 12. E-13 PC CARD Slot Insert a PC card, commercially available LAN card or NEC optional wireless LAN card here. PC CARD Eject Button Press to a computer and that there may be some brands of the Projector Ͼ Terminal Panel Features 10. INTRODUCTION Ͼ Part Names of USB mouse that the... projector does not support. 11. You can operate your PC using the supplied USB cable. You can ...

User Manual
Page 14
... and hold the POWER OFF button for a minimum of two seconds. POWER OFF Button 22 You can use this button to turn your 23 projector off the projector, press SELECT ENTER CANCEL PJ ASPECT FREEZE 3D REFORM HELP POINTER VIEWER VOLUME MAGNIFY SLIDE PICTURE PIC-MUTE FOLDER SLIDE LIST 13 15 16...: If you are using a Macintosh computer, you can use this button to turn off . 24 25 NOTE: To turn your pro- 14 jector on the projector cabinet. VIDEO 1.
... and hold the POWER OFF button for a minimum of two seconds. POWER OFF Button 22 You can use this button to turn your 23 projector off the projector, press SELECT ENTER CANCEL PJ ASPECT FREEZE 3D REFORM HELP POINTER VIEWER VOLUME MAGNIFY SLIDE PICTURE PIC-MUTE FOLDER SLIDE LIST 13 15 16...: If you are using a Macintosh computer, you can use this button to turn off . 24 25 NOTE: To turn your pro- 14 jector on the projector cabinet. VIDEO 1.

User Manual
Page 16
...pointer. INTRODUCTION Ͼ Part Names of 2 seconds, the drag mode is set. When you wish to switch the SELECT, CANCEL, and ENTER buttons between the Projector mode (lit red) and the Computer mode. SELECT ̆̄̇̈ (Mouse) Button When you are for a minimum of the Remote Control 13.... When you are in the Computer mode, these ̆̄̇̈ buttons are in the Projector mode, which is indicated by lighting the PJ button: Use this button to the Computer mode, press the PJ button again. See page E-9. 15....
...pointer. INTRODUCTION Ͼ Part Names of 2 seconds, the drag mode is set. When you wish to switch the SELECT, CANCEL, and ENTER buttons between the Projector mode (lit red) and the Computer mode. SELECT ̆̄̇̈ (Mouse) Button When you are for a minimum of the Remote Control 13.... When you are in the Computer mode, these ̆̄̇̈ buttons are in the Projector mode, which is indicated by lighting the PJ button: Use this button to the Computer mode, press the PJ button again. See page E-9. 15....

User Manual
Page 18
... image and sound without turning off the image and sound for a short period of folders included in the Projector mode. If no buttons are pressed within 60 seconds, the light goes out and the Projector mode is displayed, a press of the Remote Control 25. PICTURE MUTE Button This button turns off the...
... image and sound without turning off the image and sound for a short period of folders included in the Projector mode. If no buttons are pressed within 60 seconds, the light goes out and the Projector mode is displayed, a press of the Remote Control 25. PICTURE MUTE Button This button turns off the...

User Manual
Page 20
...if there are objects between the remote control and the sensor, or if strong light falls on the projector cabinet. • The projector will also prevent the remote control from properly operating the projector. INTRODUCTION Ͼ Part Names of the Remote Control Remote Control Precautions • Handle the remote control... types of batteries together Operating Range 7m/22 feet 30˚ 30˚ 7m/22 feet 30˚ 30˚ Remote sensor on the projector cabinet Remote control • The infrared signal operates by line-of-sight up to a distance of about 22 feet/7 m and within a 60...
...if there are objects between the remote control and the sensor, or if strong light falls on the projector cabinet. • The projector will also prevent the remote control from properly operating the projector. INTRODUCTION Ͼ Part Names of the Remote Control Remote Control Precautions • Handle the remote control... types of batteries together Operating Range 7m/22 feet 30˚ 30˚ 7m/22 feet 30˚ 30˚ Remote sensor on the projector cabinet Remote control • The infrared signal operates by line-of-sight up to a distance of about 22 feet/7 m and within a 60...

User Manual
Page 21
... are disconnected before you get started, you must first: z Set up a screen and the projector. See page E- 28. E-21 x Connect your projector and how to the projector. See page E-36. When moving the projector. Your projector is not in use . INSTALLATION AND CONNECTIONS This section describes how to set up your computer... or video equipment to connect video and audio sources. 1 2 3 To the wall outlet. But before moving the projector or when it is simple to set up and use , cover the lens with the lens cap. c Connect the supplied power cable.
... are disconnected before you get started, you must first: z Set up a screen and the projector. See page E- 28. E-21 x Connect your projector and how to the projector. See page E-36. When moving the projector. Your projector is not in use . INSTALLATION AND CONNECTIONS This section describes how to set up your computer... or video equipment to connect video and audio sources. 1 2 3 To the wall outlet. But before moving the projector or when it is simple to set up and use , cover the lens with the lens cap. c Connect the supplied power cable.

User Manual
Page 22
... from the wall or screen. The minimum size the image can be is approximately 30" (0.8 m) measured diagonally when the projector is about 80.83 feet (24.64 m) from the wall or screen. Use the drawing below as a guide. 61.0(W81)ן.3(4W51).27&#.../.290.34)8.8(/62.98/.922.6) Distance (Unit: m/feet) NOTE: Values in parentheses for LT240. The largest the image can be is 500" (12.7 m) when the projector is roughly 4 feet (1.3 m) from the screen or wall, the larger the image. E-22
... from the wall or screen. The minimum size the image can be is approximately 30" (0.8 m) measured diagonally when the projector is about 80.83 feet (24.64 m) from the wall or screen. Use the drawing below as a guide. 61.0(W81)ן.3(4W51).27&#.../.290.34)8.8(/62.98/.922.6) Distance (Unit: m/feet) NOTE: Values in parentheses for LT240. The largest the image can be is 500" (12.7 m) when the projector is roughly 4 feet (1.3 m) from the screen or wall, the larger the image. E-22

User Manual
Page 23
Refer to the table to determine the position of screen α = Throw angle E-23 Distance Chart Screen Width Screen Height Screen Diagonal Screen center (B) Screen Bottom (D) Lens Center Throw Angle (Ͱ) Throw Distance (C) B = Vertical distance between lens center and screen center C = Throw distance D = Vertical distance between lens center and bottom of installation. INSTALLATION AND CONNECTIONS Ͼ Setting Up the Screen and theProjector Throw Distance and Screen Size The following shows the proper relative positions of the projector and screen.
Refer to the table to determine the position of screen α = Throw angle E-23 Distance Chart Screen Width Screen Height Screen Diagonal Screen center (B) Screen Bottom (D) Lens Center Throw Angle (Ͱ) Throw Distance (C) B = Vertical distance between lens center and screen center C = Throw distance D = Vertical distance between lens center and bottom of installation. INSTALLATION AND CONNECTIONS Ͼ Setting Up the Screen and theProjector Throw Distance and Screen Size The following shows the proper relative positions of the projector and screen.


