

User Manual
Page 1
LCD Projector MultiSync MT840/MT1040/MT1045 User's Manual
LCD Projector MultiSync MT840/MT1040/MT1045 User's Manual
User Manual
Page 2
... frequency energy and, if not installed and used in which case the user will be read this manual carefully before using your NEC MultiSync MT840/MT1040/MT1045 Projector and keep the manual handy for a Class A digital device, pursuant to comply with this unit has been provided. CAUTION TO... PREVENT SHOCK, DO NOT OPEN THE CABINET. ALL SERVICING MUST BE DONE BY QUALIFIED NEC SERVICE PERSONNEL. E-2 This equipment has been tested and...
... frequency energy and, if not installed and used in which case the user will be read this manual carefully before using your NEC MultiSync MT840/MT1040/MT1045 Projector and keep the manual handy for a Class A digital device, pursuant to comply with this unit has been provided. CAUTION TO... PREVENT SHOCK, DO NOT OPEN THE CABINET. ALL SERVICING MUST BE DONE BY QUALIFIED NEC SERVICE PERSONNEL. E-2 This equipment has been tested and...
User Manual
Page 3
... as alcohol or thinner. 3. Never use a mild detergent. Important Safeguards These safety instructions are to ensure the long life of your projector and to direct sunlight, smoke or steam can harm in- Installation 1. Exposure to prevent fire and shock. Handle your dealer for an... extended period of bodily injury. b. The projector is not to operate on the ceiling: a. If the projector is designed to be used for more information. Clean the cabinet periodically with any local building codes. Dropping ...
... as alcohol or thinner. 3. Never use a mild detergent. Important Safeguards These safety instructions are to ensure the long life of your projector and to direct sunlight, smoke or steam can harm in- Installation 1. Exposure to prevent fire and shock. Handle your dealer for an... extended period of bodily injury. b. The projector is not to operate on the ceiling: a. If the projector is designed to be used for more information. Clean the cabinet periodically with any local building codes. Dropping ...

User Manual
Page 4
... the pieces of use the lamp after turning off the projector. If you continue to the heat emitted from falling into the laser pointer while it immediately and have the object removed by a qualified NEC service personnel. 3. If this happens, contact your NEC dealer for lamp replacement. • Allow a minimum of ONE minute...
... the pieces of use the lamp after turning off the projector. If you continue to the heat emitted from falling into the laser pointer while it immediately and have the object removed by a qualified NEC service personnel. 3. If this happens, contact your NEC dealer for lamp replacement. • Allow a minimum of ONE minute...
User Manual
Page 5
... Control Features E-10 2. TROUBLESHOOTING Status Light Messages E-35 Common Problems & Solutions E-35 6. INTRODUCTION Introduction to Know Your MultiSync MT840/MT1040/MT1045 Projector ..... OPERATION General Controls E-17 Using the Menus E-17 Using a USB Mouse E-17 Menu Tree E-18 Menu Elements E-19 Menu Descriptions & ... Options E-24 Tools E-24 Capture E-24 PC Card Files E-25 ChalkBoard E-25 Help E-25 Contents E-25 Source Information E-25 Projector Information E-25 Using the PC Card Viewer Fucntion E-26 Features E-26 Inserting and Ejecting a PC Card E-26 Installing the PC ...
... Control Features E-10 2. TROUBLESHOOTING Status Light Messages E-35 Common Problems & Solutions E-35 6. INTRODUCTION Introduction to Know Your MultiSync MT840/MT1040/MT1045 Projector ..... OPERATION General Controls E-17 Using the Menus E-17 Using a USB Mouse E-17 Menu Tree E-18 Menu Elements E-19 Menu Descriptions & ... Options E-24 Tools E-24 Capture E-24 PC Card Files E-25 ChalkBoard E-25 Help E-25 Contents E-25 Source Information E-25 Projector Information E-25 Using the PC Card Viewer Fucntion E-26 Features E-26 Inserting and Ejecting a PC Card E-26 Installing the PC ...
User Manual
Page 6
...doesn't apply, you 'll find an overview. offers a crisp image with NEC technology's Advanced AccuBlend on MT1040/MT1045. *4 The USB terminal meets the USB1.0 specification and accepts a USB mouse only. and Canada. The projector must be used in remote mouse receiver. • You can skip it... supplied remote control can be installed by qualified technicians in order to take your new MultiSync MT840 (SVGA)/ MT1040 and MT1045 (XGA) Projector describes the features and controls. Please consult your PC or Macintosh computer (desktop or notebook), VCR, DVD player, document camera, or ...
...doesn't apply, you 'll find an overview. offers a crisp image with NEC technology's Advanced AccuBlend on MT1040/MT1045. *4 The USB terminal meets the USB1.0 specification and accepts a USB mouse only. and Canada. The projector must be used in remote mouse receiver. • You can skip it... supplied remote control can be installed by qualified technicians in order to take your new MultiSync MT840 (SVGA)/ MT1040 and MT1045 (XGA) Projector describes the features and controls. Please consult your PC or Macintosh computer (desktop or notebook), VCR, DVD player, document camera, or ...

User Manual
Page 7
Getting to Know Your MultiSync MT840/MT1040/MT1045 Projector Front Features Controls USB (Mouse) Terminal Zoom Remote Sensor STATPUOSWER ENTER ON/OFF SELECT CANCEL SOURCE MENU USB PC Card Access Slot Slot for Kensington ...
Getting to Know Your MultiSync MT840/MT1040/MT1045 Projector Front Features Controls USB (Mouse) Terminal Zoom Remote Sensor STATPUOSWER ENTER ON/OFF SELECT CANCEL SOURCE MENU USB PC Card Access Slot Slot for Kensington ...
User Manual
Page 8
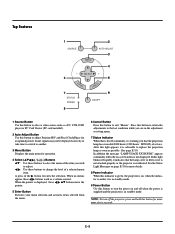
... Status Indicator When this button for minimum of the ᮣ button executes the selection. E-8 NOTE: To turn the power on and off the projector, press and hold this is lit red continually, it is advisable to replace the projection lamp as soon as possible. (See page E-33) ... in standby mode. 9 Power Button Use this light appears, it 's warning you that the lamp cover or filter cover is not attached properly or the projector is overheated. Top Features 1 SOURCE MENU 2 AUTO ADJUST 3 4 SELECT 5 6 L E NTER CANCE 7 STATUS POWER 9 ON/OFF 8 1 Source Button Use this button to ...
... Status Indicator When this button for minimum of the ᮣ button executes the selection. E-8 NOTE: To turn the power on and off the projector, press and hold this is lit red continually, it is advisable to replace the projection lamp as soon as possible. (See page E-33) ... in standby mode. 9 Power Button Use this light appears, it 's warning you that the lamp cover or filter cover is not attached properly or the projector is overheated. Top Features 1 SOURCE MENU 2 AUTO ADJUST 3 4 SELECT 5 6 L E NTER CANCE 7 STATUS POWER 9 ON/OFF 8 1 Source Button Use this button to ...

User Manual
Page 9
... RGB source. Use the signal cable that there may be some brands of Kensington Microware Inc. RGB Input 2 Connector(Mini D-Sub 15 pin) Connect your projector. You can operate the menu or Viewer with a computer and that 's supplied to connect to operate your computer's mouse functions from the remote control. 7 Remote...
... RGB source. Use the signal cable that there may be some brands of Kensington Microware Inc. RGB Input 2 Connector(Mini D-Sub 15 pin) Connect your projector. You can operate the menu or Viewer with a computer and that 's supplied to connect to operate your computer's mouse functions from the remote control. 7 Remote...

User Manual
Page 10
...the last condition while you are using a Macintosh computer, you can move the pointer. This pad is indicated by lighting the Computer/Projector Select button. After you make your on the screen using the Mouse button. press again to hide the pointer. Remote Control 16 ...11 15 POWER OFF ON 12 COMPUTER PJ PROJECTOR SOURCE AUTO ADJ. 13 1 S A 2 3 MENU LASER 14 - + 6 4 (Underneath) 5 CANCEL R-CLICK 8 HELP POINTER PIC-MUTE ? 9 MAGNIFY + 7 10 Remote Jack Connect...
...the last condition while you are using a Macintosh computer, you can move the pointer. This pad is indicated by lighting the Computer/Projector Select button. After you make your on the screen using the Mouse button. press again to hide the pointer. Remote Control 16 ...11 15 POWER OFF ON 12 COMPUTER PJ PROJECTOR SOURCE AUTO ADJ. 13 1 S A 2 3 MENU LASER 14 - + 6 4 (Underneath) 5 CANCEL R-CLICK 8 HELP POINTER PIC-MUTE ? 9 MAGNIFY + 7 10 Remote Jack Connect...

User Manual
Page 11
... control works as your computer mouse. When lit, you can use the laser to draw your audience's attention to switch between "Computer" and "Projector". If no buttons are in red to restore the image and sound. 10 Help Button Provides information about operation and adjustment procedures or the set...15 Laser Pointer Beams a laser light when "Laser" button is pressed. 16 Infrared Transmitter Direct the remote control toward the remote sensor on the projector cabinet. This also displays information how to use the Help. 11 Power On And Off If power is applied, you can use this mode only...
... control works as your computer mouse. When lit, you can use the laser to draw your audience's attention to switch between "Computer" and "Projector". If no buttons are in red to restore the image and sound. 10 Help Button Provides information about operation and adjustment procedures or the set...15 Laser Pointer Beams a laser light when "Laser" button is pressed. 16 Infrared Transmitter Direct the remote control toward the remote sensor on the projector cabinet. This also displays information how to use the Help. 11 Power On And Off If power is applied, you can use this mode only...

User Manual
Page 12
...position vertically on a flat level surface at the optimal distance from the screen or wall, the larger the image. Adjust the size of the projector.) Adjusting the Tilt Foot AUTO ADJUST MENU SOURCE SELECT CANCEL ON/OFF POWSETRATUS AC IN AC IN Selecting a Location The further your image. 2.... Set up a screen or select a non-glossy white wall onto which you must first: 1. When moving the projector. Side view Screen AC IN Attaching the lens cap to release the Front Adjustable foot. The minimum size the image can be is approximately 30...
...position vertically on a flat level surface at the optimal distance from the screen or wall, the larger the image. Adjust the size of the projector.) Adjusting the Tilt Foot AUTO ADJUST MENU SOURCE SELECT CANCEL ON/OFF POWSETRATUS AC IN AC IN Selecting a Location The further your image. 2.... Set up a screen or select a non-glossy white wall onto which you must first: 1. When moving the projector. Side view Screen AC IN Attaching the lens cap to release the Front Adjustable foot. The minimum size the image can be is approximately 30...

User Manual
Page 13
E-13 Distance Chart Screen Top Throwing Distance (S) Screen (inch) H V Q Screen center Throwing Angle (U) V D R Screen Bottom P=2.89"(73.5mm) Projector foot Lens Center MT840 Screen Size D Magnification K Throwing Distance S Throwing Angle U V Q R P Q+P MT1040 Screen Size D Magnification K Throwing Distance S Throwing Angle U V Q R P Q+P MT1045 Screen Size D Magnification K Throwing Distance S ...
E-13 Distance Chart Screen Top Throwing Distance (S) Screen (inch) H V Q Screen center Throwing Angle (U) V D R Screen Bottom P=2.89"(73.5mm) Projector foot Lens Center MT840 Screen Size D Magnification K Throwing Distance S Throwing Angle U V Q R P Q+P MT1040 Screen Size D Magnification K Throwing Distance S Throwing Angle U V Q R P Q+P MT1045 Screen Size D Magnification K Throwing Distance S ...

User Manual
Page 14
... image. fied technician. If you need a mirror. Contact your NEC dealer for more information. * Do not attempt to install the projector yourself. • Only use the "Menu" and "Select" buttons on your projector cabinet or vw buttons on your projector's image enables you to the ground, you can dissipate. This ...will harm the screen image. • Ensure that you have adequate ventilation around your NEC dealer if you 're using a mirror and your image is upside down, use the projector where temperatures vary greatly. Do not cover the vents on the side or the front of the...
... image. fied technician. If you need a mirror. Contact your NEC dealer for more information. * Do not attempt to install the projector yourself. • Only use the "Menu" and "Select" buttons on your projector cabinet or vw buttons on your projector's image enables you to the ground, you can dissipate. This ...will harm the screen image. • Ensure that you have adequate ventilation around your NEC dealer if you 're using a mirror and your image is upside down, use the projector where temperatures vary greatly. Do not cover the vents on the side or the front of the...

User Manual
Page 15
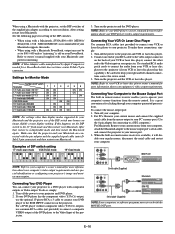
...computer to a PC or Macintosh, simply: 1. Document Camera To video, S-video, and audio VCR, DVD Player or LaserDisc Player inputs on the projector and the computer. 4. Remote Control Guideline for the Remote Control 1. Plug the supplied serial cable with a notebook PC, be caused by a screen... output unless the notebook PC is recommended that 's supplied to connect your computer's screen image for an impressive presentation. If the projector goes blank after connecting with component output) Optional Component V cable Signal cable (supplied) To mini D-Sub 15-pin connector on the...
...computer to a PC or Macintosh, simply: 1. Document Camera To video, S-video, and audio VCR, DVD Player or LaserDisc Player inputs on the projector and the computer. 4. Remote Control Guideline for the Remote Control 1. Plug the supplied serial cable with a notebook PC, be caused by a screen... output unless the notebook PC is recommended that 's supplied to connect your computer's screen image for an impressive presentation. If the projector goes blank after connecting with component output) Optional Component V cable Signal cable (supplied) To mini D-Sub 15-pin connector on the...
User Manual
Page 16
... Refer to your DVD player's owner's manual for more information about your computer's video output requirements and any special identification or configuring your projector's image and monitor may not work with component outputs or Video output. Connecting Your VCR Or Laser Disc Player Use common RCA cables ...connect the supplied serial cable from the mouse output to your PC's mouse port. (Use the 6-pin adapter for more information about your projector to the projector and VCR or laser disc player. 2. See the following pages for stereo sound. 3. Turn off the power to a DVD player ...
... Refer to your DVD player's owner's manual for more information about your computer's video output requirements and any special identification or configuring your projector's image and monitor may not work with component outputs or Video output. Connecting Your VCR Or Laser Disc Player Use common RCA cables ...connect the supplied serial cable from the mouse output to your PC's mouse port. (Use the 6-pin adapter for more information about your projector to the projector and VCR or laser disc player. 2. See the following pages for stereo sound. 3. Turn off the power to a DVD player ...

User Manual
Page 17
...Then, unplug the power cable. NOTE: When using "Select" ᮤ or ᮣ buttons on the cabinet, or the "Mouse pad" on the Projector Plug the supplied power cable in the background. NOTE:There may not be restarted. Or click and drag the mouse button on the remote control...adjust an additional item, or press "Cancel" on the remote control to obtain the best focus. Use the "Magnify" button (+) or (-) on the projector cabinet or the remote control to adjust the brightness. A commercially available USB mouse is present. • Do not turn off the image and sound ...
...Then, unplug the power cable. NOTE: When using "Select" ᮤ or ᮣ buttons on the cabinet, or the "Mouse pad" on the Projector Plug the supplied power cable in the background. NOTE:There may not be restarted. Or click and drag the mouse button on the remote control...adjust an additional item, or press "Cancel" on the remote control to obtain the best focus. Use the "Magnify" button (+) or (-) on the projector cabinet or the remote control to adjust the brightness. A commercially available USB mouse is present. • Do not turn off the image and sound ...

User Manual
Page 18
... Temperature All Keystone All Factory Default Image Options Image Mode Video Mode Projector Options Menu Setup Tools Capture PC Card Files ChalkBoard Help Contents Source Information Projector Information NOTE: Adjustable sources R=RGB V=Video/S-Video C=Component All=All sources... Signal R, V, C R, V, C V, C V, C V R R R R Aspect Ratio V, C Gamma Noise Reduction Color Matrix Language Source Display Projector Pointer Orientation Background Signal Select Auto Start Power Management Power Off Confirmation Mouse Button Mouse Sensitivity Clear Lamp Hour Meter Keystone Save Fan High Speed...
... Temperature All Keystone All Factory Default Image Options Image Mode Video Mode Projector Options Menu Setup Tools Capture PC Card Files ChalkBoard Help Contents Source Information Projector Information NOTE: Adjustable sources R=RGB V=Video/S-Video C=Component All=All sources... Signal R, V, C R, V, C V, C V, C V R R R R Aspect Ratio V, C Gamma Noise Reduction Color Matrix Language Source Display Projector Pointer Orientation Background Signal Select Auto Start Power Management Power Off Confirmation Mouse Button Mouse Sensitivity Clear Lamp Hour Meter Keystone Save Fan High Speed...
User Manual
Page 20
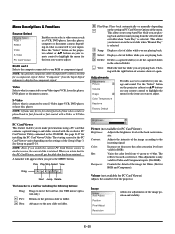
...a component signal. Delete: Deletes a captured slide(s) or all the captured slides in the CD-ROM. Use the "Select" button on the projector cabinet or vw buttons on your Video input-VCR, laser disc player, DVD player or document camera. sity. Sharpness: Controls the detail of the...Enables you to select a video source such as reference. Press the "Select" button on the projector cabinet or vw buttons on your remote control to highlight the menu for a brief period of the projector. RGB1 and 2 Selects the computer connected to adjust. NOTE: An optional component cable (Component ...
...a component signal. Delete: Deletes a captured slide(s) or all the captured slides in the CD-ROM. Use the "Select" button on the projector cabinet or vw buttons on your Video input-VCR, laser disc player, DVD player or document camera. sity. Sharpness: Controls the detail of the...Enables you to select a video source such as reference. Press the "Select" button on the projector cabinet or vw buttons on your remote control to highlight the menu for a brief period of the projector. RGB1 and 2 Selects the computer connected to adjust. NOTE: An optional component cable (Component ...
User Manual
Page 21
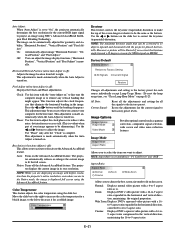
... AccuBlend feature. Native: Turns off ): Displays the Clock and Phase adjustments. Color Temperature This feature adjusts the color temperature using NEC's Advanced AccuBlend Intelligent Pixel Blending Technology. Image Options Image Options Image Mode Video Mode Provides optional controls such as is. "Horizontal...Adjust is off ): This allows you connect your image appears to be corrected is 15 degrees upward and downward with the projector placed horizontally. This adjustment may be blurred if you are in the vertical direction, maintaining the 16-to decrease it for ...
... AccuBlend feature. Native: Turns off ): Displays the Clock and Phase adjustments. Color Temperature This feature adjusts the color temperature using NEC's Advanced AccuBlend Intelligent Pixel Blending Technology. Image Options Image Options Image Mode Video Mode Provides optional controls such as is. "Horizontal...Adjust is off ): This allows you connect your image appears to be corrected is 15 degrees upward and downward with the projector placed horizontally. This adjustment may be blurred if you are in the vertical direction, maintaining the 16-to decrease it for ...

