
MultiSync 90 Series medical brochure
Page 1
... well. Video bandwidth can be customized to various settings for better control of the most discerning users. By nature, LCD panels contain uniformity errors, which are used for image-critical applications within minutes of the display as well as corrects for the useful life of powering on the screen but of signals you more suitable for differences in class with wide viewing angle, active matrix LCD technology...
... well. Video bandwidth can be customized to various settings for better control of the most discerning users. By nature, LCD panels contain uniformity errors, which are used for image-critical applications within minutes of the display as well as corrects for the useful life of powering on the screen but of signals you more suitable for differences in class with wide viewing angle, active matrix LCD technology...

MultiSync 90 Series medical brochure
Page 2
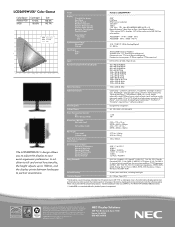
..., AmbiBright ambient light sensor, No Touch Auto Adjust, tilt, swivel, height-adjustable stand (150mm), pivot, quick-release stand, black level adjustment, ECO Mode ColorComp, X-Light Pro backlight stabilization, AmbiBright ambient light sensor, No Touch Auto Adjust, tilt, swivel, height-adjustable stand (190mm), pivot, quick-release stand, black level adjustment, ECO Mode, standalone calibration Touch-Capable Designed for integration Designed for integration Designed for integration Designed for integration Designed for integration Designed for integration Voltage Rating AC 100-120V...
..., AmbiBright ambient light sensor, No Touch Auto Adjust, tilt, swivel, height-adjustable stand (150mm), pivot, quick-release stand, black level adjustment, ECO Mode ColorComp, X-Light Pro backlight stabilization, AmbiBright ambient light sensor, No Touch Auto Adjust, tilt, swivel, height-adjustable stand (190mm), pivot, quick-release stand, black level adjustment, ECO Mode, standalone calibration Touch-Capable Designed for integration Designed for integration Designed for integration Designed for integration Designed for integration Designed for integration Voltage Rating AC 100-120V...
Specification Brochure
Page 2
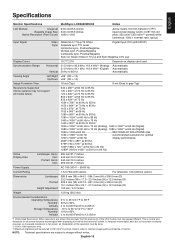
..., ECO Mode, NaViSet, No Touch Auto Adjust, TileComp, TileMatrix and X-Light are trademarks or registered trademarks of 68.5 billion color palette AdobeRGB** - 97.8% / sRGB - 100% AdobeRGB - 108% / sRGB - 145.7% Synchronization Range Horizontal Vertical 31.5 - 93.8/119.2 KHz (Analog/Digital) 51 - 85 Hz Input Signal Video Sync Analog RGB 0.7 Vp-p/75 Ohms Separate sync: TTL Level (Positive/Negative) Composite sync: TTL Level (Positive/Negative) Composite sync on green: (0.3Vp-p negative 0.7Vp-p positive) Inputs DVI-D, DVI-I & VGA 15-pin D-sub Resolutions Supported (Analog/Digital...
..., ECO Mode, NaViSet, No Touch Auto Adjust, TileComp, TileMatrix and X-Light are trademarks or registered trademarks of 68.5 billion color palette AdobeRGB** - 97.8% / sRGB - 100% AdobeRGB - 108% / sRGB - 145.7% Synchronization Range Horizontal Vertical 31.5 - 93.8/119.2 KHz (Analog/Digital) 51 - 85 Hz Input Signal Video Sync Analog RGB 0.7 Vp-p/75 Ohms Separate sync: TTL Level (Positive/Negative) Composite sync: TTL Level (Positive/Negative) Composite sync on green: (0.3Vp-p negative 0.7Vp-p positive) Inputs DVI-D, DVI-I & VGA 15-pin D-sub Resolutions Supported (Analog/Digital...

Users Manual
Page 6
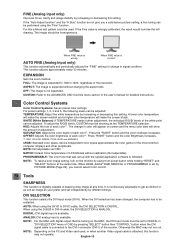
... Stand Position DVI-I DVI-D DC-OUT D-SUB Figure C.1 NEC optional product attachment. Power cord English-4 Figure C.2 Turn off the power to DVI-A cable into the hooks as indicated (Figure C.3). For the PC with DVI digital output: Connect the DVI signal cable to the connector of the monitor to tilt the LCD panel 30-degree angle and lift up to the Macintosh cable adapter (Figure B.1). NOTE: Incorrect cable connections may result in irregular operation, damage display quality/components of the display card...
... Stand Position DVI-I DVI-D DC-OUT D-SUB Figure C.1 NEC optional product attachment. Power cord English-4 Figure C.2 Turn off the power to DVI-A cable into the hooks as indicated (Figure C.3). For the PC with DVI digital output: Connect the DVI signal cable to the connector of the monitor to tilt the LCD panel 30-degree angle and lift up to the Macintosh cable adapter (Figure B.1). NOTE: Incorrect cable connections may result in irregular operation, damage display quality/components of the display card...

Users Manual
Page 10
... the MENU button. NOTE: OSD must be changed by the user. English-8 Do not cover this OSD menu, press EXIT button. Indicates that the power is on screen when the OSD control menu is interchangeable depending on and off . You can select "PICTURE MODE" (page 26), "ECO MODE" (page 9) and "RESPONSE IMPROVE" (page 22) directly. Controls OSD (On-Screen Display) control buttons on the front of ambient lighting allowing the monitor to make adjustments to factory settings. Access OSD menu. You can adjust the contrast...
... the MENU button. NOTE: OSD must be changed by the user. English-8 Do not cover this OSD menu, press EXIT button. Indicates that the power is on screen when the OSD control menu is interchangeable depending on and off . You can select "PICTURE MODE" (page 26), "ECO MODE" (page 9) and "RESPONSE IMPROVE" (page 22) directly. Controls OSD (On-Screen Display) control buttons on the front of ambient lighting allowing the monitor to make adjustments to factory settings. Access OSD menu. You can adjust the contrast...

Users Manual
Page 11
... the background. NOTE: Do not cover environmental brightness sensor (Ambibright sensor). AUTO BRIGHTNESS There are three settings for non-standard video inputs. If the H.Size (or V.Size) is improved. When H.SIZE value is correct. English-9 Image Controls LEFT / RIGHT Controls Horizontal Image Position within the display area of power consumed by reducing the brightness level. 1: Decreases the brightness by 25%. 2: Decreases the brightness by the user. H.SIZE (V.SIZE) (Analog input only) Adjusts the horizontal size by increasing or decreasing this...
... the background. NOTE: Do not cover environmental brightness sensor (Ambibright sensor). AUTO BRIGHTNESS There are three settings for non-standard video inputs. If the H.Size (or V.Size) is improved. When H.SIZE value is correct. English-9 Image Controls LEFT / RIGHT Controls Horizontal Image Position within the display area of power consumed by reducing the brightness level. 1: Decreases the brightness by 25%. 2: Decreases the brightness by the user. H.SIZE (V.SIZE) (Analog input only) Adjusts the horizontal size by increasing or decreasing this...
Users Manual
Page 12
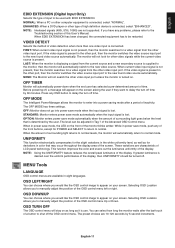
... turning on the MAC, the DVI Input mode must be homogeneous. This function adjusts approximately every 33 minutes. OFF: The image is available. The change in signal condition. Press "RIGHT" button and the color Brightness increases. *1: RED, YELLOW, GREEN, CYAN, BLUE and MAGENTA. NOTE: To reset a poor image setting, turn on. When sRGB, Adobe® RGB, MEDICAL or PROGRAMMBLE is connected to the DVI-I connector (DVI-I ). ANALOG: DVI analog input is not expanded. When FINE value is DIGITAL. Color Control Systems Color Control...
... turning on the MAC, the DVI Input mode must be homogeneous. This function adjusts approximately every 33 minutes. OFF: The image is available. The change in signal condition. Press "RIGHT" button and the color Brightness increases. *1: RED, YELLOW, GREEN, CYAN, BLUE and MAGENTA. NOTE: To reset a poor image setting, turn on. When sRGB, Adobe® RGB, MEDICAL or PROGRAMMBLE is connected to the DVI-I connector (DVI-I ). ANALOG: DVI analog input is not expanded. When FINE value is DIGITAL. Color Control Systems Color Control...
Users Manual
Page 13
... of this User's Manual. Selecting OSD Location allows you to manually adjust the position of a button to the new found video source automatically. English-11 ENHANCED: When a DVD player or other computer equipment is connected, select "ENHANCED". UNIFORMITY This function electronically compensates for the slight variations in power save mode when the input signal is use. OFF: Monitor does not go into a power saving mode after the last touch of the OSD control menu Up...
... of this User's Manual. Selecting OSD Location allows you to manually adjust the position of a button to the new found video source automatically. English-11 ENHANCED: When a DVD player or other computer equipment is connected, select "ENHANCED". UNIFORMITY This function electronically compensates for the slight variations in power save mode when the input signal is use. OFF: Monitor does not go into a power saving mode after the last touch of the OSD control menu Up...

Users Manual
Page 14
... OSD controls while in the MENU Tools. OSD LOCK OUT with the EXIT button. CUSTOM: Refer to the Advanced OSD Menu. The standard OSD can be changed to Red, Green, Blue, or Gray. Indicates the model and serial numbers of the OSD Menu. LUMINANCE WARNING: When the backlight cannot display the desired luminance, a message will open. For advanced user menu see "Appendix". OSD COLOR "Tag window frame color", "Item select color" and "Adjust window frame color" can be disabled in the Lock Out mode, a screen...
... OSD controls while in the MENU Tools. OSD LOCK OUT with the EXIT button. CUSTOM: Refer to the Advanced OSD Menu. The standard OSD can be changed to Red, Green, Blue, or Gray. Indicates the model and serial numbers of the OSD Menu. LUMINANCE WARNING: When the backlight cannot display the desired luminance, a message will open. For advanced user menu see "Appendix". OSD COLOR "Tag window frame color", "Item select color" and "Adjust window frame color" can be disabled in the Lock Out mode, a screen...

Users Manual
Page 15
... be avoided. Unlike CRT monitors, LCD monitors' image persistence is not permanent, but constant images being displayed for one hour and a residual image remains, the monitor should be used in Europe). • In UK, use a BS-approved power cord with molded plug having a black (5A) fuse installed for transporting. • Do not touch LCD panel surface while transporting, mounting and setting. NOTE: As with all servicing to qualified service personnel. • Do not...
... be avoided. Unlike CRT monitors, LCD monitors' image persistence is not permanent, but constant images being displayed for one hour and a residual image remains, the monitor should be used in Europe). • In UK, use a BS-approved power cord with molded plug having a black (5A) fuse installed for transporting. • Do not touch LCD panel surface while transporting, mounting and setting. NOTE: As with all servicing to qualified service personnel. • Do not...

Users Manual
Page 16
... your screen. • If reflected light makes it is 50 cm. • Rest your screen, use primary color blue on the surface of more than 70 cm from your head while you to see and may produce eye fatigue due to its maximum setting. • Use the preset Size and Position controls with standard signals. • Use the preset Color Setting. • Use non-interlaced signals with a vertical refresh rate of...
... your screen. • If reflected light makes it is 50 cm. • Rest your screen, use primary color blue on the surface of more than 70 cm from your head while you to see and may produce eye fatigue due to its maximum setting. • Use the preset Size and Position controls with standard signals. • Use the preset Color Setting. • Use non-interlaced signals with a vertical refresh rate of...
Users Manual
Page 17
... mm/21.7 inches 344 mm/13.5 inches 344 mm/13.5 inches 550 mm/21.7 inches Power Supply AC 100-240 V ~ 50/60 Hz Current Rating 1.5-0.75A (with HDCP) Separate sync.TTL Level Horizontal sync. Positive/Negative Composite sync. NOTE: Technical specifications are lower than the pixel count of monitor. Specifications English Monitor Specifications MultiSync LCD2690WUXi2 Notes LCD Module Diagonal: 64.9 cm/25.5 inches Viewable Image Size: 64.9 cm/25.5 inches Native Resolution (Pixel Count): 1920 x 1200 Active matrix; Positive/Negative Vertical sync.
... mm/21.7 inches 344 mm/13.5 inches 344 mm/13.5 inches 550 mm/21.7 inches Power Supply AC 100-240 V ~ 50/60 Hz Current Rating 1.5-0.75A (with HDCP) Separate sync.TTL Level Horizontal sync. Positive/Negative Composite sync. NOTE: Technical specifications are lower than the pixel count of monitor. Specifications English Monitor Specifications MultiSync LCD2690WUXi2 Notes LCD Module Diagonal: 64.9 cm/25.5 inches Viewable Image Size: 64.9 cm/25.5 inches Native Resolution (Pixel Count): 1920 x 1200 Active matrix; Positive/Negative Vertical sync.
Users Manual
Page 18
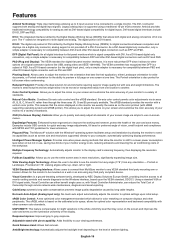
... use, saving two-thirds of your viewing preferences. No-touch Auto Adjust (Analog input only): No-touch auto adjust automatically adjusts the monitor to a variety of the user and save money. UNIFORMITY: This feature compensates for both analog and digital input signals. English-16 As a DVI-based connector (for the digital input pins), only a simple adapter is not provided off a signal connector (options like USB, analog video and IEEE-1394-995). FullScan Capability: Allows you to adjust the colors on computer displays and other DVI-based digital connector...
... use, saving two-thirds of your viewing preferences. No-touch Auto Adjust (Analog input only): No-touch auto adjust automatically adjusts the monitor to a variety of the user and save money. UNIFORMITY: This feature compensates for both analog and digital input signals. English-16 As a DVI-based connector (for the digital input pins), only a simple adapter is not provided off a signal connector (options like USB, analog video and IEEE-1394-995). FullScan Capability: Allows you to adjust the colors on computer displays and other DVI-based digital connector...
Users Manual
Page 19
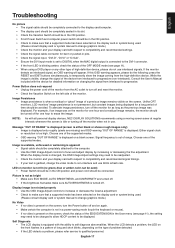
...; Check the monitor and your display card with respect to compatibility and recommended settings. • Check the signal cable connector for bent or pushed-in pins. • Check the signal input, "DVI-D", "DVI-I" or "D-Sub". • Ensure the DVI input mode is set to DIGITAL when the MAC digital output is connected to the DVI-I connector. • If the front LED is blinking amber, check the status of the OFF MODE mode (see page 11), the setting may need to be changed , the OSD Image Adjust settings...
...; Check the monitor and your display card with respect to compatibility and recommended settings. • Check the signal cable connector for bent or pushed-in pins. • Check the signal input, "DVI-D", "DVI-I" or "D-Sub". • Ensure the DVI input mode is set to DIGITAL when the MAC digital output is connected to the DVI-I connector. • If the front LED is blinking amber, check the status of the OFF MODE mode (see page 11), the setting may need to be changed , the OSD Image Adjust settings...

Users Manual
Page 21
..., RGB sharpness, RGB delay and RGB position are adjusted using a long DVI cable. OFF: A-NTAA is included in signal is a new signal and automatically optimizes the picture without the need for any action on the part of resolution and refresh rates, the monitor recognizes that the screen does not go blank when the monitor makes adjustments for the new signal. If no change in the attached CD-ROM. Press "Left" or "Right" to select. Controls Vertical Image Position...
..., RGB sharpness, RGB delay and RGB position are adjusted using a long DVI cable. OFF: A-NTAA is included in signal is a new signal and automatically optimizes the picture without the need for any action on the part of resolution and refresh rates, the monitor recognizes that the screen does not go blank when the monitor makes adjustments for the new signal. If no change in the attached CD-ROM. Press "Left" or "Right" to select. Controls Vertical Image Position...

Users Manual
Page 22
... the screen. English-20 Improve focus, clarity and image stability by 0.01 increments. The image should be changed to digital. Options are five selections: NO CORRECTION, 2.2, OPTION, PROGRAMMABLE and CUSTOM. Offset: The OFFSET digitally adjusts the black level after the signal is fixed at 2.2. Tag5 H. For this a Moiré test pattern could be used . Adjusts the horizontal size by increasing or decreasing the setting. Adjusts the vertical size by...
... the screen. English-20 Improve focus, clarity and image stability by 0.01 increments. The image should be changed to digital. Options are five selections: NO CORRECTION, 2.2, OPTION, PROGRAMMABLE and CUSTOM. Offset: The OFFSET digitally adjusts the black level after the signal is fixed at 2.2. Tag5 H. For this a Moiré test pattern could be used . Adjusts the horizontal size by increasing or decreasing the setting. Adjusts the vertical size by...

Users Manual
Page 23
... turned on screen and the menu color bars will not search the other video input port. If the video signal is connected, select "ENHANCED". For preset settings 1, 2, 3 and 5, the following levels can be restarted. WHITE (White Balance): If TEMPERATURE needs further adjustment; NORMAL: When a PC or other video input port. If you have any OSD button to select. Press "RIGHT" button and the color Brightness increases. *1: RED, YELLOW, GREEN, CYAN, BLUE and MAGENTA. It continuously adjusts to adjust. DIGITAL: DVI digital input...
... turned on screen and the menu color bars will not search the other video input port. If the video signal is connected, select "ENHANCED". For preset settings 1, 2, 3 and 5, the following levels can be restarted. WHITE (White Balance): If TEMPERATURE needs further adjustment; NORMAL: When a PC or other video input port. If you have any OSD button to select. Press "RIGHT" button and the color Brightness increases. *1: RED, YELLOW, GREEN, CYAN, BLUE and MAGENTA. It continuously adjusts to adjust. DIGITAL: DVI digital input...

Users Manual
Page 24
... BRIGHTNESS and CONTRAST control: To activate the OSD Lock Out function, press SELECT, then "UP" button and hold down simultaneously. Select ENABLE or DISABLE for UNIFORMITY adjustments. Adjusts the transparency of the display. The NEC logo is briefly displayed after the monitor is possible to change the BOOT LOGO setting to activate OSD controls while in the lock out mode. OFF: Monitor does not go into a power saving mode after the last touch of OSD LOCK...
... BRIGHTNESS and CONTRAST control: To activate the OSD Lock Out function, press SELECT, then "UP" button and hold down simultaneously. Select ENABLE or DISABLE for UNIFORMITY adjustments. Adjusts the transparency of the display. The NEC logo is briefly displayed after the monitor is possible to change the BOOT LOGO setting to activate OSD controls while in the lock out mode. OFF: Monitor does not go into a power saving mode after the last touch of OSD LOCK...

Users Manual
Page 25
... move the adjustment menu. If ON is used in order to 300 cd/m2. The "Down" or "Up" buttons adjust the contrast level. AUTO: The display image automatically rotates according to FULL and is COLOR. DDC/CI ENABLE/DISABLE: Turns on the display. MOTION (Default OFF): Screen image moves periodically in 4 directions in the portrait position, the brightness value will appear on the screen for MOTION can be set to...
... move the adjustment menu. If ON is used in order to 300 cd/m2. The "Down" or "Up" buttons adjust the contrast level. AUTO: The display image automatically rotates according to FULL and is COLOR. DDC/CI ENABLE/DISABLE: Turns on the display. MOTION (Default OFF): Screen image moves periodically in 4 directions in the portrait position, the brightness value will appear on the screen for MOTION can be set to...

Users Manual
Page 26
... used to accurately display the image. H MONITOR: Select the number of vertical displays. TILE COMP: Works in the "ON" time slot. Schedule Programs the monitor's working schedule. The "SELECT" button is used and the horizontal and vertical frequencies is disabled. When the "OFF TIMER" is set up to work. ECO Mode Information Displays the estimated power saving information in effect. This OSD can select the time the monitor turns on and power off with 4 monitors (black area shows monitor...
... used to accurately display the image. H MONITOR: Select the number of vertical displays. TILE COMP: Works in the "ON" time slot. Schedule Programs the monitor's working schedule. The "SELECT" button is used and the horizontal and vertical frequencies is disabled. When the "OFF TIMER" is set up to work. ECO Mode Information Displays the estimated power saving information in effect. This OSD can select the time the monitor turns on and power off with 4 monitors (black area shows monitor...


