MultiSync 70 Series Color Brochure
Page 1
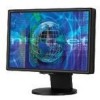
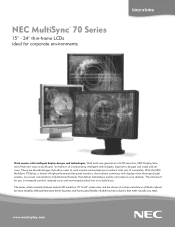
... services. The end result for corporate environments Enterprise Desktop Work smarter with displays that showcase bright screens, low power consumption and enhanced features that deliver tremendous quality and value to 24" screen sizes and the choice of high-performance flat-panel monitors, the tradition continues with intelligent display designs and technologies. www.necdisplay.com With the NEC MultiSync 70 Series, a family of a silver and white or all black...
... services. The end result for corporate environments Enterprise Desktop Work smarter with displays that showcase bright screens, low power consumption and enhanced features that deliver tremendous quality and value to 24" screen sizes and the choice of high-performance flat-panel monitors, the tradition continues with intelligent display designs and technologies. www.necdisplay.com With the NEC MultiSync 70 Series, a family of a silver and white or all black...

MultiSync 70 Series Color Brochure
Page 2
... level of the image displayed. In order to enhance the screen's contrast based on -screen, enhancing not only your viewing options. Bright ideas in front of height adjustment and capabilities for cable management, tilting and swiveling, the base adjusts to help guide the user through adjustments for a bulky power brick and the cables it requires, which further enhance user productivity. The built-in power supply eliminates the need for the MultiSync 70 Series. The MultiSync LCD1770NX, LCD1770NXM...
... level of the image displayed. In order to enhance the screen's contrast based on -screen, enhancing not only your viewing options. Bright ideas in front of height adjustment and capabilities for cable management, tilting and swiveling, the base adjusts to help guide the user through adjustments for a bulky power brick and the cables it requires, which further enhance user productivity. The built-in power supply eliminates the need for the MultiSync 70 Series. The MultiSync LCD1770NX, LCD1770NXM...
MultiSync 70 Series Color Brochure
Page 3
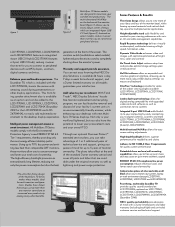
... Height-adjustable stand adds flexibility and comfort to your viewing preferences with swivel, tilt and cable management capabilities Rapid Response technology delivers virtually uninterrupted, undistorted viewing of highspeed, full-motion video Dynamic Video Mode enhances video and images with real-time optimization of brightness, color and contrast No Touch Auto Adjust reduces setup time and provides optimal image settings upon initial power-on NaViSet software offers an expanded and intuitive graphical interface, allowing you to connect...
... Height-adjustable stand adds flexibility and comfort to your viewing preferences with swivel, tilt and cable management capabilities Rapid Response technology delivers virtually uninterrupted, undistorted viewing of highspeed, full-motion video Dynamic Video Mode enhances video and images with real-time optimization of brightness, color and contrast No Touch Auto Adjust reduces setup time and provides optimal image settings upon initial power-on NaViSet software offers an expanded and intuitive graphical interface, allowing you to connect...
MultiSync 70 Series Color Brochure
Page 4
... (bezel), Ambix, Dynamic Video Mode, No Touch Auto Adjust, NaViSet software, USB 2.0, cable management, OSD user controls, sRGB, AccuColor color control, ISO 13406-2 Class II, vacation switch, height-adjustable stand, tilt, swivel Thin-frame (bezel), No Touch Auto Adjust, Dynamic Video Mode, NaViSet software, USB 2.0, sRGB, AccuColor color control, digital smoothing, digital controls, Plug and Play (VESA DDC 1/2B), VESA DPMS power management, OSD user controls, ISO 13406-2 Class II, vacation switch, height-adjustable stand, tilt, swivel, pivot, XtraView+, Ambix, Windows Vista-certified Thin...
... (bezel), Ambix, Dynamic Video Mode, No Touch Auto Adjust, NaViSet software, USB 2.0, cable management, OSD user controls, sRGB, AccuColor color control, ISO 13406-2 Class II, vacation switch, height-adjustable stand, tilt, swivel Thin-frame (bezel), No Touch Auto Adjust, Dynamic Video Mode, NaViSet software, USB 2.0, sRGB, AccuColor color control, digital smoothing, digital controls, Plug and Play (VESA DDC 1/2B), VESA DPMS power management, OSD user controls, ISO 13406-2 Class II, vacation switch, height-adjustable stand, tilt, swivel, pivot, XtraView+, Ambix, Windows Vista-certified Thin...

LCD2470WNX Users Manual
Page 3
... OF ELECTRIC SHOCK, MAKE SURE POWER CORD IS UNPLUGGED FROM WALL SOCKET. Please use the supplied USB cable with radio and television reception. (1) Please use the supplied power cord or equivalent to radio or television reception, which can radiate radio frequency energy, and, if not installed and used in accordance with any problems. Canadian Department of Communications Compliance Statement DOC: This Class B digital apparatus meets all requirements...
... OF ELECTRIC SHOCK, MAKE SURE POWER CORD IS UNPLUGGED FROM WALL SOCKET. Please use the supplied USB cable with radio and television reception. (1) Please use the supplied power cord or equivalent to radio or television reception, which can radiate radio frequency energy, and, if not installed and used in accordance with any problems. Canadian Department of Communications Compliance Statement DOC: This Class B digital apparatus meets all requirements...
LCD2470WNX Users Manual
Page 4
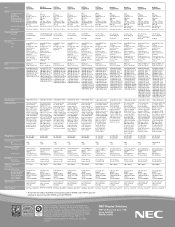
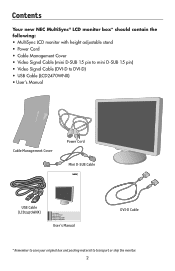
Contents Your new NEC MultiSync® LCD monitor box* should contain the following: • MultiSync LCD monitor with height adjustable stand • Power Cord • Cable Management Cover • Video Signal Cable (mini D-SUB 15 pin to mini D-SUB 15 pin) • Video Signal Cable (DVI-D to DVI-D) • USB Cable (LCD2470WNX) • User's Manual Cable Management Cover Power Cord Mini D-SUB Cable USB Cable (LCD2470WNX) User's Manual Manuel de l'utilisateur Manual del Usuario MultiSync LCD2470WNX MultiSync LCD2470WVX User's Manual DVI-D Cable * Remember to save your original box...
Contents Your new NEC MultiSync® LCD monitor box* should contain the following: • MultiSync LCD monitor with height adjustable stand • Power Cord • Cable Management Cover • Video Signal Cable (mini D-SUB 15 pin to mini D-SUB 15 pin) • Video Signal Cable (DVI-D to DVI-D) • USB Cable (LCD2470WNX) • User's Manual Cable Management Cover Power Cord Mini D-SUB Cable USB Cable (LCD2470WNX) User's Manual Manuel de l'utilisateur Manual del Usuario MultiSync LCD2470WNX MultiSync LCD2470WVX User's Manual DVI-D Cable * Remember to save your original box...

LCD2470WNX Users Manual
Page 5
... not require a Macintosh Cable Adapter 3 For MAC setup: Connect the Macintosh cable adapter to the computer, then attach the 15-pin mini D-SUB signal cable to your computer. 2. NOTE: To obtain the MultiSync Macintosh cable adapter, call NEC Display Solutions of America, Inc. Display Setup To attach the MultiSync® LCD monitor to the connector of the display card in your system (Figure 2). For the PC with DVI digital output : Connect the DVI signal cable to your system: 1.
... not require a Macintosh Cable Adapter 3 For MAC setup: Connect the Macintosh cable adapter to the computer, then attach the 15-pin mini D-SUB signal cable to your computer. 2. NOTE: To obtain the MultiSync Macintosh cable adapter, call NEC Display Solutions of America, Inc. Display Setup To attach the MultiSync® LCD monitor to the connector of the display card in your system (Figure 2). For the PC with DVI digital output : Connect the DVI signal cable to your system: 1.

LCD2470WNX Users Manual
Page 7
... connectors (Figure 8). Display Setup - If you can be adjusted to user's preference (Figure 12). Figure 8 (Pictured: LCD2470WNX) Figure 9 (Pictured: LCD2470WNX) 8. Place the attached cables into the specific hooks indicated, making sure cables are resting flat against stand (Figure 11). 10. Do not use one of the downstream ports on the computer. Place the connector cover back on the right side of the monitor can use the cord from the USB...
... connectors (Figure 8). Display Setup - If you can be adjusted to user's preference (Figure 12). Figure 8 (Pictured: LCD2470WNX) Figure 9 (Pictured: LCD2470WNX) 8. Place the attached cables into the specific hooks indicated, making sure cables are resting flat against stand (Figure 11). 10. Do not use one of the downstream ports on the computer. Place the connector cover back on the right side of the monitor can use the cord from the USB...
LCD2470WNX Users Manual
Page 8
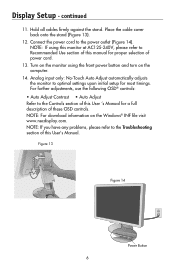
.... Analog input only: No-Touch Auto Adjust automatically adjusts the monitor to the Controls section of power cord. 13. For further adjustments, use the following OSD® controls: • Auto Adjust Contrast • Auto Adjust Refer to optimal settings upon initial setup for proper selection of this User's Manual. Turn on the monitor using this monitor at AC125-240V, please refer to Recommended Use section of these OSD controls. Figure 13 Figure 14 Power Button 6 continued 11. Place the cable cover back onto the stand (Figure...
.... Analog input only: No-Touch Auto Adjust automatically adjusts the monitor to the Controls section of power cord. 13. For further adjustments, use the following OSD® controls: • Auto Adjust Contrast • Auto Adjust Refer to optimal settings upon initial setup for proper selection of this User's Manual. Turn on the monitor using this monitor at AC125-240V, please refer to Recommended Use section of these OSD controls. Figure 13 Figure 14 Power Button 6 continued 11. Place the cable cover back onto the stand (Figure...
LCD2470WNX Users Manual
Page 10
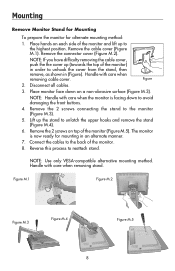
... buttons. 4. Connect the cables to the back of the monitor (Figure M.5). Figure M.1 Figure M.2 Figure M.3 Figure M.4 Figure M.5 8 Mounting Remove Monitor Stand for Mounting To prepare the monitor for mounting in (Figure). NOTE: If you have difficulty removing the cable cover, push the the cover up the stand to the highest position. Remove the 2 screws connecting the stand to reattach stand. Figure 2. Remove the connector cover (Figure M.2). Place monitor face down to unhook the cover from the stand...
... buttons. 4. Connect the cables to the back of the monitor (Figure M.5). Figure M.1 Figure M.2 Figure M.3 Figure M.4 Figure M.5 8 Mounting Remove Monitor Stand for Mounting To prepare the monitor for mounting in (Figure). NOTE: If you have difficulty removing the cable cover, push the the cover up the stand to the highest position. Remove the 2 screws connecting the stand to reattach stand. Figure 2. Remove the connector cover (Figure M.2). Place monitor face down to unhook the cover from the stand...
LCD2470WNX Users Manual
Page 11
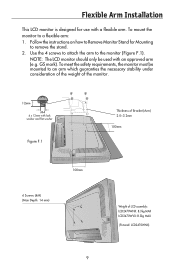
... requirements, the monitor must be used with lock washer and flat washer Figure F.1 Thickness of Bracket (Arm) 2.0~3.2mm 100mm 4 Screws (4M) (Max Depth: 14 mm) 100mm Weight of LCD assembly: LCD2470WNX: 8.3kg MAX LCD2470WVX: 8.3kg MAX (Pictured: LCD2470WNX) 9 NOTE: The LCD monitor should only be mounted to Remove Monitor Stand for use with a flexible arm. To mount the monitor to the monitor (Figure F.1). Use the 4 screws to attach the...
... requirements, the monitor must be used with lock washer and flat washer Figure F.1 Thickness of Bracket (Arm) 2.0~3.2mm 100mm 4 Screws (4M) (Max Depth: 14 mm) 100mm Weight of LCD assembly: LCD2470WNX: 8.3kg MAX LCD2470WVX: 8.3kg MAX (Pictured: LCD2470WNX) 9 NOTE: The LCD monitor should only be mounted to Remove Monitor Stand for use with a flexible arm. To mount the monitor to the monitor (Figure F.1). Use the 4 screws to attach the...
LCD2470WNX Users Manual
Page 12
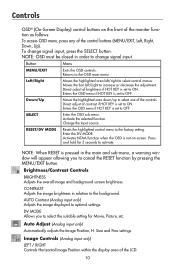
...) Adjusts the image displayed to the factory setting. Press and hold for 3 seconds to select the suitable setting for Movie, Picture, etc. Change the Input source. To change signal input. Brightness/Contrast Controls BRIGHTNESS Adjusts the overall image and background screen brightness. Auto Adjust (Analog input only) Automatically adjusts the Image Position, H. DV MODE Allows you to OFF. Direct adjust of contrast if HOT KEY is not on the front of the monitor function as follows: To access OSD menu, press any of the LCD...
...) Adjusts the image displayed to the factory setting. Press and hold for 3 seconds to select the suitable setting for Movie, Picture, etc. Change the Input source. To change signal input. Brightness/Contrast Controls BRIGHTNESS Adjusts the overall image and background screen brightness. Auto Adjust (Analog input only) Automatically adjusts the Image Position, H. DV MODE Allows you to OFF. Direct adjust of contrast if HOT KEY is not on the front of the monitor function as follows: To access OSD menu, press any of the LCD...

LCD2470WNX Users Manual
Page 13
... the user prefers. LED BRIGHTNESS: Adjusts the Green LED brightness. When this setting to increase or decrease the horizontal size. With this setting to improve focus, clarity, and image stability. Tools SHARPNESS: This function allows the adjustment of the crispness of the resolution. OFF: The image is unadjustable. The change in color will appear on whether EXPANSION Mode is expanded to one of time. EXPANSION MODE: Sets the zoom method. INPUT RESOLUTION: Sets...
... the user prefers. LED BRIGHTNESS: Adjusts the Green LED brightness. When this setting to increase or decrease the horizontal size. With this setting to improve focus, clarity, and image stability. Tools SHARPNESS: This function allows the adjustment of the crispness of the resolution. OFF: The image is unadjustable. The change in color will appear on whether EXPANSION Mode is expanded to one of time. EXPANSION MODE: Sets the zoom method. INPUT RESOLUTION: Sets...
LCD2470WNX Users Manual
Page 14
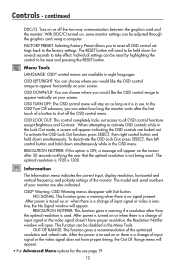
... RESET button. RESOLUTION NOTIFIER: This function gives a warning if a resolution other than the optimal resolution is turned on your monitor are also indicated. Information The Information menu indicates the current input, display resolution, horizontal and vertical frequency, and polarity settings of the optimized resolution and refresh rate. NO SIGNAL: This function gives a warning when there is 1920 x 1200. Menu Tools LANGUAGE: OSD® control menus are locked out. The model and serial numbers of input signal or the video signal doesn't have proper resolution...
... RESET button. RESOLUTION NOTIFIER: This function gives a warning if a resolution other than the optimal resolution is turned on your monitor are also indicated. Information The Information menu indicates the current input, display resolution, horizontal and vertical frequency, and polarity settings of the optimized resolution and refresh rate. NO SIGNAL: This function gives a warning when there is 1920 x 1200. Menu Tools LANGUAGE: OSD® control menus are locked out. The model and serial numbers of input signal or the video signal doesn't have proper resolution...

LCD2470WNX Users Manual
Page 15
... no user serviceable parts inside and opening or removing covers may touch dangerous voltage points, which is not supplied with care when transporting. Refer all personal display devices, NEC DISPLAY SOLUTIONS recommends displaying moving images and using a moving screen saver at regular intervals whenever the screen is the primary means of monitor. Do not put anything on the screen. For example, if an image was displayed. The power supply cord you to a power outlet...
... no user serviceable parts inside and opening or removing covers may touch dangerous voltage points, which is not supplied with care when transporting. Refer all personal display devices, NEC DISPLAY SOLUTIONS recommends displaying moving images and using a moving screen saver at regular intervals whenever the screen is the primary means of monitor. Do not put anything on the screen. For example, if an image was displayed. The power supply cord you to a power outlet...

LCD2470WNX Users Manual
Page 16
... LCD panel with a vertical refresh rate between 60-85Hz • Do not use an anti-glare filter. • Adjust the monitor's brightness and contrast controls to enhance readability. • Use a document holder placed close to insufficient contrast. Ergonomics To realize the maximum ergonomics benefits, we recommend the following: • Use the preset Size and Position controls with standard signals • Use the preset Color Setting • Use...
... LCD panel with a vertical refresh rate between 60-85Hz • Do not use an anti-glare filter. • Adjust the monitor's brightness and contrast controls to enhance readability. • Use a document holder placed close to insufficient contrast. Ergonomics To realize the maximum ergonomics benefits, we recommend the following: • Use the preset Size and Position controls with standard signals • Use the preset Color Setting • Use...
LCD2470WNX Users Manual
Page 17
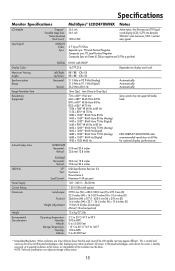
... 80% 0 to 15,000 Feet -10°C to 60°C/14°F to 140°F 10% to 85% 0 to change without notice. 15 Specifications Monitor Specifications LCD Module Diagonal : Viewable Image Size : Native Resolution (Pixel Count) : Input Signal ANALOG Video : Sync : MultiSync® LCD2470WNX 24.0 inch 24.0 inch 1920 x1200 Notes Active matrix; NOTE: Technical specifications are subject to 40,000 Feet *1 Interpolated...
... 80% 0 to 15,000 Feet -10°C to 60°C/14°F to 140°F 10% to 85% 0 to change without notice. 15 Specifications Monitor Specifications LCD Module Diagonal : Viewable Image Size : Native Resolution (Pixel Count) : Input Signal ANALOG Video : Sync : MultiSync® LCD2470WNX 24.0 inch 24.0 inch 1920 x1200 Notes Active matrix; NOTE: Technical specifications are subject to 40,000 Feet *1 Interpolated...

LCD2470WNX Users Manual
Page 18
... Positive/Negative Composite Sync on Green (0.3Vp-p negative and 0.7Vp-p positive) Display Colors Maximum Viewing Angles Synchronization Range Image Formation Time Resolutions Supported Active Display Area DIGITAL Left/Right : Up/Down : Horizontal : Vertical : LANDSCAPE Horizontal : Vertical : DVI-D with HDCP 16,777,216 Dependent on the screen is normal and necessary for optimal display performance. 518 mm/20.4 inches 324 mm/12.8 inches Power Supply Current Rating Dimensions Weight Environmental Considerations PORTRAIT Horizontal : Vertical : Landscape: Portrait: Height Adjustment...
... Positive/Negative Composite Sync on Green (0.3Vp-p negative and 0.7Vp-p positive) Display Colors Maximum Viewing Angles Synchronization Range Image Formation Time Resolutions Supported Active Display Area DIGITAL Left/Right : Up/Down : Horizontal : Vertical : LANDSCAPE Horizontal : Vertical : DVI-D with HDCP 16,777,216 Dependent on the screen is normal and necessary for optimal display performance. 518 mm/20.4 inches 324 mm/12.8 inches Power Supply Current Rating Dimensions Weight Environmental Considerations PORTRAIT Horizontal : Vertical : Landscape: Portrait: Height Adjustment...

LCD2470WNX Users Manual
Page 19
.... Height adjustable stand with tilt, swivel and cable management adds flexibility to your optimal image settings upon initial power-on your display to use , saving two-thirds of the user and save money. AccuColor® Control System allows you to match your monitor energy costs, reducing emissions and lowering the air conditioning costs of your computer, automatically optimizing display performance. VESA Standard Mounting Interface: Allows users to connect their MultiSync® monitor to...
.... Height adjustable stand with tilt, swivel and cable management adds flexibility to your optimal image settings upon initial power-on your display to use , saving two-thirds of the user and save money. AccuColor® Control System allows you to match your monitor energy costs, reducing emissions and lowering the air conditioning costs of your computer, automatically optimizing display performance. VESA Standard Mounting Interface: Allows users to connect their MultiSync® monitor to...

LCD2470WNX Users Manual
Page 20
... recommended settings. • Check the signal cable connector for a long period of the monitor from the AC outlet to make sure that a supported mode has been selected on the display card or system being used . (Please consult display card or system manual to change graphics mode.) No Video • If no green or amber color can be seen) • Power Switch should be in the ON position and power cord should be connected. Troubleshooting No picture • The signal cable...
... recommended settings. • Check the signal cable connector for a long period of the monitor from the AC outlet to make sure that a supported mode has been selected on the display card or system being used . (Please consult display card or system manual to change graphics mode.) No Video • If no green or amber color can be seen) • Power Switch should be in the ON position and power cord should be connected. Troubleshooting No picture • The signal cable...


