MultiSync 70 Series Color Brochure
Page 1
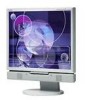
..." screen sizes and the choice of high-performance flat-panel monitors, the tradition continues with intelligent display designs and technologies. With the NEC MultiSync 70 Series, a family of a silver and white or all black cabinet (on a daily basis. These are the advantages that allow users to work smarter and enterprises to build upon its tradition of ownership. With each new generation of LCD monitors, NEC Display Solutions...
..." screen sizes and the choice of high-performance flat-panel monitors, the tradition continues with intelligent display designs and technologies. With the NEC MultiSync 70 Series, a family of a silver and white or all black cabinet (on a daily basis. These are the advantages that allow users to work smarter and enterprises to build upon its tradition of ownership. With each new generation of LCD monitors, NEC Display Solutions...

MultiSync 70 Series Color Brochure
Page 2
... Series models, provides for today and tomorrow. With Ambix® dual-input technology-which utilizes both DVI-D and traditional 15-pin VGA connectors-you can bridge the gap between silver and white or all installed, compatible MultiSync 70 Series units. Ambix provides compatibility with any signal in black). Take your desktop. As part of the redesigned control button arrangement, users can simultaneously view/work environments. (LCD2170NX available only in a preset range...
... Series models, provides for today and tomorrow. With Ambix® dual-input technology-which utilizes both DVI-D and traditional 15-pin VGA connectors-you can bridge the gap between silver and white or all installed, compatible MultiSync 70 Series units. Ambix provides compatibility with any signal in black). Take your desktop. As part of the redesigned control button arrangement, users can simultaneously view/work environments. (LCD2170NX available only in a preset range...
MultiSync 70 Series Color Brochure
Page 3
... monitor bezel, while freeing up more horizontal and vertical desktop space for multiple-monitor applications Height-adjustable stand adds flexibility and comfort to your viewing preferences with swivel, tilt and cable management capabilities Rapid Response technology delivers virtually uninterrupted, undistorted viewing of highspeed, full-motion video Dynamic Video Mode enhances video and images with real-time optimization of brightness, color and contrast No Touch Auto Adjust reduces setup time and provides optimal image settings upon initial power-on NaViSet software...
... monitor bezel, while freeing up more horizontal and vertical desktop space for multiple-monitor applications Height-adjustable stand adds flexibility and comfort to your viewing preferences with swivel, tilt and cable management capabilities Rapid Response technology delivers virtually uninterrupted, undistorted viewing of highspeed, full-motion video Dynamic Video Mode enhances video and images with real-time optimization of brightness, color and contrast No Touch Auto Adjust reduces setup time and provides optimal image settings upon initial power-on NaViSet software...
MultiSync 70 Series Color Brochure
Page 4
... (bezel), Ambix, Dynamic Video Mode, No Touch Auto Adjust, NaViSet software, USB 2.0, cable management, OSD user controls, sRGB, AccuColor color control, ISO 13406-2 Class II, vacation switch, height-adjustable stand, tilt, swivel Thin-frame (bezel), No Touch Auto Adjust, Dynamic Video Mode, NaViSet software, USB 2.0, sRGB, AccuColor color control, digital smoothing, digital controls, Plug and Play (VESA DDC 1/2B), VESA DPMS power management, OSD user controls, ISO 13406-2 Class II, vacation switch, height-adjustable stand, tilt, swivel, pivot, XtraView+, Ambix, Windows Vista-certified Thin...
... (bezel), Ambix, Dynamic Video Mode, No Touch Auto Adjust, NaViSet software, USB 2.0, cable management, OSD user controls, sRGB, AccuColor color control, ISO 13406-2 Class II, vacation switch, height-adjustable stand, tilt, swivel Thin-frame (bezel), No Touch Auto Adjust, Dynamic Video Mode, NaViSet software, USB 2.0, sRGB, AccuColor color control, digital smoothing, digital controls, Plug and Play (VESA DDC 1/2B), VESA DPMS power management, OSD user controls, ISO 13406-2 Class II, vacation switch, height-adjustable stand, tilt, swivel, pivot, XtraView+, Ambix, Windows Vista-certified Thin...

MultiSync 1770V/1770NX/1770NXM Users Manual
Page 3
... is encouraged to try to correct the interference by the Federal Communications Commission, helpful: "How to make any part inside this unit. CAUTION CAUTION: TO REDUCE THE RISK OF ELECTRIC SHOCK, MAKE SURE POWER CORD IS UNPLUGGED FROM WALL SOCKET. This equipment has been tested and found to comply with radio and television reception. (1) Please use the supplied shielded video signal cable.
... is encouraged to try to correct the interference by the Federal Communications Commission, helpful: "How to make any part inside this unit. CAUTION CAUTION: TO REDUCE THE RISK OF ELECTRIC SHOCK, MAKE SURE POWER CORD IS UNPLUGGED FROM WALL SOCKET. This equipment has been tested and found to comply with radio and television reception. (1) Please use the supplied shielded video signal cable.
MultiSync 1770V/1770NX/1770NXM Users Manual
Page 4
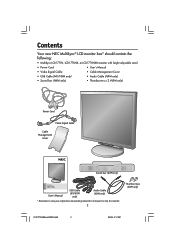
... the following: • MultiSync LCD1770V, LCD1770NX, or LCD1770NXM monitor with height adjustable stand • Power Cord • User's Manual • Video Signal Cable • Cable Management Cover • USB Cable (NX/NXM only) • Audio Cable (NXM only) • Sound bar (NXM only) • Thumbscrews x 2 (NXM only) Power Cord Video Signal Cable Cable Management Cover Sound bar (NXM only) User's Manual MultiSync LCD1770V MultiSync LCD1770NX MultiSync LCD1770NXM User's Manual USB Cable (NX/NXM only) Audio Cable (NXM only) * Remember to save your original box and...
... the following: • MultiSync LCD1770V, LCD1770NX, or LCD1770NXM monitor with height adjustable stand • Power Cord • User's Manual • Video Signal Cable • Cable Management Cover • USB Cable (NX/NXM only) • Audio Cable (NXM only) • Sound bar (NXM only) • Thumbscrews x 2 (NXM only) Power Cord Video Signal Cable Cable Management Cover Sound bar (NXM only) User's Manual MultiSync LCD1770V MultiSync LCD1770NX MultiSync LCD1770NXM User's Manual USB Cable (NX/NXM only) Audio Cable (NXM only) * Remember to save your original box and...

MultiSync 1770V/1770NX/1770NXM Users Manual
Page 5
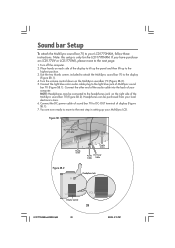
....2 Thumb Screw Thumb Screw Audio DC Power Cable Cable Headphone Jack VOL. Volume Control VOL. 3 LCD17PISAManual080604.p65 3 8/6/04, 5:14 PM Place hands on the Soundbar (Figure SB.2). 5. Figure SB.1 DC-OUT Terminal of Sound bar (Figure SB.1). Turn off the computer. 2. Connect the light blue color audio cable plug to the highest position. 3. Headphones can be connected to the display (Figure SB.1). 4. Note: this setup is only for the LCD1770NXM. Sound bar Setup To...
....2 Thumb Screw Thumb Screw Audio DC Power Cable Cable Headphone Jack VOL. Volume Control VOL. 3 LCD17PISAManual080604.p65 3 8/6/04, 5:14 PM Place hands on the Soundbar (Figure SB.2). 5. Figure SB.1 DC-OUT Terminal of Sound bar (Figure SB.1). Turn off the computer. 2. Connect the light blue color audio cable plug to the highest position. 3. Headphones can be connected to the display (Figure SB.1). 4. Note: this setup is only for the LCD1770NXM. Sound bar Setup To...
MultiSync 1770V/1770NX/1770NXM Users Manual
Page 6
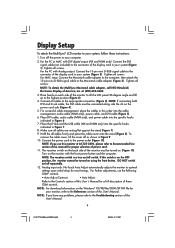
... DVI cable, audio cable (NXM only), and power cable into the specific hooks indicated in your system (Figure 1). To remove the cable cover, lift the cover off repeatedly. 12. NOTE: For download information on the power cord side (Figure 4). 5. Analog input only: No-Touch Auto Adjust automatically adjusts the monitor to optimal settings upon initial setup for your monitor, refer to the References section of this User's Manual. 4 LCD17PISAManual080604.p65 4 8/6/04, 5:14 PM Display Setup To attach the MultiSync® LCD monitor to...
... DVI cable, audio cable (NXM only), and power cable into the specific hooks indicated in your system (Figure 1). To remove the cable cover, lift the cover off repeatedly. 12. NOTE: For download information on the power cord side (Figure 4). 5. Analog input only: No-Touch Auto Adjust automatically adjusts the monitor to optimal settings upon initial setup for your monitor, refer to the References section of this User's Manual. 4 LCD17PISAManual080604.p65 4 8/6/04, 5:14 PM Display Setup To attach the MultiSync® LCD monitor to...
MultiSync 1770V/1770NX/1770NXM Users Manual
Page 10
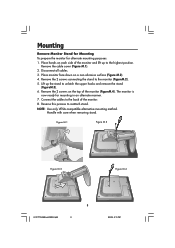
Lift up to the highest position. Remove the 2 screws on a non-abrasive surface (Figure M.2). 4. Mounting Remove Monitor Stand for Mounting To prepare the monitor for mounting in an alternate manner. 7. Figure M.1 Figure M.2 Figure M.3 Figure M.4 8 LCD17PISAManual080604.p65 8 8/6/04, 5:15 PM Remove the cable cover (Figure M.1). 2. Remove the 2 screws connecting the stand to unlatch the upper hooks and remove the stand (FigureM.3). 6. The monitor is now ready for alternate mounting purposes: 1. Reverse this process to...
Lift up to the highest position. Remove the 2 screws on a non-abrasive surface (Figure M.2). 4. Mounting Remove Monitor Stand for Mounting To prepare the monitor for mounting in an alternate manner. 7. Figure M.1 Figure M.2 Figure M.3 Figure M.4 8 LCD17PISAManual080604.p65 8 8/6/04, 5:15 PM Remove the cable cover (Figure M.1). 2. Remove the 2 screws connecting the stand to unlatch the upper hooks and remove the stand (FigureM.3). 6. The monitor is now ready for alternate mounting purposes: 1. Reverse this process to...

MultiSync 1770V/1770NX/1770NXM Users Manual
Page 12
... Adjust function. AUTO Contrast (Analog input only) Adjusts the image displayed to select one of the control buttons (MENU/EXIT, Left, Right, Down, Up). Size and Fine settings. NOTE: When RESET is selected. Brightness/Contrast Controls BRIGHTNESS Adjusts the overall image and background screen brightness. The change signal input, press the SELECT button (NX and NXM only). Moves the highlighted area down/up to optimal settings. Auto Adjust (Analog input only) Automatically adjusts the Image Position, H. AccuColor® Control Systems AccuColor® Control Systems: Six color...
... Adjust function. AUTO Contrast (Analog input only) Adjusts the image displayed to select one of the control buttons (MENU/EXIT, Left, Right, Down, Up). Size and Fine settings. NOTE: When RESET is selected. Brightness/Contrast Controls BRIGHTNESS Adjusts the overall image and background screen brightness. The change signal input, press the SELECT button (NX and NXM only). Moves the highlighted area down/up to optimal settings. Auto Adjust (Analog input only) Automatically adjusts the Image Position, H. AccuColor® Control Systems AccuColor® Control Systems: Six color...

MultiSync 1770V/1770NX/1770NXM Users Manual
Page 13
... is unadjustable. Individual settings can adjust the brightness and contrast directly. Menu Tools LANGUAGE: OSM® control menus are locked out. sRGB: sRGB mode dramatically improves the color fidelity in eight languages. OSM TURN OFF: The OSM control menu will appear on as long as it is 1280 x 1024. Information The Information menu indicates the current input, display resolution, horizontal and vertical frequency, and polarity settings of your monitor are also indicated. 11...
... is unadjustable. Individual settings can adjust the brightness and contrast directly. Menu Tools LANGUAGE: OSM® control menus are locked out. sRGB: sRGB mode dramatically improves the color fidelity in eight languages. OSM TURN OFF: The OSM control menu will appear on as long as it is 1280 x 1024. Information The Information menu indicates the current input, display resolution, horizontal and vertical frequency, and polarity settings of your monitor are also indicated. 11...
MultiSync 1770V/1770NX/1770NXM Users Manual
Page 14
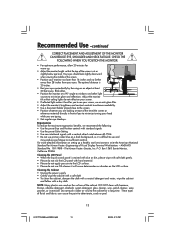
... fatal or may touch dangerous voltage points, which is not supplied with molded plug having a black (5A) fuse installed for transporting. Recommended Use Safety Precautions and Maintenance FOR OPTIMUM PERFORMANCE, PLEASE NOTE THE FOLLOWING WHEN SETTING UP AND USING THE MULTISYNC® LCD COLOR MONITOR: • DO NOT OPEN THE MONITOR. Do not put anything on the screen. To alleviate image persistence, turn off the monitor when not...
... fatal or may touch dangerous voltage points, which is not supplied with molded plug having a black (5A) fuse installed for transporting. Recommended Use Safety Precautions and Maintenance FOR OPTIMUM PERFORMANCE, PLEASE NOTE THE FOLLOWING WHEN SETTING UP AND USING THE MULTISYNC® LCD COLOR MONITOR: • DO NOT OPEN THE MONITOR. Do not put anything on the screen. To alleviate image persistence, turn off the monitor when not...
MultiSync 1770V/1770NX/1770NXM Users Manual
Page 15
... reflected light makes it is difficult to see your eyes periodically by focusing on setting up . • Adjust the monitor height so that ceiling lights do not use OA cleaner it will cause deterioration or discolor on a dark background, as it hard for a long time. The optimal distance is 20 inches. • Rest your screen, use primary color blue on the LCD surface. Cleaning the LCD Panel •...
... reflected light makes it is difficult to see your eyes periodically by focusing on setting up . • Adjust the monitor height so that ceiling lights do not use OA cleaner it will cause deterioration or discolor on a dark background, as it hard for a long time. The optimal distance is 20 inches. • Rest your screen, use primary color blue on the LCD surface. Cleaning the LCD Panel •...
MultiSync 1770V/1770NX/1770NXM Users Manual
Page 16
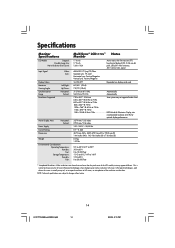
...VGA text Some systems may appear different. Specifications Monitor Specifications LCD Module Diagonal : Viewable Image Size : Native Resolution (Pixel Count) : Input Signal Video : Sync : Display Colors Maximum Viewing Angles Synchronization Range Resolutions Supported Left/Right : Up/Down : Horizontal : Vertical : Active Display Area Power Supply Current Rating Dimensions Horizontal : Vertical : Weight Environmental Considerations Operating Temperature : Humidity : Feet : Storage Temperature : Humidity : Feet : MultiSync® LCD1770V™ Monitor Notes 17.0 inch 17...
...VGA text Some systems may appear different. Specifications Monitor Specifications LCD Module Diagonal : Viewable Image Size : Native Resolution (Pixel Count) : Input Signal Video : Sync : Display Colors Maximum Viewing Angles Synchronization Range Resolutions Supported Left/Right : Up/Down : Horizontal : Vertical : Active Display Area Power Supply Current Rating Dimensions Horizontal : Vertical : Weight Environmental Considerations Operating Temperature : Humidity : Feet : Storage Temperature : Humidity : Feet : MultiSync® LCD1770V™ Monitor Notes 17.0 inch 17...

MultiSync 1770V/1770NX/1770NXM Users Manual
Page 17
... (Pixel Count) : Input Signal Video : Sync : Display Colors Maximum Viewing Angles Synchronization Range Resolutions Supported Left/Right : Up/Down : Horizontal : Vertical : Active Display Area USB Hub Power Supply Current Rating Dimensions Horizontal : Vertical : I/P: Port: Load Current: Weight Environmental Considerations Operating Temperature : Humidity : Feet : Storage Temperature : Humidity : Feet : MultiSync® LCD1770NX Notes Monitor 17.0 inch 17.0 inch 1280 x 1024 Active matrix; thin film transistor (TFT) liquid crystal display (LCD); 0.264 mm dot pitch; 250cd/m2 white...
... (Pixel Count) : Input Signal Video : Sync : Display Colors Maximum Viewing Angles Synchronization Range Resolutions Supported Left/Right : Up/Down : Horizontal : Vertical : Active Display Area USB Hub Power Supply Current Rating Dimensions Horizontal : Vertical : I/P: Port: Load Current: Weight Environmental Considerations Operating Temperature : Humidity : Feet : Storage Temperature : Humidity : Feet : MultiSync® LCD1770NX Notes Monitor 17.0 inch 17.0 inch 1280 x 1024 Active matrix; thin film transistor (TFT) liquid crystal display (LCD); 0.264 mm dot pitch; 250cd/m2 white...

MultiSync 1770V/1770NX/1770NXM Users Manual
Page 18
... Monitor Specifications LCD Module Diagonal : Viewable Image Size : Native Resolution (Pixel Count) : Input Signal Video : Sync : Display Colors Maximum Viewing Angles Synchronization Range Resolutions Supported Left/Right : Up/Down : Horizontal : Vertical : Active Display Area USB Hub Horizontal : Vertical : I/P: Port: Speakers Power Supply Current Rating Dimensions Load Current: Practical Audio Output: Weight Environmental Considerations Operating Temperature : Humidity : Feet : Storage Temperature : Humidity : Feet : MultiSync® LCD1770NXM Notes Monitor 17.0 inch 17...
... Monitor Specifications LCD Module Diagonal : Viewable Image Size : Native Resolution (Pixel Count) : Input Signal Video : Sync : Display Colors Maximum Viewing Angles Synchronization Range Resolutions Supported Left/Right : Up/Down : Horizontal : Vertical : Active Display Area USB Hub Horizontal : Vertical : I/P: Port: Speakers Power Supply Current Rating Dimensions Load Current: Practical Audio Output: Weight Environmental Considerations Operating Temperature : Humidity : Feet : Storage Temperature : Humidity : Feet : MultiSync® LCD1770NXM Notes Monitor 17.0 inch 17...

MultiSync 1770V/1770NX/1770NXM Users Manual
Page 19
... with tilt, swivel and cable management adds flexibility to quickly and easily adjust all elements of your monitor energy costs, reducing emissions and lowering the air conditioning costs of your screen image. VESA Standard Mounting Interface: Allows users to connect their MultiSync® monitor to the display card's scanning frequency, thus displaying the resolution required. The flat screen's crisp, bright images and crystal-clear text deliver a comfortable viewing experience. Multiple Frequency Technology: Automatically adjusts monitor to...
... with tilt, swivel and cable management adds flexibility to quickly and easily adjust all elements of your monitor energy costs, reducing emissions and lowering the air conditioning costs of your screen image. VESA Standard Mounting Interface: Allows users to connect their MultiSync® monitor to the display card's scanning frequency, thus displaying the resolution required. The flat screen's crisp, bright images and crystal-clear text deliver a comfortable viewing experience. Multiple Frequency Technology: Automatically adjusts monitor to...
MultiSync 1770V/1770NX/1770NXM Users Manual
Page 20
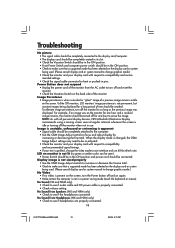
... position. • Check to make sure that a supported mode has been selected on the display card or system being used . (Please consult display card or system manual to change graphics mode.) No Video • If no green or amber color can be seen) • Power Switch should be in the ON position and power cord should be avoided. Power Button does not respond • Unplug the power cord of the monitor from the AC outlet to turn...
... position. • Check to make sure that a supported mode has been selected on the display card or system being used . (Please consult display card or system manual to change graphics mode.) No Video • If no green or amber color can be seen) • Power Switch should be in the ON position and power cord should be avoided. Power Button does not respond • Unplug the power cord of the monitor from the AC outlet to turn...
MultiSync 1770V/1770NX/1770NXM Users Manual
Page 22
... the serial number of the product. The Product shall not have been previously altered, repaired, or serviced by anyone other factors. Consumers are cautioned that Product performance is not covered under this limited warranty. Limited Warranty NEC-Mitsubishi Electronics Display of America, Inc. (hereinafter "NMD-A") warrants this warranty the Product shall not have been subjected to displaying of fixed images...
... the serial number of the product. The Product shall not have been previously altered, repaired, or serviced by anyone other factors. Consumers are cautioned that Product performance is not covered under this limited warranty. Limited Warranty NEC-Mitsubishi Electronics Display of America, Inc. (hereinafter "NMD-A") warrants this warranty the Product shall not have been subjected to displaying of fixed images...
MultiSync 1770V/1770NX/1770NXM Users Manual
Page 30
... PM Turn the volume control down on each side of sound bar 70 to the display (Figure SB.1). 4. Headphones can be connected to the light blue jack of the MultiSync sound bar 70 (Figure SB.2). Connect the light blue color audio cable plug to the headphones jack on the right side of MultiSync sound bar 70 (Figure SB.1). NOTE: Headphones may be purchased from your LCD1770NXM, follow these instructions. Connect the other...
... PM Turn the volume control down on each side of sound bar 70 to the display (Figure SB.1). 4. Headphones can be connected to the light blue jack of the MultiSync sound bar 70 (Figure SB.2). Connect the light blue color audio cable plug to the headphones jack on the right side of MultiSync sound bar 70 (Figure SB.1). NOTE: Headphones may be purchased from your LCD1770NXM, follow these instructions. Connect the other...


