User Manual
Page 2
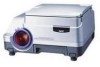
... other RGB equipment 4. Windows is a registered trademark of IBM Corporation. PC : Connect and display from your projector, please read this manual carefully. Macintosh and Power Book are not required saving you for enhanced multimedia presentations 5. 3D Objects : Project 3D objects such as circuit boards, coins, lab objects • Ease of operation Easily switch between projecting printed materials to data or video images with 2 million...
... other RGB equipment 4. Windows is a registered trademark of IBM Corporation. PC : Connect and display from your projector, please read this manual carefully. Macintosh and Power Book are not required saving you for enhanced multimedia presentations 5. 3D Objects : Project 3D objects such as circuit boards, coins, lab objects • Ease of operation Easily switch between projecting printed materials to data or video images with 2 million...

User Manual
Page 5
... any volatile solvent such as indicated. Solvents can damage the lens. • To clean the cabinet, operation panel, and glass surface, wipe gently with tissue paper or a handkerchief can cause surface deformation or flaking of 1500 hours (Refer to wipe dry. • Do not wipe the projector with any fire. Do not use . Incorrect battery usage may result...
... any volatile solvent such as indicated. Solvents can damage the lens. • To clean the cabinet, operation panel, and glass surface, wipe gently with tissue paper or a handkerchief can cause surface deformation or flaking of 1500 hours (Refer to wipe dry. • Do not wipe the projector with any fire. Do not use . Incorrect battery usage may result...

User Manual
Page 6
... turn the lamp on . Doing so may cause injury. • Replacing the lamp • Be sure to the surrounding area. • Do not do not plan to pull out the power plug and disconnect any cable connections between units and release the anti-theft lock before moving the projector while holding the handles with casters. E-6 Removing the air filter while the cooling fan...
... turn the lamp on . Doing so may cause injury. • Replacing the lamp • Be sure to the surrounding area. • Do not do not plan to pull out the power plug and disconnect any cable connections between units and release the anti-theft lock before moving the projector while holding the handles with casters. E-6 Removing the air filter while the cooling fan...
User Manual
Page 7
..., use only the attached cable to connect to external devices. If a power cable is likely to cause harmful interference in a commercial environment. DO NOT REMOVE ANY SCREWS except the lamp cover screw and two lamp unit screws. G FCC WARNING Changes or modifications not expressly approved by the party responsible for Europe. CAUTION: To turn off main power, be easily accessible. You could void the user's authority to operate...
..., use only the attached cable to connect to external devices. If a power cable is likely to cause harmful interference in a commercial environment. DO NOT REMOVE ANY SCREWS except the lamp cover screw and two lamp unit screws. G FCC WARNING Changes or modifications not expressly approved by the party responsible for Europe. CAUTION: To turn off main power, be easily accessible. You could void the user's authority to operate...

User Manual
Page 8
... not projected E-21 Input Signal Compatibility Table (PC video input E-22 Connecting to Video Deck or Laser Disc Player E-25 Operation E-26 Basic Operation of Imput Devices PC and Video Deck E-26 Basic Operation in the OHP Mode E-29 PC Zoom...E-31 Compensating Keystoning E-32 Making Adjustments E-33 Basic Operation E-37 About the "Memory" menu E-41 Maintenance E-43 Protection from Overheating E-43 Replacing the Lamp unit E-45 Cleaning the Air filter E-47 Troubleshooting E-48 Specifications...
... not projected E-21 Input Signal Compatibility Table (PC video input E-22 Connecting to Video Deck or Laser Disc Player E-25 Operation E-26 Basic Operation of Imput Devices PC and Video Deck E-26 Basic Operation in the OHP Mode E-29 PC Zoom...E-31 Compensating Keystoning E-32 Making Adjustments E-33 Basic Operation E-37 About the "Memory" menu E-41 Maintenance E-43 Protection from Overheating E-43 Replacing the Lamp unit E-45 Cleaning the Air filter E-47 Troubleshooting E-48 Specifications...

User Manual
Page 9
.... Adjustment panel These buttons are projected from here. See page E-13 for details. Operation panel This panel houses the buttons and indicators used for adjusting the vertical angle at which images are located here. Handle Remote control sensor Terminal panel This panel houses the terminals and connectors for setting the adjustment menu. An air filter is drawn in from entering the inside of the projector. See page E-47 for details. Lens Images are provided for connecting...
.... Adjustment panel These buttons are projected from here. See page E-13 for details. Operation panel This panel houses the buttons and indicators used for adjusting the vertical angle at which images are located here. Handle Remote control sensor Terminal panel This panel houses the terminals and connectors for setting the adjustment menu. An air filter is drawn in from entering the inside of the projector. See page E-47 for details. Lens Images are provided for connecting...

User Manual
Page 12
... the ON/ STANDBY button is pressed to turn on the lamp. (In this button is operative when the lamp is OFF. • These buttons select the input device. • When PC is selected, images from the VIDEO input terminal are projected. Lit: Indicates overheating Blinking: Indicates that the fan cover is selected, materials or printed matter placed on .) • Lights or blinks when machine trouble occurs. The left button reduces the image, while the...
... the ON/ STANDBY button is pressed to turn on the lamp. (In this button is operative when the lamp is OFF. • These buttons select the input device. • When PC is selected, images from the VIDEO input terminal are projected. Lit: Indicates overheating Blinking: Indicates that the fan cover is selected, materials or printed matter placed on .) • Lights or blinks when machine trouble occurs. The left button reduces the image, while the...

User Manual
Page 14
... to fix each menu item. • Use these buttons to change items, adjust values, or select items in the MENU display. • Use these buttons to scroll the zoom display in the PC ZOOM display. • These buttons adjust the OHP magnification in the OHP mode. • Adjusts the magnification of the PC in the PC and the VIDEO modes. Ofrecido por www.electromanuales.com Remote Control ON/STANDBY button MENU button / / / buttons AUTO SYNC button KEYSTONE button ON/ STANDBY OHP PC VIDEO MENU SET AUTO SYNC KEYSTONE ZOOM BRIGHT...
... to fix each menu item. • Use these buttons to change items, adjust values, or select items in the MENU display. • Use these buttons to scroll the zoom display in the PC ZOOM display. • These buttons adjust the OHP magnification in the OHP mode. • Adjusts the magnification of the PC in the PC and the VIDEO modes. Ofrecido por www.electromanuales.com Remote Control ON/STANDBY button MENU button / / / buttons AUTO SYNC button KEYSTONE button ON/ STANDBY OHP PC VIDEO MENU SET AUTO SYNC KEYSTONE ZOOM BRIGHT...

User Manual
Page 19
... LCDs. E-19 If this happens, turn the notebook PC display OFF varies according to the manufacturer of the notebook. How to the user's manuals accompanying them. • Sometimes images are not displayed properly when displaying on the market) Supplied cable * DUO Dock or Mini Dock is necessary. I Connecting to a Personal Computer G List of how to use and connect external input devices to be connected to models...
... LCDs. E-19 If this happens, turn the notebook PC display OFF varies according to the manufacturer of the notebook. How to the user's manuals accompanying them. • Sometimes images are not displayed properly when displaying on the market) Supplied cable * DUO Dock or Mini Dock is necessary. I Connecting to a Personal Computer G List of how to use and connect external input devices to be connected to models...

User Manual
Page 26
... video source). Rotate the zoom adjusting ring to the display for the desired input device. The lamp lights and the POWER indicator lights in green. Ofrecido por www.electromanuales.com Operation I Basic Operation of PC or video source. 2, 5, 6, 7 1 1 POWER LAMP ALARM 2 Main control OHP PC VIDEO 3 4 Connect the power cable. Select the external input device. The screen changes to adjust the screen size. The unit enters the standby mode and the POWER indicator lights in red, the lamp is not turned on the power of Input Devices PC and Video Source Preparation : Turn...
... video source). Rotate the zoom adjusting ring to the display for the desired input device. The lamp lights and the POWER indicator lights in green. Ofrecido por www.electromanuales.com Operation I Basic Operation of PC or video source. 2, 5, 6, 7 1 1 POWER LAMP ALARM 2 Main control OHP PC VIDEO 3 4 Connect the power cable. Select the external input device. The screen changes to adjust the screen size. The unit enters the standby mode and the POWER indicator lights in red, the lamp is not turned on the power of Input Devices PC and Video Source Preparation : Turn...

User Manual
Page 28
... on the operation panel goes out. Press the ON/STANDBY button. NOTE If you turn it again, the unit enters the standby mode. 9 POWER LAMP ALARM Pull out the power cable. Wait one minute or more and turn the power on . Doing so may sometimes emits a slight humming sound when on after having been turned off in green and turns off . "Press ON/STANDBY switch again to use your projector for...
... on the operation panel goes out. Press the ON/STANDBY button. NOTE If you turn it again, the unit enters the standby mode. 9 POWER LAMP ALARM Pull out the power cable. Wait one minute or more and turn the power on . Doing so may sometimes emits a slight humming sound when on after having been turned off in green and turns off . "Press ON/STANDBY switch again to use your projector for...

User Manual
Page 34
... the lamp turns on page E-37 for information about 15 minites). NOTE • In the [Setting] menu, the input signals currently set are described. N Setting Setting Input signal 1024 X 768 Lamp usage time 48.2KHz 60Hz 0H Keystone 0 Auto power off to +100 Change the depth of blue. When Auto power off -100 to ON, the unit enters the standby mode automatically when no signal arrives for your confirmation. N Image adjustment (when OHP is selected) Image adjustment...
... the lamp turns on page E-37 for information about 15 minites). NOTE • In the [Setting] menu, the input signals currently set are described. N Setting Setting Input signal 1024 X 768 Lamp usage time 48.2KHz 60Hz 0H Keystone 0 Auto power off to +100 Change the depth of blue. When Auto power off -100 to ON, the unit enters the standby mode automatically when no signal arrives for your confirmation. N Image adjustment (when OHP is selected) Image adjustment...

User Manual
Page 35
... Setting Description 0 to +100 Change the hue. 0 ~ 6 Change the clarity of the image. Description Save the contents set in display. Load the saved contents. E-35 Standard Quit N Memory (Only when PC is selected as an input device) Memory Save Load Quit Menu item Save Load Setting - - Ofrecido por www.electromanuales.com Operation N Video adjustment (Only when video source is selected as an input device) Video adjustment Tint 0 Color...
... Setting Description 0 to +100 Change the hue. 0 ~ 6 Change the clarity of the image. Description Save the contents set in display. Load the saved contents. E-35 Standard Quit N Memory (Only when PC is selected as an input device) Memory Save Load Quit Menu item Save Load Setting - - Ofrecido por www.electromanuales.com Operation N Video adjustment (Only when video source is selected as an input device) Video adjustment Tint 0 Color...

User Manual
Page 38
.... In the "Image adjustment", "Sync adjustment", "Setting" or "Video adjustment" menu, select "Standard" and press the SET button (or SET button) to return the setting to AUTO SYNC ZOOM Input signal 1024 X 768 Lamp usage time Keystone 0 48.2KHz 60Hz 0H KEYSTONE BRIGHT VOLUME 4-1 Auto power off " and "Start up screen Standard O N / OFF O N / OFF Quit E-38 Sync adjustment Clock 0 Phase 0 Horizontal 9 Vertical 15 Standard Quit When selecting "ON" or "OFF". ON/ STANDBY OHP PC VIDEO MENU SET 4 MENU -1 Press the button (or select an...
.... In the "Image adjustment", "Sync adjustment", "Setting" or "Video adjustment" menu, select "Standard" and press the SET button (or SET button) to return the setting to AUTO SYNC ZOOM Input signal 1024 X 768 Lamp usage time Keystone 0 48.2KHz 60Hz 0H KEYSTONE BRIGHT VOLUME 4-1 Auto power off " and "Start up screen Standard O N / OFF O N / OFF Quit E-38 Sync adjustment Clock 0 Phase 0 Horizontal 9 Vertical 15 Standard Quit When selecting "ON" or "OFF". ON/ STANDBY OHP PC VIDEO MENU SET 4 MENU -1 Press the button (or select an...
User Manual
Page 43
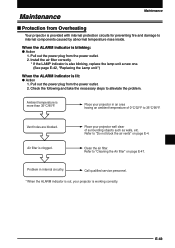
... the power plug from the power outlet. 2. Refer to "Cleaning the Air filter" on page E-4. Call qualified service personnel. * When the ALARM indicator is out, your projector in internal circuitry. When the ALARM indicator is lit: G Action 1. Install the air filter correctly. * If the LAMP indicator is also blinking, replace the lamp unit a new one. (See page E-42, "Replacing the Lamp unit.") When the ALARM indicator is blinking: G Action 1. Place your projector is...
... the power plug from the power outlet. 2. Refer to "Cleaning the Air filter" on page E-4. Call qualified service personnel. * When the ALARM indicator is out, your projector in internal circuitry. When the ALARM indicator is lit: G Action 1. Install the air filter correctly. * If the LAMP indicator is also blinking, replace the lamp unit a new one. (See page E-42, "Replacing the Lamp unit.") When the ALARM indicator is blinking: G Action 1. Place your projector is...

User Manual
Page 45
... .) POWER LAMP WARNING ALARM • Do not replace the lamp unit immediately after using a Phillips blade screwdriver. To replace the lamp unit, follow the procedure below. 1 Remove the lamp unit cover. Ofrecido por www.electromanuales.com IReplacing the Lamp unit Maintenance The life of the lamp used on this projector is 1400 hours.(This may burn yourself. When the lamp is used for repair. When the projected image becomes dark or projected colors are displayed...
... .) POWER LAMP WARNING ALARM • Do not replace the lamp unit immediately after using a Phillips blade screwdriver. To replace the lamp unit, follow the procedure below. 1 Remove the lamp unit cover. Ofrecido por www.electromanuales.com IReplacing the Lamp unit Maintenance The life of the lamp used on this projector is 1400 hours.(This may burn yourself. When the lamp is used for repair. When the projected image becomes dark or projected colors are displayed...

User Manual
Page 46
... Be sure to reset the time. Therefore, replace the air filter at the same time as a set. OHP PC VIDEO MENU 1 2 3 Setting Input signal 1024 X 768 Lamp usage time 48.2KHz 60Hz 0H Keystone 0 Auto power off forcibly regardless of the life of the lamp unit. 3 Remove the lamp unit. r Install the lamp unit cover and tighten the lamp unit cover fixing screw. Ofrecido por www.electromanuales.com 2 Loosen the lamp screws. Then the LAMP indicator blinks. q Push the lamp unit inside while holding...
... Be sure to reset the time. Therefore, replace the air filter at the same time as a set. OHP PC VIDEO MENU 1 2 3 Setting Input signal 1024 X 768 Lamp usage time 48.2KHz 60Hz 0H Keystone 0 Auto power off forcibly regardless of the life of the lamp unit. 3 Remove the lamp unit. r Install the lamp unit cover and tighten the lamp unit cover fixing screw. Ofrecido por www.electromanuales.com 2 Loosen the lamp screws. Then the LAMP indicator blinks. q Push the lamp unit inside while holding...

User Manual
Page 47
... light up inside , this , too, can block the filter. • Do not wipe with a cloth or wet rag as this will reduce the effectiveness of the fan speed. Attach the air filter following the above procedure in damage to remove the dust and dirt from dust and dirt. NOTE The projector lamp will enter inside, impairing the projected image. E-47 Use...
... light up inside , this , too, can block the filter. • Do not wipe with a cloth or wet rag as this will reduce the effectiveness of the fan speed. Attach the air filter following the above procedure in damage to remove the dust and dirt from dust and dirt. NOTE The projector lamp will enter inside, impairing the projected image. E-47 Use...
User Manual
Page 48
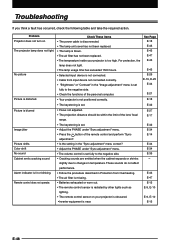
... not connected correctly. • "Brightness" or "Contrast" in the "Image adjustment" menu is set . The projector lamp does not light. • The lamp is blown. • The air filter has not been replaced. • The temperature inside your projector is obscured. •Inverter equipment is blurred • Focus not adjusted. • The projection distance should be within the limit of the personal computer. • Your projector is missing. E-43 E-47 Remote control...
... not connected correctly. • "Brightness" or "Contrast" in the "Image adjustment" menu is set . The projector lamp does not light. • The lamp is blown. • The air filter has not been replaced. • The temperature inside your projector is obscured. •Inverter equipment is blurred • Focus not adjusted. • The projection distance should be within the limit of the personal computer. • Your projector is missing. E-43 E-47 Remote control...
User Manual
Page 49
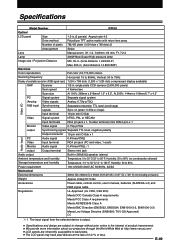
.... 8.5kg/18.74 lbs Accessories Power cable, remote control, user's manual, batteries (SUM3/AA x 2) and RGB signal cable. Ofrecido por www.electromanuales.com Specifications Troubleshooting Model Number DT100 Optical LCD panel Size 1.3-in.(3 panels) Aspect ratio 4:3 Drive method Polysilicon TFT active matrix with micro lens array Number of pixels 786,432 pixels (1,024 dots x 768 dots) x3 Arrangement Stripe Lens Manual zoom X1-1.3, f=49mm -64 mm, F1.7-2.3 Lamp 200W New Super High pressure lamp Image size / Projection Distance Min. 30-in. (focal...
.... 8.5kg/18.74 lbs Accessories Power cable, remote control, user's manual, batteries (SUM3/AA x 2) and RGB signal cable. Ofrecido por www.electromanuales.com Specifications Troubleshooting Model Number DT100 Optical LCD panel Size 1.3-in.(3 panels) Aspect ratio 4:3 Drive method Polysilicon TFT active matrix with micro lens array Number of pixels 786,432 pixels (1,024 dots x 768 dots) x3 Arrangement Stripe Lens Manual zoom X1-1.3, f=49mm -64 mm, F1.7-2.3 Lamp 200W New Super High pressure lamp Image size / Projection Distance Min. 30-in. (focal...

