User Guide
Page 11
... key (A or B) to open a highlighted item, or to select or clear a check box. Home Key Press the home key (h) to the Home screen. Send Key Press the send key (s) to: • Dial a phone number that you entered or selected. • Answer an incoming call. • Place a call on the screen immediately above the key. The Home screen is on hold. In a text field: • Press m to backspace over 1 or more characters. • Press and hold e to lock the keypad...
... key (A or B) to open a highlighted item, or to select or clear a check box. Home Key Press the home key (h) to the Home screen. Send Key Press the send key (s) to: • Dial a phone number that you entered or selected. • Answer an incoming call. • Place a call on the screen immediately above the key. The Home screen is on hold. In a text field: • Press m to backspace over 1 or more characters. • Press and hold e to lock the keypad...
User Guide
Page 23
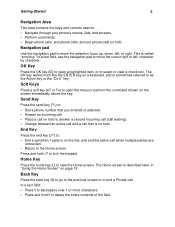
...-minute updates and detailed technical information Readme files, located in the Microsoft ActiveSync folder on page 24. Customizing your Smartphone Smartphone Connecting to -date information on using your Smartphone. Information about using ActiveSync with a desktop Welcome Guide or ActiveSync Help on the desktop computer or a Microsoft Exchange Server computer. This user guide: "Using the Start Menu" on page 35. Motorola warranty service or other information. SIM card This user guide: "Securing...
...-minute updates and detailed technical information Readme files, located in the Microsoft ActiveSync folder on page 24. Customizing your Smartphone Smartphone Connecting to -date information on using your Smartphone. Information about using ActiveSync with a desktop Welcome Guide or ActiveSync Help on the desktop computer or a Microsoft Exchange Server computer. This user guide: "Using the Start Menu" on page 35. Motorola warranty service or other information. SIM card This user guide: "Securing...
User Guide
Page 35
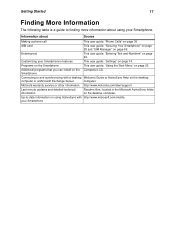
... PIN incorrectly 3 times, your service provider's representative's request, provide the information needed to contact your Smartphone will get a PIN Unblock Code (PUK). The Basics 29 Turn the PIN requirement on or off 1 On the Home screen, select Start. 2 Select Settings then Security. 3 Select Enable SIM PIN or Disable SIM PIN. 4 Enter your SIM card is permanently blocked and must be turned on in order to access this PIN when you turn on your PIN to prevent fraudulent use of your service...
... PIN incorrectly 3 times, your service provider's representative's request, provide the information needed to contact your Smartphone will get a PIN Unblock Code (PUK). The Basics 29 Turn the PIN requirement on or off 1 On the Home screen, select Start. 2 Select Settings then Security. 3 Select Enable SIM PIN or Disable SIM PIN. 4 Enter your SIM card is permanently blocked and must be turned on in order to access this PIN when you turn on your PIN to prevent fraudulent use of your service...
User Guide
Page 42
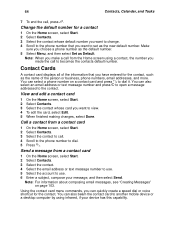
... the contact card. Change the default number for all the contact list abbreviations for a contact 1 On the Home screen, select Start. 2 Select Contacts. 3 Select the contact whose default number you want to change a contact's default number at any time. If the contact list abbreviation for the number you want to display it . 4 Press s. Note: The number you want to the phone number associated with the contact when you choose a phone number as the default number. 5 Select Menu, and then select Set as the new default number. The phone call...
... the contact card. Change the default number for all the contact list abbreviations for a contact 1 On the Home screen, select Start. 2 Select Contacts. 3 Select the contact whose default number you want to change a contact's default number at any time. If the contact list abbreviation for the number you want to display it . 4 Press s. Note: The number you want to the phone number associated with the contact when you choose a phone number as the default number. 5 Select Menu, and then select Set as the new default number. The phone call...
User Guide
Page 47
... then set call forwarding for the other features from the Home screen. Speakerphone Turning on top of your Smartphone is off With the Flip Open • Press and hold s. • Press t on speakerphone makes incoming sound come out of the Smartphone's speaker instead of service range 5 Select Enable call forwarding. 6 Enter the phone number to which to forward calls: • Unconditional to forward all calls to one number or forward missed calls to the Home screen during a call...
... then set call forwarding for the other features from the Home screen. Speakerphone Turning on top of your Smartphone is off With the Flip Open • Press and hold s. • Press t on speakerphone makes incoming sound come out of the Smartphone's speaker instead of service range 5 Select Enable call forwarding. 6 Enter the phone number to which to forward calls: • Unconditional to forward all calls to one number or forward missed calls to the Home screen during a call...
User Guide
Page 48
... your messages. Speed Dials and Voice Shortcuts Speed dials and voice shortcuts are using speed dial 1, which to create a speed dial. 42 Phone Calls Using the Flip to Answer or End Calls You can set to On, closing your flip sends incoming sound to the headset and does not end the call. You retrieve them as text messages (SMS). Create a speed dial 1 On the Home screen, select Start. 2 Select Contacts. 3 Select the contact for whom to create a speed dial. 4 Scroll to the phone number, email address, or Web page address for dialing frequently called phone numbers quickly, automatically...
... your messages. Speed Dials and Voice Shortcuts Speed dials and voice shortcuts are using speed dial 1, which to create a speed dial. 42 Phone Calls Using the Flip to Answer or End Calls You can set to On, closing your flip sends incoming sound to the headset and does not end the call. You retrieve them as text messages (SMS). Create a speed dial 1 On the Home screen, select Start. 2 Select Contacts. 3 Select the contact for whom to create a speed dial. 4 Scroll to the phone number, email address, or Web page address for dialing frequently called phone numbers quickly, automatically...

User Guide
Page 49
... Contacts. You can use . 7 Select Done. Use a speed dial • On the Home screen, press and hold the second digit. The Smartphone dials the phone number, opens a new email message, or goes to use a voice shortcut to 25 voice shortcuts in a contact. Then, when you want to create a voice shortcut for . 5 Select Menu and then Set Voice Shortcut. 6 After the audio and visual cue, begin recording the voice shortcut. 7 When prompted, repeat the voice shortcut. You can create one . To change the voice shortcut...
... Contacts. You can use . 7 Select Done. Use a speed dial • On the Home screen, press and hold the second digit. The Smartphone dials the phone number, opens a new email message, or goes to use a voice shortcut to 25 voice shortcuts in a contact. Then, when you want to create a voice shortcut for . 5 Select Menu and then Set Voice Shortcut. 6 After the audio and visual cue, begin recording the voice shortcut. 7 When prompted, repeat the voice shortcut. You can create one . To change the voice shortcut...
User Guide
Page 51
... access code. The network translates the (+) into a contact's phone number or dial it directly from the keypad. Note: You can insert a plus (+) sign appears. If you want to insert the pause. 6 Select Menu and then Insert Pause. The letter "p" appears where the 3-second pause will occur in a dialing sequence. Insert a manual pause in a dialing sequence 1 On the Home screen, select Start. 2 Select Contacts. 3 Select the contact in whose phone number you want to insert a manual...
... access code. The network translates the (+) into a contact's phone number or dial it directly from the keypad. Note: You can insert a plus (+) sign appears. If you want to insert the pause. 6 Select Menu and then Insert Pause. The letter "p" appears where the 3-second pause will occur in a dialing sequence. Insert a manual pause in a dialing sequence 1 On the Home screen, select Start. 2 Select Contacts. 3 Select the contact in whose phone number you want to insert a manual...
User Guide
Page 59
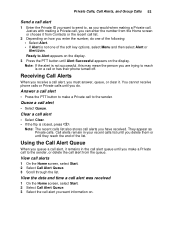
... with making a Private call. You cannot receive phone calls or Private calls until they reach the end of the list. Using the Call Alert Queue When you queue a call alert, it . View the date and time a call alert was received 1 On the Home screen, select Start. 2 Select Call Alert Queue. 3 Select the call alert you want to send to, as Private calls. Receiving Call Alerts When you receive a call alert, you must answer, queue, or clear it...
... with making a Private call. You cannot receive phone calls or Private calls until they reach the end of the list. Using the Call Alert Queue When you queue a call alert, it . View the date and time a call alert was received 1 On the Home screen, select Start. 2 Select Call Alert Queue. 3 Select the call alert you want to send to, as Private calls. Receiving Call Alerts When you receive a call alert, you must answer, queue, or clear it...
User Guide
Page 70
...addressed to the contact. Note: When you want to set as the new default number. View and edit a contact card 1 On the Home screen, select Start. 2 Select Contacts. 3 Select the contact whose default number you want to view. 4 To edit the card, select Edit. 5 When finished making changes, select Done. Contact Cards A contact card displays all of the information that you make a call from a contact card 1 On the Home screen, select Start. 2 Select Contacts. 3 Select the contact to call. 4 Scroll to the phone number to dial. 5 Press s. You can quickly create a speed dial or voice shortcut...
...addressed to the contact. Note: When you want to set as the new default number. View and edit a contact card 1 On the Home screen, select Start. 2 Select Contacts. 3 Select the contact whose default number you want to view. 4 To edit the card, select Edit. 5 When finished making changes, select Done. Contact Cards A contact card displays all of the information that you make a call from a contact card 1 On the Home screen, select Start. 2 Select Contacts. 3 Select the contact to call. 4 Scroll to the phone number to dial. 5 Press s. You can quickly create a speed dial or voice shortcut...
User Guide
Page 83
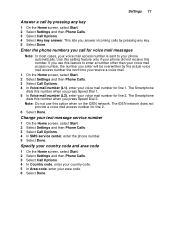
... next time you receive a voice mail. 1 On the Home screen, select Start. 2 Select Settings and then Phone Calls. 3 Select Call Options. 4 In Voice mail number (L1), enter your voice mail access number, the number you enter will be overwritten by pressing any key. 5 Select Done. Use this setting feature only if your voice mail number for line 2. 6 Select Done. Change your area code. 6 Select Done. If you use this number when you press Speed Dial 1. 5 In Voice mail number (L2), enter your phone did not receive this number when you answer incoming calls...
... next time you receive a voice mail. 1 On the Home screen, select Start. 2 Select Settings and then Phone Calls. 3 Select Call Options. 4 In Voice mail number (L1), enter your voice mail access number, the number you enter will be overwritten by pressing any key. 5 Select Done. Use this setting feature only if your voice mail number for line 2. 6 Select Done. Change your area code. 6 Select Done. If you use this number when you press Speed Dial 1. 5 In Voice mail number (L2), enter your phone did not receive this number when you answer incoming calls...

User Guide
Page 91
Please refer to use when entering information. 4 In Locale, select your locale. Configure regional settings 1 On the Home screen, select Start. 2 Select Settings and then Regional Settings. 3 In Language, select the language to "Enable TTY" for Type: • TTY - Change accessibility settings 1 On the Home screen, select Start. 2 Select Settings and then Accessibility. 3 Select the options you want , select Done. You speak into your Smartphone and read text on your TTY device. •...
Please refer to use when entering information. 4 In Locale, select your locale. Configure regional settings 1 On the Home screen, select Start. 2 Select Settings and then Regional Settings. 3 In Language, select the language to "Enable TTY" for Type: • TTY - Change accessibility settings 1 On the Home screen, select Start. 2 Select Settings and then Accessibility. 3 Select the options you want , select Done. You speak into your Smartphone and read text on your TTY device. •...
User Guide
Page 94
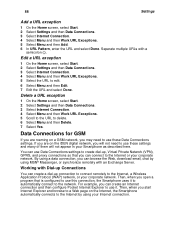
... the Web, download email, chat by using MSN® Messenger, or synchronize remotely with a semicolon (;). Delete a URL exception 1 On the Home screen, select Start. 2 Select Settings and then Data Connections. 3 Select Internet Connection. 4 Select Menu and then Work URL Exceptions. 5 Scroll to the URL to edit. 6 Select Menu and then Edit. 7 Edit the URL and select Done. If you are roaming on a GSM network, you start Internet Explorer and browse to the Internet, a Wireless Application...
... the Web, download email, chat by using MSN® Messenger, or synchronize remotely with a semicolon (;). Delete a URL exception 1 On the Home screen, select Start. 2 Select Settings and then Data Connections. 3 Select Internet Connection. 4 Select Menu and then Work URL Exceptions. 5 Scroll to the URL to edit. 6 Select Menu and then Edit. 7 Edit the URL and select Done. If you are roaming on a GSM network, you start Internet Explorer and browse to the Internet, a Wireless Application...
User Guide
Page 95
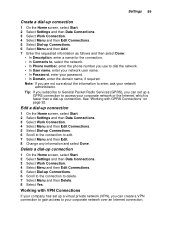
..., enter your network user name. • In Password, enter your password. • In Domain, enter the domain name, if required. Delete a dial-up connection 1 On the Home screen, select Start. 2 Select Settings and then Data Connections. 3 Select Work Connection. 4 Select Menu and then Edit Connections. 5 Select Dial-up Connections. 6 Scroll to the connection to your network administrator. Tip: If you subscribe to General Packet Radio Services (GPRS), you can create a VPN connection to gain access to edit. 7 Select Menu and then Edit. 8 Change...
..., enter your network user name. • In Password, enter your password. • In Domain, enter the domain name, if required. Delete a dial-up connection 1 On the Home screen, select Start. 2 Select Settings and then Data Connections. 3 Select Work Connection. 4 Select Menu and then Edit Connections. 5 Select Dial-up Connections. 6 Scroll to the connection to your network administrator. Tip: If you subscribe to General Packet Radio Services (GPRS), you can create a VPN connection to gain access to edit. 7 Select Menu and then Edit. 8 Change...
User Guide
Page 98
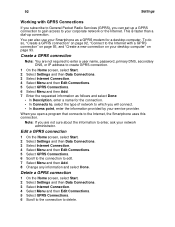
... Packet Radio Services (GPRS), you can also use your network administrator. Create a GPRS connection Note: You are not sure about the information to your service provider. Delete a GPRS connection 1 On the Home screen, select Start. 2 Select Settings and then Data Connections. 3 Select Internet Connection. 4 Select Menu and then Edit Connections. 5 Select GPRS Connections. 6 Scroll to the connection to which you are not required to enter a user name, password, primary DNS, secondary DNS, or IP address...
... Packet Radio Services (GPRS), you can also use your network administrator. Create a GPRS connection Note: You are not sure about the information to your service provider. Delete a GPRS connection 1 On the Home screen, select Start. 2 Select Settings and then Data Connections. 3 Select Internet Connection. 4 Select Menu and then Edit Connections. 5 Select GPRS Connections. 6 Scroll to the connection to which you are not required to enter a user name, password, primary DNS, secondary DNS, or IP address...

User Guide
Page 102
... PIN and select Done. View keypad lock instructions 1 On the Home screen, select Start. 2 Select Settings and then Security. 3 Select Enable Keypad Lock. 4 Select Done. 96 Settings Security Your subscriber identity module (SIM) card is enabled, you must enter a PIN to unlock it. If you want, you and others from making phone calls until the correct PIN is locked. Note: To cancel without locking the SIM card, press h. When the SIM lock is locked by default, and you must provide this PIN when you turn...
... PIN and select Done. View keypad lock instructions 1 On the Home screen, select Start. 2 Select Settings and then Security. 3 Select Enable Keypad Lock. 4 Select Done. 96 Settings Security Your subscriber identity module (SIM) card is enabled, you must enter a PIN to unlock it. If you want, you and others from making phone calls until the correct PIN is locked. Note: To cancel without locking the SIM card, press h. When the SIM lock is locked by default, and you must provide this PIN when you turn...
User Guide
Page 103
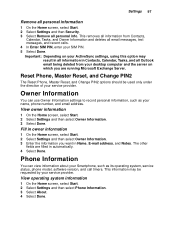
... deleted from Contacts, Calendar, Tasks, and Owner Information and deletes all email messages, text messages, and recent calls. 4 In Enter SIM PIN, enter your desktop computer and the server on which you want in automatically. 4 Select Done. Phone Information You can use Owner Information settings to record personal information, such as its operating system, service status, phone model, software version, and call timers. This removes all personal info. View operating system information 1 On the Home screen, select Start. 2 Select Settings...
... deleted from Contacts, Calendar, Tasks, and Owner Information and deletes all email messages, text messages, and recent calls. 4 In Enter SIM PIN, enter your desktop computer and the server on which you want in automatically. 4 Select Done. Phone Information You can use Owner Information settings to record personal information, such as its operating system, service status, phone model, software version, and call timers. This removes all personal info. View operating system information 1 On the Home screen, select Start. 2 Select Settings...
User Guide
Page 107
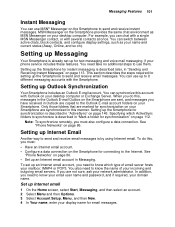
... Messenger contact, or with the Smartphone. Setting up Internet email 1 On the Home screen, select Start, Messaging, and then select an account. 2 Select Menu and then Options. 3 Select Account Setup, Menu, and then New. 4 In Your name, enter your display name for email messages. Setting up for synchronization is described in "ActiveSync" on ). Note: To synchronize remotely, you do this manner. To set up the Smartphone for text messaging and voice mail messaging, if your phone service...
... Messenger contact, or with the Smartphone. Setting up Internet email 1 On the Home screen, select Start, Messaging, and then select an account. 2 Select Menu and then Options. 3 Select Account Setup, Menu, and then New. 4 In Your name, enter your display name for email messages. Setting up for synchronization is described in "ActiveSync" on ). Note: To synchronize remotely, you do this manner. To set up the Smartphone for text messaging and voice mail messaging, if your phone service...
User Guide
Page 108
... no longer want to your email server, select Save password. 11 Select Next. 12 In Server type, select the type of each time you connect to use a different name for this account. 6 Select Attempt to obtain e-mail settings from the Internet if you want to enter, ask your network administrator. 16 Select the security options if necessary and select Next. 17 Select message download options and select Next. 18...
... no longer want to your email server, select Save password. 11 Select Next. 12 In Server type, select the type of each time you connect to use a different name for this account. 6 Select Attempt to obtain e-mail settings from the Internet if you want to enter, ask your network administrator. 16 Select the security options if necessary and select Next. 17 Select message download options and select Next. 18...
User Guide
Page 118
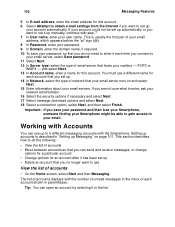
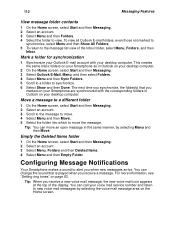
... you receive a message. For more information, see "Setting ring tones" on your Smartphone as in Outlook on page 83. Move a message to a different folder 1 On the Home screen, select Start and then Messaging. 2 Select an account. 3 Scroll to the message to move. 4 Select Menu and then Move. 5 Select the folder into which to view. Tip: You can call your voice mail service number and listen to the message list view of the display...
... you receive a message. For more information, see "Setting ring tones" on your Smartphone as in Outlook on page 83. Move a message to a different folder 1 On the Home screen, select Start and then Messaging. 2 Select an account. 3 Scroll to the message to move. 4 Select Menu and then Move. 5 Select the folder into which to view. Tip: You can call your voice mail service number and listen to the message list view of the display...


