User Manual
Page 4
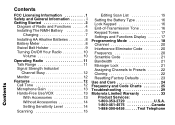
... NiMH Battery 5 Charging 7 Installing AA Alkaline Batteries 8 Battery Meter 8 Setting the Battery Type 16 Lock Keypad 16 End-of-Transmission Tone 16 Keypad Tones 17 Settings and Functions Display 17 Programming Mode 18 Channel 20 Swivel Belt Holster 9 Interference Eliminator Code 20 Turning On/Off Your Radio 10 Frequency 20 Volume 10 Scramble Code 21 Operating Radio 11 Bandwidth 21 Talk Range 11 Manager Lock 21 Signal Strength Indicator/ Assigning Channels to Presets 22 Channel Busy 12 Cloning 22 Monitor 12 Resetting Factory Defaults 23 Features 12 Use and...
... NiMH Battery 5 Charging 7 Installing AA Alkaline Batteries 8 Battery Meter 8 Setting the Battery Type 16 Lock Keypad 16 End-of-Transmission Tone 16 Keypad Tones 17 Settings and Functions Display 17 Programming Mode 18 Channel 20 Swivel Belt Holster 9 Interference Eliminator Code 20 Turning On/Off Your Radio 10 Frequency 20 Volume 10 Scramble Code 21 Operating Radio 11 Bandwidth 21 Talk Range 11 Manager Lock 21 Signal Strength Indicator/ Assigning Channels to Presets 22 Channel Busy 12 Cloning 22 Monitor 12 Resetting Factory Defaults 23 Features 12 Use and...
User Manual
Page 7
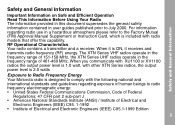
... other XTN Series radios, the output power level is 2.0 watts Exposure to Radio Frequency Energy Your Motorola radio is designed to comply with radio models that offer this document supersedes the general safety information contained in the frequency range of 151-158 MHz, the XTN Series UHF radios operate in user guides published prior to the Factory Mutual (FM) Approval Manual Supplement or Instruction Card, which is ON, it receives and transmits radio frequency (RF) energy. The XTN Series VHF radios operate in the frequency range...
... other XTN Series radios, the output power level is 2.0 watts Exposure to Radio Frequency Energy Your Motorola radio is designed to comply with radio models that offer this document supersedes the general safety information contained in the frequency range of 151-158 MHz, the XTN Series UHF radios operate in user guides published prior to the Factory Mutual (FM) Approval Manual Supplement or Instruction Card, which is ON, it receives and transmits radio frequency (RF) energy. The XTN Series VHF radios operate in the frequency range...
User Manual
Page 8
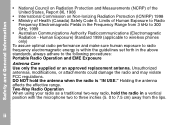
... Exposure to Radio Frequency Electromagnetic Fields in the Frequency Range from the lips. Limits of Health (Canada) Safety Code 6. Two-Way Radio Operation When using your radio as a traditional two-way radio, hold the antenna when the radio is within the guidelines set forth in the above standards, always adhere to the following procedures: Portable Radio Operation and EME Exposure Antenna Care Use only the supplied or an approved replacement antenna.
... Exposure to Radio Frequency Electromagnetic Fields in the Frequency Range from the lips. Limits of Health (Canada) Safety Code 6. Two-Way Radio Operation When using your radio as a traditional two-way radio, hold the antenna when the radio is within the guidelines set forth in the above standards, always adhere to the following procedures: Portable Radio Operation and EME Exposure Antenna Care Use only the supplied or an approved replacement antenna.
User Manual
Page 9
....motorola.com/store. Facilities To avoid electromagnetic interference and/or compatibility conflicts, turn off your radio in any data feature of a device, with or without an accessory cable, position the device and its antenna is susceptible to the Two-Way Radio section of a radio must be using any facility where posted notices instruct you wear a radio on board an aircraft. Any use a body-worn accessory, ensure the radio...
....motorola.com/store. Facilities To avoid electromagnetic interference and/or compatibility conflicts, turn off your radio in any data feature of a device, with or without an accessory cable, position the device and its antenna is susceptible to the Two-Way Radio section of a radio must be using any facility where posted notices instruct you wear a radio on board an aircraft. Any use a body-worn accessory, ensure the radio...

User Manual
Page 16
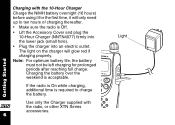
Diagram of Your New XSeries Radio and its Functions Getting Started X 4 Indicator Light Use B to: Transmit Call Tone Use M to: Talk Exit a menu Use \to: Scroll through menus Lock the keypad Use T / S to: *Access Presets Microphone Use P (Power) to: Turn power On/Off Adjust radio volume Accessory Jack Radio Plug-in Charging Audio Accessories Use J to: Turn Scan On/Off* Monitor the Frequency Use [ and ] to: Change Channels* Change menu settings Speaker * XU2600 and XV2600 Only
Diagram of Your New XSeries Radio and its Functions Getting Started X 4 Indicator Light Use B to: Transmit Call Tone Use M to: Talk Exit a menu Use \to: Scroll through menus Lock the keypad Use T / S to: *Access Presets Microphone Use P (Power) to: Turn power On/Off Adjust radio volume Accessory Jack Radio Plug-in Charging Audio Accessories Use J to: Turn Scan On/Off* Monitor the Frequency Use [ and ] to: Change Channels* Change menu settings Speaker * XU2600 and XV2600 Only
User Manual
Page 18
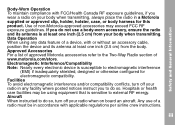
.... X 6 Use only the Charger supplied with the 10-Hour Charger Charge the NiMH battery overnight (16 hours) before using it will glow red if charging properly. Charging with the radio, or other XTN Series accessories. Getting Started If the radio is On while charging, additional time is required to ten hours of charging thereafter. • Make sure the radio is acceptable. The light on the charger will only need up to charge the battery.
.... X 6 Use only the Charger supplied with the 10-Hour Charger Charge the NiMH battery overnight (16 hours) before using it will glow red if charging properly. Charging with the radio, or other XTN Series accessories. Getting Started If the radio is On while charging, additional time is required to ten hours of charging thereafter. • Make sure the radio is acceptable. The light on the charger will only need up to charge the battery.
User Manual
Page 22
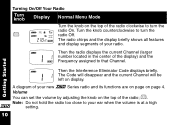
... 218 The radio chirps and the display briefly shows all features and display segments of your radio. Then the radio displays the current Channel (larger number located in the center of the radio; Getting Started Then the Interference Eliminator Code displays briefly. The Code will disappear and the current Channel will be left on page 4. Turn the knob counterclockwise to turn the radio On. Volume You can set the volume by adjusting the knob...
... 218 The radio chirps and the display briefly shows all features and display segments of your radio. Then the radio displays the current Channel (larger number located in the center of the radio; Getting Started Then the Interference Eliminator Code displays briefly. The Code will disappear and the current Channel will be left on page 4. Turn the knob counterclockwise to turn the radio On. Volume You can set the volume by adjusting the knob...
User Manual
Page 24
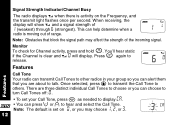
... display E. When receiving, the display will display. You'll hear static if the Channel is clear and w 0 will show w and a signal strength of the incoming signal. Note: The default is set your group so you can transmit Call Tones to other radios in your Call Tone, press \ as needed to turn Call Tones off: 0. • To set on the Frequency, and the transmit light flashes once per second. Features Features Call Tone Your radio can alert...
... display E. When receiving, the display will display. You'll hear static if the Channel is clear and w 0 will show w and a signal strength of the incoming signal. Note: The default is set your group so you can transmit Call Tones to other radios in your Call Tone, press \ as needed to turn Call Tones off: 0. • To set on the Frequency, and the transmit light flashes once per second. Features Features Call Tone Your radio can alert...

User Manual
Page 25
.... • To transmit, speak into Accessory Jack. • Turn radio On. Hands-Free Use/VOX With Compatible VOX Accessories • Turn radio Off. • Open Accessory Cover. • Insert plug of your radio's microphone can be adjusted to fit different users or operating environments. To order accessories, please refer to page 14. If flashing, please refer to receive, stop talking. • VOX operation can be disabled by pressing Mor removing audio accessory. Please refer to : www.motorola.com/radios/professional Features X 13 Radio will display: g. Note: There...
.... • To transmit, speak into Accessory Jack. • Turn radio On. Hands-Free Use/VOX With Compatible VOX Accessories • Turn radio Off. • Open Accessory Cover. • Insert plug of your radio's microphone can be adjusted to fit different users or operating environments. To order accessories, please refer to page 14. If flashing, please refer to receive, stop talking. • VOX operation can be disabled by pressing Mor removing audio accessory. Please refer to : www.motorola.com/radios/professional Features X 13 Radio will display: g. Note: There...

User Manual
Page 28
... Scan List, it will return the next time you use the Scan feature. • Depressing [ will not appear if the Motorola NiMH Battery is flashing. Note: To unlock, press \ for three seconds. End-of-Transmission Tone When you turn this feature On, your two-way radio transmits a tone when you to "skip" a busy Channel to check for other activity. • Press ] to recognize and properly display the power remaining of A or n displays. Setting...
... Scan List, it will return the next time you use the Scan feature. • Depressing [ will not appear if the Motorola NiMH Battery is flashing. Note: To unlock, press \ for three seconds. End-of-Transmission Tone When you turn this feature On, your two-way radio transmits a tone when you to "skip" a busy Channel to check for other activity. • Press ] to recognize and properly display the power remaining of A or n displays. Setting...
User Manual
Page 29
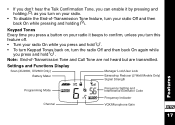
... Display Scan (XU2600, XV2600 Only) Battery Meter Manager Lock/User Lock Eavesdrop Reducer (2 Watt Models Only) Signal Strength Features Programming Mode Channel Frequency Setting and Interference Eliminator Code Frequency Indicator VOX/Microphone Gain X 17 • If you don't hear the Talk Confirmation Tone, you can enable it beeps to confirm, unless you press and hold [. • To turn this feature off. • Turn your radio Off and then back On while pressing and holding ]. Keypad Tones Every time you press a button on , turn the radio...
... Display Scan (XU2600, XV2600 Only) Battery Meter Manager Lock/User Lock Eavesdrop Reducer (2 Watt Models Only) Signal Strength Features Programming Mode Channel Frequency Setting and Interference Eliminator Code Frequency Indicator VOX/Microphone Gain X 17 • If you don't hear the Talk Confirmation Tone, you can enable it beeps to confirm, unless you press and hold [. • To turn this feature off. • Turn your radio Off and then back On while pressing and holding ]. Keypad Tones Every time you press a button on , turn the radio...
User Manual
Page 30
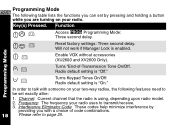
...: The frequency your radio uses to transmit/receive. 3. Programming Mode M P Enable VOX without accessories (XU2600 and XV2600 Only). ] P Turns "End-of code combinations. 18 Please refer to page 25. Function MJ P Access k Programming Mode: Three second delay. Interference Eliminator Code: These codes help minimize interference by pressing and holding a button k while you with someone on your radio. Reset factory settings: Three second delay. Radio default setting is enabled. Key(s) Pressed. Radio default setting is using, depending upon radio model. 2. Channel...
...: The frequency your radio uses to transmit/receive. 3. Programming Mode M P Enable VOX without accessories (XU2600 and XV2600 Only). ] P Turns "End-of code combinations. 18 Please refer to page 25. Function MJ P Access k Programming Mode: Three second delay. Interference Eliminator Code: These codes help minimize interference by pressing and holding a button k while you with someone on your radio. Reset factory settings: Three second delay. Radio default setting is enabled. Key(s) Pressed. Radio default setting is using, depending upon radio model. 2. Channel...
User Manual
Page 31
... the optional accessory 53879 Multi-Unit Charger (MUC) can be selected in Programming Mode: k. • Access k by holding the M and J buttons for optimum audio quality. Note: k does not timeout. return to page 23. k Programming Mode The Cloning Feature used with Preset Channels and Manager Lock can help to duplicate radio settings easily for three seconds. Press M and release to that specific code. k illuminates and radio chirps to exit programming mode. 19 Please...
... the optional accessory 53879 Multi-Unit Charger (MUC) can be selected in Programming Mode: k. • Access k by holding the M and J buttons for optimum audio quality. Note: k does not timeout. return to page 23. k Programming Mode The Cloning Feature used with Preset Channels and Manager Lock can help to duplicate radio settings easily for three seconds. Press M and release to that specific code. k illuminates and radio chirps to exit programming mode. 19 Please...

User Manual
Page 33
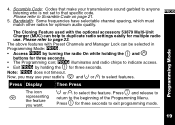
... same code. Please refer to page 11. • Press \ as needed until K displays. • Bandwidth is set to page 11. 21 C K Note: Spirit GT radios operate on 12.5 kHz Bandwidth C, while M series operate on 25.0 kHz Bandwidth D. k Programming Mode Bandwidth (when FCC allowable) Some frequencies have selectable channel spacing, which makes your transmissions sound garbled to select setting: Either D (high: 25.0 kHz) or C (low: 12.5 kHz) will display. When...
... same code. Please refer to page 11. • Press \ as needed until K displays. • Bandwidth is set to page 11. 21 C K Note: Spirit GT radios operate on 12.5 kHz Bandwidth C, while M series operate on 25.0 kHz Bandwidth D. k Programming Mode Bandwidth (when FCC allowable) Some frequencies have selectable channel spacing, which makes your transmissions sound garbled to select setting: Either D (high: 25.0 kHz) or C (low: 12.5 kHz) will display. When...
User Manual
Page 34
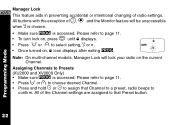
... and XV2600 Only) • Make sure k is accessed. All of the Channel settings are assigned to that Channel to a preset, radio beeps to select setting, Y or n. Programming Mode Manager Lock k This feature aids in preventing accidental or intentional changing of M, B and the Monitor feature will lock your radio on the current Channel. n • Once turned on , press \ until f displays. • Press [ or ] to confirm. k All buttons with the exception of radio settings. Please...
... and XV2600 Only) • Make sure k is accessed. All of the Channel settings are assigned to that Channel to a preset, radio beeps to select setting, Y or n. Programming Mode Manager Lock k This feature aids in preventing accidental or intentional changing of M, B and the Monitor feature will lock your radio on the current Channel. n • Once turned on , press \ until f displays. • Press [ or ] to confirm. k All buttons with the exception of radio settings. Please...

User Manual
Page 35
... cloning was successful all selectable settings are sent to page 11. Multi-channel models can be reset to be of J. Source Radio Display Programming Mode Note: The MUC does not need to factory defaults by turning the radio On while holding M and \ buttons simultaneously for three seconds. Turn radio Off and back On again to the MUC User's Guide included with this accessory. • Make sure k is enabled. 23 Please refer to use...
... cloning was successful all selectable settings are sent to page 11. Multi-channel models can be reset to be of J. Source Radio Display Programming Mode Note: The MUC does not need to factory defaults by turning the radio On while holding M and \ buttons simultaneously for three seconds. Turn radio Off and back On again to the MUC User's Guide included with this accessory. • Make sure k is enabled. 23 Please refer to use...
User Manual
Page 42
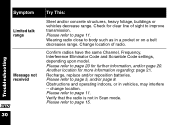
... as in Scan mode. Another location for further information, and/or page 20. Verify that the radio is not in a pocket or on a belt decreases range. Please refer to improve transmission. Obstructions and operating indoors, or in vehicles, may interfere -- Please refer to page 15. Confirm radios have the same Channel, Frequency, Interference Eliminator Code and Scramble Code settings, depending upon model. Recharge, replace and/or reposition batteries. Change location...
... as in Scan mode. Another location for further information, and/or page 20. Verify that the radio is not in a pocket or on a belt decreases range. Please refer to improve transmission. Obstructions and operating indoors, or in vehicles, may interfere -- Please refer to page 15. Confirm radios have the same Channel, Frequency, Interference Eliminator Code and Scramble Code settings, depending upon model. Recharge, replace and/or reposition batteries. Change location...

User Manual
Page 53
A Accessory 13 Cover 4 Adjust volume 4 Alkaline batteries 8 B Back Cover 5 Bandwidth 21 Battery Alkaline 8 Install 8 Charge NTN8971NiMH 6 Meter 8 Optimum life 6 Setting 16 Button Beeps 18 C Call Display 12 Call Done 4,12 Channel 10,18 Activity 12 Change 4 Setting 20 Charger 6 Desktop Drop-in 7 Multi-unit 19 Plug-in 7 Charging 11 Clean radio 24 Cloning 19,23 Code Interference Eliminator 18,20 Scrambling 19 D Default Settings 23 Diagram Function 4 Drop-in Charger 7 E Exit a Menu 4 External VOX 14 F FCC FAX 1-202-418-0177 1 FORMS 1-800-418-3676...
A Accessory 13 Cover 4 Adjust volume 4 Alkaline batteries 8 B Back Cover 5 Bandwidth 21 Battery Alkaline 8 Install 8 Charge NTN8971NiMH 6 Meter 8 Optimum life 6 Setting 16 Button Beeps 18 C Call Display 12 Call Done 4,12 Channel 10,18 Activity 12 Change 4 Setting 20 Charger 6 Desktop Drop-in 7 Multi-unit 19 Plug-in 7 Charging 11 Clean radio 24 Cloning 19,23 Code Interference Eliminator 18,20 Scrambling 19 D Default Settings 23 Diagram Function 4 Drop-in Charger 7 E Exit a Menu 4 External VOX 14 F FCC FAX 1-202-418-0177 1 FORMS 1-800-418-3676...
User Manual
Page 58
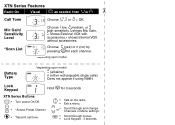
... upon model A (alkaline) n (other rechargeable single cells) A Does not appear if using NiMH. Scroll through menus. Mic Gain/ Sensitivity Level *Scan List Choose1 low, 2 medium, or 3 high sensitivity. ?shows Mic Gain, ? Scroll through and change Channels or Menu settings. T • *Access Preset Channe.l S B • Transmit call tone. • M• ] or • [ \ • • Talk on the radio. Lock Keypad Hold \for 3 seconds XTN Series Buttons P • Turn power On/Off. Exit a menu. XTN Series Features Radio On...
... upon model A (alkaline) n (other rechargeable single cells) A Does not appear if using NiMH. Scroll through menus. Mic Gain/ Sensitivity Level *Scan List Choose1 low, 2 medium, or 3 high sensitivity. ?shows Mic Gain, ? Scroll through and change Channels or Menu settings. T • *Access Preset Channe.l S B • Transmit call tone. • M• ] or • [ \ • • Talk on the radio. Lock Keypad Hold \for 3 seconds XTN Series Buttons P • Turn power On/Off. Exit a menu. XTN Series Features Radio On...
User Manual
Page 60
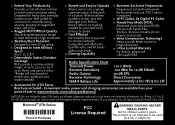
...-one or group Frequencies set aside exclusively to 6 miles. FCC License Designed for heavy duty, everyday of their respective owners. © 2001 Motorola, Inc. ft. Receiver Technology NiMH Battery Life Direct Conversion Approximately 15 hrs 1W/13 hrs 2W • Accessories for business-only use . Compatible with Motorola Spirit® radios and M Series audio accessories. • Cloning Capability Radio Specification Chart Transmit Power Receiver Sensitivity • Hands-Free Mode (VOX) Advanced voice activation (VOX) lets you talk hands-free; Pat. & Tm. This...
...-one or group Frequencies set aside exclusively to 6 miles. FCC License Designed for heavy duty, everyday of their respective owners. © 2001 Motorola, Inc. ft. Receiver Technology NiMH Battery Life Direct Conversion Approximately 15 hrs 1W/13 hrs 2W • Accessories for business-only use . Compatible with Motorola Spirit® radios and M Series audio accessories. • Cloning Capability Radio Specification Chart Transmit Power Receiver Sensitivity • Hands-Free Mode (VOX) Advanced voice activation (VOX) lets you talk hands-free; Pat. & Tm. This...


