User Guide
Page 3
... and Chargers Safety Information 7 Operational Safety Guidelines 8 FCC Licensing Information 9 Interference Information 9 Radio Overview 11 Parts of the Radio 11 On/Off/Volume Knob 12 Channel Selector Knob 12 Accessory Connector 12 Model Label 12 Microphone 12 Antenna 12 LED Indicator 12 Side Buttons 12 The ... Installing the Lithium-Ion (Li-Ion) Battery 16 Removing the Lithium-Ion (Li-Ion) Battery 16 Alkaline Battery Pack (Optional Accessory 17 Installing Alkaline Batteries 17 Removing Alkaline Batteries 17 Attaching and Removing Antenna . . . . . 18 Attaching the Antenna 18...
... and Chargers Safety Information 7 Operational Safety Guidelines 8 FCC Licensing Information 9 Interference Information 9 Radio Overview 11 Parts of the Radio 11 On/Off/Volume Knob 12 Channel Selector Knob 12 Accessory Connector 12 Model Label 12 Microphone 12 Antenna 12 LED Indicator 12 Side Buttons 12 The ... Installing the Lithium-Ion (Li-Ion) Battery 16 Removing the Lithium-Ion (Li-Ion) Battery 16 Alkaline Battery Pack (Optional Accessory 17 Installing Alkaline Batteries 17 Removing Alkaline Batteries 17 Attaching and Removing Antenna . . . . . 18 Attaching the Antenna 18...

User Guide
Page 4
CONTENTS Getting Started 29 Turning radio ON/OFF 29 Adjusting Volume 29 Selecting a Channel 29 Talking and Monitoring 29 Receiving a Call 30 Talk Range 30 Radio LED Indicators 32 Hands-Free Use/VOX 33 With Compatible VOX Accessories. . . . .33 Setting VOX Sensitivity 34 Microphone Gain 34 Battery Save... 34 Reset to Factory Defaults 34 End of Transmission Tone (Roger Beep Tone 35 Programming Features 36 Programming Mode 36 Learning to Read the Values the Radio Signals You 36 ...
CONTENTS Getting Started 29 Turning radio ON/OFF 29 Adjusting Volume 29 Selecting a Channel 29 Talking and Monitoring 29 Receiving a Call 30 Talk Range 30 Radio LED Indicators 32 Hands-Free Use/VOX 33 With Compatible VOX Accessories. . . . .33 Setting VOX Sensitivity 34 Microphone Gain 34 Battery Save... 34 Reset to Factory Defaults 34 End of Transmission Tone (Roger Beep Tone 35 Programming Features 36 Programming Mode 36 Learning to Read the Values the Radio Signals You 36 ...

User Guide
Page 5
... 81 Chargers 81 Power Supplies 82 RDX Series™ Features Summary 83 Programmable Buttons Chart 93 Icons Chart 94 3 English VHF Default Frequencies Chart 64 RDX UHF Frequencies Chart 65 RDU2020 - CONTENTS Cloning Radios 51 Cloning with a Multi Unit Charger (MUC 51 Cloning Radio using the Radio to Radio (R2R) Cloning Cable (Optional Accessory 53 Cloning using the CPS...
... 81 Chargers 81 Power Supplies 82 RDX Series™ Features Summary 83 Programmable Buttons Chart 93 Icons Chart 94 3 English VHF Default Frequencies Chart 64 RDX UHF Frequencies Chart 65 RDU2020 - CONTENTS Cloning Radios 51 Cloning with a Multi Unit Charger (MUC 51 Cloning Radio using the Radio to Radio (R2R) Cloning Cable (Optional Accessory 53 Cloning using the CPS...

User Guide
Page 6
For a list of Motorola-approved antennas, batteries, and other accessories, visit the following website which lists approved accessories: www.motorolasolutions.com/RDX SAFETY English 4 This radio is restricted to occupational use only to satisfy FCC RF energy exposure requirements. SAFETY PRODUCT SAFETY AND RF EXPOSURE COMPLIANCE ! C a u t i o n Before using this product, read the operating instructions and RF energy awareness information contained in the Product Safety and RF Exposure booklet enclosed with your radio. ATTENTION!
For a list of Motorola-approved antennas, batteries, and other accessories, visit the following website which lists approved accessories: www.motorolasolutions.com/RDX SAFETY English 4 This radio is restricted to occupational use only to satisfy FCC RF energy exposure requirements. SAFETY PRODUCT SAFETY AND RF EXPOSURE COMPLIANCE ! C a u t i o n Before using this product, read the operating instructions and RF energy awareness information contained in the Product Safety and RF Exposure booklet enclosed with your radio. ATTENTION!
User Guide
Page 9
...important safety and operating instructions. Other batteries may result in risk of injury, charge only the rechargeable Motorola-authorized batteries. it has been broken or damaged in risk of accessories not recommended by the plug rather than the cord when disconnecting the charger. 4. Use of fire,... charger from the AC outlet before attempting any way. Do not disassemble the charger; Before using the battery charger, read all the instructions and cautionary markings on • the charger, • the battery, and • the radio using the battery 1. To reduce risk of the...
...important safety and operating instructions. Other batteries may result in risk of injury, charge only the rechargeable Motorola-authorized batteries. it has been broken or damaged in risk of accessories not recommended by the plug rather than the cord when disconnecting the charger. 4. Use of fire,... charger from the AC outlet before attempting any way. Do not disassemble the charger; Before using the battery charger, read all the instructions and cautionary markings on • the charger, • the battery, and • the radio using the battery 1. To reduce risk of the...

User Guide
Page 14
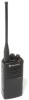
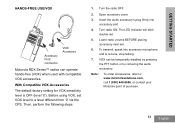
.... For RDV5100, RDU4100 antennas are non-removable. Model Label Indicates the model of batteries. Accessory Connector Used to give battery status, power-up status, radio call information and scan status. LED Indicator Used to connect compatible audio accessories. Channel Selector Knob Used to switch the radio to different channels. The Lithium-Ion (Li-Ion) Battery RDX Series™ provides...
.... For RDV5100, RDU4100 antennas are non-removable. Model Label Indicates the model of batteries. Accessory Connector Used to give battery status, power-up status, radio call information and scan status. LED Indicator Used to connect compatible audio accessories. Channel Selector Knob Used to switch the radio to different channels. The Lithium-Ion (Li-Ion) Battery RDX Series™ provides...

User Guide
Page 19
Remove battery door from the radio's body. 17 English Turn OFF the radio, if it is turned ON. 2. Remove Li-Ion battery. 3. Assemble alkaline battery pack in the same steps as installing the Li-Ion battery pack. 4. ...the battery latches, on both sides of the battery away from the radio's body, and lift the battery from alkaline battery pack. 5. Turn OFF the radio, if it is turned ON. 2. Alkaline Battery Pack (Optional Accessory) Installing Alkaline Batteries Removing Alkaline Batteries RADIO OVERVIEW Alkaline Battery Door Alkaline Battery Door 1. Slide the 5 AA alkaline...
Remove battery door from the radio's body. 17 English Turn OFF the radio, if it is turned ON. 2. Remove Li-Ion battery. 3. Assemble alkaline battery pack in the same steps as installing the Li-Ion battery pack. 4. ...the battery latches, on both sides of the battery away from the radio's body, and lift the battery from alkaline battery pack. 5. Turn OFF the radio, if it is turned ON. 2. Alkaline Battery Pack (Optional Accessory) Installing Alkaline Batteries Removing Alkaline Batteries RADIO OVERVIEW Alkaline Battery Door Alkaline Battery Door 1. Slide the 5 AA alkaline...
User Guide
Page 30
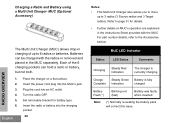
...also allows you to clone up to 3 radios (3 Source radios and 3 Target radios). Each of up to 6 radios or batteries. Set removable bracket for details. • Further details on a flat surface. Refer to the Accessories section. Batteries can hold a radio or battery, but not both. Plug ...the cord into the MUC's jack. MUC (Optional Accessory) The Multi Unit Charger (MUC) allows drop-in the MUC separately. RADIO OVERVIEW 1. 2. 3. 4. 5. 6. Insert the power cord plug into an AC outlet. Charging a Radio and Battery using a Multi Unit Charger- MUC LED Indicator...
...also allows you to clone up to 3 radios (3 Source radios and 3 Target radios). Each of up to 6 radios or batteries. Set removable bracket for details. • Further details on a flat surface. Refer to the Accessories section. Batteries can hold a radio or battery, but not both. Plug ...the cord into the MUC's jack. MUC (Optional Accessory) The Multi Unit Charger (MUC) allows drop-in the MUC separately. RADIO OVERVIEW 1. 2. 3. 4. 5. 6. Insert the power cord plug into an AC outlet. Charging a Radio and Battery using a Multi Unit Charger- MUC LED Indicator...
User Guide
Page 35
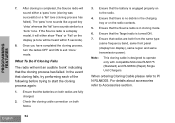
....com, call 1 (800) 448-6686, or contact your Motorola point of purchase 33 English GETTING STARTED HANDS-FREE USE/VOX Accessory Port/ Connector VOX Accessory Motorola RDX Series™ radios can be temporarily disabled by pressing the PTT button or by removing the audio accessory. Lower radio volume BEFORE placing accessory near ear. 6. VOX can operate hands-free (VOX) when...
....com, call 1 (800) 448-6686, or contact your Motorola point of purchase 33 English GETTING STARTED HANDS-FREE USE/VOX Accessory Port/ Connector VOX Accessory Motorola RDX Series™ radios can be temporarily disabled by pressing the PTT button or by removing the audio accessory. Lower radio volume BEFORE placing accessory near ear. 6. VOX can operate hands-free (VOX) when...
User Guide
Page 36
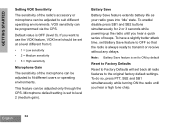
...SB1 and SB2 buttons simultaneously for 2 or 3 seconds while powering up the radio until you hear a quick series of beeps. Microphone default setting is set Battery Save feature to OFF so that the radio is always ready to level 2 (medium gain). This feature can be adjusted ... extends battery life as your radio goes into 'Idle' state. VOX sensitivity can be adjusted to the original factory default settings. English 34 Note: Battery Save feature is OFF (level 0). GETTING STARTED Setting VOX Sensitivity The sensitivity of the radio's accessory or microphone can be programmed ...
...SB1 and SB2 buttons simultaneously for 2 or 3 seconds while powering up the radio until you hear a quick series of beeps. Microphone default setting is set Battery Save feature to OFF so that the radio is always ready to level 2 (medium gain). This feature can be adjusted ... extends battery life as your radio goes into 'Idle' state. VOX sensitivity can be adjusted to the original factory default settings. English 34 Note: Battery Save feature is OFF (level 0). GETTING STARTED Setting VOX Sensitivity The sensitivity of the radio's accessory or microphone can be programmed ...

User Guide
Page 50
...other features such as shown in your Motorola point of the user guide for more details. CPS is by giving the option to Features Summary Chart Section at : www.motorolasolutions.com/RDX To program, connect the RDX Series™ radio via the Drop-in Charger Tray and ...CPS Programming Cable as : Time-out Timer, Power Select, Battery Type Select, Scan List, Call Tones, Scramble, Reverse Burst, etc. CPS Software is an accessory sold separately. PROGRAMMING ...
...other features such as shown in your Motorola point of the user guide for more details. CPS is by giving the option to Features Summary Chart Section at : www.motorolasolutions.com/RDX To program, connect the RDX Series™ radio via the Drop-in Charger Tray and ...CPS Programming Cable as : Time-out Timer, Power Select, Battery Type Select, Scan List, Call Tones, Scramble, Reverse Burst, etc. CPS Software is an accessory sold separately. PROGRAMMING ...

User Guide
Page 53
...RADIOS You can clone RDX Series™ radio profiles from the source radio.) The Source radio has to be in Pocket 1, 3 or 5 while the Target radio has to be in Pocket 2, 4 or 6, matching in the MUCs pockets by using the MUC, there must be at least two radios: • a Source radio (radio...8226; 3 and 4 or, • 5 and 6 (*). Turn ON the Target radio and place it into a power source, but ALL radios require charged batteries. 1. When cloning, the MUC does not need to - Radio cloning cable (optional accessory), • the CPS (free software download) Cloning with a Multi Unit Charger (MUC...
...RADIOS You can clone RDX Series™ radio profiles from the source radio.) The Source radio has to be in Pocket 1, 3 or 5 while the Target radio has to be in Pocket 2, 4 or 6, matching in the MUCs pockets by using the MUC, there must be at least two radios: • a Source radio (radio...8226; 3 and 4 or, • 5 and 6 (*). Turn ON the Target radio and place it into a power source, but ALL radios require charged batteries. 1. When cloning, the MUC does not need to - Radio cloning cable (optional accessory), • the CPS (free software download) Cloning with a Multi Unit Charger (MUC...
User Guide
Page 55
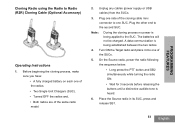
...) Cloning Cable (Optional Accessory) Operating Instructions 1. On the Source radio, power the radio following the sequence below: • Long press the PTT button and SB2 simultaneously while turning the radio ON. • Wait for 3 seconds before releasing the buttons until a distinctive audible tone is being established between the two radios. 4. Plug one side of the cloning...
...) Cloning Cable (Optional Accessory) Operating Instructions 1. On the Source radio, power the radio following the sequence below: • Long press the PTT button and SB2 simultaneously while turning the radio ON. • Wait for 3 seconds before releasing the buttons until a distinctive audible tone is being established between the two radios. 4. Plug one side of the cloning...
User Guide
Page 56
...to operate only with compatible Motorola RLN6175 (Standard) and RLN6304 (Rapid) Single Unit Chargers. Ensure that the batteries on both SUCs. 3. Note: This cloning cable is completed, the Source radio will emit an audible 'bonk' indicating that radios are both radios are fully charged. 2. ...to P/ N RLN6303. English 54 The 'pass' tone sounds like a good key 'chirp' whereas the 'fail' tone sounds similar to Accessories section. Ensure that the Target radio is a display model, it will either a 'pass' tone (cloning was successful) or a 'fail' tone (cloning process has failed)....
...to operate only with compatible Motorola RLN6175 (Standard) and RLN6304 (Rapid) Single Unit Chargers. Ensure that the batteries on both SUCs. 3. Note: This cloning cable is completed, the Source radio will emit an audible 'bonk' indicating that radios are both radios are fully charged. 2. ...to P/ N RLN6303. English 54 The 'pass' tone sounds like a good key 'chirp' whereas the 'fail' tone sounds similar to Accessories section. Ensure that the Target radio is a display model, it will either a 'pass' tone (cloning was successful) or a 'fail' tone (cloning process has failed)....
User Guide
Page 57
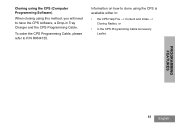
PROGRAMMING FEATURES 55 English To order the CPS Programming Cable, please refer to have the CPS software, a Drop-in the CPS Programming Cable Accessory Leaflet. Cloning using the CPS (Computer Programming Software) When cloning using the CPS is available either in: • the CPS Help File --> Content and Index --> Cloning Radios, or • in Tray Charger and the CPS Programming Cable. Information on how to clone using this method, you will need to P/N RKN4155.
PROGRAMMING FEATURES 55 English To order the CPS Programming Cable, please refer to have the CPS software, a Drop-in the CPS Programming Cable Accessory Leaflet. Cloning using the CPS (Computer Programming Software) When cloning using the CPS is available either in: • the CPS Help File --> Content and Index --> Cloning Radios, or • in Tray Charger and the CPS Programming Cable. Information on how to clone using this method, you will need to P/N RKN4155.
User Guide
Page 61
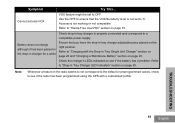
...is not set to OFF. Refer to "Hands-Free Use/VOX" section on page 23. Accessory not working or not compatible. Cannot activate VOX VOX feature might be set to see if the radio has been programmed using the CPS with the Drop-In Tray Single Unit Charger" section on page... 22 and "Charging a Standalone Battery" section on page 33. Check the charger's LEDs indicators to '0'. Note: Whenever a feature in the radio seems to not correspond to the default or preprogrammed values, check to ensure that you have the drop-in Tray Charger LED Indicators" section on...
...is not set to OFF. Refer to "Hands-Free Use/VOX" section on page 23. Accessory not working or not compatible. Cannot activate VOX VOX feature might be set to see if the radio has been programmed using the CPS with the Drop-In Tray Single Unit Charger" section on page... 22 and "Charging a Standalone Battery" section on page 33. Check the charger's LEDs indicators to '0'. Note: Whenever a feature in the radio seems to not correspond to the default or preprogrammed values, check to ensure that you have the drop-in Tray Charger LED Indicators" section on...

User Guide
Page 78
... Accessories and Cases. Business Two-way Radio Accessories One (1) year from defects in the United States, which are Repaired or Replaced. Products and Accessories Products Covered Length of Coverage Products and Accessories as follows to the exclusions contained below . Decorative covers, bezels, PhoneWrap™ covers and cases. Products and Accessories that operate via Family Radio Service or General Mobile Radio Service, Motorola...
... Accessories and Cases. Business Two-way Radio Accessories One (1) year from defects in the United States, which are Repaired or Replaced. Products and Accessories Products Covered Length of Coverage Products and Accessories as follows to the exclusions contained below . Decorative covers, bezels, PhoneWrap™ covers and cases. Products and Accessories that operate via Family Radio Service or General Mobile Radio Service, Motorola...

User Guide
Page 83
ACCESSORIES CARRY ACCESSORIES Part No. Description RLN6349 North America AC Pin Adaptor SOFTWARE APPLICATIONS Part No. Description RLN6304 RLN6309 RLN6175 Rapid ACCY Charging Kit Americas (*) Multi Unit Charger (MUC) Kit North America Standard Drop-in Tray Charger 81 English Description RLN6302 RLN6307 Hard Leather Carry Case Spring Action Belt Clip POWER SUPPLIES AC PIN ADAPTORS Part No. Description RVN5147 Computer Programming Software (CPS) CABLES Part No. Description RLN6303 RKN4155 Radio to Radio Cloning Cable CPS Programming Cable CHARGERS Part No.
ACCESSORIES CARRY ACCESSORIES Part No. Description RLN6349 North America AC Pin Adaptor SOFTWARE APPLICATIONS Part No. Description RLN6304 RLN6309 RLN6175 Rapid ACCY Charging Kit Americas (*) Multi Unit Charger (MUC) Kit North America Standard Drop-in Tray Charger 81 English Description RLN6302 RLN6307 Hard Leather Carry Case Spring Action Belt Clip POWER SUPPLIES AC PIN ADAPTORS Part No. Description RVN5147 Computer Programming Software (CPS) CABLES Part No. Description RLN6303 RKN4155 Radio to Radio Cloning Cable CPS Programming Cable CHARGERS Part No.
User Guide
Page 88
... only for display models only. IVOX, enable/ Yes N/A N/A N/A disable OFF Hands free without accessories, available for certain 4W/5W radio models. Bandwidth Range Radios Bandwidth is fixed and non-programmable. There are 122 codes available.For Eliminator Yes Yes Yes Yes ...Codes Model Dependant details refer to customize frequencies in your radio. Bandwidth Range for 2W radios: VHF 150.8 - 160 N/A N/A N/A N/A Model Dependant Mhz / UHF 450-470 Mhz Bandwidth Range for front panel radio Interference Channel and programming. To enable IVOX long press the PTT...
... only for display models only. IVOX, enable/ Yes N/A N/A N/A disable OFF Hands free without accessories, available for certain 4W/5W radio models. Bandwidth Range Radios Bandwidth is fixed and non-programmable. There are 122 codes available.For Eliminator Yes Yes Yes Yes ...Codes Model Dependant details refer to customize frequencies in your radio. Bandwidth Range for 2W radios: VHF 150.8 - 160 N/A N/A N/A N/A Model Dependant Mhz / UHF 450-470 Mhz Bandwidth Range for front panel radio Interference Channel and programming. To enable IVOX long press the PTT...

User Guide
Page 90
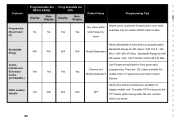
... to monitor and press SB1 again to monitor. 88 Note: Default value is set to get the Maximum Channels Menu option. Features Maximum Channels (2) Microphone Gain Level, ACCESSORY Microphone Gain Level, RADIO Monitor (4) Programmable Via RADIO PANEL Display NonDisplay Programmable via CPS Display NonDisplay Yes No Yes Yes Yes No Yes Yes Yes No Yes...
... to monitor and press SB1 again to monitor. 88 Note: Default value is set to get the Maximum Channels Menu option. Features Maximum Channels (2) Microphone Gain Level, ACCESSORY Microphone Gain Level, RADIO Monitor (4) Programmable Via RADIO PANEL Display NonDisplay Programmable via CPS Display NonDisplay Yes No Yes Yes Yes No Yes Yes Yes No Yes...


