
User Guide
Page 3
MD7250 User Guide Table of Contents FCC Information...iv Important Safety Instructions viii Welcome ...1 Handset Overview ...2 Base Unit Overview ...3 Getting Started...4 Battery Safety Instructions...4 Installing the Battery ...5 Charging the Handset Battery 6 Installing the Base Unit...7 Basic Operations...9 Handset Indicators ...9 Base Unit LEDs...9 Making a Call...10 Answering Calls ...10 Ending a Call ...10 i
MD7250 User Guide Table of Contents FCC Information...iv Important Safety Instructions viii Welcome ...1 Handset Overview ...2 Base Unit Overview ...3 Getting Started...4 Battery Safety Instructions...4 Installing the Battery ...5 Charging the Handset Battery 6 Installing the Base Unit...7 Basic Operations...9 Handset Indicators ...9 Base Unit LEDs...9 Making a Call...10 Answering Calls ...10 Ending a Call ...10 i

User Guide
Page 16
...and/or explosion. • CAUTION: There is a risk of explosion if you replace the battery with your phone or an authorized replacement recommended by the manufacturer. • Keep batteries out of the reach of properly and may need to your local recycling center for... battery type. Use only the battery that power this product must be disposed of children. • Remove batteries if storing over 30 days. • The rechargeable batteries that came with an incorrect battery type. MD7250 User Guide Getting Started Battery Safety Instructions • ...
...and/or explosion. • CAUTION: There is a risk of explosion if you replace the battery with your phone or an authorized replacement recommended by the manufacturer. • Keep batteries out of the reach of properly and may need to your local recycling center for... battery type. Use only the battery that power this product must be disposed of children. • Remove batteries if storing over 30 days. • The rechargeable batteries that came with an incorrect battery type. MD7250 User Guide Getting Started Battery Safety Instructions • ...

User Guide
Page 17
Insert the battery into the receptacle. (Make sure the black wire is on the indentation and sliding downward. 3. MD7250 User Guide Installing the Battery 1. Remove any stickers or inserts, if present. 2. Replace the battery door. 6. Remove the battery door by pressing down on the left.) 4. Attach the belt clip (optional). 5 5 Plug the battery connector into the battery compartment. 5.
Insert the battery into the receptacle. (Make sure the black wire is on the indentation and sliding downward. 3. MD7250 User Guide Installing the Battery 1. Remove any stickers or inserts, if present. 2. Replace the battery door. 6. Remove the battery door by pressing down on the left.) 4. Attach the belt clip (optional). 5 5 Plug the battery connector into the battery compartment. 5.

User Guide
Page 18
... you press the keys), charge the handset. MD7250 User Guide Charging the Handset Battery The handset of eight hours should be sufficient. Be sure to place the handset in its base when not in LOW BATTERY mode, the keypad sounds, backlighting, and speakerphone features will not work. It ...charges automatically whenever the handset is powered by a rechargeable NiMH battery pack. NOTE: When in use to ensure maximum daily performance. If your cordless telephone is in the base unit or charger. After the ...
... you press the keys), charge the handset. MD7250 User Guide Charging the Handset Battery The handset of eight hours should be sufficient. Be sure to place the handset in its base when not in LOW BATTERY mode, the keypad sounds, backlighting, and speakerphone features will not work. It ...charges automatically whenever the handset is powered by a rechargeable NiMH battery pack. NOTE: When in use to ensure maximum daily performance. If your cordless telephone is in the base unit or charger. After the ...
User Guide
Page 21
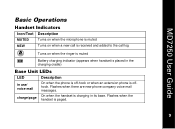
... the microphone is muted NEW Turns on when a new call is received and added to the call log Turns on when the ringer is muted E Battery charging indicator (appears when handset is placed in the charging cradle) Base Unit LEDs LED Description in its base. Flashes when there are new phone...
... the microphone is muted NEW Turns on when a new call is received and added to the call log Turns on when the ringer is muted E Battery charging indicator (appears when handset is placed in the charging cradle) Base Unit LEDs LED Description in its base. Flashes when there are new phone...

User Guide
Page 38
... seconds, the outside call. 2. NOTE: If the second handset does not respond after approximately 30 seconds, the outside call, you must install and charge the battery. 1. Press SELECT/MENU. 2. MD7250 User Guide Call Transfer During an outside call returns to the first handset, and CALL BACK appears. If the returned call...
... seconds, the outside call. 2. NOTE: If the second handset does not respond after approximately 30 seconds, the outside call, you must install and charge the battery. 1. Press SELECT/MENU. 2. MD7250 User Guide Call Transfer During an outside call returns to the first handset, and CALL BACK appears. If the returned call...

User Guide
Page 39
... while using your phone. Either move closer to another position. (See Installing the Base Unit on page 7.) 27 27 The phone doesn't work at www.motorola.com/cordless. Try moving the base unit to the base unit, or relocate it. • The layout of range. MD7250 User Guide In Case of... and electrical outlet. • Make sure the phone cord is plugged firmly into the base unit and the telephone wall jack. • Make sure the battery is properly inserted and fully charged.
... while using your phone. Either move closer to another position. (See Installing the Base Unit on page 7.) 27 27 The phone doesn't work at www.motorola.com/cordless. Try moving the base unit to the base unit, or relocate it. • The layout of range. MD7250 User Guide In Case of... and electrical outlet. • Make sure the phone cord is plugged firmly into the base unit and the telephone wall jack. • Make sure the battery is properly inserted and fully charged.

User Guide
Page 40
... telephone jack, and plug in its link with the base. Common Troubleshooting Steps for the handset to re-establish its base. Disconnect the handset battery. 3. Re-install the battery. 28 6. Wait approximately 60 seconds for Your Cordless Phone If the handset or base unit does not seem to be responding normally, then...
... telephone jack, and plug in its link with the base. Common Troubleshooting Steps for the handset to re-establish its base. Disconnect the handset battery. 3. Re-install the battery. 28 6. Wait approximately 60 seconds for Your Cordless Phone If the handset or base unit does not seem to be responding normally, then...

User Guide
Page 42
... or Accessories for commercial purposes or subjecting the Product or Accessory to normal wear and tear are excluded from coverage. Batteries. or (d) other than Motorola, or its authorized service centers, are excluded from coverage. Products or Accessories with liquid, water, rain, extreme humidity... defects in any way by this limited warranty. CD-ROM, or floppy disk). Only batteries whose fully charged capacity falls below 80% of their rated capacity and batteries that embodies the copy of parts due to abnormal usage or conditions; Periodic maintenance, repair...
... or Accessories for commercial purposes or subjecting the Product or Accessory to normal wear and tear are excluded from coverage. Batteries. or (d) other than Motorola, or its authorized service centers, are excluded from coverage. Products or Accessories with liquid, water, rain, extreme humidity... defects in any way by this limited warranty. CD-ROM, or floppy disk). Only batteries whose fully charged capacity falls below 80% of their rated capacity and batteries that embodies the copy of parts due to abnormal usage or conditions; Periodic maintenance, repair...
