
User Manual
Page 2
... described in this document is carefully examined, and is restricted to any form the copyrighted computer program. ATTENTION! C a u t i o n Before using this manual may include copyrighted Motorola computer programs stored in any products herein to all DTR Series portable radios, unless otherwise specified. No part of this product, read the operating instructions for any liability...
... described in this document is carefully examined, and is restricted to any form the copyrighted computer program. ATTENTION! C a u t i o n Before using this manual may include copyrighted Motorola computer programs stored in any products herein to all DTR Series portable radios, unless otherwise specified. No part of this product, read the operating instructions for any liability...
User Manual
Page 4
... 3-1 Accessing the Advanced Menu ...3-1 Managing Your Scroll List ...3-1 Enabling Call Forwarding...3-2 Remote Disabling (DTR650 Models Only 3-3 Remote Monitoring (DTR650 Models Only 3-4 Remote Time (DTR650 Models Only 3-4 Chapter 4 Radio Programming 4-1 Program Menu Navigation Chart ...4-1 Entering Programming Mode...4-2 My Info ...4-2 Adding Contacts ...4-3 Call Type...4-3 Channel...4-4 Unit Name ...4-4 Programming a Unit ID (Private Calls Only 4-5 Selecting a Group ID...4-5 Entering a Home Group Number...
... 3-1 Accessing the Advanced Menu ...3-1 Managing Your Scroll List ...3-1 Enabling Call Forwarding...3-2 Remote Disabling (DTR650 Models Only 3-3 Remote Monitoring (DTR650 Models Only 3-4 Remote Time (DTR650 Models Only 3-4 Chapter 4 Radio Programming 4-1 Program Menu Navigation Chart ...4-1 Entering Programming Mode...4-2 My Info ...4-2 Adding Contacts ...4-3 Call Type...4-3 Channel...4-4 Unit Name ...4-4 Programming a Unit ID (Private Calls Only 4-5 Selecting a Group ID...4-5 Entering a Home Group Number...

User Manual
Page 21
...14 Contcs Mesgs Press and hold to turn your radio should be programmed in order to be fully compatible with any existing DTR Series radios and to turn the radio off. However, your radio on the upper left side of the radio. To adjust the speaker volume, press the upper ... and press the lower button to Chapter 3 - Advanced Radio Operations. Chapter 2 General Radio Operations Your radio is pressed, the display shows a bar chart indicating the present level for the volume. The radio chirps and the display briefly shows Motorola. When either button is ready for use after a fully...
...14 Contcs Mesgs Press and hold to turn your radio should be programmed in order to be fully compatible with any existing DTR Series radios and to turn the radio off. However, your radio on the upper left side of the radio. To adjust the speaker volume, press the upper ... and press the lower button to Chapter 3 - Advanced Radio Operations. Chapter 2 General Radio Operations Your radio is pressed, the display shows a bar chart indicating the present level for the volume. The radio chirps and the display briefly shows Motorola. When either button is ready for use after a fully...

User Manual
Page 23
... group. To maximize clarity, hold the PTT button. Types of Calls Your radio can make and receive three different types of privacy than a PublicGroup. Press and hold the radio two-to member radios. Refer to listen. All DTR Series radios are factory programmed with the RRDN5378 cloning cable) to -three inches away from your Contact...
... group. To maximize clarity, hold the PTT button. Types of Calls Your radio can make and receive three different types of privacy than a PublicGroup. Press and hold the radio two-to member radios. Refer to listen. All DTR Series radios are factory programmed with the RRDN5378 cloning cable) to -three inches away from your Contact...
User Manual
Page 26
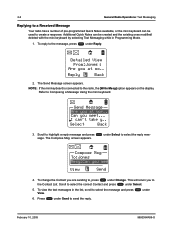
...: Text Messaging Replying to a Received Message Your radio has a number of pre-programmed Quick Notes available, or the mini keyboard can be created and the existing ones modified/ deleted with the mini keyboard by selecting Text Messaging while ... Back 3. screen appears. Detailed View From:Jones Are you at wo.. To view the text messages in Programming Mode. 1. The Compose Msg. Reply Back 2. I can be used to , press under Select. 5. Refer to the radio, the [Write Mesg] option appears on the display. Compose Msg To:Jones Mesg:Can you are sending...
...: Text Messaging Replying to a Received Message Your radio has a number of pre-programmed Quick Notes available, or the mini keyboard can be created and the existing ones modified/ deleted with the mini keyboard by selecting Text Messaging while ... Back 3. screen appears. Detailed View From:Jones Are you at wo.. To view the text messages in Programming Mode. 1. The Compose Msg. Reply Back 2. I can be used to , press under Select. 5. Refer to the radio, the [Write Mesg] option appears on the display. Compose Msg To:Jones Mesg:Can you are sending...
User Manual
Page 27
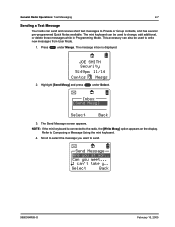
... text messages to change, add additional, or delete these messages while in Programming Mode. This accessory can be used to Private or Group contacts, and has several pre-programmed Quick Notes available. Inbox [Send Mesg] Select Back 3. Scroll to the radio, the [Write Mesg] option appears on the display. Send Message Are you... be used to Composing a Message Using the mini keyboard. 4. NOTE: If the mini keyboard is displayed. The Send Message screen appears. Press under Select. General Radio Operations: Text Messaging 2-7 Sending a Text Message Your...
... text messages to change, add additional, or delete these messages while in Programming Mode. This accessory can be used to Private or Group contacts, and has several pre-programmed Quick Notes available. Inbox [Send Mesg] Select Back 3. Scroll to the radio, the [Write Mesg] option appears on the display. Send Message Are you... be used to Composing a Message Using the mini keyboard. 4. NOTE: If the mini keyboard is displayed. The Send Message screen appears. Press under Select. General Radio Operations: Text Messaging 2-7 Sending a Text Message Your...
User Manual
Page 38
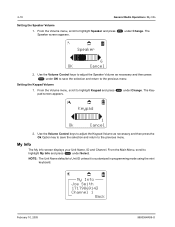
...as necessary and then press the Ok Option key to save the selection and return to the previous menu. under Change. 2-18 General Radio Operations: My Info Setting the Speaker Volume 1. under Change. From the Volume menu, scroll to highlight Speaker and press Speaker screen appears....Info Joe Smith 17179869143 Channel 1 Back February 10, 2005 9980384R89-O From the Main Menu, scroll to Unit ID unless it is customized in programming mode using the mini keyboard. Keypad 1 Ok Cancel 2. NOTE: The Unit Name defaults to highlight My Info and press under OK to save...
...as necessary and then press the Ok Option key to save the selection and return to the previous menu. under Change. 2-18 General Radio Operations: My Info Setting the Speaker Volume 1. under Change. From the Volume menu, scroll to highlight Speaker and press Speaker screen appears....Info Joe Smith 17179869143 Channel 1 Back February 10, 2005 9980384R89-O From the Main Menu, scroll to Unit ID unless it is customized in programming mode using the mini keyboard. Keypad 1 Ok Cancel 2. NOTE: The Unit Name defaults to highlight My Info and press under OK to save...
User Manual
Page 39
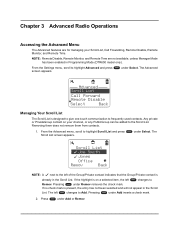
... is present, the entry has not been selected and will not appear in the Scroll List. If no check mark is already in Programming Mode (DTR650 model only). Pressing under Select. under Add inserts a check mark. 2. The Scroll List ! Joe Smith ! The left changes to... Remov. Press under Remov removes the check mark. From the Advanced menu, scroll to Add. Chapter 3 Advanced Radio Operations Accessing the Advanced Menu The Advanced...
... is present, the entry has not been selected and will not appear in the Scroll List. If no check mark is already in Programming Mode (DTR650 model only). Pressing under Select. under Add inserts a check mark. 2. The Scroll List ! Joe Smith ! The left changes to... Remov. Press under Remov removes the check mark. From the Advanced menu, scroll to Add. Chapter 3 Advanced Radio Operations Accessing the Advanced Menu The Advanced...
User Manual
Page 43
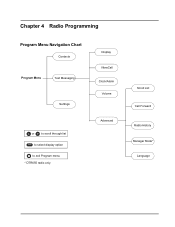
Chapter 4 Radio Programming Program Menu Navigation Chart Contacts Program Menu Text Messaging Settings or to scroll through list to select display option to exit Program menu * DTR650 radio only. Display VibraCall Clock/Alarm Volume Advanced Scroll List Call Forward Radio History Manager Mode* Language
Chapter 4 Radio Programming Program Menu Navigation Chart Contacts Program Menu Text Messaging Settings or to scroll through list to select display option to exit Program menu * DTR650 radio only. Display VibraCall Clock/Alarm Volume Advanced Scroll List Call Forward Radio History Manager Mode* Language
User Manual
Page 44
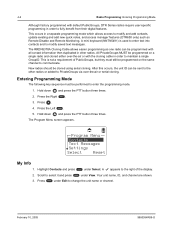
...radios should be programmed on the same channel to fully benefit from their digital features. The Program Menu screen appears. Press . 4. Press under Edit to select it and press under Select. 4-2 Radio Programming: Entering Programming Mode Although factory programmed with default PublicGroups, DTR Series radios require user-specific programming in other radios...and add new quick notes, and access manager features (DTR650 only) such as one radio can be performed to modify saved text messages. Program Menu Contacts Text Messages Settings Select Reset My Info 1....
...radios should be programmed on the same channel to fully benefit from their digital features. The Program Menu screen appears. Press . 4. Press under Edit to select it and press under Select. 4-2 Radio Programming: Entering Programming Mode Although factory programmed with default PublicGroups, DTR Series radios require user-specific programming in other radios...and add new quick notes, and access manager features (DTR650 only) such as one radio can be performed to modify saved text messages. Program Menu Contacts Text Messages Settings Select Reset My Info 1....
User Manual
Page 45
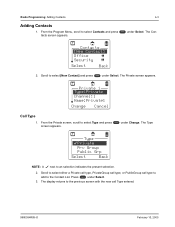
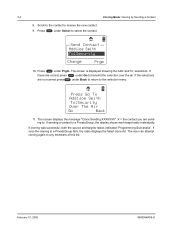
From the Program Menu, scroll to select [New Contact] and press under Select. under Select. 3. The display returns to the previous screen with the new call type to ... screen, scroll to an selection indicates the present selection. 2. The Con- Private 1 Type:Private Channel:1 Name:Private1 Change Cancel Call Type 1. The Private screen appears. Radio Programming: Adding Contacts Adding Contacts 1. Contacts [New Contact] Office Security Select Back 2. The Type Type !Private Prv Group Public Grp Select Back NOTE: A next to select...
From the Program Menu, scroll to select [New Contact] and press under Select. under Select. 3. The display returns to the previous screen with the new call type to ... screen, scroll to an selection indicates the present selection. 2. The Con- Private 1 Type:Private Channel:1 Name:Private1 Change Cancel Call Type 1. The Private screen appears. Radio Programming: Adding Contacts Adding Contacts 1. Contacts [New Contact] Office Security Select Back 2. The Type Type !Private Prv Group Public Grp Select Back NOTE: A next to select...
User Manual
Page 46
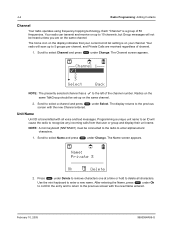
4-4 Radio Programming: Adding Contacts Channel Your radio operates using frequency-hopping technology. Your radio can transmit and receive on up to 10 channels, but Group messages will not be heard unless you are received regardless of the channel number. ... returns to recognize any incoming calls from that your channel. The Name screen appears. Your radio will cause the radio to the previous Unit Name Unit ID is transmitted with the new Channel entered. The Channel screen appears. Programming a unique unit name to 5 groups per channel, and Private Calls are on your current...
4-4 Radio Programming: Adding Contacts Channel Your radio operates using frequency-hopping technology. Your radio can transmit and receive on up to 10 channels, but Group messages will not be heard unless you are received regardless of the channel number. ... returns to recognize any incoming calls from that your channel. The Name screen appears. Your radio will cause the radio to the previous Unit Name Unit ID is transmitted with the new Channel entered. The Channel screen appears. Programming a unique unit name to 5 groups per channel, and Private Calls are on your current...
User Manual
Page 47
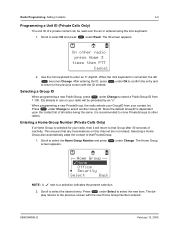
... that Group after 30 seconds of inactivity. under Select to the previous screen with the ID entered. The Home Group Home Group ! Radio Programming: Adding Contacts 4-5 Programming a Unit ID (Private Calls Only) The unit ID of a private contact can be preceded by an "x". IDs already in use ...February 10, 2005 Press under Read. Since the default GroupID is recommended to clone PrivateGroups to other radio press Home 3 times then PTT Cancel 2. The dis- Scroll to enter an 11 digit ID. The ID screen appears. Use the mini keyboard to select ID and press under Change ...
... that Group after 30 seconds of inactivity. under Select to the previous screen with the ID entered. The Home Group Home Group ! Radio Programming: Adding Contacts 4-5 Programming a Unit ID (Private Calls Only) The unit ID of a private contact can be preceded by an "x". IDs already in use ...February 10, 2005 Press under Read. Since the default GroupID is recommended to clone PrivateGroups to other radio press Home 3 times then PTT Cancel 2. The dis- Scroll to enter an 11 digit ID. The ID screen appears. Use the mini keyboard to select ID and press under Change ...
User Manual
Page 48
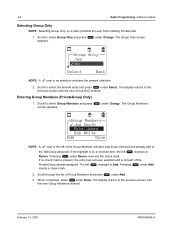
... returns to the previous screen with the new Group Only entered. Pressing under Add 2. Pressing under Remov removes the check mark. 4-6 Radio Programming: Adding Contacts Selecting Group Only NOTE: Selecting Group Only on a checked item, the left changes to the left inserts a check mark... Add Done NOTE: A next to Remov. If no check mark is present, the entry has not been selected and is on a radio prohibits the user from initiating PrivateCalls. 1. Entering Group Members (PrivateGroup Only) 1. Scroll through the list of the TalkGroup assigned. The Group...
... returns to the previous screen with the new Group Only entered. Pressing under Add 2. Pressing under Remov removes the check mark. 4-6 Radio Programming: Adding Contacts Selecting Group Only NOTE: Selecting Group Only on a checked item, the left changes to the left inserts a check mark... Add Done NOTE: A next to Remov. If no check mark is present, the entry has not been selected and is on a radio prohibits the user from initiating PrivateCalls. 1. Entering Group Members (PrivateGroup Only) 1. Scroll through the list of the TalkGroup assigned. The Group...
User Manual
Page 49
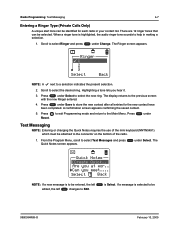
... 2005 Press under Text Messaging NOTE: Entering or changing the Quick Notes requires the use of the radio. 1. If a message is highlighted, the audio ringer tone sounds to select the desired ring. Radio Programming: Text Messaging 4-7 Entering a Ringer Type (Private Calls Only) A unique alert tone can be identified... and press Quick Notes screen appears. The display returns to store the new contact after all entries for each radio in making a selection. 1. Press under Select. From the Program Menu, scroll to Edit. Select Back NOTE: If a new message is Select.
... 2005 Press under Text Messaging NOTE: Entering or changing the Quick Notes requires the use of the radio. 1. If a message is highlighted, the audio ringer tone sounds to select the desired ring. Radio Programming: Text Messaging 4-7 Entering a Ringer Type (Private Calls Only) A unique alert tone can be identified... and press Quick Notes screen appears. The display returns to store the new contact after all entries for each radio in making a selection. 1. Press under Select. From the Program Menu, scroll to Edit. Select Back NOTE: If a new message is Select.
User Manual
Page 50
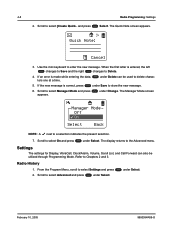
4-8 Radio Programming: Settings 2. The Quick Note screen appears. When the first letter is made while entering the data, ters one at a time. Scroll to select On and press under Save to delete charac- 5. Radio History 1. Use the mini keyboard to select Manager Mode and press appears. If the new message is correct, press under...
4-8 Radio Programming: Settings 2. The Quick Note screen appears. When the first letter is made while entering the data, ters one at a time. Scroll to select On and press under Save to delete charac- 5. Radio History 1. Use the mini keyboard to select Manager Mode and press appears. If the new message is correct, press under...
User Manual
Page 51
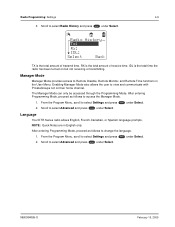
..., proceed as follows to select Advanced and press under Select. From the Program Menu, scroll to Remote Disable, Remote Monitor, and Remote Time functions in English only. Scroll to change the language. 1. Radio Programming: Settings 4-9 3. Scroll to view and communicate with PrivateGroups not on but not receiving or transmitting. Enabling Manager Mode also...
..., proceed as follows to select Advanced and press under Select. From the Program Menu, scroll to Remote Disable, Remote Monitor, and Remote Time functions in English only. Scroll to change the language. 1. Radio Programming: Settings 4-9 3. Scroll to view and communicate with PrivateGroups not on but not receiving or transmitting. Enabling Manager Mode also...
User Manual
Page 56
... new contact. 9. X = the contact you are not correct press under Go to . Scroll to the contact to a PrivateGroup fails, the radio displays the failed clone list. The screen is displayed showing the Add: and To: selections. If over the air. February 10, 2005 9980384R89...Change Prgm 10. The user can attempt cloning again to a PrivateGroup, the display shows each target radio individually. If cloning was successful, both the source and targets radios indicated "Programming Successful". Press under Prgm. Press under Select to the selection menu. If sending a contact to ...
... new contact. 9. X = the contact you are not correct press under Go to . Scroll to the contact to a PrivateGroup fails, the radio displays the failed clone list. The screen is displayed showing the Add: and To: selections. If over the air. February 10, 2005 9980384R89...Change Prgm 10. The user can attempt cloning again to a PrivateGroup, the display shows each target radio individually. If cloning was successful, both the source and targets radios indicated "Programming Successful". Press under Prgm. Press under Select to the selection menu. If sending a contact to ...
User Manual
Page 57
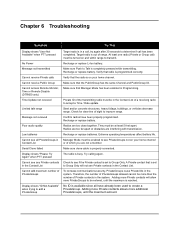
...Extreme operating temperatures affect battery life. Therefore, the number of PrivateGroups allowed cannot be enabled to Talk is busy. Verify that radio is programmed correctly. Make sure that the PublicGroup has the same Channel and PublicGroup ID. Private ID of PrivateGroups Display shows "ID ... Group Cannot access Remote Monitor, Time or Remote Disable (DTR650 only) Time Update not received Limited talk range Message not received Poor audio quality Low batteries Cannot see all have been properly programmed. Target radio is properly connected. Try calling again. Check to be ...
...Extreme operating temperatures affect battery life. Therefore, the number of PrivateGroups allowed cannot be enabled to Talk is busy. Verify that radio is programmed correctly. Make sure that the PublicGroup has the same Channel and PublicGroup ID. Private ID of PrivateGroups Display shows "ID ... Group Cannot access Remote Monitor, Time or Remote Disable (DTR650 only) Time Update not received Limited talk range Message not received Poor audio quality Low batteries Cannot see all have been properly programmed. Target radio is properly connected. Try calling again. Check to be ...
User Manual
Page 63
... 2-5 Accessories 1-12 Adding Contacts 4-2 Call Type 4-3 Channel 4-3 Entering a Home Group Number (Private Calls Only 4-5 Entering a Ringer Type (Private Calls Only 4-7 Entering Group Members (PrivateGroup Only 4-6 Programming a Unit ID (Private Calls Only 4-5 Selecting a Group ID 4-5 Selecting Group Only 4-6 Unit Name 4-4 Adjusting the Speaker Volume 2-1 Alerting a Recent Caller 2-11 Alerts 2-4 Receiving an Alert...
... 2-5 Accessories 1-12 Adding Contacts 4-2 Call Type 4-3 Channel 4-3 Entering a Home Group Number (Private Calls Only 4-5 Entering a Ringer Type (Private Calls Only 4-7 Entering Group Members (PrivateGroup Only 4-6 Programming a Unit ID (Private Calls Only 4-5 Selecting a Group ID 4-5 Selecting Group Only 4-6 Unit Name 4-4 Adjusting the Speaker Volume 2-1 Alerting a Recent Caller 2-11 Alerts 2-4 Receiving an Alert...


