User Manual
Page 2
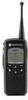
..., or design. C a u t i o n Before using this product, read the operating instructions for copyrighted computer programs, including, but not limited to, the exclusive right to all DTR Series portable radios, unless otherwise specified. Motorola does not assume any liability arising out of the applications or use only to ensure compliance with your radio (Motorola Publication part number 6881095C98) to satisfy FCC RF energy exposure requirements...
..., or design. C a u t i o n Before using this product, read the operating instructions for copyrighted computer programs, including, but not limited to, the exclusive right to all DTR Series portable radios, unless otherwise specified. Motorola does not assume any liability arising out of the applications or use only to ensure compliance with your radio (Motorola Publication part number 6881095C98) to satisfy FCC RF energy exposure requirements...
User Manual
Page 3
Table of Contents Foreword inside cover FCC Licensing Information v Chapter 1 Introduction 1-1 Notations Used in This Manual...1-1 Your DTR Series Radio ...1-3 Getting Started ...1-4 Menu Icons ...1-4 Status Icons ...1-4 Text Area ...1-5 Display Options...1-5 Menu Key...1-5 Menus and Lists...1-5 Battery ...1-5 Battery Life...1-5 Charging the Radio...1-6 Charging using the Drop-in Charging Tray 1-6 Charging using the Plug-in Charger 1-6 Charging a Radio and Battery using a Multi-Unit Charger 1-7 Battery Meter ...1-7 Attaching the Battery ...1-7 Swivel Belt Holster...1-8 Mini Keyboard...
Table of Contents Foreword inside cover FCC Licensing Information v Chapter 1 Introduction 1-1 Notations Used in This Manual...1-1 Your DTR Series Radio ...1-3 Getting Started ...1-4 Menu Icons ...1-4 Status Icons ...1-4 Text Area ...1-5 Display Options...1-5 Menu Key...1-5 Menus and Lists...1-5 Battery ...1-5 Battery Life...1-5 Charging the Radio...1-6 Charging using the Drop-in Charging Tray 1-6 Charging using the Plug-in Charger 1-6 Charging a Radio and Battery using a Multi-Unit Charger 1-7 Battery Meter ...1-7 Attaching the Battery ...1-7 Swivel Belt Holster...1-8 Mini Keyboard...
User Manual
Page 4
......2-12 Setting the Display ...2-13 Setting VibraCall ...2-14 Clock and Alarm...2-14 Setting the Volume...2-17 My Info ...2-18 Chapter 3 Advanced Radio Operations 3-1 Accessing the Advanced Menu ...3-1 Managing Your Scroll List ...3-1 Enabling Call Forwarding...3-2 Remote Disabling (DTR650 Models Only 3-3 Remote Monitoring (DTR650 Models Only 3-4 Remote Time (DTR650 Models Only 3-4 Chapter 4 Radio Programming 4-1 Program Menu Navigation Chart ...4-1 Entering Programming Mode...4-2 My Info ...4-2 Adding Contacts ...4-3 Call Type...4-3 Channel...4-4 Unit Name ...4-4 Programming a Unit ID...
......2-12 Setting the Display ...2-13 Setting VibraCall ...2-14 Clock and Alarm...2-14 Setting the Volume...2-17 My Info ...2-18 Chapter 3 Advanced Radio Operations 3-1 Accessing the Advanced Menu ...3-1 Managing Your Scroll List ...3-1 Enabling Call Forwarding...3-2 Remote Disabling (DTR650 Models Only 3-3 Remote Monitoring (DTR650 Models Only 3-4 Remote Time (DTR650 Models Only 3-4 Chapter 4 Radio Programming 4-1 Program Menu Navigation Chart ...4-1 Entering Programming Mode...4-2 My Info ...4-2 Adding Contacts ...4-3 Call Type...4-3 Channel...4-4 Unit Name ...4-4 Programming a Unit ID...
User Manual
Page 7
FCC Licensing Information DTR Series® professional two-way radios operate in the license-free 900 MHz ISM band and are subject to the Rules and Regulations of the Federal Communications Commission (FCC) This device complies with FCC requirements, transmitter adjustments should not be made only by the FCC to the following two conditions: (1) This device may not cause harmful interference, and (2) this device must accept...
FCC Licensing Information DTR Series® professional two-way radios operate in the license-free 900 MHz ISM band and are subject to the Rules and Regulations of the Federal Communications Commission (FCC) This device complies with FCC requirements, transmitter adjustments should not be made only by the FCC to the following two conditions: (1) This device may not cause harmful interference, and (2) this device must accept...

User Manual
Page 9
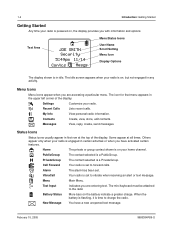
... hotel management, and more. Motorola professional two-way radios are used to properly operate the radio before use of WARNINGS, Cautions, and Notes. These notations are the perfect communications solution for purchasing a Motorola, DTR Series® radio. Radio keys and buttons are shown in the designing ... certain items: Example Volume Control Contcs Description Button names are shown as they appear on the display is shown in this manual carefully to the equipment if not carefully observed. This User's Guide covers operation and maintenance of your DTR Series radio.
... hotel management, and more. Motorola professional two-way radios are used to properly operate the radio before use of WARNINGS, Cautions, and Notes. These notations are the perfect communications solution for purchasing a Motorola, DTR Series® radio. Radio keys and buttons are shown in the designing ... certain items: Example Volume Control Contcs Description Button names are shown as they appear on the display is shown in this manual carefully to the equipment if not carefully observed. This User's Guide covers operation and maintenance of your DTR Series radio.
User Manual
Page 10
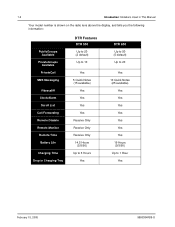
1-2 Introduction: Notations Used in This Manual Your model number is shown on the radio lens above the display, and tells you the following information: PublicGroups Available PrivateGroups Available PrivateCall SMS Messaging Vibracall® Clock/Alarm Scroll List Call Forwarding Remote Disable Remote Monitor Remote Time Battery Life Charging Time Drop in Charging Tray DTR Features DTR 550 Up to 20 (2 default) Up to 10 Yes 5 Quick Notes (15...
1-2 Introduction: Notations Used in This Manual Your model number is shown on the radio lens above the display, and tells you the following information: PublicGroups Available PrivateGroups Available PrivateCall SMS Messaging Vibracall® Clock/Alarm Scroll List Call Forwarding Remote Disable Remote Monitor Remote Time Battery Life Charging Time Drop in Charging Tray DTR Features DTR 550 Up to 20 (2 default) Up to 10 Yes 5 Quick Notes (15...
User Manual
Page 12
... been set to the radio Battery Status More bars on , the display provides you are accessing a particular menu. New Message You have activated certain features. Contacts Create, view, store, edit contacts. The mini keyboard must be attached to forward calls. VibraCall Your radio is time to vibrate when receiving an alert or text message. When the battery is flashing, it is set to charge the radio...
... been set to the radio Battery Status More bars on , the display provides you are accessing a particular menu. New Message You have activated certain features. Contacts Create, view, store, edit contacts. The mini keyboard must be attached to forward calls. VibraCall Your radio is time to vibrate when receiving an alert or text message. When the battery is flashing, it is set to charge the radio...
User Manual
Page 13
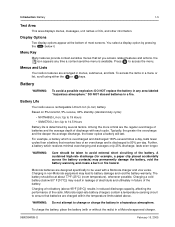
... menus, submenus, and lists. Menus and Lists Your radio's features are charged within the temperature limits stated above 95°F [35°C]) results in a Motorola-approved charger. 9980384R89-O February 15, 2005 Battery Life Your radio uses a rechargeable Lithium Ion (Li-Ion) battery. Based on 5% transmit, 5% receive, 90% standby (standard duty cycle): • NNTN4655 Li-Ion; Introduction: Battery 1-5 Text Area This area displays menus, messages, unit names or IDs...
... menus, submenus, and lists. Menus and Lists Your radio's features are charged within the temperature limits stated above 95°F [35°C]) results in a Motorola-approved charger. 9980384R89-O February 15, 2005 Battery Life Your radio uses a rechargeable Lithium Ion (Li-Ion) battery. Based on 5% transmit, 5% receive, 90% standby (standard duty cycle): • NNTN4655 Li-Ion; Introduction: Battery 1-5 Text Area This area displays menus, messages, unit names or IDs...
User Manual
Page 14
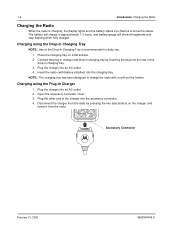
Charging using the Plug-in Charging Tray is charging, the display lights and the battery status icon flashes to charge the radio with battery installed) into the charging tray. Place the charging tray on the charger and remove from the radio by inserting the plug into the accessory connector. 4. Insert the radio (with or without the holster. Plug the charger into an AC outlet. 2. Accessory Connector February 15, 2005 9980384R89-O The battery will charge in Charging Tray NOTE...
Charging using the Plug-in Charging Tray is charging, the display lights and the battery status icon flashes to charge the radio with battery installed) into the charging tray. Place the charging tray on the charger and remove from the radio by inserting the plug into the accessory connector. 4. Insert the radio (with or without the holster. Plug the charger into an AC outlet. 2. Accessory Connector February 15, 2005 9980384R89-O The battery will charge in Charging Tray NOTE...

User Manual
Page 21
Advanced Radio Operations. The display shows the radio Unit ID or Name, current Scroll list setting, time, date, and the available Option key selections. To adjust the speaker volume, press the upper button to increase the volume level and press the lower button to Chapter 3 - Volume 3 Chapter 2 General Radio Operations Your radio is pressed, the display shows a bar chart indicating the present level for use after a fully-charged battery has been installed. The radio chirps and...
Advanced Radio Operations. The display shows the radio Unit ID or Name, current Scroll list setting, time, date, and the available Option key selections. To adjust the speaker volume, press the upper button to increase the volume level and press the lower button to Chapter 3 - Volume 3 Chapter 2 General Radio Operations Your radio is pressed, the display shows a bar chart indicating the present level for use after a fully-charged battery has been installed. The radio chirps and...

User Manual
Page 23
... all radios set to your channel and PublicGroup number. Begin speaking after the radio emits the talk permit tone. Release the PTT button to Chapter 3 - Talkgrp in Use Security (Joe Smith) Private in your Scroll List, Contacts, or Recent Call List. 2. NOTE: If "User Not Available" displays, the recipient is received, the radio chirps and the display shows the call again. Advanced Radio Operations. To maximize clarity, hold the PTT button. One...
... all radios set to your channel and PublicGroup number. Begin speaking after the radio emits the talk permit tone. Release the PTT button to Chapter 3 - Talkgrp in Use Security (Joe Smith) Private in your Scroll List, Contacts, or Recent Call List. 2. NOTE: If "User Not Available" displays, the recipient is received, the radio chirps and the display shows the call again. Advanced Radio Operations. To maximize clarity, hold the PTT button. One...

User Manual
Page 24
... channel, has the radio turned off, or is out of beeps, or vibrates, and displays your Unit Name or ID along with the time and date. "Ready to reach is not successful, the radio you are trying to Alert" appears on the display. delete the call by pressing the PTT button. • Clear - Alert Smith 9:46pm 11/18 Clear To answer a call alert, press the PTT button...
... channel, has the radio turned off, or is out of beeps, or vibrates, and displays your Unit Name or ID along with the time and date. "Ready to reach is not successful, the radio you are trying to Alert" appears on the display. delete the call by pressing the PTT button. • Clear - Alert Smith 9:46pm 11/18 Clear To answer a call alert, press the PTT button...

User Manual
Page 37
... selection and return to adjust the Ringer volume as Alert Tones and incoming SMS Messages. NOTE: Pressing the Volume Control keys while not in the Volume menu only sets the Speaker Volume. Use the Volume Control keys to the previous menu. 9980384R89-O February 10, 2005 Alarm: volume level for voice messages. From the Volume menu, scroll to 0. Speaker: volume level for the Alarm feature, which is overridden...
... selection and return to adjust the Ringer volume as Alert Tones and incoming SMS Messages. NOTE: Pressing the Volume Control keys while not in the Volume menu only sets the Speaker Volume. Use the Volume Control keys to the previous menu. 9980384R89-O February 10, 2005 Alarm: volume level for voice messages. From the Volume menu, scroll to 0. Speaker: volume level for the Alarm feature, which is overridden...
User Manual
Page 39
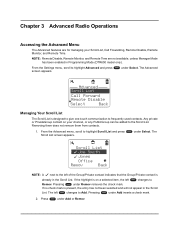
... 3 Advanced Radio Operations Accessing the Advanced Menu The Advanced features are not available, unless Manager Mode has been enabled in Programming Mode (DTR650 model only). NOTE: Remote Disable, Remote Monitor, and Remote Time are for managing your channel, or any PublicGroup can be added to frequently used contacts. From the Settings menu, scroll to the left changes to Remov. Removing them does not remove them from contacts. 1. under Select. The Scroll List...
... 3 Advanced Radio Operations Accessing the Advanced Menu The Advanced features are not available, unless Manager Mode has been enabled in Programming Mode (DTR650 model only). NOTE: Remote Disable, Remote Monitor, and Remote Time are for managing your channel, or any PublicGroup can be added to frequently used contacts. From the Settings menu, scroll to the left changes to Remov. Removing them does not remove them from contacts. 1. under Select. The Scroll List...

User Manual
Page 42
... Select. Scroll to highlight a radio from the list to monitor and press changes to page 4-9. Refer to show the radio's status. Any receiving radio must have the transmitting radio User ID in order to use this broadcast message. under Yes. Remote Monitoring allows you to monitor a selected radio either for any failures. 1. 3-4 Advanced Radio Operations: Accessing the Advanced Menu Remote Monitoring (DTR650 Models Only) NOTE: Manager Mode must be turned on your channel.
... Select. Scroll to highlight a radio from the list to monitor and press changes to page 4-9. Refer to show the radio's status. Any receiving radio must have the transmitting radio User ID in order to use this broadcast message. under Yes. Remote Monitoring allows you to monitor a selected radio either for any failures. 1. 3-4 Advanced Radio Operations: Accessing the Advanced Menu Remote Monitoring (DTR650 Models Only) NOTE: Manager Mode must be turned on your channel.
User Manual
Page 44
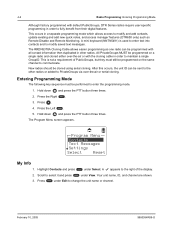
... be programmed with default PublicGroups, DTR Series radios require user-specific programming in order to maintain a single GroupID. After this occurs, the unit ID can be performed to change the unit name or channel. Scroll to select it and press under Edit to enter the programming mode. 1. Press under View. All PrivateGroups MUST be sent to the other radios. Program Menu Contacts Text Messages Settings Select Reset My Info...
... be programmed with default PublicGroups, DTR Series radios require user-specific programming in order to maintain a single GroupID. After this occurs, the unit ID can be performed to change the unit name or channel. Scroll to select it and press under Edit to enter the programming mode. 1. Press under View. All PrivateGroups MUST be sent to the other radios. Program Menu Contacts Text Messages Settings Select Reset My Info...
User Manual
Page 46
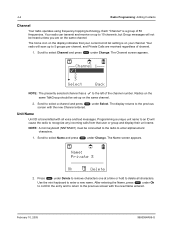
.... 4-4 Radio Programming: Adding Contacts Channel Your radio operates using frequency-hopping technology. Each "Channel" is on your current scroll list setting is a group of the channel number. The home icon on the display indicates that user or group and display their unit name. Scroll to select Name and press under Change. Scroll to enter a new name. Use the mini keyboard to select a channel and press screen with the new Channel entered. The Channel...
.... 4-4 Radio Programming: Adding Contacts Channel Your radio operates using frequency-hopping technology. Each "Channel" is on your current scroll list setting is a group of the channel number. The home icon on the display indicates that user or group and display their unit name. Scroll to select Name and press under Change. Scroll to enter a new name. Use the mini keyboard to select a channel and press screen with the new Channel entered. The Channel...
User Manual
Page 51
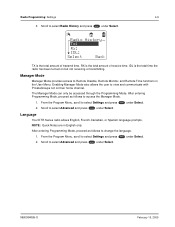
... of receive time. RX is the total time the radio has been turned on their home channel. Enabling Manager Mode also allows the user to view and communicate with PrivateGroups not on but not receiving or transmitting. From the Program Menu, scroll to select Advanced and press under Select. Scroll to select Settings and press 2. IDL is the total amount of transmit time. Manager Mode Manager Mode provides...
... of receive time. RX is the total time the radio has been turned on their home channel. Enabling Manager Mode also allows the user to view and communicate with PrivateGroups not on but not receiving or transmitting. From the Program Menu, scroll to select Advanced and press under Select. Scroll to select Settings and press 2. IDL is the total amount of transmit time. Manager Mode Manager Mode provides...
User Manual
Page 57
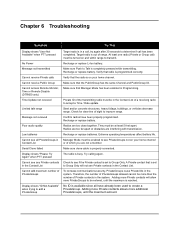
... affect battery life. Radios are too far apart or obstacles are too close together. Chapter 6 Troubleshooting Symptom Try This: Display shows "User Not Available" when PTT pressed No Power Message not transmitted Cannot receive Private calls Cannot receive Public Group Cannot access Remote Monitor, Time or Remote Disable (DTR650 only) Time Update not received Limited talk range Message not received Poor audio quality Low batteries Cannot see all have been properly programmed. Recharge or replace battery. Manager Mode must be turned...
... affect battery life. Radios are too far apart or obstacles are too close together. Chapter 6 Troubleshooting Symptom Try This: Display shows "User Not Available" when PTT pressed No Power Message not transmitted Cannot receive Private calls Cannot receive Public Group Cannot access Remote Monitor, Time or Remote Disable (DTR650 only) Time Update not received Limited talk range Message not received Poor audio quality Low batteries Cannot see all have been properly programmed. Recharge or replace battery. Manager Mode must be turned...

User Manual
Page 67
INDEX: 5 Sending an Alert 2-4 Setting the Clock/Alarm 2-14 Setting the Display 2-13 Setting the Volume 2-17 Setting VibraCall 2-14 Settings 2-12 Clock/Alarm 2-14 Display 2-13 VibraCall 2-14 Volume 2-17 Software Copyright Notice 5-8 Software 5-8 Speaker Volume Adjustment 2-1 Standard Yellow Function Green Function 1-10 Status Icons 1-4 Swivel Belt Holster 1-8 T Text Area 1-4 Text Messaging 4-7 Troubleshooting 6-1 Turning Your Radio On or Off 2-1 Types of Calls 2-3 U Using the Cloning Cable 5-1 Using Mini Keyboard Key Shortcuts 1-11...
INDEX: 5 Sending an Alert 2-4 Setting the Clock/Alarm 2-14 Setting the Display 2-13 Setting the Volume 2-17 Setting VibraCall 2-14 Settings 2-12 Clock/Alarm 2-14 Display 2-13 VibraCall 2-14 Volume 2-17 Software Copyright Notice 5-8 Software 5-8 Speaker Volume Adjustment 2-1 Standard Yellow Function Green Function 1-10 Status Icons 1-4 Swivel Belt Holster 1-8 T Text Area 1-4 Text Messaging 4-7 Troubleshooting 6-1 Turning Your Radio On or Off 2-1 Types of Calls 2-3 U Using the Cloning Cable 5-1 Using Mini Keyboard Key Shortcuts 1-11...


