User Guide
Page 3
... 14 Installing the Batteries 15 Charging the Battery 16 Turning Your Radio On and Off . 19 Adjusting the Volume 20 Factory Default Settings 27 Entering Programming Mode .....28 Cloning Radio Settings 32 Advanced Features 33 Troubleshooting 35 Use and Care 38 Frequencies and Bandwidths.....39 Spirit GT Series Programming ... 45 Warranty 46...
... 14 Installing the Batteries 15 Charging the Battery 16 Turning Your Radio On and Off . 19 Adjusting the Volume 20 Factory Default Settings 27 Entering Programming Mode .....28 Cloning Radio Settings 32 Advanced Features 33 Troubleshooting 35 Use and Care 38 Frequencies and Bandwidths.....39 Spirit GT Series Programming ... 45 Warranty 46...
User Guide
Page 9
... "IN USE." Two-Way Radio Operation When using your radio as a traditional two-way radio, hold the antenna when the radio is within the guidelines set forth in the Frequency Range from the lips. 7 Portable Radio Operation and EME Exposure Antenna Care Use only the supplied or an approved replacement antenna...
... "IN USE." Two-Way Radio Operation When using your radio as a traditional two-way radio, hold the antenna when the radio is within the guidelines set forth in the Frequency Range from the lips. 7 Portable Radio Operation and EME Exposure Antenna Care Use only the supplied or an approved replacement antenna...
User Guide
Page 15
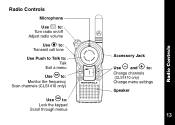
Radio Controls Microphone Use P to: Turn radio on/off Adjust radio volume Use B to: Transmit call tone Use Push to Talk to: Talk Exit a menu Use T to: Monitor the frequency Scan channels (CLS1410 only) Use S to: Lock the keypad Scroll through menus Accessory Jack Use [ and ] to: Change channels (CLS1410 only) Change menu settings Speaker 020976o 13 Radio Controls
Radio Controls Microphone Use P to: Turn radio on/off Adjust radio volume Use B to: Transmit call tone Use Push to Talk to: Talk Exit a menu Use T to: Monitor the frequency Scan channels (CLS1410 only) Use S to: Lock the keypad Scroll through menus Accessory Jack Use [ and ] to: Change channels (CLS1410 only) Change menu settings Speaker 020976o 13 Radio Controls

User Guide
Page 24
... g. If g is flashing and you start talking and when the radio transmits. A short delay occurs between the time when you are setting up the VOX accessory for the first time, set the VOX sensitivity level (see page 23). 5. Multi-Level Inside multi-level buildings Up to 15 floors Outdoor Flat ground with...
... g. If g is flashing and you start talking and when the radio transmits. A short delay occurs between the time when you are setting up the VOX accessory for the first time, set the VOX sensitivity level (see page 23). 5. Multi-Level Inside multi-level buildings Up to 15 floors Outdoor Flat ground with...

User Guide
Page 25
...is indicated by g. 1. Press S until g displays. The radio displays H when you are setting the external VOX (with audio accessory). 2. Note: To order accessories, visit www.motorola.com/radios/professional, call 1-800-448-6686, or contact your radio settings. 1. Press [ or ] to select the sensitivity level: 0 = Off 1 = Low ... purchase. To receive, stop talking. Press and hold S for 3 seconds. 2. To transmit, speak into the accessory microphone. Setting the VOX Sensitivity You can lock the keypad to Talk or remove the audio accessory. To disable VOX operation, press Push to ...
...is indicated by g. 1. Press S until g displays. The radio displays H when you are setting the external VOX (with audio accessory). 2. Note: To order accessories, visit www.motorola.com/radios/professional, call 1-800-448-6686, or contact your radio settings. 1. Press [ or ] to select the sensitivity level: 0 = Off 1 = Low ... purchase. To receive, stop talking. Press and hold S for 3 seconds. 2. To transmit, speak into the accessory microphone. Setting the VOX Sensitivity You can lock the keypad to Talk or remove the audio accessory. To disable VOX operation, press Push to ...
User Guide
Page 28
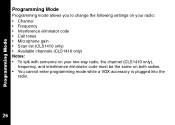
Programming Mode Programming Mode Programming mode allows you to change the following settings on your radio: • Channel • Frequency • Interference eliminator code • Call tones • Microphone gain • Scan list (CLS1410 only) • Available channels (CLS1410 only) Notes: • To talk with someone on your two-way radio, the channel (CLS1410 only), frequency, and interference eliminator code must be the same on both radios. • You cannot enter programming mode while a VOX accessory is plugged into the radio. 26
Programming Mode Programming Mode Programming mode allows you to change the following settings on your radio: • Channel • Frequency • Interference eliminator code • Call tones • Microphone gain • Scan list (CLS1410 only) • Available channels (CLS1410 only) Notes: • To talk with someone on your two-way radio, the channel (CLS1410 only), frequency, and interference eliminator code must be the same on both radios. • You cannot enter programming mode while a VOX accessory is plugged into the radio. 26

User Guide
Page 29
Factory Default Settings Your radio is programmed at the factory to the following settings: Programming Mode Frequency Channel 1 CLS1110 2 CLS1410 2 2 8 3 Not available 5 4 6 Code 1 Call Tone/ VibraCall® Off (0) VOX Not available Off (0) Microphone Gain 2 (medium sensitivity) To restore the factory settings, turn the radio on while holding Push to Talk and S for 3 seconds. 27
Factory Default Settings Your radio is programmed at the factory to the following settings: Programming Mode Frequency Channel 1 CLS1110 2 CLS1410 2 2 8 3 Not available 5 4 6 Code 1 Call Tone/ VibraCall® Off (0) VOX Not available Off (0) Microphone Gain 2 (medium sensitivity) To restore the factory settings, turn the radio on while holding Push to Talk and S for 3 seconds. 27
User Guide
Page 30
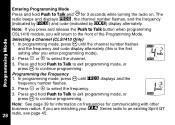
... radio to select the channel. 3. In programming mode, press S until the channel number flashes and the frequency and code display alternately (this is the first setting after you will return to select the frequency. 3. Note: If you press and release the Push to Talk button when programming CSL1410 models, you enter...
... radio to select the channel. 3. In programming mode, press S until the channel number flashes and the frequency and code display alternately (this is the first setting after you will return to select the frequency. 3. Note: If you press and release the Push to Talk button when programming CSL1410 models, you enter...
User Guide
Page 31
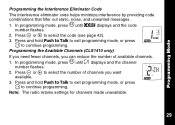
... S until y displays and the code number flashes. 2. Programming the Available Channels (CLS1410 only) If you need fewer channels, you want available. 3. Note: The radio retains settings for channels made unavailable. 29 In programming mode, press S until = displays and the channel number flashes. 2.
... S until y displays and the code number flashes. 2. Programming the Available Channels (CLS1410 only) If you need fewer channels, you want available. 3. Note: The radio retains settings for channels made unavailable. 29 In programming mode, press S until = displays and the channel number flashes. 2.

User Guide
Page 32
... not transmitted or received in your call tone 4 for VibraCall® (CLS1410 only). 3. Your radio is an additional call tone. Select call tones turned off (set to turn VibraCall® on . 1. In programming mode, press S until E displays. 2. To transmit your group so you can change this...
... not transmitted or received in your call tone 4 for VibraCall® (CLS1410 only). 3. Your radio is an additional call tone. Select call tones turned off (set to turn VibraCall® on . 1. In programming mode, press S until E displays. 2. To transmit your group so you can change this...

User Guide
Page 34
.... The radio beeps and displays k. 2. Press and hold Push to Talk and T for Fail displays on . The source radio transmits its settings to a singlechannel radio, but both radios require charged batteries. The MUC does not have to use. 6. Turn the target radio off and ...for more information. To clone another radio, repeat steps 3 and 4. 7. Cloning Radio Settings You can copy _ Series radio settings from one radio (the source) to Talk 32 until k no longer appears. Cloning Radio Settings 1. To exit programming mode on the source radio. On the source radio, press and...
.... The radio beeps and displays k. 2. Press and hold Push to Talk and T for Fail displays on . The source radio transmits its settings to a singlechannel radio, but both radios require charged batteries. The MUC does not have to use. 6. Turn the target radio off and ...for more information. To clone another radio, repeat steps 3 and 4. 7. Cloning Radio Settings You can copy _ Series radio settings from one radio (the source) to Talk 32 until k no longer appears. Cloning Radio Settings 1. To exit programming mode on the source radio. On the source radio, press and...

User Guide
Page 35
..., your two-way radio transmits a tone when you will not hear the end-of -transmission tone is transmitted. 33 Advanced Features Advanced Features You can set the following features by pressing and holding additional buttons while turning the radio on , you finish transmitting (like saying Roger or Over). ] Off If keypad... tones are off for silent keypad operation. To Do This Press This Button While Turning the Radio On Default Setting Turn Keypad Tones On/Off [ On Turns keypad beeps off and end-of -transmission tone, but it is on .
..., your two-way radio transmits a tone when you will not hear the end-of -transmission tone is transmitted. 33 Advanced Features Advanced Features You can set the following features by pressing and holding additional buttons while turning the radio on , you finish transmitting (like saying Roger or Over). ] Off If keypad... tones are off for silent keypad operation. To Do This Press This Button While Turning the Radio On Default Setting Turn Keypad Tones On/Off [ On Turns keypad beeps off and end-of -transmission tone, but it is on .

User Guide
Page 36
Push to Talk S --- Restore Factory Defaults Returns radio to its frequency and broadcasts audio. Push to Talk T [ On Turning battery save mode off decreases battery life by approximately 20%. Advanced Features 34 To Do This Press This Button While Turning the Radio On Default Setting Turn Battery Save Mode On/Off Decreases attack time, which is the brief period of time between when the radio receives a transmission on its original factory settings.
Push to Talk S --- Restore Factory Defaults Returns radio to its frequency and broadcasts audio. Push to Talk T [ On Turning battery save mode off decreases battery life by approximately 20%. Advanced Features 34 To Do This Press This Button While Turning the Radio On Default Setting Turn Battery Save Mode On/Off Decreases attack time, which is the brief period of time between when the radio receives a transmission on its original factory settings.
User Guide
Page 37
.... Hearing other radios should be in use. For optimal audio quality when communicating with _Series radios, the bandwidth of other noises or Frequency may be set to Talk is illuminated while speaking. Verify the transmit light is completely pressed while transmitting. Change on all radios if possible (see conversation on page...
.... Hearing other radios should be in use. For optimal audio quality when communicating with _Series radios, the bandwidth of other noises or Frequency may be set to Talk is illuminated while speaking. Verify the transmit light is completely pressed while transmitting. Change on all radios if possible (see conversation on page...

User Guide
Page 38
... Unlock by holding S for clear line of radio. Extreme operating temperatures affect battery life. Confirm radios have the same channel, frequency, and interference eliminator code settings (see page 24). Verify radio is not in scan mode (CLS1410 only, see page 26). They must be at least 5 feet apart. Low batteries 36...
... Unlock by holding S for clear line of radio. Extreme operating temperatures affect battery life. Confirm radios have the same channel, frequency, and interference eliminator code settings (see page 24). Verify radio is not in scan mode (CLS1410 only, see page 26). They must be at least 5 feet apart. Low batteries 36...
User Guide
Page 39
... radio. Clean battery and/or charger contacts. AAA cells installed in charger. only) Verify that the charging pin on the transformer is set to 0 (see page 23). VOX (CLS1410 Sensitivity set and on Reinsert radio and/or battery. Troubleshooting Symptom Try This: Charger light does not come on (see page 15). Cannot...
... radio. Clean battery and/or charger contacts. AAA cells installed in charger. only) Verify that the charging pin on the transformer is set to 0 (see page 23). VOX (CLS1410 Sensitivity set and on Reinsert radio and/or battery. Troubleshooting Symptom Try This: Charger light does not come on (see page 15). Cannot...
User Guide
Page 47
... GT Series radio. Spirit GT Series Programming Spirit GT Series Programming The _Series platform is designed to select the code. To program your Spirit GT settings as follows. To change the interference eliminator code: 1. Use the Scroll button to talk with Spirit GT Series. The code number flashes. 3. To exit programming...
... GT Series radio. Spirit GT Series Programming Spirit GT Series Programming The _Series platform is designed to select the code. To program your Spirit GT settings as follows. To change the interference eliminator code: 1. Use the Scroll button to talk with Spirit GT Series. The code number flashes. 3. To exit programming...

User Guide
Page 57
... of available channels. Press S until l displays. _Series Programming Quick Reference To enter programming mode, press and hold Push to change the frequency. Set the Frequency Set the Interference Eliminator Code Set Available Channels* * CLS1410 Only Press S until = displays. The radio beeps and displays k, the channel number flashes, and the frequency (indicated by l) and...
... of available channels. Press S until l displays. _Series Programming Quick Reference To enter programming mode, press and hold Push to change the frequency. Set the Frequency Set the Interference Eliminator Code Set Available Channels* * CLS1410 Only Press S until = displays. The radio beeps and displays k, the channel number flashes, and the frequency (indicated by l) and...
User Guide
Page 58
Press S until h displays and the channel number and Y or n flash. display. Press [ or ] to select: 1 Low sensitivity 2 Medium sensitivity 3 High sensitivity Press S until g and ? Press [ or ] to select the channel, then press T to select1, 2, or 3 for audible call tones, 4 for VibraCall, or 0 for off (default). _Series Programming Quick Reference Set a Call Tone Set the Microphone Gain Edit the Scan List* Press S until E display.s Press [ or ] to select Y (include channel) or n (exclude channel).
Press S until h displays and the channel number and Y or n flash. display. Press [ or ] to select: 1 Low sensitivity 2 Medium sensitivity 3 High sensitivity Press S until g and ? Press [ or ] to select the channel, then press T to select1, 2, or 3 for audible call tones, 4 for VibraCall, or 0 for off (default). _Series Programming Quick Reference Set a Call Tone Set the Microphone Gain Edit the Scan List* Press S until E display.s Press [ or ] to select Y (include channel) or n (exclude channel).


