User Manual
Page 3
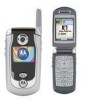
....In menus, press K to the world of Motorola digital wireless communications! Flip closed: toggle through ring styles, show phone status on /off, end phone calls, exit menus. 1 Left Soft Key Perform functions identified by right display prompt. We are pleased that you have chosen the Motorola A840 wireless phone. Volume Keys Adjust earpiece & ringer volume. CLR...
....In menus, press K to the world of Motorola digital wireless communications! Flip closed: toggle through ring styles, show phone status on /off, end phone calls, exit menus. 1 Left Soft Key Perform functions identified by right display prompt. We are pleased that you have chosen the Motorola A840 wireless phone. Volume Keys Adjust earpiece & ringer volume. CLR...
User Manual
Page 4
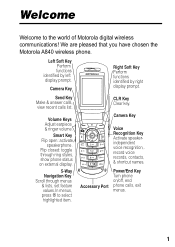
TransFlash Memory Card Camera Light Shines a brief burst of light for photos that require extra light. Camera Key External Display Feature Take Photo Send Photo Description Press the camera key to activate the camera, point lens at subject, press CAPTURE (+) to a phone number: Press STORE (+) 032380o > Send in Message 2 Send photo to take a photo. Check It Out! Headset Jack Camera Lens Take photos to send to others & use on your phone.
TransFlash Memory Card Camera Light Shines a brief burst of light for photos that require extra light. Camera Key External Display Feature Take Photo Send Photo Description Press the camera key to activate the camera, point lens at subject, press CAPTURE (+) to a phone number: Press STORE (+) 032380o > Send in Message 2 Send photo to take a photo. Check It Out! Headset Jack Camera Lens Take photos to send to others & use on your phone.
User Manual
Page 5
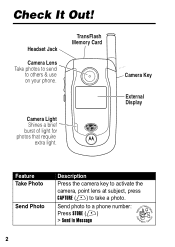
... > Create Message 032380o > New TXT Msg Read a new multimedia message or letter you have received: Press READ (+) Select from CDMA and GSM modes: 032380o M > Settings > Phone Mode > desired mode 3
... > Create Message 032380o > New TXT Msg Read a new multimedia message or letter you have received: Press READ (+) Select from CDMA and GSM modes: 032380o M > Settings > Phone Mode > desired mode 3
User Manual
Page 7
...Battery 11 Charging the Battery 12 Installing and Removing the TransFlash Memory Card 13 Turning On Your Phone 15 Adjusting Volume 16 Making a Call 16 Answering a Call 18 Changing the Call Alert 19 Viewing Your Phone Number 19 Highlight Features 20 Taking a Photo 20 Receiving a Multimedia Message (CDMA Only 24 ...TTY Operation (CDMA Only 24 Learning to Use Your Phone 27 Using the Display 27 Using the 5-Way Navigation Key 30 Using Menus 30 Entering Text 33 Using the Smart Key 43 Using the ...
...Battery 11 Charging the Battery 12 Installing and Removing the TransFlash Memory Card 13 Turning On Your Phone 15 Adjusting Volume 16 Making a Call 16 Answering a Call 18 Changing the Call Alert 19 Viewing Your Phone Number 19 Highlight Features 20 Taking a Photo 20 Receiving a Multimedia Message (CDMA Only 24 ...TTY Operation (CDMA Only 24 Learning to Use Your Phone 27 Using the Display 27 Using the 5-Way Navigation Key 30 Using Menus 30 Entering Text 33 Using the Smart Key 43 Using the ...
User Manual
Page 8
Changing a Code, PIN, or Password 46 Locking and Unlocking Your Phone 47 If You Forget a Code, PIN, or Password 48 Using the Phonebook 49 Setting Up Your Phone 57 Setting Time and Date 57 Setting an Alert Style 57 Setting Answer Options 58 Setting a Wallpaper Image 58 Setting... a Screen Saver Image 59 Setting Display Color 60 Setting Phone Greeting 61 Adjusting the Backlight 61 Setting Display Contrast 61 Setting Display Brightness 61 Hiding or Showing Location Information 61 Conserving Battery Power...
Changing a Code, PIN, or Password 46 Locking and Unlocking Your Phone 47 If You Forget a Code, PIN, or Password 48 Using the Phonebook 49 Setting Up Your Phone 57 Setting Time and Date 57 Setting an Alert Style 57 Setting Answer Options 58 Setting a Wallpaper Image 58 Setting... a Screen Saver Image 59 Setting Display Color 60 Setting Phone Greeting 61 Adjusting the Backlight 61 Setting Display Contrast 61 Setting Display Brightness 61 Hiding or Showing Location Information 61 Conserving Battery Power...

User Manual
Page 9
Putting a Call On Hold 73 Making Data and Fax Calls 73 Phone Features 77 Main Menu 77 Calling Features 79 Messages 79 Phonebook 81 Personalizing Features 82 Menu Features 88 Dialing Features 89 Call Monitoring 89 Handsfree Features 90 Data and Fax Calls 92 Network Features 92 Personal Organizer Features 94 Security 96 News and Entertainment 96 Specific Absorption Rate Data 98 Index 100 7
Putting a Call On Hold 73 Making Data and Fax Calls 73 Phone Features 77 Main Menu 77 Calling Features 79 Messages 79 Phonebook 81 Personalizing Features 82 Menu Features 88 Dialing Features 89 Call Monitoring 89 Handsfree Features 90 Data and Fax Calls 92 Network Features 92 Personal Organizer Features 94 Security 96 News and Entertainment 96 Specific Absorption Rate Data 98 Index 100 7
User Manual
Page 10
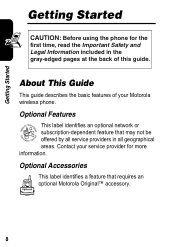
Getting Started Getting Started CAUTION: Before using the phone for more information. Optional Accessories This label identifies a feature that may not be offered by all service providers in the gray-edged pages at the ... and Legal Information included in all geographical areas. Optional Features This label identifies an optional network or 032380o subscription-dependent feature that requires an optional Motorola Original™ accessory. 8 Contact your Motorola wireless phone.
Getting Started Getting Started CAUTION: Before using the phone for more information. Optional Accessories This label identifies a feature that may not be offered by all service providers in the gray-edged pages at the ... and Legal Information included in all geographical areas. Optional Features This label identifies an optional network or 032380o subscription-dependent feature that requires an optional Motorola Original™ accessory. 8 Contact your Motorola wireless phone.
User Manual
Page 11
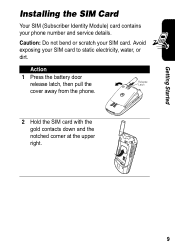
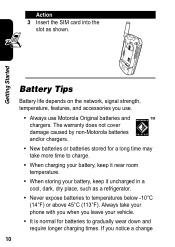
Avoid exposing your SIM card. Caution: Do not bend or scratch your SIM card to static electricity, water, or dirt. Release Latch 032409o 2 Hold the SIM card with the gold contacts down and the notched corner at the upper right. 9 Action 1 Press the battery door release latch, then pull the cover away from the phone. Getting Started Installing the SIM Card Your SIM (Subscriber Identity Module) card contains your phone number and service details.
Avoid exposing your SIM card. Caution: Do not bend or scratch your SIM card to static electricity, water, or dirt. Release Latch 032409o 2 Hold the SIM card with the gold contacts down and the notched corner at the upper right. 9 Action 1 Press the battery door release latch, then pull the cover away from the phone. Getting Started Installing the SIM Card Your SIM (Subscriber Identity Module) card contains your phone number and service details.
User Manual
Page 12
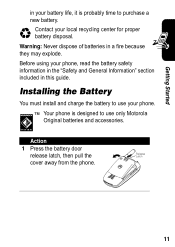
If you use. • Always use Motorola Original batteries and chargers. Always take your phone with you when you leave your battery, keep it near room temperature. • When storing your vehicle. • It is normal for a long time may .... • When charging your battery, keep it uncharged in a cool, dark, dry place, such as shown. The warranty does not cover damage caused by non-Motorola batteries and/or chargers. • New batteries or batteries stored for batteries to gradually wear down and require longer charging times. Getting Started Action 3 Insert...
If you use. • Always use Motorola Original batteries and chargers. Always take your phone with you when you leave your battery, keep it near room temperature. • When storing your vehicle. • It is normal for a long time may .... • When charging your battery, keep it uncharged in a cool, dark, dry place, such as shown. The warranty does not cover damage caused by non-Motorola batteries and/or chargers. • New batteries or batteries stored for batteries to gradually wear down and require longer charging times. Getting Started Action 3 Insert...
User Manual
Page 13
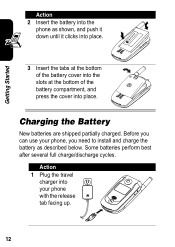
Before using your local recycling center for proper battery disposal. Release Latch 032409o 11 Contact your phone, read the battery safety information in the "Safety and General Information" section included in this guide. Warning: Never dispose of batteries in a ...explode. Action 1 Press the battery door release latch, then pull the cover away from the phone. Installing the Battery You must install and charge the battery to use only Motorola Original batteries and accessories. Your phone is probably time to use your battery life, it is designed to purchase a new battery....
Before using your local recycling center for proper battery disposal. Release Latch 032409o 11 Contact your phone, read the battery safety information in the "Safety and General Information" section included in this guide. Warning: Never dispose of batteries in a ...explode. Action 1 Press the battery door release latch, then pull the cover away from the phone. Installing the Battery You must install and charge the battery to use only Motorola Original batteries and accessories. Your phone is probably time to use your battery life, it is designed to purchase a new battery....
User Manual
Page 14
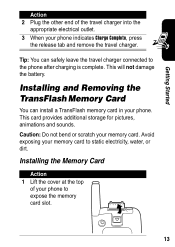
... New batteries are shipped partially charged. Action 1 Plug the travel charger into place. Getting Started Action 2 Insert the battery into the phone as described below. Before you can use your phone, you need to install and charge the battery as shown, and push it down until it clicks into place. 032410o 3 Insert... tabs at the bottom of the battery cover into the slots at the bottom of the battery compartment, and 032409o press the cover into your phone with the release tab facing up. 12
... New batteries are shipped partially charged. Action 1 Plug the travel charger into place. Getting Started Action 2 Insert the battery into the phone as described below. Before you can use your phone, you need to install and charge the battery as shown, and push it down until it clicks into place. 032410o 3 Insert... tabs at the bottom of the battery cover into the slots at the bottom of the battery compartment, and 032409o press the cover into your phone with the release tab facing up. 12
User Manual
Page 15
...cover at the top of the travel charger into the appropriate electrical outlet. 3 When your phone indicates Charge Complete, press the release tab and remove the travel charger connected to the phone after charging is complete. This card provides additional storage for pictures, animations and sounds. Caution:... Do not bend or scratch your phone. Installing and Removing the TransFlash Memory Card You can safely leave the travel charger. This will not damage the battery. ...
...cover at the top of the travel charger into the appropriate electrical outlet. 3 When your phone indicates Charge Complete, press the release tab and remove the travel charger connected to the phone after charging is complete. This card provides additional storage for pictures, animations and sounds. Caution:... Do not bend or scratch your phone. Installing and Removing the TransFlash Memory Card You can safely leave the travel charger. This will not damage the battery. ...
User Manual
Page 16
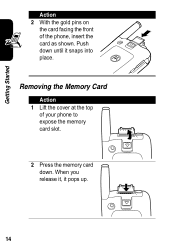
Push down . Getting Started Action 2 With the gold pins on the card facing the front of your phone to expose the memory card slot. 040061o 2 Press the memory card down until it pops up. 14 Removing the Memory Card Action 1 Lift the cover at the top of the phone, insert the card as shown. When you release it, it snaps into place.
Push down . Getting Started Action 2 With the gold pins on the card facing the front of your phone to expose the memory card slot. 040061o 2 Press the memory card down until it pops up. 14 Removing the Memory Card Action 1 Lift the cover at the top of the phone, insert the card as shown. When you release it, it snaps into place.
User Manual
Page 17
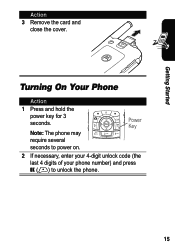
Power Key 2 If necessary, enter your 4-digit unlock code (the last 4 digits of your phone number) and press OK (+) to power on. Getting Started Action 3 Remove the card and close the cover. Note: The phone may require several seconds to unlock the phone. 15 Turning On Your Phone Action 1 Press and hold the power key for 3 seconds.
Power Key 2 If necessary, enter your 4-digit unlock code (the last 4 digits of your phone number) and press OK (+) to power on. Getting Started Action 3 Remove the card and close the cover. Note: The phone may require several seconds to unlock the phone. 15 Turning On Your Phone Action 1 Press and hold the power key for 3 seconds.
User Manual
Page 19
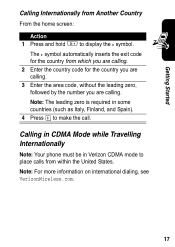
... calls from Another Country From the home screen: Action 1 Press and hold 0 to make the call. Calling in CDMA Mode while Travelling Internationally Note: Your phone must be in some countries (such as Italy, Finland, and Spain). 4 Press N to display the + symbol. Getting Started Calling Internationally from within the United States...
... calls from Another Country From the home screen: Action 1 Press and hold 0 to make the call. Calling in CDMA Mode while Travelling Internationally Note: Your phone must be in some countries (such as Italy, Finland, and Spain). 4 Press N to display the + symbol. Getting Started Calling Internationally from within the United States...
User Manual
Page 20
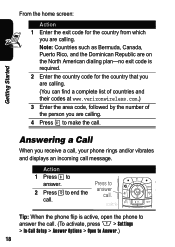
... is required. 2 Enter the country code for the country from which you receive a call, your phone rings and/or vibrates and displays an incoming call message. Getting Started From the home screen: Action 1 Enter the exit code for the country that ... Rico, and the Dominican Republic are calling. Answering a Call When you are on the North American dialing plan-no exit code is active, open the phone to answer the call. (To activate, press M > Settings > In-Call Setup > Answer Options > Open to end the call . Action 1 Press N to answer. 2 Press P to Answer...
... is required. 2 Enter the country code for the country from which you receive a call, your phone rings and/or vibrates and displays an incoming call message. Getting Started From the home screen: Action 1 Enter the exit code for the country that ... Rico, and the Dominican Republic are calling. Answering a Call When you are on the North American dialing plan-no exit code is active, open the phone to answer the call. (To activate, press M > Settings > In-Call Setup > Answer Options > Open to end the call . Action 1 Press N to answer. 2 Press P to Answer...
User Manual
Page 21
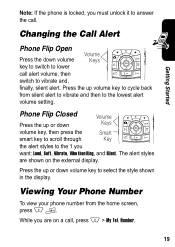
...scroll through Key the alert styles to the 1 you must unlock it to cycle back from the home screen, press M #. Viewing Your Phone Number To view your phone number from silent alert to vibrate and then to lower call , press M > My Tel. The alert styles are on the external display.... Changing the Call Alert Phone Flip Open Volume Press the down volume key to vibrate and, finally, silent alert. Phone Flip Closed Press the up or down volume Keys key to switch to the lowest alert volume setting...
...scroll through Key the alert styles to the 1 you must unlock it to cycle back from the home screen, press M #. Viewing Your Phone Number To view your phone number from silent alert to vibrate and then to lower call , press M > My Tel. The alert styles are on the external display.... Changing the Call Alert Phone Flip Open Volume Press the down volume key to vibrate and, finally, silent alert. Phone Flip Closed Press the up or down volume Keys key to switch to the lowest alert volume setting...
User Manual
Page 22
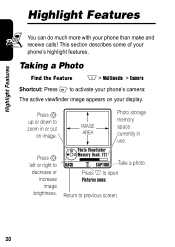
...% BACK CAPTURE Take a photo. This section describes some of your display. Taking a Photo Find the Feature M > Multimedia > Camera Shortcut: Press F to activate your phone's camera: The active viewfinder image appears on image. Return to zoom in use. Press S up or down to previous screen. 20 IMAGE AREA Photo storage... memory space currently in or out on your phone's highlight features. Highlight Features Highlight Features You can do much more with your phone than make and receive calls!
...% BACK CAPTURE Take a photo. This section describes some of your display. Taking a Photo Find the Feature M > Multimedia > Camera Shortcut: Press F to activate your phone's camera: The active viewfinder image appears on image. Return to zoom in use. Press S up or down to previous screen. 20 IMAGE AREA Photo storage... memory space currently in or out on your phone's highlight features. Highlight Features Highlight Features You can do much more with your phone than make and receive calls!
User Manual
Page 23
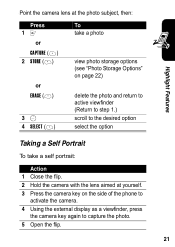
... take a self portrait: Action 1 Close the flip. 2 Hold the camera with the lens aimed at yourself. 3 Press the camera key on the side of the phone to activate the camera. 4 Using the external display as a viewfinder, press the camera key again to capture the photo. 5 Open the flip. 21
... take a self portrait: Action 1 Close the flip. 2 Hold the camera with the lens aimed at yourself. 3 Press the camera key on the side of the phone to activate the camera. 4 Using the external display as a viewfinder, press the camera key again to capture the photo. 5 Open the flip. 21
User Manual
Page 24
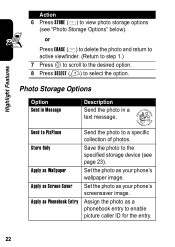
... scroll to the desired option. 8 Press SELECT (+) to enable picture caller ID for the entry. 22 Set the photo as your phone's wallpaper image. Set the photo as your phone's screensaver image. Save the photo to the specified storage device (see "Photo Storage Options" below). Assign the photo as Phonebook Entry Send...
... scroll to the desired option. 8 Press SELECT (+) to enable picture caller ID for the entry. 22 Set the photo as your phone's wallpaper image. Set the photo as your phone's screensaver image. Save the photo to the specified storage device (see "Photo Storage Options" below). Assign the photo as Phonebook Entry Send...


