
Quick Reference Guide
Page 1
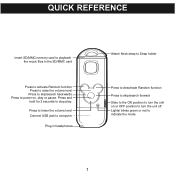
Press to lower the volume level Connect USB jack to computer Plug in the SD/MMC card Press to activate Random function Press to raise the volume level Press to skip/search backwards Press to indicate the mode 1 QUICK REFERENCE Insert SD/MMC memory card to playback the music files in headphones Attach Neck strap to Strap holder Press to deactivate Random function Press to skip/search forward Slide to the ON position to turn the unit on or OFF position to turn the unit off Lights/ blinks green or red to power on, play . Press and hold for 2 seconds to stop play or pause.
Press to lower the volume level Connect USB jack to computer Plug in the SD/MMC card Press to activate Random function Press to raise the volume level Press to skip/search backwards Press to indicate the mode 1 QUICK REFERENCE Insert SD/MMC memory card to playback the music files in headphones Attach Neck strap to Strap holder Press to deactivate Random function Press to skip/search forward Slide to the ON position to turn the unit on or OFF position to turn the unit off Lights/ blinks green or red to power on, play . Press and hold for 2 seconds to stop play or pause.
Quick Reference Guide
Page 2
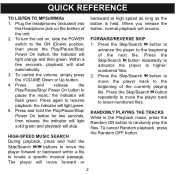
... player to highernumbered files. 2. QUICK REFERENCE TO LISTEN TO MP3s/WMAs 1. Within a few seconds, playback will light green. 5. the indicator will start automatically. 3. Press the Skip/Search o button repeatedly to move the player back to lower-numbered files. To control the volume, simply press the VOLUME Down or Up button. 4. Press the Skip/Search o button to move the player back to the beginning of the unit. 2. To turn...
... player to highernumbered files. 2. QUICK REFERENCE TO LISTEN TO MP3s/WMAs 1. Within a few seconds, playback will light green. 5. the indicator will start automatically. 3. Press the Skip/Search o button repeatedly to move the player back to lower-numbered files. To control the volume, simply press the VOLUME Down or Up button. 4. Press the Skip/Search o button to move the player back to the beginning of the unit. 2. To turn...
Quick Reference Guide
Page 3
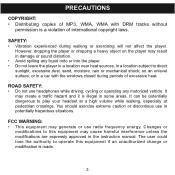
... will not affect the player. ROAD SAFETY: • Do not use headphones while driving, cycling or operating any liquid onto or into the player. • Do not leave the player in potentially hazardous situations. Changes or modifications to operate this equipment may generate or use in a location near heat sources; It may result in the instruction manual. FCC WARNING: •...
... will not affect the player. ROAD SAFETY: • Do not use headphones while driving, cycling or operating any liquid onto or into the player. • Do not leave the player in potentially hazardous situations. Changes or modifications to operate this equipment may generate or use in a location near heat sources; It may result in the instruction manual. FCC WARNING: •...
Quick Reference Guide
Page 4
FCC DECLARATION This device complies with Part 15 of the FCC Rules. These limits are designed to operate the equipment. Shield cable must be determined by turning the equipment off and on a circuit different from that to which can radiate radio frequency energy and, if not installed and used with this unit to ensure compliance with the instructions, may cause...
FCC DECLARATION This device complies with Part 15 of the FCC Rules. These limits are designed to operate the equipment. Shield cable must be determined by turning the equipment off and on a circuit different from that to which can radiate radio frequency energy and, if not installed and used with this unit to ensure compliance with the instructions, may cause...
Quick Reference Guide
Page 5
..., we want you listening for your protection. 5 This list of your new sound equipment will help to your volume control at a low setting. • Slowly increase the sound until it at a safe level BEFORE your hearing adapts. We Want You Listening For A Lifetime Used wisely, your musical enjoyment. Over time your hearing "comfort level" adapts to get the most importantly, without distortion. Once...
..., we want you listening for your protection. 5 This list of your new sound equipment will help to your volume control at a low setting. • Slowly increase the sound until it at a safe level BEFORE your hearing adapts. We Want You Listening For A Lifetime Used wisely, your musical enjoyment. Over time your hearing "comfort level" adapts to get the most importantly, without distortion. Once...

Quick Reference Guide
Page 7
Volume Down Button 6. Flash Plug (Inside Flash Plug Cover) 1 11 7. Random OFF Button 12. Skip/Search n Button 8 13. Function Indicator 7 LOCATION OF CONTROLS 1. Skip/Search o Button 10 4. Flash Plug Cover 2 8. Strap Holder 5 13 14 10. Random ON Button 2. Volume Up Button 9 3. Play/Pause/Stop/ Power On Button 5. Headphone Jack 3 12 4 9. SD/MMC Memory Card Slot 6 7 11. POWER Switch 14.
Volume Down Button 6. Flash Plug (Inside Flash Plug Cover) 1 11 7. Random OFF Button 12. Skip/Search n Button 8 13. Function Indicator 7 LOCATION OF CONTROLS 1. Skip/Search o Button 10 4. Flash Plug Cover 2 8. Strap Holder 5 13 14 10. Random ON Button 2. Volume Up Button 9 3. Play/Pause/Stop/ Power On Button 5. Headphone Jack 3 12 4 9. SD/MMC Memory Card Slot 6 7 11. POWER Switch 14.
Quick Reference Guide
Page 8
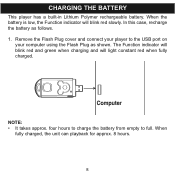
... the USB port on your player to full. When fully charged, the unit can playback for approx. 8 hours. 8 The Function indicator will blink red and green when charging and will blink red slowly. When the battery is low, the Function indicator will light constant red when fully charged. NOTE: • It takes approx. Remove the Flash Plug cover and connect your computer using the Flash Plug...
... the USB port on your player to full. When fully charged, the unit can playback for approx. 8 hours. 8 The Function indicator will blink red and green when charging and will blink red slowly. When the battery is low, the Function indicator will light constant red when fully charged. NOTE: • It takes approx. Remove the Flash Plug cover and connect your computer using the Flash Plug...
Quick Reference Guide
Page 10
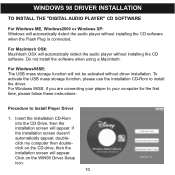
... Windows 98SE, if you are connecting your player to your computer for the first time, please follow these instructions: Procedure to install the driver. WINDOWS 98 DRIVER INSTALLATION TO INSTALL THE "DIGITAL AUDIO PLAYER" CD SOFTWARE For Windows ME, Windows2000 or Windows XP: Windows will automatically detect the audio player without installing the CD software. To activate the USB mass storage function, please use the installation CD-Rom to Install Player Driver 1. Click on the CD drive, then the installation screen...
... Windows 98SE, if you are connecting your player to your computer for the first time, please follow these instructions: Procedure to install the driver. WINDOWS 98 DRIVER INSTALLATION TO INSTALL THE "DIGITAL AUDIO PLAYER" CD SOFTWARE For Windows ME, Windows2000 or Windows XP: Windows will automatically detect the audio player without installing the CD software. To activate the USB mass storage function, please use the installation CD-Rom to Install Player Driver 1. Click on the CD drive, then the installation screen...
Quick Reference Guide
Page 12
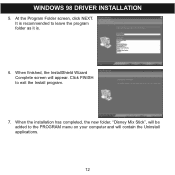
Click FINISH to the PROGRAM menu on your computer and will contain the Uninstall applications. 12 When the installation has completed, the new folder, "Disney Mix Stick", will appear. At the Program Folder screen, click NEXT. It is recommended to leave the program folder as it is. 6. When finished, the InstallShield Wizard Complete screen will be added to exit the Install program. 7. WINDOWS 98 DRIVER INSTALLATION 5.
Click FINISH to the PROGRAM menu on your computer and will contain the Uninstall applications. 12 When the installation has completed, the new folder, "Disney Mix Stick", will appear. At the Program Folder screen, click NEXT. It is recommended to leave the program folder as it is. 6. When finished, the InstallShield Wizard Complete screen will be added to exit the Install program. 7. WINDOWS 98 DRIVER INSTALLATION 5.
Quick Reference Guide
Page 13
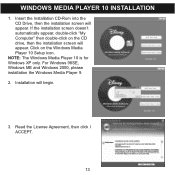
NOTE: The Windows Media Player 10 is for Windows XP only. Read the License Agreement, then click I ACCEPT. 13 WINDOWS MEDIA PLAYER 10 INSTALLATION 1. For Windows 98SE, Windows ME and Windows 2000, please installation the Windows Media Player 9. 2. Click on the CD drive, then the installation screen will appear. Installation will appear. Insert the Installation CD-Rom into the CD Drive, then the installation screen will begin. 3. If the installation screen doesn't automatically appear, double-click "My Computer" then double-click on the Windows Media Player 10 Setup icon.
NOTE: The Windows Media Player 10 is for Windows XP only. Read the License Agreement, then click I ACCEPT. 13 WINDOWS MEDIA PLAYER 10 INSTALLATION 1. For Windows 98SE, Windows ME and Windows 2000, please installation the Windows Media Player 9. 2. Click on the CD drive, then the installation screen will appear. Installation will appear. Insert the Installation CD-Rom into the CD Drive, then the installation screen will begin. 3. If the installation screen doesn't automatically appear, double-click "My Computer" then double-click on the Windows Media Player 10 Setup icon.
Quick Reference Guide
Page 16
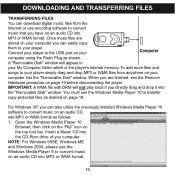
... Windows 2000, please use the Windows Media Player 9 to convert music on an audio CD into the "Removable Disk" window. DOWNLOADING AND TRANSFERRING FILES TRANSFERRING FILES You can download digital music files from anywhere on your computer you can easily copy them to your player. A "Removable Disk" window will not play back if you computer. You must use the Windows Media Player 10 to the USB port on an audio CD into MP3 or WMA format as follows: 1. To add more files and songs...
... Windows 2000, please use the Windows Media Player 9 to convert music on an audio CD into the "Removable Disk" window. DOWNLOADING AND TRANSFERRING FILES TRANSFERRING FILES You can download digital music files from anywhere on your computer you can easily copy them to your player. A "Removable Disk" window will not play back if you computer. You must use the Windows Media Player 10 to the USB port on an audio CD into MP3 or WMA format as follows: 1. To add more files and songs...

Quick Reference Guide
Page 17
... files into the player, follow the "Safely Remove Hardware" procedure as desired. When the music tracks are finished loading into the "Removable Disk" window. 6. Open the "Removable Disk" window and open the ripped music location window. 5. Adjust the audio quality as shown on "Options"; Click on your computer. 4. When the files are ripped; DOWNLOADING AND TRANSFERRING FILES (CONT.) 2. To add the transferred/ripped music files/songs to confirm the settings. 3. Click on the "Tools" menu...
... files into the player, follow the "Safely Remove Hardware" procedure as desired. When the music tracks are finished loading into the "Removable Disk" window. 6. Open the "Removable Disk" window and open the ripped music location window. 5. Adjust the audio quality as shown on "Options"; Click on your computer. 4. When the files are ripped; DOWNLOADING AND TRANSFERRING FILES (CONT.) 2. To add the transferred/ripped music files/songs to confirm the settings. 3. Click on the "Tools" menu...

Quick Reference Guide
Page 18
... "Safely Remove Hardware" procedure on and connect the unit to your unit, follow the procedure described below using the previously installed Windows Media Player 10. Click "Start Sync" to start downloading the WMA file(s) with DRM to from the right side drop-down menu to locate the music files you want to copy to the Portable Device. 4. Click on "Sync". 2. Open the "Windows Media Player Browser 10" and click on the "Sync List" pull-down menu.
... "Safely Remove Hardware" procedure on and connect the unit to your unit, follow the procedure described below using the previously installed Windows Media Player 10. Click "Start Sync" to start downloading the WMA file(s) with DRM to from the right side drop-down menu to locate the music files you want to copy to the Portable Device. 4. Click on "Sync". 2. Open the "Windows Media Player Browser 10" and click on the "Sync List" pull-down menu.
Quick Reference Guide
Page 21
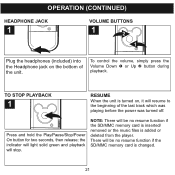
... is inserted/ removed or the music files is added or deleted from the player. NOTE: There will resume to the beginning of the unit. TO STOP PLAYBACK 1 RESUME When the unit is turned on the bottom of the last track which was playing before the power was turned off. There will stop. Press and hold the Play/Pause/Stop/Power On button for two...
... is inserted/ removed or the music files is added or deleted from the player. NOTE: There will resume to the beginning of the unit. TO STOP PLAYBACK 1 RESUME When the unit is turned on the bottom of the last track which was playing before the power was turned off. There will stop. Press and hold the Play/Pause/Stop/Power On button for two...
Quick Reference Guide
Page 22
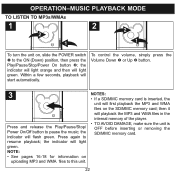
To control the volume, simply press the Volume Down 1 or Up 2 button. 3 Press and release the Play/Pause/Stop/ Power On/Off button to the ON (Down) position, then press the Play/Pause/Stop/Power On button 2; OPERATION-MUSIC PLAYBACK MODE TO LISTEN TO MP3s/WMAs 1 2 2 1 2 1 To turn the unit on, slide the POWER switch 1 to pause the music; the indicator will flash green. the indicator will light green. NOTE: •...
To control the volume, simply press the Volume Down 1 or Up 2 button. 3 Press and release the Play/Pause/Stop/ Power On/Off button to the ON (Down) position, then press the Play/Pause/Stop/Power On button 2; OPERATION-MUSIC PLAYBACK MODE TO LISTEN TO MP3s/WMAs 1 2 2 1 2 1 To turn the unit on, slide the POWER switch 1 to pause the music; the indicator will flash green. the indicator will light green. NOTE: •...

Quick Reference Guide
Page 23
... a specific musical passage. Press the Skip/Search n button repeatedly to advance the player to the beginning of the currently playing file. During playback, press the Skip/Search o button to move the player back to the beginning of the next file. Press the Skip/Search o button repeatedly to move the player back to lower-numbered files. 23 The player will resume. OPERATION-MUSIC PLAYBACK MODE (CONTINUED) HIGH-SPEED MUSIC SEARCH 1 2 1 During playback, press and hold...
... a specific musical passage. Press the Skip/Search n button repeatedly to advance the player to the beginning of the currently playing file. During playback, press the Skip/Search o button to move the player back to the beginning of the next file. Press the Skip/Search o button repeatedly to move the player back to lower-numbered files. 23 The player will resume. OPERATION-MUSIC PLAYBACK MODE (CONTINUED) HIGH-SPEED MUSIC SEARCH 1 2 1 During playback, press and hold...

Quick Reference Guide
Page 24
NOTES: • If a SD/MMC memory card is inserted, the player will randomly playback the music files in the SD/MMC memory card and in the player's internal memory. • The Random Playback function will randomly play the files. To cancel Random playback, press the Random OFF button. OPERATION-MUSIC PLAYBACK MODE (CONTINUED) RANDOMLY PLAYING THE TRACKS 1 2 During playback, press the Random ON button and the unit will be cancelled if you power off the unit and turn it back on again. 24
NOTES: • If a SD/MMC memory card is inserted, the player will randomly playback the music files in the SD/MMC memory card and in the player's internal memory. • The Random Playback function will randomly play the files. To cancel Random playback, press the Random OFF button. OPERATION-MUSIC PLAYBACK MODE (CONTINUED) RANDOMLY PLAYING THE TRACKS 1 2 During playback, press the Random ON button and the unit will be cancelled if you power off the unit and turn it back on again. 24

Quick Reference Guide
Page 25
... DRM can't playback. WMA files with DRM. 25 POWER switch is set too Raise the volume using the low. VOLUME Up button. securely connected. compatibility. inserted. Volume is not Slide POWER switch to the in the Upload files to download methods. No files are in the ON position. CAUSE SOLUTION Battery is not securely connected. Headphones are corrupted. The player is Make sure player is low/empty. TROUBLESHOOTING GUIDE If you experience a problem with this...
... DRM can't playback. WMA files with DRM. 25 POWER switch is set too Raise the volume using the low. VOLUME Up button. securely connected. compatibility. inserted. Volume is not Slide POWER switch to the in the Upload files to download methods. No files are in the ON position. CAUSE SOLUTION Battery is not securely connected. Headphones are corrupted. The player is Make sure player is low/empty. TROUBLESHOOTING GUIDE If you experience a problem with this...
Quick Reference Guide
Page 26
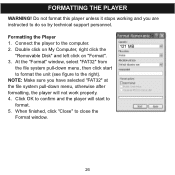
... "FAT32" at the file system pull-down menu, then click start to do so by technical support personnel. NOTE: Make sure you are instructed to format. 5. Click OK to the right). Formatting the Player 1. Connect the player to close the Format window. 121 MB 26 When finished, click "Close" to the computer. 2. Double click on My Computer, right click the "Removable Disk" and left...
... "FAT32" at the file system pull-down menu, then click start to do so by technical support personnel. NOTE: Make sure you are instructed to format. 5. Click OK to the right). Formatting the Player 1. Connect the player to close the Format window. 121 MB 26 When finished, click "Close" to the computer. 2. Double click on My Computer, right click the "Removable Disk" and left...

Quick Reference Guide
Page 28
Playtime Supported OS Operating Temperature 107 x 39 x 18 mm 40g USB 2.0 128MB Approx. 8 hours Win ME, 2000, XP and Mac OSX Win 98SE (Driver is required) 23° F to 104° F (-5° C to 40° C) Specifications are subject to change without notice. 28 SPECIFICATIONS Audio Frequency Range Headphones Output S/N Ratio 20Hz-20KHz 10mW, 16 ohm (Max Vol) 90dB (MP3) File Support MP3 WMA Bit Rate MPEG 1/2/2.5 Layer 3 Windows Media Audio (WMA file with DRM) 8kbps-320kbps General Dimension Weight USB Built-in Memory Max.
Playtime Supported OS Operating Temperature 107 x 39 x 18 mm 40g USB 2.0 128MB Approx. 8 hours Win ME, 2000, XP and Mac OSX Win 98SE (Driver is required) 23° F to 104° F (-5° C to 40° C) Specifications are subject to change without notice. 28 SPECIFICATIONS Audio Frequency Range Headphones Output S/N Ratio 20Hz-20KHz 10mW, 16 ohm (Max Vol) 90dB (MP3) File Support MP3 WMA Bit Rate MPEG 1/2/2.5 Layer 3 Windows Media Audio (WMA file with DRM) 8kbps-320kbps General Dimension Weight USB Built-in Memory Max.


