
User Guide
Page 1
Mi4004 Suffix A User's Guide iWake Clock Radio with Dual Alarm Before operating this product, please read these instructions completely.
Mi4004 Suffix A User's Guide iWake Clock Radio with Dual Alarm Before operating this product, please read these instructions completely.
User Guide
Page 2
ATTENTION: The exclamation point within the product's enclosure that may generate or use radio frequency energy. ATTENTION: POUR ÉVITER LES CHOC ÉLECTRIQUES, INTRODUIRE LA LAME LA PLUS LARGE DE LA FICHE DANS LA BORNE CORRESPONDANTE DE LA ...
ATTENTION: The exclamation point within the product's enclosure that may generate or use radio frequency energy. ATTENTION: POUR ÉVITER LES CHOC ÉLECTRIQUES, INTRODUIRE LA LAME LA PLUS LARGE DE LA FICHE DANS LA BORNE CORRESPONDANTE DE LA ...
User Guide
Page 3
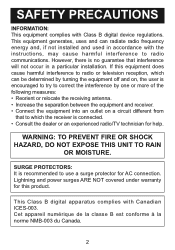
...to correct the interference by turning the equipment off and on, the user is connected. • Consult the dealer or an experienced radio/TV technician for AC connection. SAFETY PRECAUTIONS INFORMATION: This equipment complies with Canadian ICES-003. If this product. Lightning and power surges... ARE NOT covered under warranty for this equipment does cause harmful interference to radio or television reception, which the receiver is encouraged to try to use a surge protector for help. Cet appareil numérique ...
...to correct the interference by turning the equipment off and on, the user is connected. • Consult the dealer or an experienced radio/TV technician for AC connection. SAFETY PRECAUTIONS INFORMATION: This equipment complies with Canadian ICES-003. If this product. Lightning and power surges... ARE NOT covered under warranty for this equipment does cause harmful interference to radio or television reception, which the receiver is encouraged to try to use a surge protector for help. Cet appareil numérique ...
User Guide
Page 4
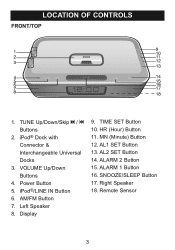
Power Button 5. TIME SET Button 10. HR (Hour) Button 11. AL1 SET Button 13. Remote Sensor 3 iPod® Dock with Connector & Interchangeable Universal Docks 3. MN (Minute) Button 12. SNOOZE/SLEEP Button 17. Right Speaker 18. ALARM 2 Button 15. Display 9. AL2 SET Button 14. VOLUME Up/Down Buttons 4. iPod®/LINE IN Button 6. ALARM 1 Button 16. TUNE Up/Down/Skip n / o Buttons 2. AM/FM Button 7. Left Speaker 8. LOCATION OF CONTROLS FRONT/TOP 1.
Power Button 5. TIME SET Button 10. HR (Hour) Button 11. AL1 SET Button 13. Remote Sensor 3 iPod® Dock with Connector & Interchangeable Universal Docks 3. MN (Minute) Button 12. SNOOZE/SLEEP Button 17. Right Speaker 18. ALARM 2 Button 15. Display 9. AL2 SET Button 14. VOLUME Up/Down Buttons 4. iPod®/LINE IN Button 6. ALARM 1 Button 16. TUNE Up/Down/Skip n / o Buttons 2. AM/FM Button 7. Left Speaker 8. LOCATION OF CONTROLS FRONT/TOP 1.
User Guide
Page 5
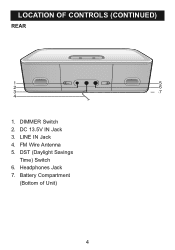
Headphones Jack 7. DIMMER Switch 2. DST (Daylight Savings Time) Switch 6. Battery Compartment (Bottom of Unit) 4 LOCATION OF CONTROLS (CONTINUED) REAR 1. FM Wire Antenna 5. LINE IN Jack 4. DC 13.5V IN Jack 3.
Headphones Jack 7. DIMMER Switch 2. DST (Daylight Savings Time) Switch 6. Battery Compartment (Bottom of Unit) 4 LOCATION OF CONTROLS (CONTINUED) REAR 1. FM Wire Antenna 5. LINE IN Jack 4. DC 13.5V IN Jack 3.
User Guide
Page 6
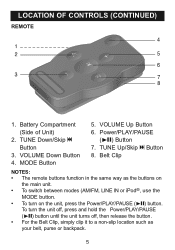
MODE Button 5. LOCATION OF CONTROLS (CONTINUED) REMOTE 1. VOLUME Down Button 4. TUNE Up/Skip n Button 8. To turn the unit off, press and hold the Power/PLAY/PAUSE (®p) button until the unit turns off, then release the button. • For the Belt Clip, simply clip it to a non-slip location such as the buttons on the main unit. • To switch between modes (AM/FM, LINE IN or iPod®, use the MODE button. • To turn on the unit, press the Power/PLAY/PAUSE (®p) button. Battery Compartment (Side of Unit) 2. TUNE Down/Skip o Button 3. Power/PLAY/PAUSE (®...
MODE Button 5. LOCATION OF CONTROLS (CONTINUED) REMOTE 1. VOLUME Down Button 4. TUNE Up/Skip n Button 8. To turn the unit off, press and hold the Power/PLAY/PAUSE (®p) button until the unit turns off, then release the button. • For the Belt Clip, simply clip it to a non-slip location such as the buttons on the main unit. • To switch between modes (AM/FM, LINE IN or iPod®, use the MODE button. • To turn on the unit, press the Power/PLAY/PAUSE (®p) button. Battery Compartment (Side of Unit) 2. TUNE Down/Skip o Button 3. Power/PLAY/PAUSE (®...
User Guide
Page 7
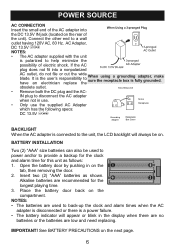
... with the unit is polarized to electrician replace the When using a grounding adapter, make sure the receptacle box is connected to provide a backup for the clock and alarm time for the longest playing time. 3. obsolete outlet. IMPORTANT! See BATTERY PRECAUTIONS on the tab, then removing the door. 2. BATTERY INSTALLATION Two (2)...DC plug and the AC- Open the battery door by pushing in on the next page. 6 Connect the other end to back-up the clock and alarm times when the AC adapter is disconnected or there is have an do not file or cut the wide the user's ...
... with the unit is polarized to electrician replace the When using a grounding adapter, make sure the receptacle box is connected to provide a backup for the clock and alarm time for the longest playing time. 3. obsolete outlet. IMPORTANT! See BATTERY PRECAUTIONS on the tab, then removing the door. 2. BATTERY INSTALLATION Two (2)...DC plug and the AC- Open the battery door by pushing in on the next page. 6 Connect the other end to back-up the clock and alarm times when the AC adapter is disconnected or there is have an do not file or cut the wide the user's ...
User Guide
Page 8
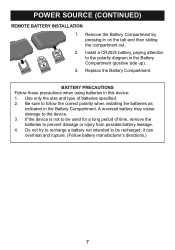
Install a CR2025 battery, paying attention to be used for a long period of batteries specified. 2. Do not try to recharge a battery not intended to the polarity diagram in the Battery Compartment. POWER SOURCE (CONTINUED) REMOTE BATTERY INSTALLATION 1. Be sure to the device. 3. Replace the Battery Compartment. BATTERY PRECAUTIONS Follow these precautions when using batteries in on the tab and then sliding the compartment out. 2. Use only the size and type of time, remove the batteries to be recharged; it can overheat and rupture. (Follow battery manufacturer's ...
Install a CR2025 battery, paying attention to be used for a long period of batteries specified. 2. Do not try to recharge a battery not intended to the polarity diagram in the Battery Compartment. POWER SOURCE (CONTINUED) REMOTE BATTERY INSTALLATION 1. Be sure to the device. 3. Replace the Battery Compartment. BATTERY PRECAUTIONS Follow these precautions when using batteries in on the tab and then sliding the compartment out. 2. Use only the size and type of time, remove the batteries to be recharged; it can overheat and rupture. (Follow battery manufacturer's ...
User Guide
Page 9
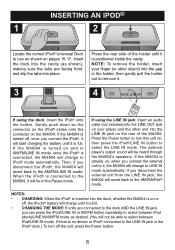
...Power button to turn off , the iPod's® battery will charge until it is turned on the Mi4004. If the Mi4004 is turned off, once you can press the iPod®/LINE IN or AM/FM button repeatedly to ...able to select between iPod/LINE IN mode, if there is no device or iPod® connected to the Mi4004, it will change to use as shown), making sure the tabs are facing front, and slip the tabs... into the gap in the holder, then gently pull the holder out to remove it , the Mi4004 will start charging the battery until it is connected to the LINE IN jack or the iPod® dock.)...
...Power button to turn off , the iPod's® battery will charge until it is turned on the Mi4004. If the Mi4004 is turned off, once you can press the iPod®/LINE IN or AM/FM button repeatedly to ...able to select between iPod/LINE IN mode, if there is no device or iPod® connected to the Mi4004, it will change to use as shown), making sure the tabs are facing front, and slip the tabs... into the gap in the holder, then gently pull the holder out to remove it , the Mi4004 will start charging the battery until it is connected to the LINE IN jack or the iPod® dock.)...
User Guide
Page 10
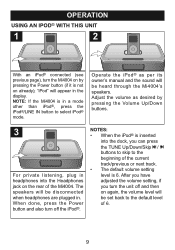
... the beginning of the current track/previous or next track. • The default volume setting level is 6. "iPod" will be heard through the Mi4004's speakers. Adjust the vol1ume 1as desired by pressing the Power button (if it is not on already); When done, press the Power button and ...disconnected when headph1ones1are plugged in. OPERATION USING AN IPOD® WITH THIS UNIT 1 2 With an iPod® connected (see previous page), turn the Mi4004 on by pressing the Volume Up/Down buttons. 3 For private listening, plug in headphones into the dock, you turn the unit off the iPod®...
... the beginning of the current track/previous or next track. • The default volume setting level is 6. "iPod" will be heard through the Mi4004's speakers. Adjust the vol1ume 1as desired by pressing the Power button (if it is not on already); When done, press the Power button and ...disconnected when headph1ones1are plugged in. OPERATION USING AN IPOD® WITH THIS UNIT 1 2 With an iPod® connected (see previous page), turn the Mi4004 on by pressing the Volume Up/Down buttons. 3 For private listening, plug in headphones into the dock, you turn the unit off the iPod®...
User Guide
Page 11
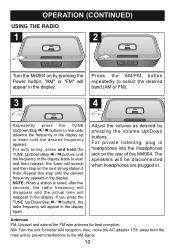
... main unit to prevent interference to manually advance the frequency in the display starts to scan and then release; OPERATION (CONTINUED) USING THE RADIO 1 2 Turn the Mi4004 on the next strong station it finds. Press the AM/FM button repeatedly to selec1t the desired band (AM or FM). 3 4 ... to the AM signal. 10 Adjust the volume as desired by pressing the Power button; NOTE: When a station is tuned, after five seconds, the radio frequency will disappear and the actual time will reappear in the display. "AM" 1or "FM" will search and then stop on by pressing the Volume...
... main unit to prevent interference to manually advance the frequency in the display starts to scan and then release; OPERATION (CONTINUED) USING THE RADIO 1 2 Turn the Mi4004 on the next strong station it finds. Press the AM/FM button repeatedly to selec1t the desired band (AM or FM). 3 4 ... to the AM signal. 10 Adjust the volume as desired by pressing the Power button; NOTE: When a station is tuned, after five seconds, the radio frequency will disappear and the actual time will reappear in the display. "AM" 1or "FM" will search and then stop on by pressing the Volume...
User Guide
Page 12
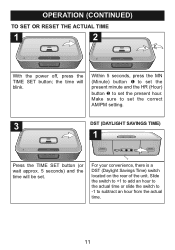
OPERATION (CONTINUED) TO SET OR RESET THE ACTUAL TIME 1 2 2 1 With the power off, press the TIME SET button; 1the time will be set the present hour. Slide the switch to +1 to add an hour to the actual time or slide the switch to -1 to set the correct AM/PM setting. 3 DST (DAYLIGHT SAVINGS TIME) 1 Press the TIME SET button (or wait approx. 5 seconds) and the time will blink. Within 5 seconds, press the MN (Minute) button 1 to set the present minute and the HR (Hour) button 2 to set . 1 For your convenience, there is a DST (Daylight Savings Time) switch located on the rear of ...
OPERATION (CONTINUED) TO SET OR RESET THE ACTUAL TIME 1 2 2 1 With the power off, press the TIME SET button; 1the time will be set the present hour. Slide the switch to +1 to add an hour to the actual time or slide the switch to -1 to set the correct AM/PM setting. 3 DST (DAYLIGHT SAVINGS TIME) 1 Press the TIME SET button (or wait approx. 5 seconds) and the time will blink. Within 5 seconds, press the MN (Minute) button 1 to set the present minute and the HR (Hour) button 2 to set . 1 For your convenience, there is a DST (Daylight Savings Time) switch located on the rear of ...
User Guide
Page 13
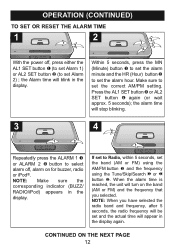
NOTE: Make sure the corresponding indicator (BUZZ/ RADIO/iPod) appears in the display again. the alarm time will blink in the display. NOTE: When you selected. Make sure to set the correct AM/... off , alarm on the band (AM or FM) and the frequency that you have selected the radio band and frequency, after 5 seconds, the radio frequency will be set and the actual time will turn on for buzzer, radio or iPod®. the Alarm time will stop blinking. 3 4 2 1 2 1 Repeatedly press the ALARM 1 1 or ALARM...
NOTE: Make sure the corresponding indicator (BUZZ/ RADIO/iPod) appears in the display again. the alarm time will blink in the display. NOTE: When you selected. Make sure to set the correct AM/... off , alarm on the band (AM or FM) and the frequency that you have selected the radio band and frequency, after 5 seconds, the radio frequency will be set and the actual time will turn on for buzzer, radio or iPod®. the Alarm time will stop blinking. 3 4 2 1 2 1 Repeatedly press the ALARM 1 1 or ALARM...
User Guide
Page 14
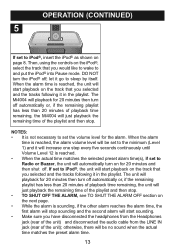
The Mi4004 will just playback the remaining time of the unit); Then, using the controls on the iPod®, select the ... the track that you selected and the tracks following it will start sounding. • Make sure you would like to wake to Radio or Buzzer, the unit will automatically turn off automatically or, if the remaining playlist has less than 20 minutes of playback time remaining... DO NOT turn off automatically or, if the remaining playlist has less than 20 minutes of playback time remaining, the Mi4004 will playback for 20 minutes then turn the iPod® off .
The Mi4004 will just playback the remaining time of the unit); Then, using the controls on the iPod®, select the ... the track that you selected and the tracks following it will start sounding. • Make sure you would like to wake to Radio or Buzzer, the unit will automatically turn off automatically or, if the remaining playlist has less than 20 minutes of playback time remaining... DO NOT turn off automatically or, if the remaining playlist has less than 20 minutes of playback time remaining, the Mi4004 will playback for 20 minutes then turn the iPod® off .
User Guide
Page 15
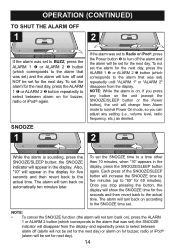
... button), the unit will change from the display. The alarm will turn back on for buzzer, radio or iPod® (alarm will be set for the next day. Once you press any setting (i.e., volume level, radio frequency, etc.) as desired. 2 While the alarm is sounding, press the SNOOZE/SLEEP button; the SNOOZE... was set) and the alarm will turn off and NOT be set for next day). 14 To set for buzzer, radio or iPod® again. SNOOZE 1 2 1 2 3 If the alarm was set to Radio or iPod®, press the Power button 1 to turn off the alarm and the alarm will be set the...
... button), the unit will change from the display. The alarm will turn back on for buzzer, radio or iPod® (alarm will be set for the next day. Once you press any setting (i.e., volume level, radio frequency, etc.) as desired. 2 While the alarm is sounding, press the SNOOZE/SLEEP button; the SNOOZE... was set) and the alarm will turn off and NOT be set for next day). 14 To set for buzzer, radio or iPod® again. SNOOZE 1 2 1 2 3 If the alarm was set to Radio or iPod®, press the Power button 1 to turn off the alarm and the alarm will be set the...
User Guide
Page 16
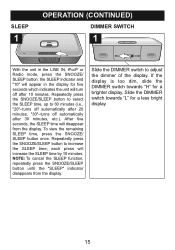
... display. After five seconds, the SLEEP time will turn off automatically after 10 minutes. each press will appear in the LINE IN, iPod® or Radio mode, press the SNOOZE/ SLEEP button; the SLEEP indicator and "10" will increase the SLEEP time by 10 minutes. Slide the DIMMER switch to adjust...
... display. After five seconds, the SLEEP time will turn off automatically after 10 minutes. each press will appear in the LINE IN, iPod® or Radio mode, press the SNOOZE/ SLEEP button; the SLEEP indicator and "10" will increase the SLEEP time by 10 minutes. Slide the DIMMER switch to adjust...
User Guide
Page 17
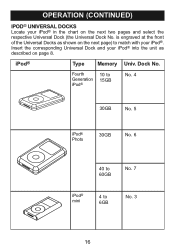
Insert the corresponding Universal Dock and your iPod® into the unit as shown on page 8. Fourth Generation iPod® 10 to 15GB No. 4 30GB No. 5 iPod® Photo 30GB No. 6 40 to 60GB No. 7 iPod® mini 4 to match with your iPod® in the chart on the next two pages and select the respective Universal Dock (the Universal Dock No. Dock No. is engraved at the front of the Universal Docks as described on the next page) to 6GB No. 3 16 iPod® Type Memory Univ. OPERATION (CONTINUED) IPOD® UNIVERSAL DOCKS Locate your iPod®.
Insert the corresponding Universal Dock and your iPod® into the unit as shown on page 8. Fourth Generation iPod® 10 to 15GB No. 4 30GB No. 5 iPod® Photo 30GB No. 6 40 to 60GB No. 7 iPod® mini 4 to match with your iPod® in the chart on the next two pages and select the respective Universal Dock (the Universal Dock No. Dock No. is engraved at the front of the Universal Docks as described on the next page) to 6GB No. 3 16 iPod® Type Memory Univ. OPERATION (CONTINUED) IPOD® UNIVERSAL DOCKS Locate your iPod®.
User Guide
Page 18
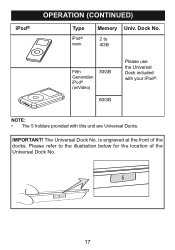
IMPORTANT! The Universal Dock No. NOTE: • The 5 holders provided with your iPod®. iPod® OPERATION (CONTINUED) Type iPod® nano Memory Univ. Dock No. 2 to the illustration below for the location of the docks. is engraved at the front of the Universal Dock No. 17 Please refer to 4GB Fifth Generation iPod® (w/Video) 30GB 60GB Please use the Universal Dock included with this unit are Universal Docks.
IMPORTANT! The Universal Dock No. NOTE: • The 5 holders provided with your iPod®. iPod® OPERATION (CONTINUED) Type iPod® nano Memory Univ. Dock No. 2 to the illustration below for the location of the docks. is engraved at the front of the Universal Dock No. 17 Please refer to 4GB Fifth Generation iPod® (w/Video) 30GB 60GB Please use the Universal Dock included with this unit are Universal Docks.
User Guide
Page 19
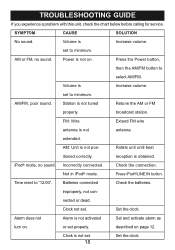
.... AM or FM, no sound. set to minimum. iPod® mode, no sound. nected or dead. Clock not set . 18 Set the clock. Set the clock. Incorrectly connected. Check the connection. Batteries connected Check the batteries. Clock is not activated Set and activate alarm as turn on. TROUBLESHOOTING GUIDE If you experience a problem with...
.... AM or FM, no sound. set to minimum. iPod® mode, no sound. nected or dead. Clock not set . 18 Set the clock. Set the clock. Incorrectly connected. Check the connection. Batteries connected Check the batteries. Clock is not activated Set and activate alarm as turn on. TROUBLESHOOTING GUIDE If you experience a problem with...
User Guide
Page 20
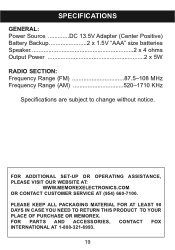
...-7100. PLEASE KEEP ALL PACKAGING MATERIAL FOR AT LEAST 90 DAYS IN CASE YOU NEED TO RETURN THIS PRODUCT TO YOUR PLACE OF PURCHASE OR MEMOREX. FOR PARTS AND ACCESSORIES, CONTACT FOX INTERNATIONAL AT 1-800-321-6993. 19 SPECIFICATIONS GENERAL: Power Source DC 13.5V Adapter (Center Positive) Battery ...Backup 2 x 1.5V "AAA" size batteries Speaker 2 x 4 ohms Output Power 2 x 5W RADIO SECTION: Frequency Range (FM 87.5-108 MHz Frequency Range (AM 520-1710 KHz Specifications are subject to change without notice.
...-7100. PLEASE KEEP ALL PACKAGING MATERIAL FOR AT LEAST 90 DAYS IN CASE YOU NEED TO RETURN THIS PRODUCT TO YOUR PLACE OF PURCHASE OR MEMOREX. FOR PARTS AND ACCESSORIES, CONTACT FOX INTERNATIONAL AT 1-800-321-6993. 19 SPECIFICATIONS GENERAL: Power Source DC 13.5V Adapter (Center Positive) Battery ...Backup 2 x 1.5V "AAA" size batteries Speaker 2 x 4 ohms Output Power 2 x 5W RADIO SECTION: Frequency Range (FM 87.5-108 MHz Frequency Range (AM 520-1710 KHz Specifications are subject to change without notice.