
Manual
Page 1
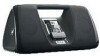
Mi3005 Suffix A User's Guide iMove with AM/FM Radio Before operating this product, please read these instructions completely.
Mi3005 Suffix A User's Guide iMove with AM/FM Radio Before operating this product, please read these instructions completely.

Manual
Page 2
... to constitute a risk of important operating and maintenance (servicing) instructions in the instruction manual. The user could lose the authority to operate this equipment may be of sufficient magnitude to persons. NO USERSERVICEABLE PARTS INSIDE. FCC WARNING: This equipment may generate or use radio frequency energy. SAFETY PRECAUTIONS CAUTION RISK OF ELECTRIC SHOCK DO NOT OPEN CAUTION: TO REDUCE THE RISK OF...
... to constitute a risk of important operating and maintenance (servicing) instructions in the instruction manual. The user could lose the authority to operate this equipment may be of sufficient magnitude to persons. NO USERSERVICEABLE PARTS INSIDE. FCC WARNING: This equipment may generate or use radio frequency energy. SAFETY PRECAUTIONS CAUTION RISK OF ELECTRIC SHOCK DO NOT OPEN CAUTION: TO REDUCE THE RISK OF...

Manual
Page 3
... or an experienced radio/TV technician for help. Lightning and power surges ARE NOT ...instructions, may cause harmful interference to radio communications. This equipment generates, uses and can be determined by turning the equipment off and on, the user...antenna. • Increase the separation between the equipment and receiver. • Connect the equipment into an outlet on a circuit different from that to use a surge protector for this equipment does cause harmful interference to radio or television reception, which can radiate radio frequency energy and, if not installed and used...
... or an experienced radio/TV technician for help. Lightning and power surges ARE NOT ...instructions, may cause harmful interference to radio communications. This equipment generates, uses and can be determined by turning the equipment off and on, the user...antenna. • Increase the separation between the equipment and receiver. • Connect the equipment into an outlet on a circuit different from that to use a surge protector for this equipment does cause harmful interference to radio or television reception, which can radiate radio frequency energy and, if not installed and used...

Manual
Page 4
LOCATION OF CONTROLS 1. iPod® Dock with Connector & Interchangeable Holders 4. Power Button 6. Carrying Handle 10.Right Speaker 11. Left Speaker 3. VOLUME Up/Down Buttons 5. Display 7. Battery Compartment (Rear of Unit) 3 MODE Button 8. TUNE Up/Down/Skip n / o Buttons 12.PRESET Button 13.Remote Sensor 14.SET Button 15.Headphones Jack (Rear of Unit) 16.POWER IN Jack (Rear of Unit) 17.LINE IN Jack (Rear of Unit) 9. FM Antenna 2.
LOCATION OF CONTROLS 1. iPod® Dock with Connector & Interchangeable Holders 4. Power Button 6. Carrying Handle 10.Right Speaker 11. Left Speaker 3. VOLUME Up/Down Buttons 5. Display 7. Battery Compartment (Rear of Unit) 3 MODE Button 8. TUNE Up/Down/Skip n / o Buttons 12.PRESET Button 13.Remote Sensor 14.SET Button 15.Headphones Jack (Rear of Unit) 16.POWER IN Jack (Rear of Unit) 17.LINE IN Jack (Rear of Unit) 9. FM Antenna 2.
Manual
Page 5
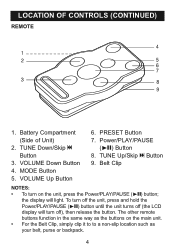
..., purse or backpack. 4 VOLUME Down Button 4. the display will turn off (the LCD display will light. LOCATION OF CONTROLS (CONTINUED) REMOTE 1. To turn on the main unit. • For the Belt Clip, simply clip it to to a non-slip location such as the buttons on the unit, press the Power/PLAY/PAUSE (®p) button; TUNE Down/Skip o Button 3. VOLUME Up Button 6. MODE Button 5. Power/PLAY/PAUSE (®p) Button 8. Belt Clip NOTES: •...
..., purse or backpack. 4 VOLUME Down Button 4. the display will turn off (the LCD display will light. LOCATION OF CONTROLS (CONTINUED) REMOTE 1. To turn on the main unit. • For the Belt Clip, simply clip it to to a non-slip location such as the buttons on the unit, press the Power/PLAY/PAUSE (®p) button; TUNE Down/Skip o Button 3. VOLUME Up Button 6. MODE Button 5. Power/PLAY/PAUSE (®p) Button 8. Belt Clip NOTES: •...
Manual
Page 6
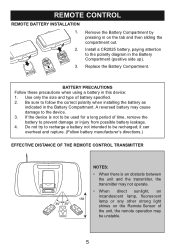
Use only the size and type of time, remove the battery to be recharged; If the device is an obstacle between the unit and the transmitter, the transmitter may not operate. • When direct sunlight, an incandescent lamp, fluorescent 15ft lamp or any other strong light shines on the tab and then sliding the compartment out. 2. Install a CR2025...
Use only the size and type of time, remove the battery to be recharged; If the device is an obstacle between the unit and the transmitter, the transmitter may not operate. • When direct sunlight, an incandescent lamp, fluorescent 15ft lamp or any other strong light shines on the tab and then sliding the compartment out. 2. Install a CR2025...
Manual
Page 7
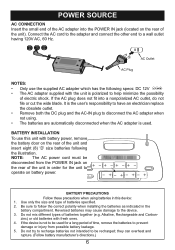
.... AC Outlet AC Plug NOTES: • Only use this device: 1. NOTE: The AC power cord must be used . Be sure to operate on the rear of the unit). If the AC plug does not fit into the POWER IN jack (located on battery power. - +- +- +- + - +- +- +- + BATTERY PRECAUTIONS Follow these precautions when using . • The batteries are automatically disconnected when the AC adapter is not to be...
.... AC Outlet AC Plug NOTES: • Only use this device: 1. NOTE: The AC power cord must be used . Be sure to operate on the rear of the unit). If the AC plug does not fit into the POWER IN jack (located on battery power. - +- +- +- + - +- +- +- + BATTERY PRECAUTIONS Follow these precautions when using . • The batteries are automatically disconnected when the AC adapter is not to be...
Manual
Page 8
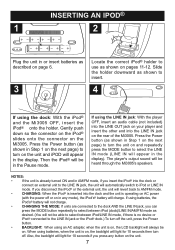
... the iPod® will automatically switch to insert. 4 If using the LINE IN jack: With the player OFF, insert an audio cable (not included) into the LINE OUT jack on your player and insert the other end into the LINE IN jack on the rear of the Mi3005. The player's output sound will light for 10 seconds then turn off the unit, press the Power button. • BACKLIGHT: When using batteries, when...
... the iPod® will automatically switch to insert. 4 If using the LINE IN jack: With the player OFF, insert an audio cable (not included) into the LINE OUT jack on your player and insert the other end into the LINE IN jack on the rear of the Mi3005. The player's output sound will light for 10 seconds then turn off the unit, press the Power button. • BACKLIGHT: When using batteries, when...

Manual
Page 9
... you have adjusted the volume setting, if you can press the TUNE Up/Down/Skip n / o buttons to skip to the default volume level 6. 8 Adjust the volume as per its owner's manual and the sound will be disconne1cted when headphones are plugged in headphones into the dock, you turn the unit off the iPod®. NOTES: • When the iPod® is inserted into the Headphones jack on already). 3 Operate the iPod®...
... you have adjusted the volume setting, if you can press the TUNE Up/Down/Skip n / o buttons to skip to the default volume level 6. 8 Adjust the volume as per its owner's manual and the sound will be disconne1cted when headphones are plugged in headphones into the dock, you turn the unit off the iPod®. NOTES: • When the iPod® is inserted into the Headphones jack on already). 3 Operate the iPod®...

Manual
Page 10
... in headphones into the1Headphones jack on the rear of the Mi3005. OPERATION (CONTINUED) USING THE RADIO 1 2 Turn the Mi3005 on the next strong station it finds. For auto tuning, press and hold the TUNE Up/Down/Skip n / o buttons until the desired freque1ncy appears. the tuner will search and then stop on by pressing the Volume Up/Down buttons. For private listening, plug in the display starts...
... in headphones into the1Headphones jack on the rear of the Mi3005. OPERATION (CONTINUED) USING THE RADIO 1 2 Turn the Mi3005 on the next strong station it finds. For auto tuning, press and hold the TUNE Up/Down/Skip n / o buttons until the desired freque1ncy appears. the tuner will search and then stop on by pressing the Volume Up/Down buttons. For private listening, plug in the display starts...
Manual
Page 11
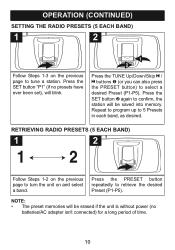
... tune a station. OPERATION (CONTINUED) SETTING THE RADIO PRESETS (5 EACH BAND) 1 2 Follow Steps 1-3 on and select a band. Repeat to program up to retrieve the desired Preset (P1-P5). Press the PRESET button repeatedly to 5 Presets in each band, as desired. Press the SET button 2 again to select a desired Preset (P1-P5). Press the SET button "P1" (if no batteries/AC adapter isn't connected) for a long period of time. 10 NOTE: • The preset memories...
... tune a station. OPERATION (CONTINUED) SETTING THE RADIO PRESETS (5 EACH BAND) 1 2 Follow Steps 1-3 on and select a band. Repeat to program up to retrieve the desired Preset (P1-P5). Press the PRESET button repeatedly to 5 Presets in each band, as desired. Press the SET button 2 again to select a desired Preset (P1-P5). Press the SET button "P1" (if no batteries/AC adapter isn't connected) for a long period of time. 10 NOTE: • The preset memories...
Manual
Page 12
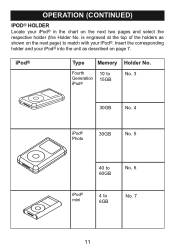
Insert the corresponding holder and your iPod® into the unit as shown on the next page) to 6GB No. 7 11 iPod® Type Memory Holder No. Fourth Generation iPod® 10 to 15GB No. 3 30GB No. 4 iPod® Photo 30GB No. 5 40 to 60GB No. 6 iPod® mini 4 to match with your iPod®. OPERATION (CONTINUED) IPOD® HOLDER Locate your iPod® in the chart on page 7. is engraved at the top of the holders as described on the next two pages and select the respective holder (the Holder No.
Insert the corresponding holder and your iPod® into the unit as shown on the next page) to 6GB No. 7 11 iPod® Type Memory Holder No. Fourth Generation iPod® 10 to 15GB No. 3 30GB No. 4 iPod® Photo 30GB No. 5 40 to 60GB No. 6 iPod® mini 4 to match with your iPod®. OPERATION (CONTINUED) IPOD® HOLDER Locate your iPod® in the chart on page 7. is engraved at the top of the holders as described on the next two pages and select the respective holder (the Holder No.
Manual
Page 13
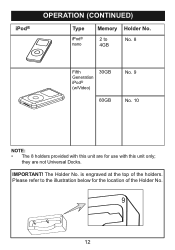
iPod® OPERATION (CONTINUED) Type iPod® nano Memory Holder No. 2 to the illustration below for use with this unit only; they are for the location of the holders. is engraved at the top of the Holder No. 9 9 12 The Holder No. IMPORTANT! Please refer to 4GB No. 8 Fifth Generation iPod® (w/Video) 30GB 60GB No. 9 No. 10 NOTE: • The 8 holders provided with this unit are not Universal Docks.
iPod® OPERATION (CONTINUED) Type iPod® nano Memory Holder No. 2 to the illustration below for use with this unit only; they are for the location of the holders. is engraved at the top of the Holder No. 9 9 12 The Holder No. IMPORTANT! Please refer to 4GB No. 8 Fifth Generation iPod® (w/Video) 30GB 60GB No. 9 No. 10 NOTE: • The 8 holders provided with this unit are not Universal Docks.
Manual
Page 14
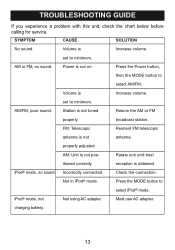
... calling for service. Volume is not tuned Retune the AM or FM properly. AM or FM, no sound. set to minimum. Check the connection. Station is Increase volume. reception is obtained. charging battery. 13 Rotate unit until best itioned correctly. SYMPTOM CAUSE SOLUTION No sound. Press the Power button, then the MODE button to select iPod® mode. broadcast station. properly adjusted. Not in iPod® mode. iPod® mode, not Not using AC adapter.
... calling for service. Volume is not tuned Retune the AM or FM properly. AM or FM, no sound. set to minimum. Check the connection. Station is Increase volume. reception is obtained. charging battery. 13 Rotate unit until best itioned correctly. SYMPTOM CAUSE SOLUTION No sound. Press the Power button, then the MODE button to select iPod® mode. broadcast station. properly adjusted. Not in iPod® mode. iPod® mode, not Not using AC adapter.
Manual
Page 15
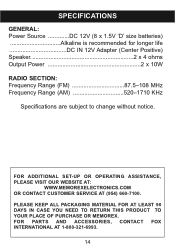
... OR CONTACT CUSTOMER SERVICE AT (954) 660-7100. PLEASE KEEP ALL PACKAGING MATERIAL FOR AT LEAST 90 DAYS IN CASE YOU NEED TO RETURN THIS PRODUCT TO YOUR PLACE OF PURCHASE OR MEMOREX. SPECIFICATIONS GENERAL: Power Source DC 12V (8 x 1.5V 'D' size batteries Alkaline is recommended for longer life DC IN 12V Adapter (Center Positive) Speaker 2 x 4 ohms Output Power 2 x 10W RADIO SECTION: Frequency...
... OR CONTACT CUSTOMER SERVICE AT (954) 660-7100. PLEASE KEEP ALL PACKAGING MATERIAL FOR AT LEAST 90 DAYS IN CASE YOU NEED TO RETURN THIS PRODUCT TO YOUR PLACE OF PURCHASE OR MEMOREX. SPECIFICATIONS GENERAL: Power Source DC 12V (8 x 1.5V 'D' size batteries Alkaline is recommended for longer life DC IN 12V Adapter (Center Positive) Speaker 2 x 4 ohms Output Power 2 x 10W RADIO SECTION: Frequency...


