Memorex Mi3005BLK Support Question
Memorex Mi3005BLK Support Question
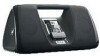
Find answers below for this question about Memorex Mi3005BLK - iMove Boombox.Need a Memorex Mi3005BLK manual? We have 1 online manual for this item!
Question posted by jggrobe on August 11th, 2010
Unit Won't Turn On.
I have the unit plugged into a wall outlet, but it won't come on. The power cord has the green light lit, when it isn't plugged into the unit, but once I connect them together, it flashes, and the unit won't power on. What is wrong?
Current Answers
Answer #1: Posted by MITHTech on August 12th, 2010 2:11 PM
MITHTech

Member since:
August 12th, 2010 Points: 12,240

Member since:
August 12th, 2010 Points: 12,240
I would suggest you to make sure the power cord is connected properly to the Power In Jack on rear of the unit. If the cord is loose this could be reason why it is not making a good contact. Try using the player with batteries instead. If it works with batteries probably the connection on the unit is no longer working.
Answer #2: Posted by Anonymous-20707 on December 22nd, 2010 11:48 AM
Anonymous-20707

Member since:
December 22nd, 2010 Points: 100
Member since:
December 22nd, 2010 Points: 100
Your answer helped me! My daughter has the Mi3005BLK and hasn't been able to use it for months because of a "low battery" error even when it's plugged in.
Since you said the electrical cord connection could be poor, I just pressed on the power connector plug at the unit and gradually moved it around until the flashing green light on the cord/box thingy stopped flashing and the unit turned on. I thought it would go off when I stopped applying pressure, but it stayed on and it works now! I think maybe the connector inside the unit was bent out of place and I was able to move it back.
Thanks so much!
Related Memorex Mi3005BLK Manual Pages
Manual - Page 1

Mi3005 Suffix A
User's Guide
iMove with AM/FM Radio
Before operating this product, please read these instructions completely.
Manual - Page 3

... generates, uses and can be determined by turning the equipment off and on, the user ...the equipment and receiver. • Connect the equipment into an outlet on a circuit different from
that ...connection. If this product. WARNING: TO PREVENT FIRE OR SHOCK HAZARD, DO NOT EXPOSE THIS UNIT TO RAIN
OR MOISTURE. SURGE PROTECTORS: It is no guarantee that to radio communications. Lightning and power...
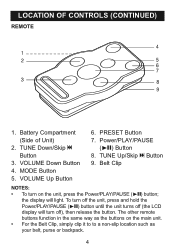
Manual - Page 4

Left Speaker 3. TUNE Up/Down/Skip n
/ o Buttons 12.PRESET Button 13.Remote Sensor 14.SET Button 15.Headphones Jack
(Rear of Unit) 16.POWER IN Jack
(Rear of Unit) 17.LINE IN Jack
(Rear of Unit)
9. Carrying Handle 10.Right Speaker 11. VOLUME Up/Down Buttons 5. iPod® Dock with
Connector & Interchangeable Holders 4. Battery Compartment...
Manual - Page 5
... function in the same way as the buttons on the unit, press the Power/PLAY/PAUSE (®p) button; MODE Button 5. Power/PLAY/PAUSE
(®p) Button 8. To turn off the unit, press and hold the Power/PLAY/PAUSE (®p) button until the unit turns off (the LCD display will light. TUNE Up/Skip n Button 9. LOCATION OF CONTROLS (CONTINUED)
REMOTE
1.
Battery...
Manual - Page 6
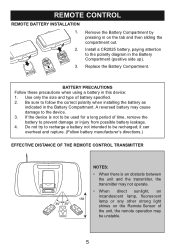
... operate.
• When direct sunlight, an
incandescent lamp, fluorescent
15ft
lamp or any other strong light
shines on the tab and then sliding the compartment out.
2. If the device is an obstacle between the unit and the transmitter, the transmitter may
be used for a long period of battery specified...
Manual - Page 7
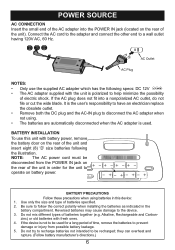
... wide blade.
AC Outlet AC Plug
NOTES: • Only use this device: 1. Alkaline, Rechargeable and Carbon- It is used for the unit to disconnect the AC adapter when not using batteries in this unit with fresh ones. 4. NOTE: The AC power cord must be used . If the AC plug does not fit into the POWER IN jack (located...
Manual - Page 8
... will appear in the Pause mode. If using batteries, when the unit is operating on AC power
(with the power off .
Also, the backlight will light for 10 seconds then turn
off or on in any button on the unit.
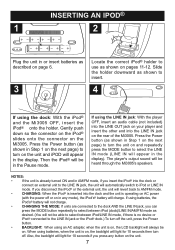
7 INSERTING AN IPOD®
1
2
- +- +- +- +
- +- +- +- +
Plug the unit in or insert batteries as described on page 6.
3
Locate the correct...
Manual - Page 9

OPERATION
USING AN IPOD® WITH THIS UNIT
1
2
With an iPod® connected (see previous page), turn the Mi3005 on by pressing the Power button (if it will be disconne1cted when headphones are plugged in headphones into the dock, you turn off and on the rear of the current track/previous or next track. • The default...
Manual - Page 10

... unit slightly so that provides the strongest reception for each of your favorite AM stations. It may have to experiment to select Power button; OPERATION (CONTINUED)
USING THE RADIO
1
2
Turn the Mi3005 on by pressing the Volume Up/Down buttons.
You may be disconnected when headphones are plugged in the direction of the Mi3005...
Manual - Page 11
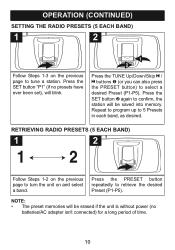
...program up to retrieve the desired Preset (P1-P5). Press the SET button 2 again to turn the unit on and select a band. RETRIEVING RADIO PRESETS (5 EACH BAND)
1
2
Follow Steps 1-2... on the previous page to confirm, the station will be erased if the unit is without power (no presets have ever been set), will be saved into memory.
OPERATION (CONTINUED)
SETTING THE ...
Manual - Page 12
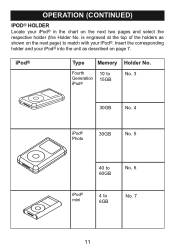
... Locate your iPod® in the chart on the next page) to 6GB
No. 7
11 Insert the corresponding holder and your iPod® into the unit as shown on the next two pages and select the respective holder (the Holder No. iPod®
Type Memory Holder No.
Manual - Page 13
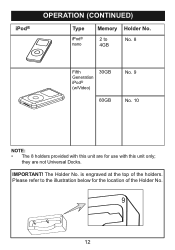
The Holder No. IMPORTANT! iPod®
OPERATION (CONTINUED)
Type
iPod® nano
Memory Holder No.
2 to the illustration below for use with this unit only; is engraved at the top of the Holder No.
9
9
12 Please refer to 4GB
No. 8
Fifth Generation iPod® (w/Video)
30GB
60GB
No. 9 No. ...
Manual - Page 14
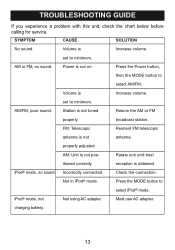
... tuned
Retune the AM or FM
properly. Station is
Increase volume.
AM: Unit is not on.
set to
select iPod® mode.
Power is not pos-
Volume is
Increase volume. set to
select AM/FM.
broadcast station. properly adjusted.
Check the connection. Press the MODE button to minimum. iPod® mode, not
Not...
Manual - Page 15
... FOR ADDITIONAL SET-UP OR OPERATING ASSISTANCE, PLEASE VISIT OUR WEBSITE AT:
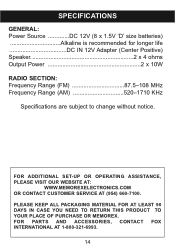
WWW.MEMOREXELECTRONICS.COM OR CONTACT CUSTOMER SERVICE AT (954) 660-7100. SPECIFICATIONS
GENERAL: Power Source DC 12V (8 x 1.5V 'D' size batteries Alkaline is recommended for longer life DC IN 12V Adapter (Center Positive) Speaker 2 x 4 ohms Output...
Similar Questions


Memorex Cd Boombox With Am/fm Ned How To On Turning On. No Power Button
(Posted by englisheastc 10 years ago)

Memorex Mi3005blk - Charging Ipod But Unable To Charge Iphone 3gs
is there any solution to charge iphone
is there any solution to charge iphone
(Posted by ganesanvenkataraman 11 years ago)

Why Wont My Mi3x Boombox Turn On
(Posted by Anonymous-88147 11 years ago)

I Cant Get It To Play My I Pod Music
hello i just bought a Memorex Mi3005BLK iMove Boombox for iPod and i just cant get it to play my i p...
hello i just bought a Memorex Mi3005BLK iMove Boombox for iPod and i just cant get it to play my i p...
(Posted by cassi898 12 years ago)