
User Manual
Page 2
... Using the Component Cable 13 • Connecting the DVD to a Home Theater System (Audio Jack 15 • Connecting the DVD to a Home Theater System (Coaxial Jack 16 About Discs 17 Setup Menu 19 • General Setup Menu 20 • Audio Setup Menu 21 • Dolby Setup Menu 22 • Video Setup Menu 23 • Preference Setup Menu 24 • Parental 25 • Password 26 Basic Operation 27 • Mute 27 • P/N (PAL/NTSC) Button 27 • Headphone Jack 27 • Screen Mode Button 27...
... Using the Component Cable 13 • Connecting the DVD to a Home Theater System (Audio Jack 15 • Connecting the DVD to a Home Theater System (Coaxial Jack 16 About Discs 17 Setup Menu 19 • General Setup Menu 20 • Audio Setup Menu 21 • Dolby Setup Menu 22 • Video Setup Menu 23 • Preference Setup Menu 24 • Parental 25 • Password 26 Basic Operation 27 • Mute 27 • P/N (PAL/NTSC) Button 27 • Headphone Jack 27 • Screen Mode Button 27...

User Manual
Page 3
... RISK OF FIRE OR ELECTRIC SHOCK, DO NOT EXPOSE THIS PRODUCT TO RAIN OR MOISTURE. IMPORTANT SAFETY INSTRUCTIONS CAUTION RISK OF ELECTRIC SHOCK DO NOT OPEN CAUTION: TO REDUCE THE RISK OF ELECTRIC SHOCK, DO NOT REMOVE COVER (OR BACK). NO USER-SERVICEABLE PARTS INSIDE. USE OF CONTROLS, ADJUSTMENTS OR THE PERFORMANCE OF PROCEDURES OTHER THAN THOSE SPECIFIED HEREIN MAY...
... RISK OF FIRE OR ELECTRIC SHOCK, DO NOT EXPOSE THIS PRODUCT TO RAIN OR MOISTURE. IMPORTANT SAFETY INSTRUCTIONS CAUTION RISK OF ELECTRIC SHOCK DO NOT OPEN CAUTION: TO REDUCE THE RISK OF ELECTRIC SHOCK, DO NOT REMOVE COVER (OR BACK). NO USER-SERVICEABLE PARTS INSIDE. USE OF CONTROLS, ADJUSTMENTS OR THE PERFORMANCE OF PROCEDURES OTHER THAN THOSE SPECIFIED HEREIN MAY...
User Manual
Page 4
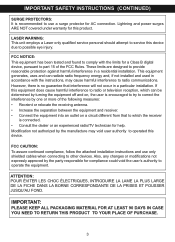
... occur in accordance with the limits for compliance could void the user's authority to operate the equipment. IMPORTANT SAFETY INSTRUCTIONS (CONTINUED) SURGE PROTECTORS: It is recommended to use only shielded cables when connecting to other devices. Modification not authorized by the party responsible for a Class B digital device, pursuant to part 15 of the following measures: • Reorient or relocate the...
... occur in accordance with the limits for compliance could void the user's authority to operate the equipment. IMPORTANT SAFETY INSTRUCTIONS (CONTINUED) SURGE PROTECTORS: It is recommended to use only shielded cables when connecting to other devices. Modification not authorized by the party responsible for a Class B digital device, pursuant to part 15 of the following measures: • Reorient or relocate the...

User Manual
Page 6
..., move the DVD player away from the TV, radio or VCR. Turn on the finish. • The top and rear panels of the DVD player may not function properly in use, be sure to remove the disc and turn off the power. • If you do not use . In this DVD player near the DVD player. NOTES ON CLEANING: Use a soft, dry cloth for a long time. Do not use the original shipping...
..., move the DVD player away from the TV, radio or VCR. Turn on the finish. • The top and rear panels of the DVD player may not function properly in use, be sure to remove the disc and turn off the power. • If you do not use . In this DVD player near the DVD player. NOTES ON CLEANING: Use a soft, dry cloth for a long time. Do not use the original shipping...

User Manual
Page 10
... 4 21 5 22 23 6 24 25 26 7 8 9 1. CHARGE Indicator (Side of the Rechargeable Battery) 3. SCREEN MODE Button 15. POWER Button 17. Power Indicator 21. LCD MODE Button * During playback, the Navigation (√,®) buttons will be used as Skip (o, n) buttons. 9 OPEN/CLOSE Button 7. Headphone 1 Jack 9. MENU Button 18. SETUP Button 20. DC IN Jack 9V z (Side of the Main Unit) 5. IP (Interlace/Progressive) Button 11. Stop (I) Button 24. ZOOM Button 13. Remote Sensor 22. Display 14. ENTER...
... 4 21 5 22 23 6 24 25 26 7 8 9 1. CHARGE Indicator (Side of the Rechargeable Battery) 3. SCREEN MODE Button 15. POWER Button 17. Power Indicator 21. LCD MODE Button * During playback, the Navigation (√,®) buttons will be used as Skip (o, n) buttons. 9 OPEN/CLOSE Button 7. Headphone 1 Jack 9. MENU Button 18. SETUP Button 20. DC IN Jack 9V z (Side of the Main Unit) 5. IP (Interlace/Progressive) Button 11. Stop (I) Button 24. ZOOM Button 13. Remote Sensor 22. Display 14. ENTER...

User Manual
Page 13
... through a VCR, the playback picture will be distorted because DVD video discs are unplugged before making any connections. • Connect the unit to your TV has Component (Y, Pb, Pr) inputs, connect the unit with them for best results. • Set the TV's TV/VIDEO button or switch to the VIDEO setting. • When connecting the unit, refer to the owner's manual of the TV, as well as this manual. • When connecting the...
... through a VCR, the playback picture will be distorted because DVD video discs are unplugged before making any connections. • Connect the unit to your TV has Component (Y, Pb, Pr) inputs, connect the unit with them for best results. • Set the TV's TV/VIDEO button or switch to the VIDEO setting. • When connecting the unit, refer to the owner's manual of the TV, as well as this manual. • When connecting the...

User Manual
Page 14
... again, the Component Output will reset to LCD. 13 To observe the pictures on the unit's display screen again, turn off the unit and then turn the unit on the TV screen will turn off and both units are copy protected. • When using the Component Output, you should set to YUV, the main unit's screen display will be distorted because DVD video discs are unplugged before making any connections. • Connect the unit...
... again, the Component Output will reset to LCD. 13 To observe the pictures on the unit's display screen again, turn off the unit and then turn the unit on the TV screen will turn off and both units are copy protected. • When using the Component Output, you should set to YUV, the main unit's screen display will be distorted because DVD video discs are unplugged before making any connections. • Connect the unit...
User Manual
Page 15
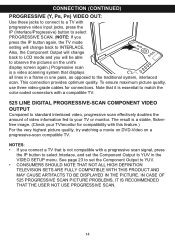
... color-coded connectors with a compatible TV. 525 LINE DIGITAL PROGRESSIVE-SCAN COMPONENT VIDEO OUTPUT Compared to standard interlaced video, progressive scan effect1ively doubles the amount of video information fed to the traditional system, interlaced scan. IN CASE OF 525 PROGRESSIVE SCAN PICTURE PROBLEMS, IT IS RECOMMENDED THAT THE USER NOT USE PROGRESSIVE SCAN. 14 This connection provides optimum quality. NOTES: • If you press the IP button again, the TV mode setting...
... color-coded connectors with a compatible TV. 525 LINE DIGITAL PROGRESSIVE-SCAN COMPONENT VIDEO OUTPUT Compared to standard interlaced video, progressive scan effect1ively doubles the amount of video information fed to the traditional system, interlaced scan. IN CASE OF 525 PROGRESSIVE SCAN PICTURE PROBLEMS, IT IS RECOMMENDED THAT THE USER NOT USE PROGRESSIVE SCAN. 14 This connection provides optimum quality. NOTES: • If you press the IP button again, the TV mode setting...
User Manual
Page 16
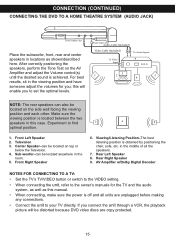
... the VIDEO setting. • When connecting the unit, refer to the owner's manuals for you to find 7 6 8 optimal position. 1. Viewing/Listening Position-The best listening position is located between the two speakers in this case. If you connect the unit through a VCR, the playback picture will enable you ; CONNECTION (CONTINUED) CONNECTING THE DVD TO A HOME THEATRE SYSTEM (AUDIO JACK) From Audio Out Place the subwoofer, front, rear...
... the VIDEO setting. • When connecting the unit, refer to the owner's manuals for you to find 7 6 8 optimal position. 1. Viewing/Listening Position-The best listening position is located between the two speakers in this case. If you connect the unit through a VCR, the playback picture will enable you ; CONNECTION (CONTINUED) CONNECTING THE DVD TO A HOME THEATRE SYSTEM (AUDIO JACK) From Audio Out Place the subwoofer, front, rear...

User Manual
Page 17
... the Television. 4. Front Right Speaker 6. Experiment to set the optimal levels. Rear Left Speaker 8. AV Amplifier w/Dolby Digital Decoder NOTES FOR CONNECTING TO A TV: • Set the TV's TV/VIDEO button or switch to the VIDEO setting. • When connecting the unit, refer to the owner's manuals for you; After correctly positioning the speakers, perform the Tone Test on the AV Amplifier and adjust the Volume control...
... the Television. 4. Front Right Speaker 6. Experiment to set the optimal levels. Rear Left Speaker 8. AV Amplifier w/Dolby Digital Decoder NOTES FOR CONNECTING TO A TV: • Set the TV's TV/VIDEO button or switch to the VIDEO setting. • When connecting the unit, refer to the owner's manuals for you; After correctly positioning the speakers, perform the Tone Test on the AV Amplifier and adjust the Volume control...

User Manual
Page 19
... the TV screen. 18 If the Region number described on the DVD disc does not correspond to play back an unauthorized disc, "Wrong Region" appears on cable, play that is prohibited. DVD video discs are copy protected, and any recordings made for home and other rights owners. This product incorporates copyright protection technology that disc. Reverse engineering or disassembly is protected by Macrovision Corporation and other limited viewing uses only, unless...
... the TV screen. 18 If the Region number described on the DVD disc does not correspond to play back an unauthorized disc, "Wrong Region" appears on cable, play that is prohibited. DVD video discs are copy protected, and any recordings made for home and other rights owners. This product incorporates copyright protection technology that disc. Reverse engineering or disassembly is protected by Macrovision Corporation and other limited viewing uses only, unless...

User Manual
Page 20
...;,†) buttons 2 to change the desired setting, then press the PLAY/ENTER button 3 to the previous menu, simply press the Navigation (√) button 2. 3 2 1 NOTE: • To turn on the unit, press the STANDBY button on the remote or press the POWER button on the main unit. Exit by allowing you to select various language preferences, set up a parental level, turn off , adjust what type of the screen using the...
...;,†) buttons 2 to change the desired setting, then press the PLAY/ENTER button 3 to the previous menu, simply press the Navigation (√) button 2. 3 2 1 NOTE: • To turn on the unit, press the STANDBY button on the remote or press the POWER button on the main unit. Exit by allowing you to select various language preferences, set up a parental level, turn off , adjust what type of the screen using the...
User Manual
Page 21
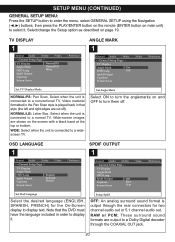
... Display Mode NORGeMneAraLl /PSA:udPioan SDcoalnby. SeleVcidteowhen Ptrhefeereunnceit is played back in order to a wide- Preference cNoOnR-nTAOSC-eMpVanSGpdcgDAeDittlfineeoLiLeOsdMnarp/unsaLlalagttBrpoySkue:ttauLpenPtotaergmre B-a-loOOxTnf.fVS. Set Osd Language General Audio Dolby Video - - A- C- General Setup Page - - SGDenLearnalgSetup Page - - TV Display Angle Mark OSD Lang Spdif Output Captions Screen Saver Off Raw Pcm Video Preference Setup Spdif Select the desired language (ENGLISH, OFF: An analog surround sound format is connected to display...
... Display Mode NORGeMneAraLl /PSA:udPioan SDcoalnby. SeleVcidteowhen Ptrhefeereunnceit is played back in order to a wide- Preference cNoOnR-nTAOSC-eMpVanSGpdcgDAeDittlfineeoLiLeOsdMnarp/unsaLlalagttBrpoySkue:ttauLpenPtotaergmre B-a-loOOxTnf.fVS. Set Osd Language General Audio Dolby Video - - A- C- General Setup Page - - SGDenLearnalgSetup Page - - TV Display Angle Mark OSD Lang Spdif Output Captions Screen Saver Off Raw Pcm Video Preference Setup Spdif Select the desired language (ENGLISH, OFF: An analog surround sound format is connected to display...
User Manual
Page 22
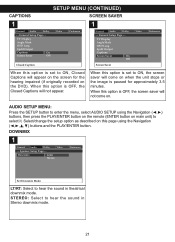
... mode. TV Display Angle Mark OSD Lang Spdif Output Captions Screen Saver On Off Closed Caption Screen Saver Video Preference When this page using the Navigation (√,®) buttoTnVs,Dtihspelnaypress the PLAY/ENTER button on the remote (ENTER button on the screen for approximately 3.5 minutes. Speaker Setup Page - - SETUP MENU (CONTINUED) CAPTIONS SCREEN SAVER 1 1 General Audio Dolby - - General Setup Page - - When this option is set to selecAOt nSitgD.leSLMaenalgerkct/change the setup...
... mode. TV Display Angle Mark OSD Lang Spdif Output Captions Screen Saver On Off Closed Caption Screen Saver Video Preference When this page using the Navigation (√,®) buttoTnVs,Dtihspelnaypress the PLAY/ENTER button on the remote (ENTER button on the screen for approximately 3.5 minutes. Speaker Setup Page - - SETUP MENU (CONTINUED) CAPTIONS SCREEN SAVER 1 1 General Audio Dolby - - General Setup Page - - When this option is set to selecAOt nSitgD.leSLMaenalgerkct/change the setup...

User Manual
Page 24
... Progressive Scan Component Video Output. Component TV Mode Sharpness Brightness Contrast Brightness General Audio Dolby - - Component TV Mode Sharpness Brightness Contrast Video Preference General Audio Dolby Video Preference Contr-a-sVt ideo Setup Page - NU: Sharpness High Component LCD Brightness Medium PreTsVs MthoedeSETUP buYtutovn to see the image on the built-in screen will turn off Caountotrmasat tically and yoLuowcan see the TimVaMgeoduesing the Component cable.) NOSThEa:rpWnhesesn you connect a TV (using...
... Progressive Scan Component Video Output. Component TV Mode Sharpness Brightness Contrast Brightness General Audio Dolby - - Component TV Mode Sharpness Brightness Contrast Video Preference General Audio Dolby Video Preference Contr-a-sVt ideo Setup Page - NU: Sharpness High Component LCD Brightness Medium PreTsVs MthoedeSETUP buYtutovn to see the image on the built-in screen will turn off Caountotrmasat tically and yoLuowcan see the TimVaMgeoduesing the Component cable.) NOSThEa:rpWnhesesn you connect a TV (using...

User Manual
Page 26
... played, the user will require a password. General Audio Dolby Video Preference NOTE: The default password Old Password New Password is entered, access will have to enter a password. 1 2 2 General Audio Dolby Video Preference - - Audio ENG 1 KID SAF Subtitle Disc Menu ENG 2 G ENG 3 PG 1 Parental 4 PG 13 3 Password Default 2 5 PGR 6R 7 NC17 1 8 ADULT Set Parental Control Press the SETUP button 1 to enter the menu, select PREFERENCE SETUP using the Number buttons 2 (see note below), then press the PLAY/ENTER button 1 again. If an incorrect password...
... played, the user will require a password. General Audio Dolby Video Preference NOTE: The default password Old Password New Password is entered, access will have to enter a password. 1 2 2 General Audio Dolby Video Preference - - Audio ENG 1 KID SAF Subtitle Disc Menu ENG 2 G ENG 3 PG 1 Parental 4 PG 13 3 Password Default 2 5 PGR 6R 7 NC17 1 8 ADULT Set Parental Control Press the SETUP button 1 to enter the menu, select PREFERENCE SETUP using the Number buttons 2 (see note below), then press the PLAY/ENTER button 1 again. If an incorrect password...
User Manual
Page 27
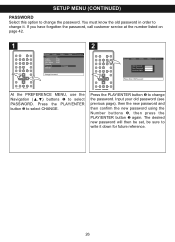
... PREFERENCE MENU, use the Navigation (π,†) buttons 1 to select CHANGE. Audio Subtitle ENG ENG Disc Menu ENG Parental Password Default Change Change Password Press the PLAY/ENTER button 1 to Password Default Set Parental Control 5 PGR 6R 7 NC17 8 ADULT Audio Subtitle Disc Menu Parental Password ENG ENG ENG Change Default change it down for future reference. The desired new password will then be set, be sure to change the password. SETUP MENU (CONTINUED) Audio Subtitle ENG 1 KID SAF ENG 2 G Disc Menu ENG 3 PG General Audio Dolby Video Preference Parental...
... PREFERENCE MENU, use the Navigation (π,†) buttons 1 to select CHANGE. Audio Subtitle ENG ENG Disc Menu ENG Parental Password Default Change Change Password Press the PLAY/ENTER button 1 to Password Default Set Parental Control 5 PGR 6R 7 NC17 8 ADULT Audio Subtitle Disc Menu Parental Password ENG ENG ENG Change Default change it down for future reference. The desired new password will then be set, be sure to change the password. SETUP MENU (CONTINUED) Audio Subtitle ENG 1 KID SAF ENG 2 G Disc Menu ENG 3 PG General Audio Dolby Video Preference Parental...
User Manual
Page 29
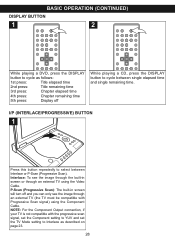
... TV must be compatible with the progressive scan signal, set the Component setting to YUV and set the TV Mode setting to select between single elapsed time and single remaining time. 2 1 I/P (INTERLACE/PROGRESSIVE) BUTTON 1 Press this button repeatedly to Interlace as described on page 23. 28 Interlace: To see the image through an external TV using the Component Cable. BASIC OPERATION (CONTINUED) DISPLAY BUTTON 1 2 While playing a DVD, press the DISPLAY button to cycle as...
... TV must be compatible with the progressive scan signal, set the Component setting to YUV and set the TV Mode setting to select between single elapsed time and single remaining time. 2 1 I/P (INTERLACE/PROGRESSIVE) BUTTON 1 Press this button repeatedly to Interlace as described on page 23. 28 Interlace: To see the image through an external TV using the Component Cable. BASIC OPERATION (CONTINUED) DISPLAY BUTTON 1 2 While playing a DVD, press the DISPLAY button to cycle as...

User Manual
Page 37
... next screen. 2 Use the Navigation button 1 to 20 chapters on the first chapter that you programmed and the player will continue to play all desired chapters have been programmed (up to select "Start" at the bottom of a DVD disc, press the PROGRAM button; DVD OPERATION (CONTINUED) PROGRAMMED PLAYBACK The DVD player in this unit has a 20 chapter programmable memory that allows you to program up to input two numbers for each program...
... next screen. 2 Use the Navigation button 1 to 20 chapters on the first chapter that you programmed and the player will continue to play all desired chapters have been programmed (up to select "Start" at the bottom of a DVD disc, press the PROGRAM button; DVD OPERATION (CONTINUED) PROGRAMMED PLAYBACK The DVD player in this unit has a 20 chapter programmable memory that allows you to program up to input two numbers for each program...
User Manual
Page 42
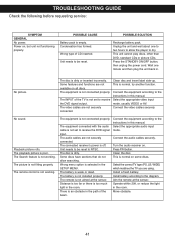
... this manual. Unit needs to be reset. TROUBLESHOOTING GUIDE Check the following before requesting service: SYMPTOM GENERAL No power. This unit cannot play discs, other than DVD, standard CDs or picture CDs. Playback picture rolls. The remote is off. The connected receiver's power is not aimed at the sensor. The equipment is not working . No sound. Connect the equipment according to NTSC. The remote control is not connected properly. Wrong menu option is poor. Turn the audio receiver...
... this manual. Unit needs to be reset. TROUBLESHOOTING GUIDE Check the following before requesting service: SYMPTOM GENERAL No power. This unit cannot play discs, other than DVD, standard CDs or picture CDs. Playback picture rolls. The remote is off. The connected receiver's power is not aimed at the sensor. The equipment is not working . No sound. Connect the equipment according to NTSC. The remote control is not connected properly. Wrong menu option is poor. Turn the audio receiver...


