
User Manual
Page 2
... OF CONTENTS Contents 1 Important Safety Instructions 2 Precautions 5 Power Sources 7 Location of Controls 9 • Main Unit 9 • Side 10 • Remote 10 Remote Control 11 • Battery Installation 11 • Effective Distance of the Remote Control Transmitter 11 Connection 12 • Connecting the DVD to a TV Using the A/V Cable 12 • Connecting...
... OF CONTENTS Contents 1 Important Safety Instructions 2 Precautions 5 Power Sources 7 Location of Controls 9 • Main Unit 9 • Side 10 • Remote 10 Remote Control 11 • Battery Installation 11 • Effective Distance of the Remote Control Transmitter 11 Connection 12 • Connecting the DVD to a TV Using the A/V Cable 12 • Connecting...

User Manual
Page 6
Do not leave rubber or plastic products in contact with supplied rechargeable Battery Pack; Use a dry cloth to wipe it was originally packed at the factory. • Do not use the DVD player occasionally. For maximum protection, repack ...the unit as it dry. They will leave marks on and use volatile liquids, such as they may damage the surface of batteries may become poor and the sound may not function properly in a weak detergent solution, wring well and wipe. NOTES ON CLEANING: Use a soft, dry cloth...
Do not leave rubber or plastic products in contact with supplied rechargeable Battery Pack; Use a dry cloth to wipe it was originally packed at the factory. • Do not use the DVD player occasionally. For maximum protection, repack ...the unit as it dry. They will leave marks on and use volatile liquids, such as they may damage the surface of batteries may become poor and the sound may not function properly in a weak detergent solution, wring well and wipe. NOTES ON CLEANING: Use a soft, dry cloth...

User Manual
Page 8
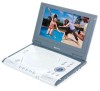
... only. • Remove both the DC plug and the AC-IN plug to help minimize the possibility of arrow B. TO INSERT: Align tabs from the battery into a nonpolarized AC outlet, do not file or cut the wide blade. If the AC plug does not fit into the holes in the... unit, then slide the battery in the direction of electric shock. POWER SOURCES AC CONNECTION Insert the small end of the AC adapter into the DC IN jack (located on...
... only. • Remove both the DC plug and the AC-IN plug to help minimize the possibility of arrow B. TO INSERT: Align tabs from the battery into a nonpolarized AC outlet, do not file or cut the wide blade. If the AC plug does not fit into the holes in the... unit, then slide the battery in the direction of electric shock. POWER SOURCES AC CONNECTION Insert the small end of the AC adapter into the DC IN jack (located on...
User Manual
Page 9
...located AC outlet having 120V AC, 60Hz. USING THE CAR ADAPTER Plug the small end of the unit. The battery can be charged while attached or not attached to the unit by inserting the small end of the AC adapter... into the DC IN CHARGE jack on the side of the Battery Pack or the DC IN jack on the side of the car adapter into the DC IN jack ...and then plug the other end (with the 2 blades) into the car cigarette lighter socket. 8 WITH THE BATTERY NOT ATTACHED TO THE UNIT: You can operate for 12 hours before using it is charging and green when charging ...
...located AC outlet having 120V AC, 60Hz. USING THE CAR ADAPTER Plug the small end of the unit. The battery can be charged while attached or not attached to the unit by inserting the small end of the AC adapter... into the DC IN CHARGE jack on the side of the Battery Pack or the DC IN jack on the side of the car adapter into the DC IN jack ...and then plug the other end (with the 2 blades) into the car cigarette lighter socket. 8 WITH THE BATTERY NOT ATTACHED TO THE UNIT: You can operate for 12 hours before using it is charging and green when charging ...

User Manual
Page 10
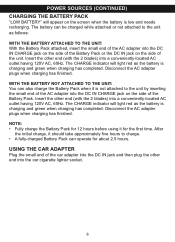
DC IN CHARGE Jack 9V z (Side of the Rechargeable Battery) 4. OPEN/CLOSE Button 7. Left Speaker 10. IP (Interlace/Progressive) Button 11. POWER Button 17. MENU Button 18. Remote Sensor 22. Search √√ Button 12. ... 14 15 16 17 18 2 3 19 20 4 21 5 22 23 6 24 25 26 7 8 9 1. Power Indicator 21. Pause (p) Button 25. CHARGE Indicator (Side of the Rechargeable Battery) 3. SCREEN MODE Button 15. Search ®® Button 26. Headphone 1 Jack 9. Play (®) Button 23. ZOOM Button 13. DC IN Jack 9V z (Side of the...
DC IN CHARGE Jack 9V z (Side of the Rechargeable Battery) 4. OPEN/CLOSE Button 7. Left Speaker 10. IP (Interlace/Progressive) Button 11. POWER Button 17. MENU Button 18. Remote Sensor 22. Search √√ Button 12. ... 14 15 16 17 18 2 3 19 20 4 21 5 22 23 6 24 25 26 7 8 9 1. Power Indicator 21. Pause (p) Button 25. CHARGE Indicator (Side of the Rechargeable Battery) 3. SCREEN MODE Button 15. Search ®® Button 26. Headphone 1 Jack 9. Play (®) Button 23. ZOOM Button 13. DC IN Jack 9V z (Side of the...
User Manual
Page 11
... 25 22. STANDBY Button 4. 0-9/10+ Number Buttons 16 5. AUDIO Button 9. STEP Button 19 12. Skip (n) Button 22 16. REPEAT A-B Button 19. TITLE Button 17 8. Battery Pack 6. Skip (o) Button 21 15. Search√√ Button 10 Battery Release Switch (Bottom of the Battery Pack) 1. PLAY/ENTER Button 18 10. COMPONENT OUT (Y/Pb/Pr) Jacks 2.
... 25 22. STANDBY Button 4. 0-9/10+ Number Buttons 16 5. AUDIO Button 9. STEP Button 19 12. Skip (n) Button 22 16. REPEAT A-B Button 19. TITLE Button 17 8. Battery Pack 6. Skip (o) Button 21 15. Search√√ Button 10 Battery Release Switch (Bottom of the Battery Pack) 1. PLAY/ENTER Button 18 10. COMPONENT OUT (Y/Pb/Pr) Jacks 2.
User Manual
Page 12
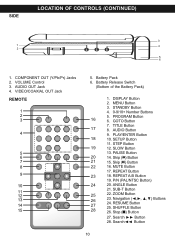
... then sliding the compartment out. 2. Be sure to follow the correct polarity when installing the battery as indicated next to be used for a long period of battery specified. 2. BATTERY PRECAUTIONS Follow these precautions when using a battery in on the Remote Sensor of the DVD, the remote operation may cause damage to the...
... then sliding the compartment out. 2. Be sure to follow the correct polarity when installing the battery as indicated next to be used for a long period of battery specified. 2. BATTERY PRECAUTIONS Follow these precautions when using a battery in on the Remote Sensor of the DVD, the remote operation may cause damage to the...
User Manual
Page 42
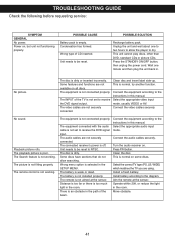
... video input mode, usually VIDEO or AV. The Search feature is not aimed at the sensor. Unit needs to NTSC. The battery is not connected properly. The remote is not working . Operate within 20ft, or reduce the light in the room. Wait one...normal on . Select the appropriate audio input mode. This is dirty. Install battery according to dry. POSSIBLE SOLUTION Recharge battery pack. Playback picture rolls. The playback picture is empty. POSSIBLE CAUSE Battery pack is poor. The disc is not fitting properly. Some features and functions ...
... video input mode, usually VIDEO or AV. The Search feature is not aimed at the sensor. Unit needs to NTSC. The battery is not connected properly. The remote is not working . Operate within 20ft, or reduce the light in the room. Wait one...normal on . Select the appropriate audio input mode. This is dirty. Install battery according to dry. POSSIBLE SOLUTION Recharge battery pack. Playback picture rolls. The playback picture is empty. POSSIBLE CAUSE Battery pack is poor. The disc is not fitting properly. Some features and functions ...
User Manual
Page 45
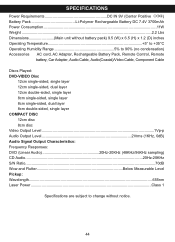
...) 9.5 (W) x 6.5 (H) x 1.2 (D) inches Operating Temperature 5° to +35°C Operating Humidity Range 5% to 90% (no condensation) Accessories AC cord, AC Adapter, Rechargeable Battery Pack, Remote Control, Remote battery, Car Adapter, Audio Cable, Audio(Coaxial)/Video Cable, Component Cable Discs Played: DVD-VIDEO Disc 12cm single-sided, single layer 12cm single-sided, dual layer ...
...) 9.5 (W) x 6.5 (H) x 1.2 (D) inches Operating Temperature 5° to +35°C Operating Humidity Range 5% to 90% (no condensation) Accessories AC cord, AC Adapter, Rechargeable Battery Pack, Remote Control, Remote battery, Car Adapter, Audio Cable, Audio(Coaxial)/Video Cable, Component Cable Discs Played: DVD-VIDEO Disc 12cm single-sided, single layer 12cm single-sided, dual layer ...

