
User Guide
Page 2
...8226; Forward/Reverse Search 42 • Repeat Play 42 • MP3 FAQs 42 CD/VCD Basic Operation 43 • Playback of the Remote Control Transmitter 9 Connection to Output DVD 10 • Connecting the Unit to a TV Using the Audio/Video Output Jacks 10 • Connecting the Unit to a TV Using ...19 • Dolby Digital Setup Menu 19 • Preference Menu 20 • TVG (TV Guardian®) Password 20 • TV Guardian® Feature 21 VCR Setup Menu 23 • Date and Time 23 • Language 24 • Go To Zero Search 25 • Counter Search 25 • Index Search...
...8226; Forward/Reverse Search 42 • Repeat Play 42 • MP3 FAQs 42 CD/VCD Basic Operation 43 • Playback of the Remote Control Transmitter 9 Connection to Output DVD 10 • Connecting the Unit to a TV Using the Audio/Video Output Jacks 10 • Connecting the Unit to a TV Using ...19 • Dolby Digital Setup Menu 19 • Preference Menu 20 • TVG (TV Guardian®) Password 20 • TV Guardian® Feature 21 VCR Setup Menu 23 • Date and Time 23 • Language 24 • Go To Zero Search 25 • Counter Search 25 • Index Search...
User Guide
Page 8
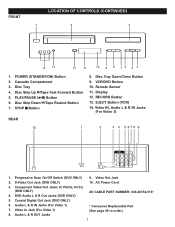
...) 1. Cassette Compartment 3. Disc Tray 4. STOP s Button REAR 8. Remote Sensor 11. Display 12. Progressive Scan On/Off Switch (DVD ONLY) 9. Component Video Out Jacks (Y, Pb/Cb, Pr/Cr) (DVD ONLY) 4. S-Video Out Jack (DVD ONLY) 10. Disc Skip Down o/Tape Rewind Button 7. Video In Jack (For Video 1) 8. VCR/DVD Button 10. POWER (STANDBY/ON) Button 2. PLAY/PAUSE...
...) 1. Cassette Compartment 3. Disc Tray 4. STOP s Button REAR 8. Remote Sensor 11. Display 12. Progressive Scan On/Off Switch (DVD ONLY) 9. Component Video Out Jacks (Y, Pb/Cb, Pr/Cr) (DVD ONLY) 4. S-Video Out Jack (DVD ONLY) 10. Disc Skip Down o/Tape Rewind Button 7. Video In Jack (For Video 1) 8. VCR/DVD Button 10. POWER (STANDBY/ON) Button 2. PLAY/PAUSE...
User Guide
Page 9
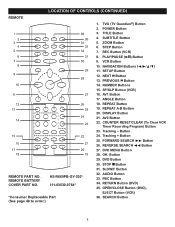
... Recording Program) Button 23. REVERSE SEARCH √√ Button 27. RETURN Button (DVD) 35. SEARCH Button 8 REC Button (VCR) 8. PREVIOUS o Button 14. AV1 Button 17. Tracking - OK Button 29. SLOW/F Button 32. PBC Button 34. LOCATION OF CONTROLS (CONTINUED) REMOTE REMOTE PART NO. REMOTE BATTERY COVER PART NO. TITLE Button 4. ANGLE Button 18. REPEAT A-B Button...
... Recording Program) Button 23. REVERSE SEARCH √√ Button 27. RETURN Button (DVD) 35. SEARCH Button 8 REC Button (VCR) 8. PREVIOUS o Button 14. AV1 Button 17. Tracking - OK Button 29. SLOW/F Button 32. PBC Button 34. LOCATION OF CONTROLS (CONTINUED) REMOTE REMOTE PART NO. REMOTE BATTERY COVER PART NO. TITLE Button 4. ANGLE Button 18. REPEAT A-B Button...

User Guide
Page 10
... lamp, fluorescent lamp or any other strong light shines on the tab and lifting it out. 2. REMOTE CONTROL 1. Do not mix different types of the unit, the remote operation may cause damage to be used for a long period of batteries specified. 2. Open the ...Battery Compartment. 3. Do not try to recharge batteries not intended to follow the correct polarity when installing the batteries as indicated in on the REMOTE SENSOR of batteries together (e.g. Reversed batteries may be recharged; Be sure to be unstable. 9 they can overheat and rupture. (Follow battery ...
... lamp, fluorescent lamp or any other strong light shines on the tab and lifting it out. 2. REMOTE CONTROL 1. Do not mix different types of the unit, the remote operation may cause damage to be used for a long period of batteries specified. 2. Open the ...Battery Compartment. 3. Do not try to recharge batteries not intended to follow the correct polarity when installing the batteries as indicated in on the REMOTE SENSOR of batteries together (e.g. Reversed batteries may be recharged; Be sure to be unstable. 9 they can overheat and rupture. (Follow battery ...
User Guide
Page 15
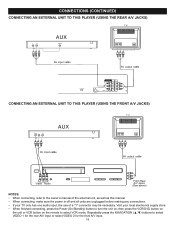
.... • When finished connecting, press the Power (On/Standby) button to turn the unit on the remote to select VIDEO 1 for the rear A/V input or select VIDEO 2 for the front A/V input. 14 then press the VCR/DVD button on the unit or VCR button on ; Repeatedly press the NAVIGATION (π,†) buttons to select...
.... • When finished connecting, press the Power (On/Standby) button to turn the unit on the remote to select VIDEO 1 for the rear A/V input or select VIDEO 2 for the front A/V input. 14 then press the VCR/DVD button on the unit or VCR button on ; Repeatedly press the NAVIGATION (π,†) buttons to select...
User Guide
Page 30
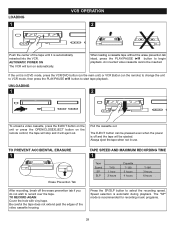
... prevention tab if you do not wish to begin playback. Always eject the tape when not in DVD mode, press the VCR/DVD button (on the main unit) or VCR Button (on the remote) to change the unit to VCR mode, then press the PLAY/PAUSE ®P button to select the recording speed. LOADING... 1 VCR OPERATION 2 Push the center of the video cassette housing. the tape will eject out. The EJECT button ...
... prevention tab if you do not wish to begin playback. Always eject the tape when not in DVD mode, press the VCR/DVD button (on the main unit) or VCR Button (on the remote) to change the unit to VCR mode, then press the PLAY/PAUSE ®P button to select the recording speed. LOADING... 1 VCR OPERATION 2 Push the center of the video cassette housing. the tape will eject out. The EJECT button ...
User Guide
Page 31
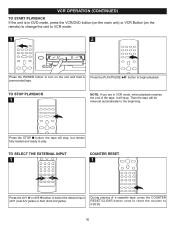
... A/V jacks). 1 During playing of the tape, it will stop . TO STOP PLAYBACK 1 NOTE: If you are in DVD mode, press the VCR/DVD button (on the main unit) or VCR Button (on the remote) to change the unit to VCR mode. 1 2 Press the POWER button to turn on the unit and load a prerecorded tape.... VCR OPERATION (CONTINUED) TO START PLAYBACK If the unit is in VCR mode, when playback reaches the end of a ...
... A/V jacks). 1 During playing of the tape, it will stop . TO STOP PLAYBACK 1 NOTE: If you are in DVD mode, press the VCR/DVD button (on the main unit) or VCR Button (on the remote) to change the unit to VCR mode. 1 2 Press the POWER button to turn on the unit and load a prerecorded tape.... VCR OPERATION (CONTINUED) TO START PLAYBACK If the unit is in VCR mode, when playback reaches the end of a ...
User Guide
Page 34
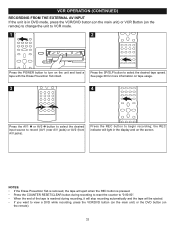
... recording to reset the counter to "0:00:00". • When the end of the tape is in DVD mode, press the VCR/DVD button (on the main unit) or VCR Button (on the remote) to change the unit to VCR mode. 1 2 Press the POWER button to record (AV1 (rear A/V jacks) or AV2 (front A/V jacks...). Press the REC button to view a DVD while recording, press the VCR/DVD button (on the main unit) or the DVD button (...
... recording to reset the counter to "0:00:00". • When the end of the tape is in DVD mode, press the VCR/DVD button (on the main unit) or VCR Button (on the remote) to change the unit to VCR mode. 1 2 Press the POWER button to record (AV1 (rear A/V jacks) or AV2 (front A/V jacks...). Press the REC button to view a DVD while recording, press the VCR/DVD button (on the main unit) or the DVD button (...
User Guide
Page 36
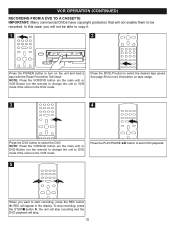
... will stop . 35 See page 29 for more information on the remote) to change the unit to DVD mode if the unit is in the DVD mod3e. NOTE: Press the VCR/DVD button (on the main unit) or VCR Button (on tape usage. 3 4 Press the DVD button to select the desired tape speed. Press the PLAY/PAUSE...
... will stop . 35 See page 29 for more information on the remote) to change the unit to DVD mode if the unit is in the DVD mod3e. NOTE: Press the VCR/DVD button (on the main unit) or VCR Button (on tape usage. 3 4 Press the DVD button to select the desired tape speed. Press the PLAY/PAUSE...
User Guide
Page 48
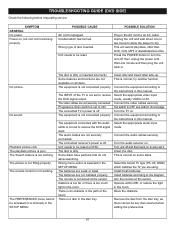
... not installed properly. The batteries are not securely connected. Set switch to allow searching. This is off and then back on some discs. Aim the remote at the sensor. Wrong type of next page. Unplug the unit and wait about one minute and then plug the unit back in the SETUP... audio receiver on . Clean the disc. Remove the disc from the disc tray, as there cannot be reset. This unit cannot play discs, other than DVD, VCD, MP3 or standard/picture CDs. The Search feature is too much light in this manual. Unit needs to be accessed (it . The...
... not installed properly. The batteries are not securely connected. Set switch to allow searching. This is off and then back on some discs. Aim the remote at the sensor. Wrong type of next page. Unplug the unit and wait about one minute and then plug the unit back in the SETUP... audio receiver on . Clean the disc. Remove the disc from the disc tray, as there cannot be reset. This unit cannot play discs, other than DVD, VCD, MP3 or standard/picture CDs. The Search feature is too much light in this manual. Unit needs to be accessed (it . The...


